Tuesday, February 28, 2017
GLTools v1 97
GLTools v1 97
%2Bv1.29.png)
Fitur daftar:
- Mengubah resolusi dan rendering bitness di app apapun, bahkan jika tidak mendukung itu secara default.
- Ganti Nama GPU dan menikmati grafis ditingkatkan bahkan pada Noname low-end GPU.
- Ambil kontrol penuh atas tekstur: sekarang Anda dapat dekompresi / recompress mereka (bahkan jika GPU Anda tidak mendukung format tekstur) dan mengubah ukuran. Perhatikan bahwa fitur dekompresi tersedia hanya jika Anda akan menginstal plugin (internet diperlukan untuk melakukan itu)
- Optimalkan shader on-the-fly untuk kinerja yang optimal (optimizer yang sama digunakan dalam Unity3D mesin secara default)
- Aktifkan MSAA atau CSAA di app apapun untuk meningkatkan kualitas grafis (pastikan bahwa GPU Anda mendukung itu)
- Mengukur memperoleh kinerja dengan baik layar FPS counter (atau Anda dapat keluaran informasi FPS untuk logcat jika Anda seorang pro)
Download :
GLTools v.1.97
Kumpulan Settingan GLTools Untuk Game HD Android :
Asphalt 8 caranya:
? centang enable custom settings for this app
? Optimize GLSL Shaders
? Force 16 Bit Rendering
? downscale textures = 0,5 kalau ngga bisa coba 0.25
? use fake gpu info
? Use Template Adreno 320 / Tegra 4
Angry Birds Go! caranya:
? buka gl tools
? pilih game angry birds go
? centang enable custom setting for this app
? centang juga force 16 bit rendering
? centang lagi Optimize GLSL shader
? klik downscale texture ganti jadi 0,5x
? trus centang Use fake GPU info
? klik dan buka use a template -> pilih mali pokoknya paling bawah
? selesai dan mainkan game nya.
Angry birds Transformers:
? centang enable custom setting for this app
? trus centang Use fake GPU info
? klik dan buka use a template->Mali-T604
? Fake GL_Renderer Ubah jadi Mali-400MP4
BIA3:
? centang enable custom setting for this app
? centang lagi Optimize GLSL shader
? trus centang Use fake GPU info
? klik dan buka use a template->andreno 320
Brandnew Boy:
? Usahakan free RAM 200++
? Enable custom settings for this app
? Anti-aliasing pilih disable(forced)
? Force 16 bit rendering
? Optimize GLSL shaders
? Downscale textures 0.5x
? Enable texture decompression all
? Use template Adreno 320
CSR Racing:
? centang enable custom setting for this app
? centang juga force 16 bit rendering
? centang lagi Optimize GLSL shader
? trus centang Use fake GPU info
? klik dan buka use a template -> andreno 320
City racing 3D:
? centang enable custom setting for this app
? trus centang Use fake GPU info
? klik dan buka use a template->Mali-T604
? Fake GL_Renderer Ubah jadi Mali-400MP
Deus Ex The Fall:
? Enable custom setting for this app
? Force 16 bit rendering
? Optimize GLSL shaders
? Downscale textures 0.5x / 0.25x
? Use fake gpu info
? Use template Tegra 4
Dead Space:
? Enable custom setting for this app
? Anti-aliasing disable(forced)
? Optimize GLSL shaders
? Use fake gpu info
? Use template Adreno 320
truss ubah yg ada di fake GL_renderer Adreno (TM) 320 ubah Jadi Adreno (TM) 225
Frontline Comando 2:
? Enable custom setting for this app
? Force 16 bit rendering
? Optimize GLSL shaders
? Downscale textures 0.5x
? Use fake gpu info
? Use template SGX 544MP
Dream League Soccer:
? Enable custom setting
? Downscale textures 0.5
? Use fake gpu ceklis
? template pilih tegra 4
Deer Hunter:
? Enable custom setting for this app
? Optimize GLSL shader
? Downscale 0.5x
? Centang Fake GPU
? Pilih Template Tegra 4
FIFA 14 caranya:
? centang enable custom settings for this app
? downscale textures = 0,5
? use fake gpu info
? Use template adreno 320
Frontline Commando:
? enable setting custom setting for this app
? anti-aliasing disabled(forced),
? force 16 bit rendering,
? downcale 0.5,
? gpu fake info ceklis
? pilih mali-T604 terus diubah ke MALI-400MP
Fornline 2:
? Enable custom setting for this app
? Optimize GLSL shader
? Downscale textures 0.5x
? Centang Fake GPU
? Pilih Tegra 4
Gangstar Rio:
? Enable custom setting for this app
? Anti-aliasing pilih disable(forced) / 4x non tegra
? Enable texture decompression all
? Downscale textures disable / 0.5x
? Use fake gpu info
? Use template Tegra 4 / Tegra 2 / Adreno 320
GTA San Andreas 3:
? Enable custom setting for this app
? Force 16 bit rendering
? Optimize GLSL shaders
? Enable texture decompression all
? Downscale textures 0.5x
? Use fake gpu info
? Use template Adreno 320 Di game di buat max , shadow on draw distance 100% , screen resolution 75-100%
GTA San Andreas:
? Enable custom setting for this app
? Force 16 bit rendering
? Optimize GLSL shaders
? Downscale Texture 0,5
? Use fake gpu info
? Use a template Andreno 320
Modern Combat 3:Fallen Nation:
? centang enable custom settings for this app
? centang force 16 bit rendering
? centang optimize GLSL shader
? centang use fake gpu
? pakai template adreno 320 selesai dan mainkan game nya.
Modern Combat 4:Zero Hour:
? centang enable custom settings for this app
? centang force 16 bit rendering
? centang optimize GLSL shader
? Enable texture decompression > pilih All
? (Bagi yg masih FC/PATAH") Downscale Textures > Ganti ke 0.5x
? centang use fake gpu
? pakai template Nvidia Tegra 3/Adreno 320
NFS : Most Wanted:
? centang enable custom settings for this app
? enable texture decompression : all
? use fake GPU info
? Use Template Adreno 320selesai dan mainkan game nya.
NOVA 3:
? Enable custom setting for this app
? Force 16 bit rendering
? Optimize GLSL shaders
? Downscale textures 0.5x / 0.25x
? Use fake gpu info
? Use template Adreno 320 / Tegra 3
Real Boxing:
? centang enable custom settings for this app
? centang force 16 bit rendering
? centang optimize GLSL shader
? ubah downscale texture ke 0,5
? centang use fake gpu
? pakai template adreno 320selesai dan mainkan game nya.
Real Racing 3:
? Enable custom setting for this app
? Anti-aliasing disable(forced)
? Downscale textures 0.5x
? Use fake gpu info
? Use template Adreno 320
truss ubah yg ada di fake GL_renderer Adreno (TM) 320 ubah Jadi Adreno (TM) 225
Real Steel World Robot Boxing:
? centang enable custom settings for this app
? centang force 16 bit rendering
? centang optimize GLSL shader
? ubah downscale texture ke 0,5
? centang use fake gpu,
? pakai template adreno 320
Robocop:
? centang enable custom settings for this app
? downscale textures = 0,5x
? centang use fake gpu
? pakai template Tegra 2 / 3
Subway surfers:
? centang enable custom setting for this app
? centang juga force 16 bit rendering
? centang lagi Optimize GLSL shader
? enable decompression texture-->All
? klik downscale texture ganti jadi 0,5x
? trus centang Use fake GPU info
? klik dan buka use a template Andreno 320
The Amazing Spiderman 2:
? Enable custom setting for this app
? Optimize GLSL shaders
? Downscale textures 0.5x / 0.25x
? Use fake gpu info
? Use template Adreno 320
trus ubah yg ada di fake GL_renderer Adreno (TM) 320 ubah Jadi Adreno (TM) 225
The Amazing Spiderman:
? Enable custom setting for this app
? Force 16 bit rendering
? Optimize GLSL shaders
? Use fake gpu info
? Use template Adreno 320 kalo hh kuat pake Tegra 3 efeck keluar kota ramai+mata
The Dark Knight Rises:
? Enable custom settings for this app
? Downscale textures disable / 0.5x
? Use fake gpu info
? Use template Adreno 320
truss ubah yg ada di fake GL_renderer Adreno (TM) 320 ubah Jadi Adreno (TM) 225
Toy Defence 3:
? centang enable custom settings for this app
? downscale textures = 0,5
? centang use fake gpu
? pakai template Adreno 320
Wild Blood:
? Enable custom setting for this app
? Force 16 bit rendering
? Optimize GLSL shaders
? Use fake gpu info
? Downscale textures (disable)
? Use template Tegra 4
Go to link Download
Monday, February 27, 2017
How to set the Universal DNS Server address manually
How to set the Universal DNS Server address manually
Domain Name System (DNS ) is the global address book for internet just like the phone book in your cell phone. So when you have to call your friend you actually find his name in the address book and dial his name but it’s technically his phone number which is dialed and connects you to your friends or relatives, the same way each website also has an address on internet by which it is accessed and that address is known as IP address and typically written as 31.124.56.80 so if you want to open a website you can also type the IP address of that website in the browser and the browser will open it for you. Normally this IP address is always the IP address of the web server where the web pages are held or hosted. But remembering the IP address of any website is not easy so the concept of DNS came and it actually maintains the name and IP address of the entire website in the world and translates the web address in text format into IP address.
For more details read about DNS here.
So whenever we have to open any website lets say http://www.yahoo.com we type the address of the website in the browser and the browser send the Website address to DNS Server to look for its IP address.DNS Server responds to the browser with the IP address ( 46.228.47.115 in case of www.yahoo.com) and then your browser makes a direct contact with the website http://www.yahoo.com using its IP address.
If your Internet Service Provider s DNS server set on your computer goes down or does not respond due to any reason you will not be able to visit any pages if you type the website address in the browser like http://www.google.com but you can visit the same website easily by typing its IP address directly as 173.194.40.115 in case of www.google.com. Complex pages often require multiple DNS lookups before they start loading, so your computer may be performing hundreds of lookups a day.
If the DNS Server is down or have some issue you would see the following error messages.
1. Server not found
2. The webpage requested is not available
3. The webpage is not available
5. Webpage can not be displayed
6. Sorry,We could not find www.google.com.
Flush your DNS. Sometimes your DNS cache gets outdated and needs to be manually flushed. This can be done from the Command Prompt.
To open the Command Prompt, press ? Win+R and type cmd.
Type ipconfig /flushdns. Wait for the command to process and then restart your computer.
Test the connection again. If the problem still persists, move on to the next step.
So in order to fix this problem change the DNS server address to a reliable DNS server.There are some Global Universal DNS Server which are ups and running all the time 24x7x365.They are free to use and are very fast.
The most commonly used Universal DNS server address are 4.2.2.2, 4.2.2.1. They are 6 DNS servers at 4.2.2.1 through 4.2.2.6.
You could also use Googles Public DNS, which is a free and used as global Domain Name System (DNS) resolution service, that you can use as an alternative to your current DNS provider.
The Google Public DNS IP addresses (IPv4) are as follows:
The Google Public DNS IPv6 addresses are as follows:
You can use either address as your primary or secondary DNS server. You can specify both addresses, but do not specify one address as both primary and secondary.
Steps to Change DNS server settings on Windows 7
After changing the DNS server address, restart the computer and your internet should work faster.
Incoming search term
DNS server is the IP address that we set in the computers network connection settings that is contacted every time we type any website address in the browser and try to load it.And you wont believe that every DNS server also has its another DNS server address set in its network connection settings.The DNS system is, in fact, its own network. If one DNS server doesnt know how to translate a particular domain name, it asks another one, and so on, until the correct IP address is returned.
For more details read about DNS here.
So whenever we have to open any website lets say http://www.yahoo.com we type the address of the website in the browser and the browser send the Website address to DNS Server to look for its IP address.DNS Server responds to the browser with the IP address ( 46.228.47.115 in case of www.yahoo.com) and then your browser makes a direct contact with the website http://www.yahoo.com using its IP address.
If your Internet Service Provider s DNS server set on your computer goes down or does not respond due to any reason you will not be able to visit any pages if you type the website address in the browser like http://www.google.com but you can visit the same website easily by typing its IP address directly as 173.194.40.115 in case of www.google.com. Complex pages often require multiple DNS lookups before they start loading, so your computer may be performing hundreds of lookups a day.
If the DNS Server is down or have some issue you would see the following error messages.
1. Server not found
2. The webpage requested is not available
3. The webpage is not available
5. Webpage can not be displayed
6. Sorry,We could not find www.google.com.
Flush your DNS. Sometimes your DNS cache gets outdated and needs to be manually flushed. This can be done from the Command Prompt.
To open the Command Prompt, press ? Win+R and type cmd.
Type ipconfig /flushdns. Wait for the command to process and then restart your computer.
Test the connection again. If the problem still persists, move on to the next step.
So in order to fix this problem change the DNS server address to a reliable DNS server.There are some Global Universal DNS Server which are ups and running all the time 24x7x365.They are free to use and are very fast.
The most commonly used Universal DNS server address are 4.2.2.2, 4.2.2.1. They are 6 DNS servers at 4.2.2.1 through 4.2.2.6.
You could also use Googles Public DNS, which is a free and used as global Domain Name System (DNS) resolution service, that you can use as an alternative to your current DNS provider.
The Google Public DNS IP addresses (IPv4) are as follows:
- 8.8.8.8
- 8.8.4.4
The Google Public DNS IPv6 addresses are as follows:
- 2001:4860:4860::8888
- 2001:4860:4860::8844
You can use either address as your primary or secondary DNS server. You can specify both addresses, but do not specify one address as both primary and secondary.
Steps to Change DNS server settings on Windows 7
- Go to the Control Panel.
- Click Network and Internet > Network and Sharing Center > Change adapter settings.
- Select the connection for which you want to configure Google Public DNS. For example:
- To change the settings for an Ethernet connection, right-click Local Area Connection > Properties.
- To change the settings for a wireless connection, right-click Wireless Network Connection > Properties.
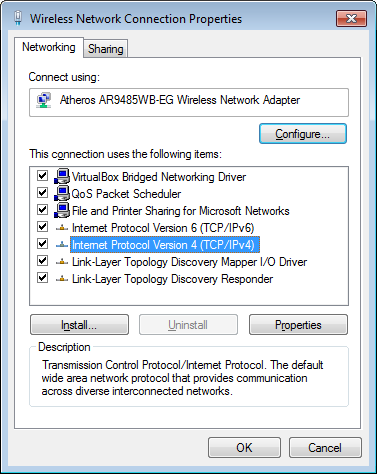
- Select the Networking tab. Under This connection uses the following items, select Internet Protocol Version 4 (TCP/IPv4) or Internet Protocol Version 6 (TCP/IPv6) and then click Properties.
 |
| How to set the universal DNS Server address |
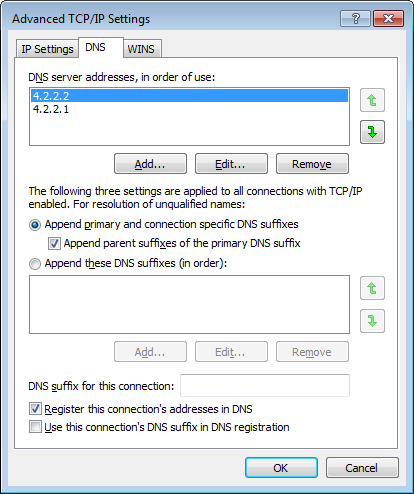
- Click Advanced and select the DNS tab. If there are any DNS server IP addresses listed there, write them down for future reference, and remove them from this window.
- Click OK.
 |
| How to set the universal DNS Server address |
 |
| How to set the universal DNS Server address |
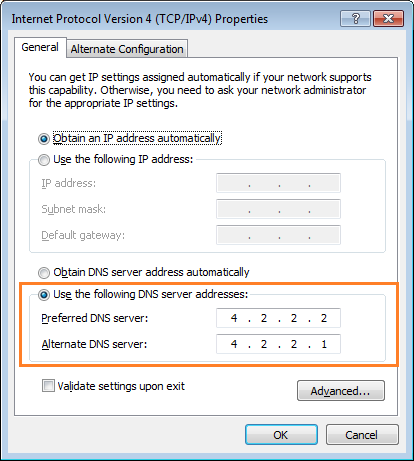
- Select Use the following DNS server addresses. If there are any IP addresses listed in the Preferred DNS server or Alternate DNS server, write them down for future reference.
- Replace those addresses with the IP addresses of the Google DNS servers:
- For IPv4: 8.8.8.8 and/or 8.8.4.4.
- For IPv6: 2001:4860:4860::8888 and/or 2001:4860:4860::8844
- Restart the connection you selected in step 3.
- Repeat the procedure for additional network connections you want to change.
Steps to Change DNS server settings on Mac OS 10.5
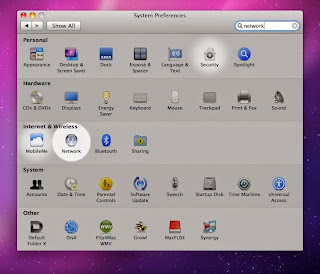
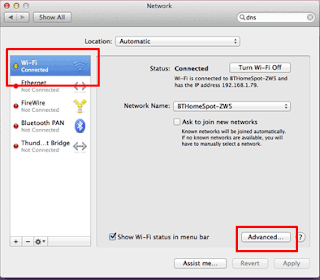
- Click Apple > System Preferences > Network.
 |
| How to set the universal DNS Server address |
- If the lock icon in the lower left-hand corner of the window is locked, click the icon to make changes, and when prompted to authenticate, enter your password.
- Select the connection for which you want to configure Google Public DNS. For example:
- To change the settings for an Ethernet connection, select Built-In Ethernet, and click Advanced.
 |
| How to set the universal DNS Server address |
- To change the settings for a wireless connection, select Airport, and click Advanced.
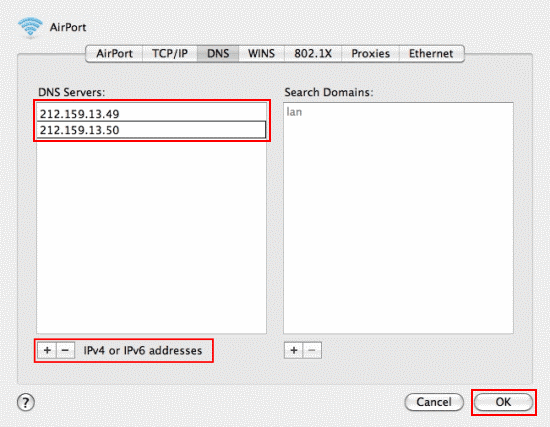
- Select the DNS tab.
- Click + to replace any listed addresses with, or add, the Google IP addresses at the top of the list:
- For IPv4: 8.8.8.8 and/or 8.8.4.4.
- For IPv6: 2001:4860:4860::8888 and/or 2001:4860:4860::8844
 |
| How to set the universal DNS Server address |
- Click Apply > OK.
- Repeat the procedure for additional network connections you want to change the DNS for.
After changing the DNS server address, restart the computer and your internet should work faster.
Incoming search term
- Universal DNS Server
- DNS Server address
- Set DNS Manually
- Set universal DNS in Mac
- How to set the universal DNS Server address
==============================
Go to link Download
How do I restore an accidentally deleted trash
How do I restore an accidentally deleted trash
How do I restore an accidentally deleted trash?
The Recycle Bin is an important feature of all modern versions of Microsoft Windows operating system. Instead of permanently remove data from your hard drive when a "Delete" command, the other Windows files and folders in the Recycle Bin, where it can be repaired or removed later sends. By default, the Recycle Bin icon on your Windows desktop. If you want to restore accidentally the icon on the desktop and the operating system supports it with a few clicks.
Right-click an empty area of ??the desktop and select "Customize".
Click "Change desktop icons" on the left side of the window.
See the "Desktop Icons" at the top of the dialog box that follows.
Select the check box next to "Trash" items.
Click "Apply" to confirm the change.
Click "OK" to close the dialog box to open.
How to restore the Recycle Bin when youve accidentally deleted
If you removed the trash to empty the contents, but the icon from the desktop, there is a way to bring.
On the desktop, right-click and click "Edit".
Click "Change desktop icons" on-link and a pop-up.
Clear the checkbox for the Recycle Bin. "Click" OK. "Your trash is back on the desktop.
How do I restore an accidentally deleted trash?
Go to link Download
Gateway UC73 Drivers for Windows XP
Gateway UC73 Drivers for Windows XP

Gateway UC73 Drivers for Windows XP
| Category | Vendor | Description | Version | Size | Date | Download |
| AHCI | Intel | SATA AHCI Driver | 8.5.0.1032 | 282.0 KB | 2010/05/18 | Download |
| Audio | Realtek | Audio Driver | 5.10.0.5730 | 33.3 MB | 2010/05/18 | Download |
| Bluetooth | Broadcom | Bluetooth Driver | 5.5.0.5100 | 102.8 MB | 2010/05/18 | Download |
| Camera | Chicony | Camera Driver | 61.005.029.190 | 1.4 MB | 2010/05/18 | Download |
| CardReader | Alcor | Card Reader Driver | 1.00.00.00 | 2.1 MB | 2010/05/18 | Download |
| Chipset | Intel | Chipset Driver | 9.0.0.1009 | 2.2 MB | 2010/05/18 | Download |
| Lan | Realtek | LAN Driver | 5.702.0806.2008 | 4.5 MB | 2010/05/18 | Download |
| Others | Pegatron | Other Drivers ACPI | 1043.2.15.101 | 91.5 KB | 2010/05/19 | Download |
| TouchPad | Synaptics | Touchpad Driver | 11.1.22.0 | 13.0 MB | 2010/05/18 | Download |
| VGA | ATI | VGA Driver | 8.57 | 158.5 MB | 2010/05/18 | Download |
| VGA | Intel | VGA Driver | 6.14.10.5016 | 20.0 MB | 2010/05/18 | Download |
| Wireless LAN | Atheros | Wireless LAN Driver (AW-NE771) | 7.6.0.239 | 27.4 MB | 2010/05/18 | Download |
| Wireless LAN | Atheros | Wireless LAN Driver (AW-GE780) | 7.0.1.116 | 27.4 MB | 2010/05/18 | Download |
| Wireless LAN | Intel | Wireless LAN Driver | 12.1.2.1 | 33.4 MB | 2010/05/18 | Download |
Go to link Download
Sunday, February 26, 2017
HP Pavilion dv6000 CTO Windows XP Driver
HP Pavilion dv6000 CTO Windows XP Driver
Chipset
NVIDIA nForce Chipset Driver and Network Controller
Version:8.62 A, 9.75M
Download
NVIDIA nForce Chipset Driver and Network Controller
Version:8.62 A, 9.75M
Download
AudioInstall UAA first, reboot and Install audio:
Microsoft Universal Audio Architecture (UAA) Bus Driver for High Definition Audio (sp33867)
Version:1.00 B3, 54.26M
Download
Conexant High Definition Audio Driver
Version:3.26.0.0 A, 1.38M
Download
Microsoft Universal Audio Architecture (UAA) Bus Driver for High Definition Audio (sp33867)
Version:1.00 B3, 54.26M
Download
Conexant High Definition Audio Driver
Version:3.26.0.0 A, 1.38M
Download
GraphicNVIDIA GeForce Series Video Driver
Version:8.6.0.2 A, 29.28M
Download
Input
HP Quick Launch Buttons
Version:6.30 J, 20.39M
Download
Touchpad
Synaptics Touchpad
Version:10.0.13.2, 24.26M
Download
Webcam
HP 1.3 MegaPixel (MP) Webcam Software Drivers
Version:1.0 A, 4.91M
Download
Modem
HDAUDIO Soft Data Fax Modem with SmartCP
Version:7.56.0.0 A, 6.18M
Download
Wireless
Broadcom Wireless LAN Driver
Version:6.20, 6.29M
Download
Card Raeder
Ricoh 5-in-1 Card Reader Driver
Version:1.01.09 A, 2.25M
Download
Processor
AMD Processor Update for Microsoft Windows XP
Version:1.3.2.0 E6, 3.01M
Download
Bluetooth
Software and Drivers for HP Integrated Module with Bluetooth Wireless
Version:4.00 I, 39.31M
Download
Go to link Download
Free Download Clubix Wordpress Theme
Free Download Clubix Wordpress Theme
 |
| Clubix Wordpress Theme |
Clubix - Nightlife, Music & Events WordPress Theme Version 2.1.9
:: About Clubix Wordpress Theme ::
Clubix is a responsive wordpress theme, and is the best theme for nightlife events, music, bands and also magazines. This is the perfect theme for you, if you are involved into nightlife, music or events and you want something different. That’s why we created Clubix, a theme with strong design and strong features made to satisfy your fans, followers, party starters and most important YOU.Clubix brings back the fun to browse on the web, gathering together artists, music, friends, parties and many more. Take a look for yourself!
Version 2.0 of Clubix, brings you more than 25 features that version 1.0 had. We want to make the best music, events and artists theme on the market and we want you to see this. So we’ve decided to make custom demos for each of possibilities you have with Clubix.
Whats New in Clubix Wordpress Theme Version 2.1.9, Features Clubix Wordpress Theme, Read More at Themeforest
Clubix - Nightlife, Music & Events WordPress Theme Version 2.1.9
Download Clubix Wordpress Theme Gratis
Demo | Download
Go to link Download
How to Install Minimal ADB and Fastboot for Android Device in Windows XP 7 8 8 1 2 MB size compared to 500 MB Android SDK
How to Install Minimal ADB and Fastboot for Android Device in Windows XP 7 8 8 1 2 MB size compared to 500 MB Android SDK
ADB and Fastboot are two of the most important tools used while working with Android devices. If you want to modify, debug, and tweak along with their awesome uses in rooting, and other procedures ADB and Fastboot are a must for any Android device owner. Normally if you want to install ADB and Fastboot you have to download and setup the Android SDK (If you really want to learn about Android Development I highly recommend downloading and installing the full Android SDK from here), but this can be unnecessary for people who just want to install ADB and Fastboot. The total installation of Minimal ADB and Fastboot is around 2 MB in size (Compared to the 90+ MB size of the Android SDK Tools, and 425+ MB size of the complete Android SDK) making it very lightweight.
STEPS :
1. Download the .exe file from below link.
2. Follow the instructions and select where you would like to install (Example: Desktop).
3. Connect your device to computer with USB cable.
4. Now in your device turn on Developer Options (Setting -> Developer Options).
5. In Developer Options list, mark the check box “USB Debugging”.
6. Start Minimal ADB and Fastboot.
7. You should now see a command window open.
8. With the command window open you can now issue ADB and Fastboot commands to your device.

Link to download Minimal ADB and Fastboot : https://www.dropbox.com/s/7ajb66qltzg1fla/minimal_adb_fastboot_v1.2_setup.exe?dl=0
Go to link Download
Subscribe to:
Comments (Atom)