Tuesday, May 23, 2017
How to buy apps in the android market or play store using a credit card
How to buy apps in the android market or play store using a credit card
How to buy apps in the android market or play store using a credit card - Even though many android apps are free, but sometimes there are also interesting applications yet paid, for those of you who use credit cards here are the steps to make a purchase through the app store play.
Make sure your credit card is issued by active local bank. Or if you have a debit card, the card must be valid internationally. And supported google wallet, usually type VISA / Mastercard. Record Number of credit cards, note cards behind the three numbers, and month / year expired.
For example:
Card No.: 1234 5678 9012 3456
No. On the back of the card: 123
Expired: 12/99
Open the application you want to buy.
Click on a price, then you will go into google wallet, just click proceed.
Complete input your card details, name and address of card suits, and phone numbers.
If it is then your card is ready for use, is there a charge, if based on the info from google wallet here -> http://www.google.com/wallet/faq.html use charge cards are not charged a penny, so you will be charged according to the application fee purchased. Well if it is active. Then you can buy the application directly.
Fill in your password (email password that you use to play store), if it is okay. Then the application can be downloaded directly purchased.
Well done, for now you can directly buy the application, if the application is purchased, in the handset anywhere in the home account status will remain the same then purchased.
So if you do not like the application, whether it can refund, yes for the application you are able to do a preview, if it does not fit anymore open the program and click refund (the same with the delete key applications). And the refund is active about 15 minutes. If after 15 minutes through the refund process should report to the developer and of course more complicated. For clarity -> http://support.google.com/googleplay/bin/answer.py?hl=en&answer=134336
Happy shopping, do not be wasteful. And do not be late to pay bills that are not subject to interest.
Hopefully useful.
Go to link Download

Monday, May 22, 2017
How to Fix Searching and Indexing issue and Rebuild the Index
How to Fix Searching and Indexing issue and Rebuild the Index
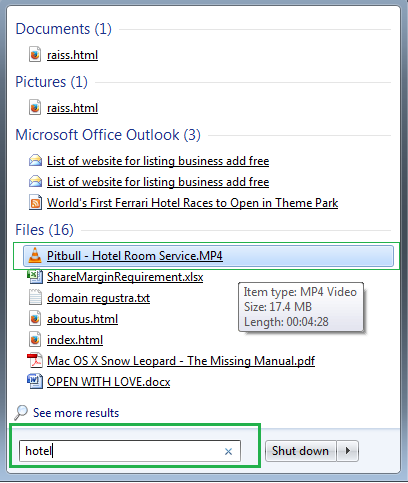 |
| Pic-26(a) Fix Searching and Indexing issue and Rebuild the Index |
What is Index?
A collection of detailed information about the files on your computer.Windows uses the index to perform very fast searches on your computer. Here are some advanced indexing settings you can change.
What files are indexed?
By default, all of the most common files on your computer are indexed. Indexed locations include all folders included in libraries (anything you see in the Documents library, for example), e?mail, and offline files. Files that arent indexed include program files and system files—files that most people rarely need to search.Can I index my entire computer so all searches are fast?
You shouldnt do this. If you make the index too large, or if you include system file locations (such as the Program Files folder), your routine searches will slow down. For best search results, we recommend that you only add folders that you search frequently to enable fast searching.What if Im using Windows Server 2008 R2?
How to fix Searching and Indexing issue
1. To add a file type to the index
- Open Indexing Options from control panel.
- Click Advanced.
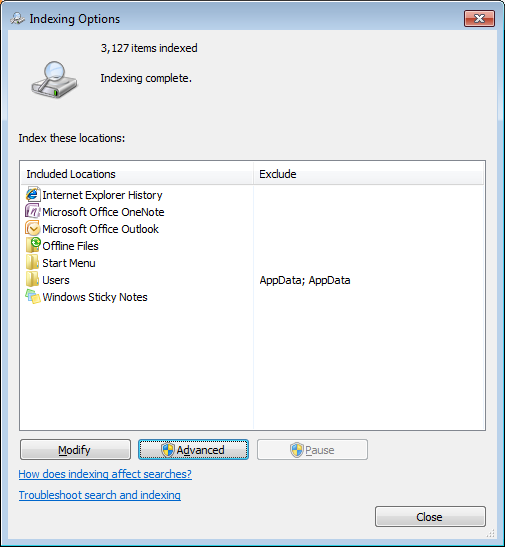 |
| Pic-26(b)-Fix Searching and Indexing issue and Rebuild the Index |
- In the Advanced Options dialog box, click the File Types tab.
- In the Add new extension to list box, type the file name extension (for example, "txt"), and then click Add to enable searching the file type.
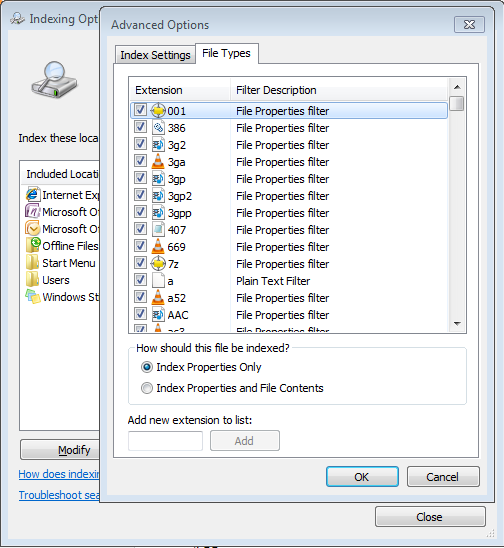 |
| Pic-26(c)-Fix Searching and Indexing issue and Rebuild the Index |
- Click Index Properties Only or Index Properties and File Contents, and then click OK.After this method you should be able to search the added file type.
2. To rebuild the index
- Go to Control panel and then open Indexing Options.
- Click Advanced.
 |
| Pic-26(d)-Fix Searching and Indexing issue and Rebuild the Index |
- In the Advanced Options dialog box, click the Index Settings tab, and then click Rebuild. If you are prompted for an administrator password or confirmation, type the password or provide confirmation.
3. To index encrypted files for searching encrypted files too
Before you add encrypted files to the index, we recommend that you have Windows BitLocker (or a non-Microsoft encryption program) enabled on your system drive (the drive that Windows is installed on).Note:Windows BitLocker is only included in Windows 7 Enterprise and Windows 7 Ultimate.
Note that the index will automatically rebuild each time this setting is changed. This can take a long time, and might cause searches to be incomplete until the process is complete.
- Go to Control panel and then open Indexing Options.
- Click Advanced. If you are prompted for an administrator password or confirmation, type the password or provide confirmation.
- In the Advanced Options dialog box, click the Index Settings tab, select the Index encrypted files check box, and then click OK. If you are prompted for an administrator password or confirmation, type the password or provide confirmation.
Notes
Although you can use a non-Microsoft program to encrypt your system drive, non-Microsoft file encryption programs are not supported. Windows only supports files encrypted using Encrypting File System (EFS).
EFS is only included in Windows 7 Enterprise, Windows 7 Professional, and Windows 7 Ultimate.
If you add encrypted files to the index and youre not using full-volume encryption for the location of the index, encrypted data from your files for example, text from an encrypted Microsoft Word document will be added to the index and will be available for searching. The index is obscured so that its not easily readable if someone tries to open the index files, but it doesnt have strong data encryption. If someone were to gain access to your computer, they could extract your data from the index. Therefore, the location of the index should also be encrypted to help protect your indexed data.
4. To index words with and without diacritics as different words
If you commonly use diacritics (small signs added to letters to change the pronunciation of words) in your file and folder names, you can configure the index to recognize words with diacritics differently. By default, Windows recognizes diacritics according to the language version you are using. If you change this setting, all diacritics will be recognized.The index will automatically be rebuilt each time this setting is changed. This can take a long time and might cause searches to be incomplete until the process is complete.
- Click to open Indexing Options.
- Click Advanced. If you are prompted for an administrator password or confirmation, type the password or provide confirmation.
- In the Advanced Options dialog box, click the Index Settings tab.
- Under File Settings, select the Treat similar words with diacritics as different words check box, click OK, and then click OK again.
5. To change the location where the index is stored
If you need to free up space on a hard disk, you can change the location of the index. If you change this location, the Windows Search service will automatically be restarted, and the change will not go into effect until the restart is complete.- Click to open Indexing Options.
- Click Advanced. If you are prompted for an administrator password or confirmation, type the password or provide confirmation.
- In the Advanced Options dialog box, click the Index Settings tab.
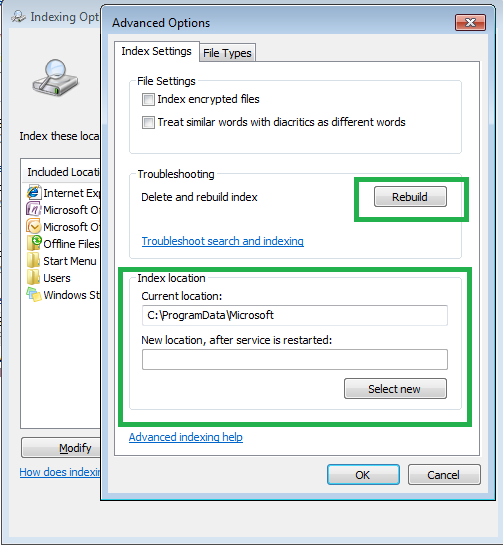 |
| Pic-26(e)-Fix Searching and Indexing issue and Rebuild the Index |
- Under Index location, click Select new, click a new location, click OK, and then click OK again.
Note
When you change the index location, you should choose a location on a non-removable hard disk that is formatted using the NTFS file system.
What does it mean when I see a message that search results might be incomplete?
It means that the files are still being indexed. To perform fast and accurate searches, Windows collects information about files on your computer. This information is stored in the index. Periodically, Windows needs to update the index. If you perform a search while the index is being updated, the results might be out of date.What does it mean when I see a message that a location cant be searched or theres no media present in the search location?
Theres a problem searching one or more of your selected locations. Usually thats because youve selected a network location or a device thats not currently connected to your computer. Its also possible that youve selected a removable media device with no media (such as a memory card or a CD) in the device. Check your locations, and then try the search again.How do I troubleshoot problems with searching and indexing?
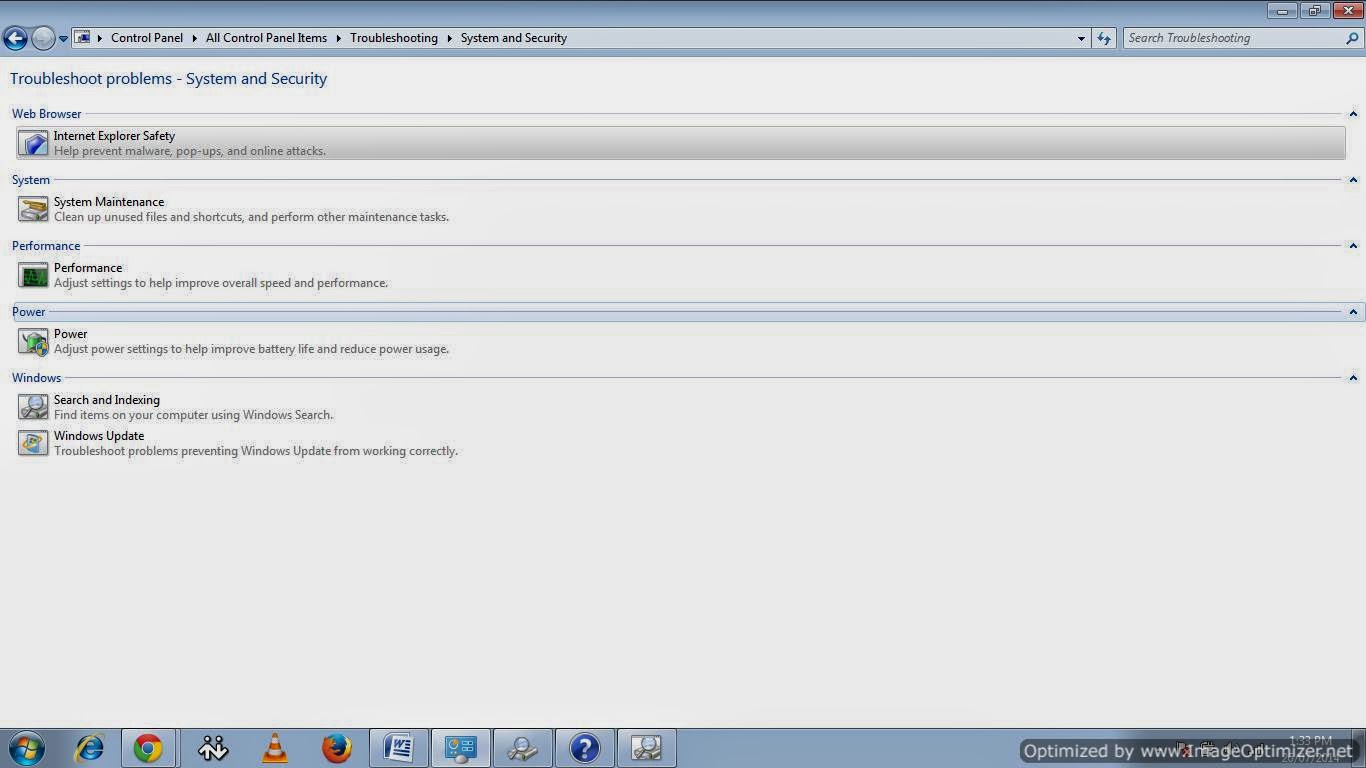
If you are experiencing problems with searching, such as unusually slow searches or incomplete search results,or no search results at all run the Search and Indexing troubleshooter to see if it can diagnose the problem.- Go to control panel and open Troubleshooting.
- Click on System and Security.
 |
| Pic-26(f)-Fix Searching and Indexing issue and Rebuild the Index |
- Now Click on Search and Indexing.
- Its gonna ask the problem you are facing so select the problems and click next to troubleshoot and fix.
 |
| Pic-26(g)-Fix Searching and Indexing issue and Rebuild the Index |
Depending on the severity of the problem, the Search and Indexing troubleshooter might need to restart the Windows Search service.After the Windows search service it restarted it might take few minutes to enable searching feature.
Here is a list that troubleshooter checks and fix
| ||||
When permissions on the Windows Search data directories are set incorrectly, the search service might not be able to access or update the computers search index. This can result in slow searches or incomplete search results. | ||||
| ||||
Problems with the Search Filter Host might indicate errors in the Windows Search service, which can cause searches to fail or return incomplete search results. | ||||
| ||||
When the Windows Search service is forcibly shut down while performing maintenance, searches might fail or return incomplete search results. | ||||
| ||||
When the Windows Search service is forcibly shut down, searches might fail or return incomplete search results. | ||||
| ||||
When the Windows Search service is not running, searches might be slower, and you might not be able to find all items. | ||||
| ||||
Problems with the Windows Search service can cause searches to fail or return incomplete search results. | ||||
| ||||
Problems with the Search Protocol Host might indicate errors in the Windows Search service, which can cause searches to fail or return incomplete search results. |
- Windows Searching and indexing issues
- Enable fast Searching
- Searching
- searching the encrypted files.
- Rebuild index
- Can not search file
- Windows Search does not work
- Could not find the known file if search for it
People also read following top most searched issue
Best Google Search Tips and Tricks
Windows takes long time or ages to shut down
how to fix Weather gadget could not connect to service
Go to link Download
Monday, May 15, 2017
Guardians of the Galaxy 2014 Hindi Dubbed Movie Watch Online
Guardians of the Galaxy 2014 Hindi Dubbed Movie Watch Online

| StoryLines: | After stealing a mysterious orb in the far reaches of outer space, Peter Quill is now the main target of a manhunt led by the villain known as Ronan the Accuser. To help fight Ronan and his team and save the galaxy from his power, Quill creates a team known as the Guardians of the Galaxy to save the world. |
|---|---|
| Director: | James Gunn |
| Producer: | Victoria Alonso, Louis DEsposito, Kevin Feige, Alan Fine, David J. Grant, Nikolas Korda |
| Stars: | Chris Pratt, Zoe Saldana, Dave Bautista, Vin Diesel, Bradley Cooper, Lee Pace, Michael Rooker, Karen Gillan, Djimon Hounsou, John C. Reilly, Glenn Close, Benicio Del Toro, Laura Haddock |
| Genres: | Action, Adventure, Sci-Fi |
| Writers: | James Gunn, Nicole Perlman, Dan Abnett, Andy Lanning |
| More Info: | Visit IMDb |
| Watch Online At | Zee-Share (Recommended) |
|---|
Guardians of the Galaxy 2014
Go to link Download
Friday, May 12, 2017
How to restore your iPhone iPad or iPod back to factory default settings if you have forgotten the passcode
How to restore your iPhone iPad or iPod back to factory default settings if you have forgotten the passcode
 |
| Pic-7(a) |
Now after you have installed the iTunes and open it first time it will show you the welcome screen as shown in the picture below.
 |
| Pic-7(b) |
iTunes is a media management software created by Apple, Inc., for both the Macintosh and Windows operating systems. You can use it to manage and play both audio and video files on your computer.You can take it anywhere which means all the contents like songs, your playlists, purchase and other stored items are available to you everywhere whenever and wherever you login onto iTunes using your Apple Id.
Someone else can log onto his iTunes account on your iPad if he signs out of your ID in the settings app first.The option can be found by selecting iTunes and App Store, then tapping on your ID. Any purchases downloaded on the device stay until they are deleted, but apps must be updated using the ID that originally downloaded them.And You can share purchases from both accounts on the same iPad with very little difficulty.
iTunes can also be used to restore and back up your settings, Messages, Camera Roll, documents, saved games, and other data loke Histories, cookies, bookmarks and much more. Backups dont contain content synced to the device, such as movies, music, podcasts, and apps.
If you choose to backup your iOS device on your PC it is saves the back up files at the following location, otherwise you can choose to save the back up at iCloud.
Mac: ~/Library/Application Support/MobileSync/Backup/
The "~" represents your Home folder. If you dont see Library in your home folder, hold Option and click the Go menu.
Windows XP: Documents and Settings(username)Application DataApple ComputerMobileSyncBackup
To quickly access the Application Data folder, click Start, and choose Run. Type %appdata% and click OK.
Windows Vista, Windows 7, and Windows 8: Users(username)AppDataRoamingApple ComputerMobileSyncBackup
To quickly access the AppData folder, click Start. In the search bar, type %appdata% and press Return.
Restoring your iPhone, iPad or iPod
Now depending on the condition of your phone you can go about this a number of ways. If your phone is functioning you can simply click "Settings" then go to "About" and click "Restore to Factory Defaults". If however the phone is not working it can be a little trickier. If you have forgotten the password and can not access the settings menu.Then you have to connect your iOS device to iTunes on your PC and restore it under recovery mode.
Method -1. Reset and Restore iPhone to Original Default Factory Settings with Recovery Mode
iPhone display freezing? iPhone doesn’t detect by or appear in iTunes? iPhone cannot sync with iTunes on PC or Mac? Cannot make or receive calls, send or receive text messages, or access email or the web? Or worse, iPhone simply won’t turn on and does not respond to tap or button press? If the problem still persists after you have reseted the iPhone, or tried various iPhone troubleshooting, it may be worthwhile to invoke recovery mode to restore iPhone to default factory settings, the original state as when you first received and unwrapped the phone.
Restoration of iPhone to original factory defaults will likely to fix all problem, with the downside that all data and information stored on your phone will be lost. Normally iTunes will make a backup automatically when you connect and sync the iPhone with the program, however, it’s still a good recommendation to copy out and backup everything that you may need on the phone before proceed to restore the iPhone.
To restore iPhone and reset the phone to default factory settings, follow these steps:
1. Turn off iPhone – Hold down the Sleep/Wake button for a few seconds until the red slider appears, then slide the red slider. Ignore this step if your iPhone is already off.
2. Press and hold down the Home button for about 10 seconds until a yellow triangle with a text which says Please Connect to iTunes appears.

- You cant update or restore because iTunes doesnt recognize your device or says its "in recovery mode".
- The Apple logo remains onscreen for several minutes with no progress bar.
- The Connect to iTunes screen appears.
- Turn off your device. If you cant turn it off, press and hold the Sleep/Wake and Home buttons at the same time and wait a few seconds for it to turn off.
- Plug the devices USB cable into your computer only.
- Hold down the devices Home button as you connect the USB cable to it.
- When you see the Connect to iTunes screen, release the Home button. If you dont see this screen, try steps 1 through 3 one more time.
 |
| Pic-7(c) |

 |
| Pic-7(d) |
 |
| Pic-7(e) |
5. Now as in the picture 7(e) above click OK and then Click Restore.Its now gonna ask you are sure you want to restore this iPhone to its factory default settings as shown in the pic-7(f) below, Click Restore and update.It will then start restoring the device which may take several minutes so make sure your computer has a power source connected to avoid unwanted power outage.
 |
| Pic-7(f) |
Additional Information
If you started your device in recovery mode by mistake, restart it to exit recovery mode. Or you can just wait-after 15 minutes the device will exit recovery mode by itself.
Method-3. Using DFU Mode in iPhone, iPad and iPod touch (Recovery)
In addition to recovery mode on iPhone, iPad and iPod touch, the iOS-based iDevices also has another mode which calls DFU. The main difference between the recovery mode and DFU mode is whether iBoot bootloader is loaded or bypassed during boot, with iBoot agent, when available, ensures that user cannot flash a firmware OS software which is lower or older version than the current one, effectively disable downgrade.
In recovery mode, which is the standard default way to upgrade or restore iDevices, iBoot is used when restoring or upgrade iPhone to make sure that the a iOS .ipsw which has the version number greater than or equal to current one is flashed or written to the device, or otherwise does not allow restoration process to proceed. In addition, unless the iPhone, iPad and iPod touch has been jailbroken or pwned”, custom-built firmware OS cannot be flashed. If the device is not connected to computer in recovery mode, the screen will display “Please connect to iTunes” logo.
DFU mode bypasses the loading of iBoot while still maintain the interfacing with iTunes, allow a older or lower version of iOS .ipsw to be flashed and restored to the device, including flashing a custom-build or home-made firmware iOS software. DFU mode is mostly used by hackers to downgrade or upgrade with a pre-jailbroken firmware created by PwnageTool. In DFU mode, the screen is totally black with no text display, just like when the phone is in power down state.
Here’s how to enter DFU Mode in iPhone, iPad and iPod touch:
1. Power on the iPhone, iPad or iPod touch if it’s in off state.
2. Connect the device to computer via USB cable or dock.
3. Run and open the iTunes program so that user will be notified when device enters DFU mode.
4. Press and hold Power or Sleep-Wake and Home buttons simultaneously for 10 seconds.
5. Release the Power or Sleep-Wake button and continue holding the Home button for 10 to 60 more seconds.
6. Wait until iTunes detects and recognizes the iDevice in DFU Recovery mode with notification message or system sound indicating hardware connect or disconnect.
 |
| Pic-7(g) |
Now you will see the message as shown below.

Alright So thats Enough to know about restoration..If you have any question or doubt please feel free to contact me at nasir@simulato.com.
In the next Post I am gonna write some interesting troubleshooting on Printers So Stay connected keep visiting.
Happy troubleshooting..
Best of Luck.!!!
Nasir
Go to link Download
Thursday, May 4, 2017
Identify the Hardware installed in your computer to find its driver
Identify the Hardware installed in your computer to find its driver
So after windows installation you could get into trouble if the device driver is not found or can not be installed automatically because that device would stop working.So here are the steps to get that issue fixed.
Option 1
Step 1. Open device manager by typing Devmgmt.msc at run.
Step 2. Right mouse click on the unknown device and select properties.
Step 3. On the device properties window click on the Details tab and select Hardware Ids.
 |
| Pic-18(a) |
Step 4. Here you only need to note down these two information highlighted in the rectangle shown in the above picture-18(a).So as shown in the picture above note down VEN( Vendor ID) -168C ( as shown in the above picture) and DEV ( Part/Device ID )- 0032 as per the above picture.
Step 5. Go to website http://www.pcidatabase.com/ and then under vendor search Type the Vendor ID as 168C or whatever it shows in your device properties windows for that unknown hardware, and then hit search.
 |
| Pic-18(b) |
 |
| Pic-18(d) |
Step 7. so you will need to find the device with code mentioned in the Hardware Ids as DEV which is 0032 in my case.
 |
| Pic-18(e) |
Option 2
Option two is the easiest and best way to identify the unknown device.There is this tool name Hardware Identify from Tweaking.com.you can download it from the download tab of my blog or click here.
Tweaking.com - Hardware Identify will help identify unknown hardware on your system. This program does not help you download drivers but helps let you know what the hardware is so you know what drivers to find.
For example say you just reinstalled a computer and the device manager shows multiple unknown hardware with no drivers installed. Well you dont know what drivers to find since you dont know what the hardware is. Now with Tweaking.com - Hardware Identify you can see what that hardware is.
The program also has a easy option to help improve the device database. Once you have all drivers installed you can have the program check for any hardware on the system that isnt in the database and submit it to Tweaking.com. With in a few days the database will be updated and the device list will grow with the help of users like you!
Picture below was taken from Tweaking .com for the educational and instructional purposes.
 |
| Pic-18(f) |
..
Note: Any suggestion or comments to improve this article is very welcome and appreciated.Please write to me at nasir@simulato.com in case you have any queries.
People also read following top most searched issue
Go to link Download
Thursday, April 27, 2017
How To Increase The Internet Speed in PC
How To Increase The Internet Speed in PC

And when it fails to deliver, there’s no telling how worse it could be.
The slow net scenario
Now, at an era largely characterised by instant gratification, the sight of a loading icon – the circling arrow or the bar of green – could inspire automatic groans. Nobody wants them, unless this slow net thing is epidemic in your neighbourhood.What are the causes of this slow internet connection? About.com’s “Internet for Beginners” has identified at least thirteen (13) causes.
- Poor hardware
- Incorrect router configuration
- Leeching internet users
- Un-upgraded NIC
- Spyware/malware infection
- Downloads
- ISP’s routing signals
- Outdated DNS
- Full browser memory cache
- Devices disrupt signals
- Old PC
- Open windows
- Unattended dialog box
Faster than energy bunnies
There are many ways of increasing your internet connections speed. The best way to do it is to start with diagnosis. See through those aforementioned causes and learn which among those are causing your internet speed to drop.Through a determined cause, you are able to appropriate a targeted solution. For instance, if the problem is caused by poor hardware, then you can purchase a newer and better model. If it’s about the incorrect router configuration, try to correct it or tap your friendly IT expert to do the works.
Or if the culprit of the internet snail-pace is your leeching neighbours (most likely the case for Wi-Fi connections), strengthen your connection’s password and utilise other security features. Infections, on the other hand, could be fixed through stringent scanning software.
Obviously, the nature of addressing your internet connection speed has something to do with the basics: consistent upgrades and investment in clearing ups. All of these serve to speed up that connection, probably faster than the proverbial energy bunnies.
Tech buddies
Apart from those, don’t skimp on tech savvy relationships. Try to foster a friendly (and not hostile) bond with that tech – the ones from the hardware distributor, the internet connection provider, the tech support team, and so on.They’re your key to the better world of lightning speed connection. And though you might approach them for professional service, they would be willing to extend support if you’re consistently nice to them.
Awakened consciousness
Lastly, to increase the speed of your internet connection, try not to do things that could disrupt it. Avoid these disruptive things if it can be helped. And if the PC or any other device is shared among the members of the family, encourage them to perform the same measures.Image Credit: ddpavumba
Go to link Download
Tuesday, April 25, 2017
How to Change the Windows 7 Desktop Being Android ICS advanced users only
How to Change the Windows 7 Desktop Being Android ICS advanced users only

If you are fond of Android and a Windows 7 computer user, the following trick will surely like. Yes, this show is a way to change your Windows 7 computer to Android Ice Cream. Before you decide to try it, you need to know that we present here are the result of a collaboration called Flickr user David Molina and his team of Lifehacker.com.
Go to link Download
Sunday, April 23, 2017
How to get the all opened tab back in Google Chrome if you have closed all the tab by mistake
How to get the all opened tab back in Google Chrome if you have closed all the tab by mistake
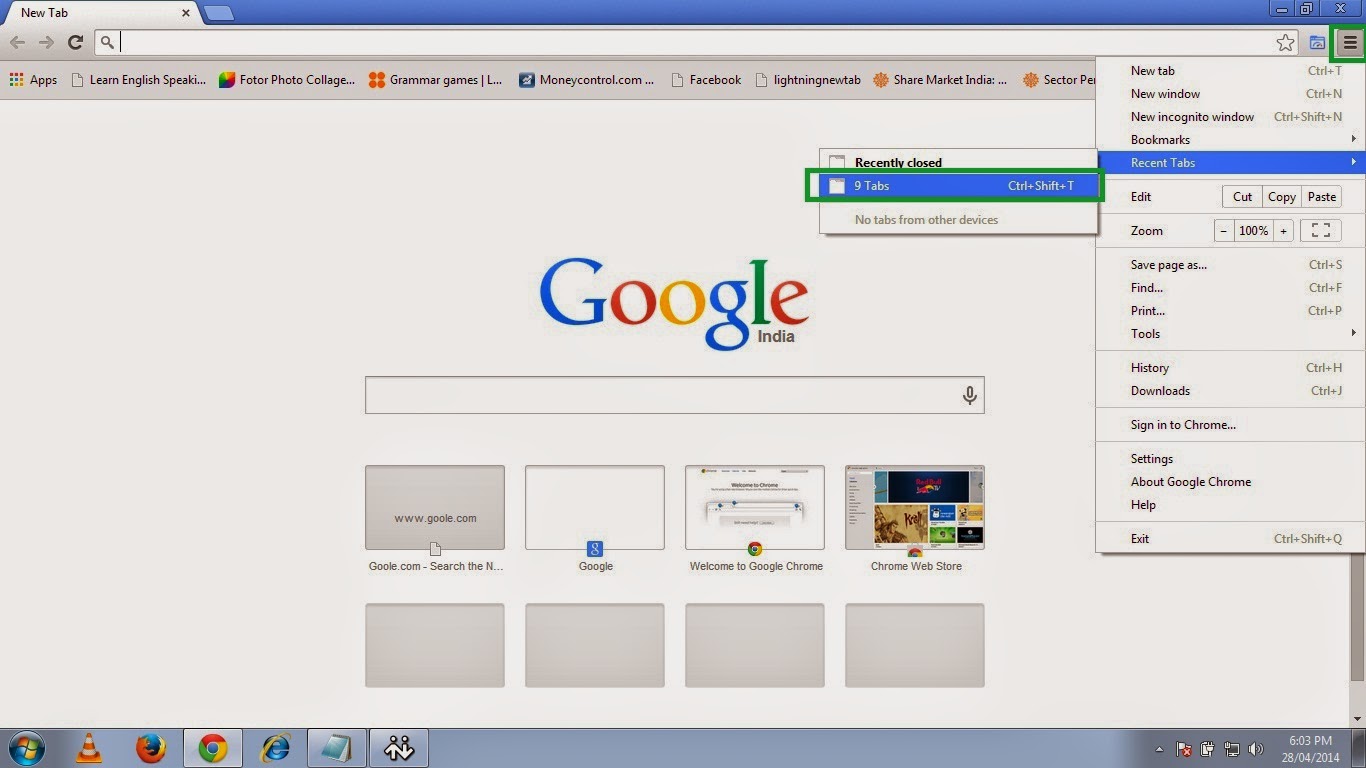
This is just for an information I am sure most of you must know it already.I wanted to let you know how you can get all the opened tab in Google Chrome back if you have closed all the tab by mistake, because when you manually close it, you dont get the option of restore so if you dont get the restore option here is how you can get all those opened tab back.
Get all opened pages that you were working on back
1. Open chrome and click on the three small parallel lines on the top right hand side and then move to Recent Tab and click the no. of Tab option so here in this picture it shows 9 Tab because I had 9 tabs opened before closing the Chrome.
So click on the 9 Tab.
OR
Just press Ctrl+Shift+T.
 |
| Pic-14(a) |
2. And then it will open all previously opened tabs with the webpages you were browsing.
 |
| Pic-14(b) |
Happy Learning
Nasir
People Also read my Following Posts.
Get a Website ups and running @ $2.95
What is a website and how is it accessed on the web?How to build and host it free?
How to Speed up your computer 20 Times faster.
Restore and Reset your iPhone, iPad or iPod back to the original Factory Default Settings.
Go to link Download
Friday, April 21, 2017
IBM builds a service to help you know who to trust in the cloud
IBM builds a service to help you know who to trust in the cloud

Go to link Download
How to Resolve Backup skipped backing up E My Documents as it is on the backup target Error 0x81000006
How to Resolve Backup skipped backing up E My Documents as it is on the backup target Error 0x81000006
Backup skipped backing up E:My Documents as it is on the backup target. Error 0x81000006
Hi, I have a toshiba i7-2670QM notebook with this problem when attempting to backup.
Previously before I had backed up files on this external HDD from my old computer running windows XP and transferred them to this windows 7 computer.
Now as I attempt
to backup for the first time on this computer it comes up with this error.
Windows Backup and Volume Shadow Copy services are set to automatic and are started.
I seemed to have no errors on either disk when checked.
Could you please help me with this.
Thank you.
Anwsers to the Problem Backup skipped backing up E:My Documents as it is on the backup target. Error 0x81000006
Download SmartPCFixer to Fix It (Free)
- Download the Microsoft Windows ISO (installation device) from the following website:
- http://www.microsoft.com/en-us/software-download/windows10
- Users must select the appropriate ISO, either 32 bit or 64 bit, depending upon their individual computer.
- Extract the ISO file to a separate USB device or burn the program to a compact disc.
- Run the Microsoft Windows 10 upgrade directly from the software that you have thus created.
Recommended Method to Fix the Problem: Backup skipped backing up E:My Documents as it is on the backup target. Error 0x81000006:


How to Fix Backup skipped backing up E:My Documents as it is on the backup target. Error 0x81000006 with SmartPCFixer?
1. Click the button to download Error Fixer . Install it on your computer. Open it, and it will scan your system. The junk files will be shown in the list.

2. After the scan is finished, you can see the errors and problems need to be repaired. Click Fix All.

3. The Fixing part is finished, the speed of your computer will be much higher than before and the errors have been removed.

Related: AMD Radeon HD 7800M Win8 not working [Anwsered],I can access the internet, get on facebook and get to hotmail, but I cant play games on facebook and I cant open or respond to my e-mails,I keep getting this Media Player error when I log on my computer. [Anwsered],[Anwsered] System Hanging on shutdown and restart,Unable to get the Vlookup property of the WorksheetFunction class,Solution to Error: Error: "0x81000032 make sure the C: drive is online and set to NTFS" when trying to backup to external hard drive.
,Troubleshoot:External Hard Drive not listed in Windows 7 backup wizard Error
,Im always being signed off so annoying Tech Support
,Solution to Problem: Impossible to use Internet Explorer! I keep getting the same error message every time i try to use IE.
,Solution to Problem: Referencing data in another file
,Troubleshoot:Error: "0x81000032 make sure the C: drive is online and set to NTFS" when trying to backup to external hard drive. Error,External Hard Drive not listed in Windows 7 backup wizard Tech Support,Tech Support: Im always being signed off so annoying,Solution to Problem: Impossible to use Internet Explorer! I keep getting the same error message every time i try to use IE.,Referencing data in Access using Excel [Anwsered],Need Best Way To Present Data [Anwsered],Same question but for windows 7 home edition,sometimes fullscreen wont activate [Solved],Solution to Error: We bought a new computer with windows 7 and it is constantly freezing. How do we fix this?,Solution to Error: Windows 8 update crash (2013-07-22)
Read More: How to Resolve - Backup disk is about to overflow.?,[Solution] Assistance with trend line equation,How to Fix - BACKING UP BOOKMARKS AND FAVORITES?,Troubleshoot:back up files on a CD-RW Error,backup failed but space consumed and i want my space back [Solved],application not found error,any problems in a team where one has Windows XP and the other has Windows 7?,Application/Object-Defined Error,An Excel formula question where hours are totalled and cumulating,Anyone know the hardware email?
Go to link Download