Showing posts with label get. Show all posts
Showing posts with label get. Show all posts
Tuesday, April 25, 2017
How To Choose What Laptop System To Get
How To Choose What Laptop System To Get
Basically there are only a few questions you need to ask.
1.Size
How big you need your laptop to be?
Keep in mind size is related to weight, the smaller the laptop the lighter it usually is.
<12.1>
13.1 inches (Mainstream Laptops)14.1 inches (Mainstream Laptops)
15.1 inches (Mainstream Intensive Gaming Laptops)
16.1 inches (Desktop Replacement)
>16.1 inches (Desktop Replacement)
Usually if you need to move it around 14.1 -15.1 inches would be around the max for mobility.
2.Usage
Processor
Intel
For Intel Processor typically it is easily identified
Intel Core i (Processor Class Number) - (3 Digit SKU Number)(Alphabet 1)(Alphabet 2)
The Processor Class Number is either 3/5 or 7.
3 refers to the low end ProcessorsThe 1st Digit SKU Number refers to the instruction set in the Processor.
5 refers to the mainstream Processors
7 refers to the high end Processors
3X0 means
- No Intel® Turbo Boost Technology,
- No Intel® Virtualization Technology for Directed I/O (VT-d),
- No Intel® Trusted Execution Technology,
- No AES New Instructions
4X0 means
- No Intel® Virtualization Technology for Directed I/O (VT-d),
- No Intel® Trusted Execution Technology,
- No AES New Instructions
5X0 and above
The 2nd Digit refers to the different Frequency of the Processor Family
- All Instruction Set Supported
For the alphabet there are a number of fixed Alphabets
M - MainstreamAMD
Q - Quad Core (4 Cores, 8 Threads, No Intel HD Graphics due to high TDP)
X - Xtreme (Unlocked Multiplier)
U - Ultra Low Voltage (Low Frequency + Low Voltage)
L - Low Voltage (Low Voltage only)
E - Embedded (Not Upgradable)
For AMD Processor it is not as easy.
Generation Griffin
Identifier:AMD (Model) X(No. of Cores) (SKU Alphabet)-(Frequency Identifier No.)(Odd/Even Last Digit)
X2 refers to Dual Core
- Turion refers to high end model
- Athlon refers to mainstream model
- Sempron refers to low end model
Ultra refers to Total 2MB L2 Cache otherwise 1MB L2 Cache or less.
ZM refers to Turion Processor with 3 Power State
RM refers to Turion Processor with 3 Power State
QL refers to Athlon Processor with 2 Power State
SI refers to Total 512 KB Cache with 2 Power State
| Frequency Identifier No. starts from 4X to 8X. |
- RM-70 starts from 2GHZ (Every 2 increase Frequency Increase by 100MHZ ) Odd Last Digit refers to an increase in HyperTransport Frequency from the Even Digit SKU
- RM-80 starts from 2.1GHZ (Every 2 increase Frequency Increase by 100MHZ ) Odd Last Digit refers to an increase in HyperTransport Frequency from the Even Digit SKU
- V refers to Low Voltage Processor
Generation Caspian
Identifier:AMD (Model) (Generation II) Ultra (No. of Cores) (Type Alphabet) (3 Digit SKU No.)
Generation II refer to K10 Architecture
- Turion refers to high end model
- Athlon refers to mainstream model
- Sempron refers to low end model
Ultra refers to Total 2MB L2 Cache otherwise 1MB L2 Cache or less.
Type Alphabet
- M refers to Mainstream
- L refers to Low Voltage
6XX refers to Turion Ultra Series Starting from 2.4 GHZ, every increment in 20 increase by 100MHZ with 5 Power StatesNote Starting Frequency of L Series differ from M Series
5XX refers to Turion Series Starting from 2.2 GHZ, every increment in 20 increase by 100MHZ with 5 Power States
3XX refers to Athlon Series Starting from 2.0 GHZ, every increment in 20 increase by 100MHZ with 3 Power States
Generation Champlain
Identifier: X NNN
X is either X for Black Edition (Unlocked Multiplier 45 Watt TDP ), N for MainStream (35 Watt TDP) & P for MainStream Lower Power Consumption (25 Watt TDP), V for Low End (25 TDP Single Core).
1st Digit refers to SKU
9 - Quad Core with 21.3GB/s HyperTransport
8 - Triple Core with 21.3GB/s HyperTransport
6 - Dual Core with 21.3GB/s HyperTransport
5 - Dual Core with 17GB/s HyperTransport
3 - Dual Core with 64bit Floating Point Unit (I suspect it is the old Caspian Refresh) (All the new Champlain should have 128Bit Floating Point Units) 17GB/s HyperTransport
1 - Single Core with 64bit Floating Point Unit
All Champlain Generation has 0.5 MB L2 Cache per CPU Core.
Graphics (For Gaming GPU > CPU)
For occasional gaming get at least some decent graphics from Nvidia, ATi.
For Intel Graphics if you must at least go for 3150,4500MHD or the new Intel HD Graphics.
They have Video Codec Decoding Abilties for Adobe Flash 10.1.
They have Video Codec Decoding Abilties for Adobe Flash 10.1.
For ATi any Radeon HD will do, DO NOT go for Radeon Xpress they are obselete.
For Nvidia, go for anything below 8000 Series. 7000 series are obselete.
Both Nvidia 7000 Series and Radeon Xpress do not support GPU computing and DirectX 10
Use Notebookcheck as a rough guide for gaming performance.
Class 3, Class 2, Class 1 are suitable for occasional gaming.
For more intensive gaming consider getting Class 2 and Class 1 Graphics however they are most available only on 14.1/15.1 inch and above laptops.
Reason being more powerful graphics requires more powerful fansink these contributes to size hence usually they can only be found on 14.1 inch and above systems.
RAM
I dont really bother as it is very easy and cheap to upgrade laptop RAM.
You get more cost saving upgrading RAM yourself than buying a high RAM laptop.
Harddisk
Size is of no concern as they come with at least 120GB and that is more than sufficient.
Edit:
With regards to how good a laptop is in terms of quality you have to look at the design layout.
1) Google the motherboard prints of the particular laptop
2) Heatsink size must be sufficiently large enough particularly for AMD Processor Laptops and those with Nvidia/ATi GPU, larger mass allows higher heat capacity so temperature will not be too high.
The GPU, CPU and Northbridge must not be too close to each other.
3) The capacitors must be of high quality
 High Quality Capacitor
 Lower Quality Capacitor
Edit:
With regards to how good a laptop is in terms of quality you have to look at the design layout.
1) Google the motherboard prints of the particular laptop
2) Heatsink size must be sufficiently large enough particularly for AMD Processor Laptops and those with Nvidia/ATi GPU, larger mass allows higher heat capacity so temperature will not be too high.
The GPU, CPU and Northbridge must not be too close to each other.
3) The capacitors must be of high quality
High Quality CapacitorLower Quality CapacitorGo to link Download

Sunday, April 23, 2017
How to get the all opened tab back in Google Chrome if you have closed all the tab by mistake
How to get the all opened tab back in Google Chrome if you have closed all the tab by mistake
Hi Friends,
This is just for an information I am sure most of you must know it already.I wanted to let you know how you can get all the opened tab in Google Chrome back if you have closed all the tab by mistake, because when you manually close it, you dont get the option of restore so if you dont get the restore option here is how you can get all those opened tab back.
Get all opened pages that you were working on back
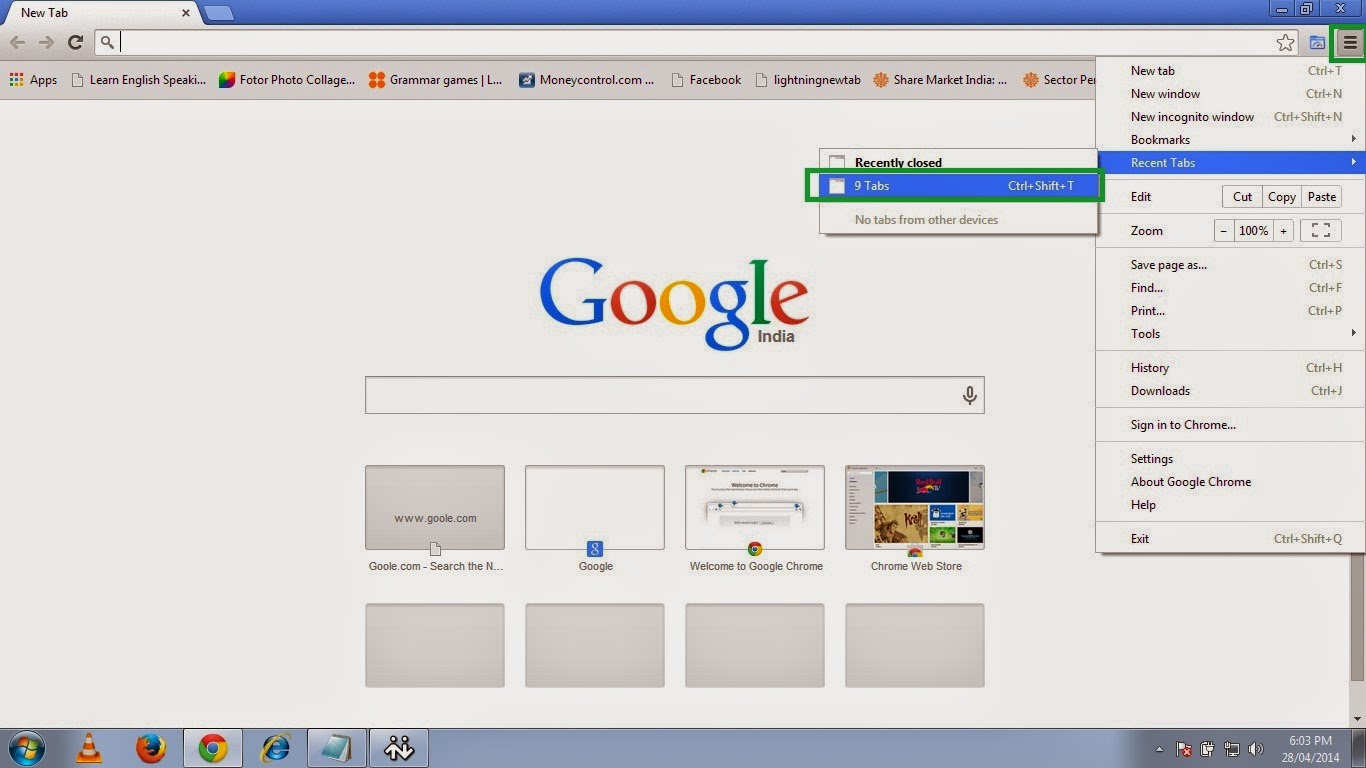
1. Open chrome and click on the three small parallel lines on the top right hand side and then move to Recent Tab and click the no. of Tab option so here in this picture it shows 9 Tab because I had 9 tabs opened before closing the Chrome.
So click on the 9 Tab.
OR
Just press Ctrl+Shift+T.
2. And then it will open all previously opened tabs with the webpages you were browsing.
Happy Learning
Nasir
People Also read my Following Posts.
Get a Website ups and running @ $2.95
What is a website and how is it accessed on the web?How to build and host it free?
How to Speed up your computer 20 Times faster.
Restore and Reset your iPhone, iPad or iPod back to the original Factory Default Settings.
This is just for an information I am sure most of you must know it already.I wanted to let you know how you can get all the opened tab in Google Chrome back if you have closed all the tab by mistake, because when you manually close it, you dont get the option of restore so if you dont get the restore option here is how you can get all those opened tab back.
Get all opened pages that you were working on back
1. Open chrome and click on the three small parallel lines on the top right hand side and then move to Recent Tab and click the no. of Tab option so here in this picture it shows 9 Tab because I had 9 tabs opened before closing the Chrome.
So click on the 9 Tab.
OR
Just press Ctrl+Shift+T.
 |
| Pic-14(a) |
2. And then it will open all previously opened tabs with the webpages you were browsing.
 |
| Pic-14(b) |
Happy Learning
Nasir
People Also read my Following Posts.
Get a Website ups and running @ $2.95
What is a website and how is it accessed on the web?How to build and host it free?
How to Speed up your computer 20 Times faster.
Restore and Reset your iPhone, iPad or iPod back to the original Factory Default Settings.
Go to link Download
Thursday, April 13, 2017
Get rid of the virus hard disk diagnostics repair your PC at this time
Get rid of the virus hard disk diagnostics repair your PC at this time
Get rid of the virus hard disk diagnostics , repair your PC at this time
One of the components on the computer of a person not regularly exceed the most is the hard drive. A combination of moving parts and continuous access to daily activities, let alone things like power surges and heat build-up all files on your hard drive can, but still a disorganized way, damage to your files and they are inaccessible.
Therefore, an instrument to accurately scan and repair the damage remains clean and organize something that should have almost every computer user.
The only problem is that a growing number of malware programmers to create and viruses are more chances to see this kind of PC tools and create their own brand of tools designed to not help, but in reality, so many problems on the computer that you are willing to try everything, including the purchase of a copy of the software to do to solve problems. Instead, you get the elimination of the virus hard disk diagnostics.
Thats exactly what the malware before as a hard disk known diagnostic viris.
The first thing that makes this malware is to try, and you think you have many different problems on your PC by a "scan" of your decision-making system. Although this is not something that other legitimate software with malware all these questions that the reports were falsified to make troubles. Once you get this information is then told that the only way to tackle these problems must be solved before it even worse is to activate their copy of the software. From this point it does not matter what you will see a sales page for this, and you should get rid of the virus hard disk diagnostics quickly.
After the initial scan, you will begin to experiment with different types of random error messages continue to appear until the malware is deleted from your computer. Warnings are available in various types and include things like:
The time to read the hard drive is too long.
The temperature in the computer reach a critical and can damage components.
Registry errors.
Damaged or bad sectors on your hard disk.
All these messages are all designed to entice you and like I said before, and that still plague you until you clean the infection.
The best solution to get rid of the virus hard disk diagnostics is to download a file system and registry scanner. This will help you to remove this mare quickly and effectively and keep your computer safe.
You need to follow two steps.
a. Download a system and registry scanner.
b. Faster automatically perform a full scan on your computer and get rid of all malware. So your computer will run faster and free of malware and remove the virus hard disk diagnostics.
Get rid of the virus hard disk diagnostics , repair your PC at this time
Therefore, an instrument to accurately scan and repair the damage remains clean and organize something that should have almost every computer user.
The only problem is that a growing number of malware programmers to create and viruses are more chances to see this kind of PC tools and create their own brand of tools designed to not help, but in reality, so many problems on the computer that you are willing to try everything, including the purchase of a copy of the software to do to solve problems. Instead, you get the elimination of the virus hard disk diagnostics.
Thats exactly what the malware before as a hard disk known diagnostic viris.
The first thing that makes this malware is to try, and you think you have many different problems on your PC by a "scan" of your decision-making system. Although this is not something that other legitimate software with malware all these questions that the reports were falsified to make troubles. Once you get this information is then told that the only way to tackle these problems must be solved before it even worse is to activate their copy of the software. From this point it does not matter what you will see a sales page for this, and you should get rid of the virus hard disk diagnostics quickly.
After the initial scan, you will begin to experiment with different types of random error messages continue to appear until the malware is deleted from your computer. Warnings are available in various types and include things like:
The time to read the hard drive is too long.
The temperature in the computer reach a critical and can damage components.
Registry errors.
Damaged or bad sectors on your hard disk.
All these messages are all designed to entice you and like I said before, and that still plague you until you clean the infection.
The best solution to get rid of the virus hard disk diagnostics is to download a file system and registry scanner. This will help you to remove this mare quickly and effectively and keep your computer safe.
You need to follow two steps.
a. Download a system and registry scanner.
b. Faster automatically perform a full scan on your computer and get rid of all malware. So your computer will run faster and free of malware and remove the virus hard disk diagnostics.
Get rid of the virus hard disk diagnostics , repair your PC at this time
Go to link Download
Friday, April 7, 2017
How to Get Data From an Old Hard Drive without pc
How to Get Data From an Old Hard Drive without pc
How to Get Data Off an Old Hard Drive (Without Putting It in a PC)

You saved an old hard drive (or three) from previous computers and now you’d like to get at the data on it. Is there an easy way to access the data without cracking open your current computer and mounting the hard drives inside?
On the expensive side of things, you can pick up a hot swap dock for around $30-40 like this Anker USB 3.0 dock. The only problem is that hardly anyone makes a dock that supports both IDE and SATA connections anymore (neither the product sample we linked to nor it’s competitors do).
How to Get Data from an Old Hard Drive, install hard drive, how to use old hard drive, how to mount old hard drive, how to get data off old hard drive, retrieve data from old hard drive,
If you’re doing a lot of work with bare SATA drives, the dock makes sense; for your application, and most home users, the dock is overkill.

Sabrent USB to SATA/IDE Adapter
How to Get Data from an Old Hard Drive, install hard drive, how to use old hard drive, how to mount old hard drive, how to get data off old hard drive, retrieve data from old hard drive,
How to Get Data from an Old Hard Drive, install hard drive, how to use old hard drive, how to mount old hard drive, how to get data off old hard drive, retrieve data from old hard drive,
If you’re doing a lot of work with bare SATA drives, the dock makes sense; for your application, and most home users, the dock is overkill.
Sabrent USB to SATA/IDE Adapter
How to Get Data from an Old Hard Drive, install hard drive, how to use old hard drive, how to mount old hard drive, how to get data off old hard drive, retrieve data from old hard drive,
What you want is an adapter/converter cable that allows you to mount the HDDs like you’re simply attaching a portable HDD or flash drive to the computer.
How to Get Data from an Old Hard Drive, install hard drive, how to use old hard drive, how to mount old hard drive, how to get data off old hard drive, retrieve data from old hard drive, Historically these adapters were pretty flaky, but improvements in both Windows and the hardware itself has yielded dependable functionality at really reasonable prices. The model we use around the office is the Sabrent USB 3.0 to SATA/IDE Adapter.
How to Get Data from an Old Hard Drive, install hard drive, how to use old hard drive, how to mount old hard drive, how to get data off old hard drive, retrieve data from old hard drive, It’s reliable, speedy, and, handily, it comes with its own molex transformer so you can power the drives. This is where most of the adapters you find on eBay, Amazon, etc. all fall short: they provide a cable but you’re expected to provide the power via an old PSU or such.
How to Get Data from an Old Hard Drive, install hard drive, how to use old hard drive, how to mount old hard drive, how to get data off old hard drive, retrieve data from old hard drive, The Sabrent model packages both the adapter and power supply together so you’re not left trying to figure out how to power your drives (and hoping you have an old PSU stashed along with all those old drives).
How to Get Data from an Old Hard Drive, install hard drive, how to use old hard drive, how to mount old hard drive, how to get data off old hard drive, retrieve data from old hard drive,
How to Get Data from an Old Hard Drive, install hard drive, how to use old hard drive, how to mount old hard drive, how to get data off old hard drive, retrieve data from old hard drive, Historically these adapters were pretty flaky, but improvements in both Windows and the hardware itself has yielded dependable functionality at really reasonable prices. The model we use around the office is the Sabrent USB 3.0 to SATA/IDE Adapter.
How to Get Data from an Old Hard Drive, install hard drive, how to use old hard drive, how to mount old hard drive, how to get data off old hard drive, retrieve data from old hard drive, It’s reliable, speedy, and, handily, it comes with its own molex transformer so you can power the drives. This is where most of the adapters you find on eBay, Amazon, etc. all fall short: they provide a cable but you’re expected to provide the power via an old PSU or such.
How to Get Data from an Old Hard Drive, install hard drive, how to use old hard drive, how to mount old hard drive, how to get data off old hard drive, retrieve data from old hard drive, The Sabrent model packages both the adapter and power supply together so you’re not left trying to figure out how to power your drives (and hoping you have an old PSU stashed along with all those old drives).
How to Get Data from an Old Hard Drive, install hard drive, how to use old hard drive, how to mount old hard drive, how to get data off old hard drive, retrieve data from old hard drive,
Acquiring the hardware is the trickiest part. Once you have the hardware, all you need to do is use the appropriate side of the adapter (it has a side for 3.5 IDE, 2.5 IDE, and SATA), make sure the drive jumpers are set to Master (if the drive is old enough to use a jumper system, modern SATA drives rarely use jumpers), plug the adapter into a USB port on your computer, plug in the power via the molex adapter unit, and then turn the switch on the power cable on to provide power to the drive. Here’s what a drive looks like hooked up correctly to an IDE drive:

Once the power is on and the drive spins up, it should appear in Windows as a removable drive the same way a brand new off-the-shelf external hard drive would, no software or drivers needed. Here’s the drive detected right along side an actual external drive:

Here’s a peek inside the drive, and old Windows desktop drive, where you can see all the old folders and such are easily accessible:

When opening folders, especially folders on old hard drives with Windows previously installed, you may run into a message like this:

You’ll see this error/prompt when you attempt to open a file/folder that had file permissions assigned to it by the previous operating system, but for which no currently valid permissions exist. You should only need to click this once for most situations (such as opening a user directory of an old Windows account). If the simple permissions prompt seen above doesn’t work (or you don’t even get the prompt to apply the permission, but an access error instead), check out our primer on Windows file permissions to learn how to manually edit the permissions and get to your files.
How to Get Data from an Old Hard Drive, install hard drive, how to use old hard drive, how to mount old hard drive, how to get data off old hard drive, retrieve data from old hard drive,
If your drive does not appear, and you’ve properly connected both the power and data cables, there’s usually only three culprits: 1) it’s an older drive and you need to set the jumpers properly, 2) the drive’s file system is unreadable by your OS, or 3) the drive is damaged.
How to Get Data from an Old Hard Drive, install hard drive, how to use old hard drive, how to mount old hard drive, how to get data off old hard drive, retrieve data from old hard drive,
Remember, what you’re doing to the drive with the data/power adapter cable is essentially mounting it as you would with an internal drive (but without the hassle of cracking open the case). If your computer can’t read the drive under those circumstances (because the drive has an incompatible file system or is physically degraded/damaged), then it won’t be able to read it over the USB setup either.
How to Get Data from an Old Hard Drive, install hard drive, how to use old hard drive, how to mount old hard drive, how to get data off old hard drive, retrieve data from old hard drive,
How to Get Data from an Old Hard Drive, install hard drive, how to use old hard drive, how to mount old hard drive, how to get data off old hard drive, retrieve data from old hard drive,
Remember, what you’re doing to the drive with the data/power adapter cable is essentially mounting it as you would with an internal drive (but without the hassle of cracking open the case). If your computer can’t read the drive under those circumstances (because the drive has an incompatible file system or is physically degraded/damaged), then it won’t be able to read it over the USB setup either.
How to Get Data from an Old Hard Drive, install hard drive, how to use old hard drive, how to mount old hard drive, how to get data off old hard drive, retrieve data from old hard drive,
Barring that, though, it’s as simple as plug and play. For $20 you have a hassle free way to check your drives, retrieve old data, compare it to your backups, wipe the data, and otherwise interact with the drives as if they’re mounted right in the computer case.
Go to link Download
Wednesday, April 5, 2017
Get a Website ups and running 2 95
Get a Website ups and running 2 95
Get a Website ups and running -Free
Host Your Website Free Now with all the features of cPanel
Objective
To register a Free Website:
Go to 000webhost.com and then click on the sign up on the right hand side and choose a name of your website and fill in the few details like your name and Email in the form shown below and click Sign up.You now need to verify your email address by clicking on the link received from 000webhost.com.So log in to your Email and click the link and you are done registering your website.You now need to upload webpages and Home page to your website.To upload pages to your website read this post How to upload webpages to Web Server.
Or you can just pay for a Domain (your-domain-name.com or your-domain-name.net) registration which is gonna cost you $2.95 from GoDaddy.com.And host your domain on 000webhost.com to get your website( www.your-domain-name.com) ups and running.
Here in this article I am going to show you free website hosting option on 000webhost.com which is one of the best options to host your website free of cost so you just pay for domain which normally costs $2.95 from Godaddy.com and by using a free hosting account, you are just spending $2.95 to get your website ups and running.To register a domain with Godaddy now click on this banner below.
Host Your Website Free Now with all the features of cPanel
Objective
After reading this post you will be able to do the following:
- You can register a free website or just register with your own personal domain by paying a minimal charge.
- You can set up your personal email with your very own Domain.
- You will be able to upload and manage your website.
- You will be able to optimize and index your website with search engines.
To register a Free Website:
Go to 000webhost.com and then click on the sign up on the right hand side and choose a name of your website and fill in the few details like your name and Email in the form shown below and click Sign up.You now need to verify your email address by clicking on the link received from 000webhost.com.So log in to your Email and click the link and you are done registering your website.You now need to upload webpages and Home page to your website.To upload pages to your website read this post How to upload webpages to Web Server.
 |
| Pic-1(b) |
Or you can just pay for a Domain (your-domain-name.com or your-domain-name.net) registration which is gonna cost you $2.95 from GoDaddy.com.And host your domain on 000webhost.com to get your website( www.your-domain-name.com) ups and running.
Here in this article I am going to show you free website hosting option on 000webhost.com which is one of the best options to host your website free of cost so you just pay for domain which normally costs $2.95 from Godaddy.com and by using a free hosting account, you are just spending $2.95 to get your website ups and running.To register a domain with Godaddy now click on this banner below.
000webhost also gives you the option of creating a free sub domain with them. So let’s go to 00webhost by clicking here.Once you click on the link you will be landed on a page which is shown in the pic-1(c).
Now on this website click on Signup and select from options to host your own domain which is already registered or create a sub domain with them as shown in picture 1-(c) below and your absolutely free website will have a name like www.yourdomain.netai.net / www.yourdomain.cumli.net or something like that. So this is also a good option to build a free website and learn the website administration because this web server support all the services from PHP, Mail handling to zyro web builder tool. You can also use their templates to auto install your website.You can have your business email as yourname@yourbusiness_name.com.
|
| Pic-1(c) |
 |
| Pic-1(d) |
After you click on create My Account your account will be created and you will be logged into 000webhost.But it will show the status of the website as Verification pending.So you need to verify your email for which you need to login to your email and go to inbox to click on the verification link that you have received from 000webhost .So you better check your inbox and follow the link in the mail to verify your email address and after the verification is done the status of your website under the list will show as active as shown in pic 1(e) .
 |
| Pic-1(e) |
 |
| 1(f) |
Now you will need to go to your domain registrar to change the DNS server address i.e to tell the global DNS that your WebPages are held at 000webhost server.Here my domain registrar is Namecheap.com. So lets login there and you will see the home page of your account something like Picture 1-(g) below.
 |
| 1(g) |
Then click on the first option “Your Domains/Products” on the right hand side. And then you will see the list of domain you have registered as shown in the pic 1-(i). So click on the domain name you want to modify the settings for.And then on next page look at the left hand side menu options for Domain Nameserver setup link as shown in picture1-(h) and click it to change the DNS server to ns01.000webhost.com and record 2 as ns02.000webhost.com and you are done.
Now to host or Set up your Email associated with your registered Domain read my Post How to configure your Email Id for your own Hosting account.
Bingo!! Happy hosting…
Now after changing this value your domain registrar may take few hours to update the records.Once the records are updated the 000webhost will start displaying your page and your website is ups and running.
 |
| Pic-1(h) |
 |
| 1(i) |
So far we have learned what is a Website, how to Register a domain and how to Host it.
Do not forget to read How to upload webpages to Web Server.
Do not forget to read How to upload webpages to Web Server.
So stay connected...Keep visisting... :-)
Nasir :-)
Nasir :-)
People Also read my Following Posts.
How to Speed up your computer 20 Times faster.Restore and Reset your iPhone, iPad or iPod back to the original Factory Default Settings.
Best Google Search Tips and Tricks
Go to link Download
Saturday, March 18, 2017
How to get back formatted data and file from Transcend SD Card
How to get back formatted data and file from Transcend SD Card

When you connect Transcend SD Card to computer, sometimes it asks you to format, and if you click ‘Yes’ then your data will be formatted. If this happens to you, here is the solution to get back formatted data and file from Transcend SD Card.
Why and How Data Recovery is Possible from a Formatted Transcend SD Card
Transcend SD card does not wipe the files completely even after you delete any picture file or format the memory card. It just removes the file name and their entries but the original data remain the same in the Transcend SD card. So the possibility of data recovery is very high after any type of deletion or formatting the SD card. You can download Transcend SD Card Recovery software which will search all the lost photos or other media files and recover deleted photos, videos, documents from formatted SD Card.
H-Data Recovery Master is an effective recovery tool, which helps you to recover lost or formatted file from Transcend SD card. Indeed, everyone feels so depressed when he or she lost the important photos. But now, with this recovery software, there is no need to be unhappy.
Here are my steps to get back formatted data from Transcend SD Card

Note: please stop using your phone/micro sd card once data get deleted. If you continue using the phone like saved new data to the sd after data deleted, then it is of high chance that some of the lost data may become corrupted.
Step 1: Connet your SD Card to Computer
Connect SD to computer via a card reader to hook up the computer, Then in Computer, check whether the smart phone shows as a drive letter (e.g. drive E: ).
Step2: Run H-Data Recovery Master on windows OS (Windows 8.1/8/7/Vista/XP...)

Step3: Scan deleted files or lost data on formatted crashed not recognized external hard drive
After you select the "USB disk/Card recovery", press "Next" to start scanning for recoverable photos, videos, and music files.
Step4: Select and recover lost hard disk data
After the program finish scanning all files, you can preview the files you wanted. Then mark the files you need. Click the “Recover” button to recover deleted data on htc one.

View more post
Retrieve tons of formatted pictures from 8GB Micro SD Card
With no recycle bin, is it possible to do Android deleted photo recovery
Formated Data Recovery – Recover Data from Memory Card, Disk Drive, USB, External Drive
Recover deleted files from Google Nexus 6 without a backup
Android 5.0 Lollipop Phone Data Recovery– Get Back All Deleted Files
High chance to recover files/formatted files from Memory Card
Go to link Download
Wednesday, March 1, 2017
Get back your deleted files on 16GB Google HTC Nexus 9 Tablet
Get back your deleted files on 16GB Google HTC Nexus 9 Tablet

For Google/HTC Nexus 9 users, it is common thing to capture photos and videos, download movies or save files in .doc, ppt, excel on Nexus 9. However, there are many reasons that you may delete or lost files on Nexus 9, once your files are lost after the system update; restore the Nexus 9 factory setting cause Nexus 9 data lost; lost important file due to formating the Nexus 9; Even if the Nexus 9 is crashed, smashed or broken, here are two ways for Google Nexus 9 users easily recover your files or file folders those lost or deleted from Nexus 9. Whats the way to recover Google/HTC Nexus 9 deleted file?
As we know, HTC Nexus 9 features a 8.9-inch IPS screen with 2048x1536 pixels resolution (4:3 aspect ratio), Mobile solutions include Plus, your favorite Google apps – Gmail, Google Drive, Docs, Sheets and Slides and more, Bluetooth 4.1 connectivity and 16 or 32GB of storage. The Nexus 9 is powered by a 64bit NVIDIA tegra K1 dual-core processor clocked at 2.3GHz and 2GB of DDR3 memory. To recover files deleted from Nexus 9,you need to use an effectively HTC Nexus 9 File Recovery-H-Data Recovery Master for Windows(Windows 8.1/Windows 8/Windows 7/Windows Vista/Windows XP supported).
This powerful and helpful HTC Nexus 9 Data Recovery can help HTC Nexus 9 users recover the lost and deleted photos/videos on Google Nexus 9. If you have mistakenly deleted other files like SMS, Contacts, Call History, DOC, XLS, and PPT etc. from Google Nexus 9 and want to get them back, it is the right software you are looking for. You can regard it as an all-in-one file recovery software to recover all types of deleted file from Google/HTC Nexus 9. Whats more,the Nexus 9 data recovery not only recover photos/videos form Nexus 9,but also supports restore photos/videos from other android phones like LG G Flex 2, Samsung Galaxy S6, Galaxy Note 4, etc, as well.
Steps to recover lost photos,video files from 16 GB HTC Nexus 9 Tablets
Step 1. Free Download HTC Nexus Photo Recovery

Step2. Connect Google/HTC Nexus 9 to Computer and Enable USB Debugging
Note: Once you deleted photos/videos/audios from Nexus 9 by mistake, stop using the phone to take any new photos or videos or save new files to it. Any new data written into the phone will overwrite the deleted photos and make them unrecoverable.
Connect your Google Nexus 9 to computer via USB cable or link your phones SD card to Windows with card reader.
Step 3. Scan Deleted Photos on Nexus 9
Launch the Photo Recovery, then click "files deleted accidentally" or "empted the recycle bin" to start scanning lost photos/videos/audios on Google Nexus 9.

Step 4. Preview and Recover Deleted Photos from Nexus 9
After scanning done, you are allowed to preview the scanned photos/videos/audios. Then select the photos or videos you need to recover and click on the "Recover" button to get them back.
View more posts
Recover lost/formatted photos pictures from HTC Nexus 9 32GB Tablet
Samsung Galaxy S6 Data Recovery – Recover Pics, Photos, videos
Not difficult to recover deleted data from Android cell phone
Step by Step to recover LG G Flex 2 Media Data with no backup
Is it possible to recover accidently deleted pictures from Nikon S8100
Restore Deleted Pictures, Videos, Files on Windows 8.1 Tablets
Go to link Download
Monday, February 20, 2017
Get Free H Data Card Recovery V4 6 00 000154 Full Version Crack
Get Free H Data Card Recovery V4 6 00 000154 Full Version Crack

H-Data Card Recovery is a professional cardrecovery software specialized in recovering deleted, lost, corrupted orformatted photos, videos, music and other files from couples of storage devicesincluding SD card, Mini SD card, Micro SD card, CF card, XD-picture card, MMC,memory stick, etc from 256 MB, 512 MB, 1 GB, 2 GB, 4 GB to 64 GB. The programcan be installed in all Windows based drive, including Windows8.1/8/7/Vista/XP…
More than a super advanced card recovery tool , theWindows recovery engine also can get lost/deleted files with other fivescanning modes, including recovering from Recycle Bin, lost partition,formatted Disks, etc. The super Card Recovery for Windows users supports 250+file types, such as deleted, lost, corrupted or formatted photos, videos, andaudio file types, as well as deleted emails from Outlook/Outlook Express. Youcan also get you mistaken erased files from digital camera, mobile phone, harddrive, flash drive, etc.
What’s the beautiful parts of the Card Recovery forWin7/Win 8 users? It goes deeper to find your important, private files in aprofessional, personal and simple way.
Download Free Version of H-Data Card Recovery V4.6.00.000154
Key Features of H-Data Card Recovery Windowsversion:
1. Recover250+ file types from documents, photos, audio to photos
2. Getlost, deleted, formatted or corrupted photos, videos and audio from partition.
3. All-in-one solution to recover bad data from hard drive, disks, USB,etc.
4. Supportselecting the path to save recovered files
5. Keepthe original file name after recovery for Windows 8.1/7/Vista
6. Extremely user-friendly interface and effective processing design
1. Recover250+ file types from documents, photos, audio to photos
2. Getlost, deleted, formatted or corrupted photos, videos and audio from partition.
3. All-in-one solution to recover bad data from hard drive, disks, USB,etc.
4. Supportselecting the path to save recovered files
5. Keepthe original file name after recovery for Windows 8.1/7/Vista
6. Extremely user-friendly interface and effective processing design
Go to link Download
Monday, February 13, 2017
How To Get Free Apps on Android Market
How To Get Free Apps on Android Market

How To Get Free Apps on Android Market - Previously when we want to get the android application in android market but it is a paid app so you can not have it because they have to pay.
So I have a solution to get it without paying .... see below ..
how to get free apps on android market
How do I get the android app without having to buy it ..
follow these steps:
1. Go to Google, then go to 4shared
2. Type in a search on 4shared and type android application that you want and write it back. "Apk" (do not use quotation marks)
example: "Wheres My Water.apk"
3 And you can download it for free without having to pay in advance
GOOD TRY ..
Note: if the application youre looking for is not there then you have to wait because there is no at 4shared
Go to link Download
Sunday, February 5, 2017
Get Free News Cricket Weather Updates Alerts and Headlines On Your Mobile
Get Free News Cricket Weather Updates Alerts and Headlines On Your Mobile

To Get Free News/Cricket/Weather Updates, Alerts and Headlines On Your Mobile With Out Internet Follow the Instructions Blow.
1- Go to Right Message On Your Mobile2- Type "Follow Black_Eyez007" Without Underscores, make sure to type upper and lower case and space are type correct same as screenshot blow.

3- Send it to 40404 (if you are not in Pakistan find your country code blow)
You Will receive a text message that you are following Black_Eyez007 now.
Now you will receive all Pakistani news updates for free
1st time SMS send Charges is 1rs+tax
Note: This Service sends only Pakistani News.
If You are from abroad you also can subscribe this service but you need to send "Follow Black_Eyez007" on your country relevant code Here.
See Also: How To Check Warid Sim Number Without Balance
Go to link Download
Monday, January 30, 2017
How do I get real player cloud icon off my computer
How do I get real player cloud icon off my computer
Hi Friends,
Today we got an issue where our Tier-1 support engineer spent almost four hours in trying to get rid of Real player cloud icon which is a system folder icon that shows in my computer under others list underneath the hard drive icons.It looks just like the icons listed under other in the following picture but you can not find an easy way to remove it.Real Player Cloud icon is such a stubborn icon that you can not get rid of easily.
This issue actually occurred after one of our clients uninstalled the Real player Cloud from his computer.He did not know that he would not completely get rid of the real player.So after it was uninstalled he went to Computer and found the Real Player Cloud system folder there.He tried to remove it, he checked the add remove program ( Program and features ) and scrolled through the list but did not find Real Player there.He then checked the control panel if he could find the real player cloud icon so that he could uninstall it from there but did not find any icons for Real player.Checked the start up items by going to Run-> typing "Msconfig" and in the system configuration utility clicked on start up and unchecked everything he could find related to the Real Player Cloud.So after doing all this he Googled about this issue and reached a support forum for Real Player here is the link of that support forum https://realnetworks.zendesk.com/entries/26869617-Uninstall-Realplayer-Cloud he read it and tried all the steps to get Rid of that.So he re-installed and uninstalled it but the same issue persists.
After the uninstall he was instructed to do the following
Delete the RealPlayer folders.
To delete the folders for RealPlayer located at:
c:program files ealRealPlayer
c:program filescommon files eal
1. Go to My Computer.
2. Go to C: or Local Disk (C:).
3. Go to the Program Files folder.
4. Go to the Real folder.
5. Delete the RealPlayer folder: c:program files ealRealPlayer
6. Go back to the Program Files folder.
7. Go to the Common Files folder.
8. Delete the Real folder: c:program filescommon files eal
NOTE: If you have a 64-bit operating system, the RealPlayer folders will be in a different location:
c:program files x86 ealRealPlayer
c:program files x86common files eal
1. Go to My Computer.
2. Go to C: or Local Disk (C:).
3. Go to the Program Files folder.
4. Go to the Real folder.
5. Delete the RealPlayer folder: c:program files x 86 ealRealPlayer
6. Go back to the Program Files folder.
7. Go to the Common Files folder.
8. Delete the Real folder: c:program files x86common files eal
After doing all these troubleshooting he was told to delete RPcloudview.dll file he searched through the computer and could not find that.He also checked process named recordingmanager.exe*32 and rndlresolversvc.exe*32 , Ended the process and deleted the file associated with them but could not get rid of the icon.
When I got this case escalated to me I got confused for some time as what to do next.
When I searched the Google I found apart from the Main executable file of Real Player (C:Program Files eal ealplayer ealplay.exe) there are multiple other files which were installed and they are as following.
rdsf3260.dll - RealPlayer (32-bit) (Audio Filter Plugin)
convert.exe - RealConverter
dbghelp.dll (by Microsoft) - Debugging Tools for Windows(R) (Windows Image Helper)
dunzip32.dll (by Inner Media) - DynaZIP-32 Multi-Threading UnZIP DLL
fixrjb.exe - RealNetworks RealPlayer (RealNetworks Fix RJB Application)
hxaudiodevicehook.dll - HXAudioDeviceHook Module
ierjplug.dll - ierjplug Module
mediainfo.dll (by MediaArea.net) - MediaInfo (All about your audio and video files)
mmcdda32.dll - RealNetworks CD Extract Component
realcleaner.exe - RealCleaner
realconverter.exe
realjbox.exe
realshare.exe - RealShare (RealShare Launcher)
realtrimmer.exe - RealTrimmer
rjbres.dll - RealPlayer (Resources)
rjdlg.dll - My Media Component
rjprog.dll
rjwmapln.dll - Windows Media Audio import plugin
rndevicedbbuilder.exe - rndevicedblauncher (RN Device DB Builder)
rpau3260.dll - rpautostream Module
rphelperapp.exe - RealNetworks Helper Application
rpplugprot.dll - rpplugprot module
rpshell.dll - RealPlayer Shell Extensions
rpshellextension.dll (by RealPlayer) - RealPlayer shellextension
rpshellsearch.dll - RealPlayer Search Shell Extension
rpwa3260.dll - RealPlayer Plugin
tnetdtct.dll - RealNetworks Online Utility
tpasdk.dll - RealNetworks Playback System
tsasdk.dll - RealNetworks Utility Services
wmdmhelper.dll - RealNetworks Products (32-bit) (WMDM PD Helper Plugin)
cddbcontrol.dll (by Gracenote) - CDDBControl Core Module
cddblink.dll (by Gracenote) - CddbLink Module
cddbmusicid.dll (by Gracenote) - CddbMusicID M
So in order to remove the real player cloud icon from my computer folder I am supposed to delete these files and folder too but I did not deal with any of those files.
I went to the C:/ drive and open the "Documents and Settings" folder .Go to your Windows username folder and click the "Application Data" folder and then find the "Real" folder and delete it.For windows 7 you can go to c:/users/UserName/AppData and delete the folder named Real from there.
I started researching and found this nice article to delete Namespace key contents from registry.This key lists several cryptic folders which define the icons that are displayed in My Computer in Windows Explorer.So delete all the subkeys listed under NameSpace key.To delete them do the following steps.
Steps to delete NameSpace Key contents
1). Click on start, Go to Run and Type Regedit and click ok.
2). Then navigate to the following key "HKEY_LOCAL_MACHINESOFTWAREMicrosoftWindowsCurrentVersionExplorerMyComputerNameSpace"
3). I deleted all the key under NameSpace and rebooted the computer I still see the Real Player Cloud icon in My Computer in Windows Explorer.
I searched the forum and found this apologies as shown in the picture- 13 (c) below from Real network support guys that they were sorry for the inconvenience and they apologize and are researching to fix this issue.
4. So then I opened the registry and started finding keys with keyword Real Player, Cloud and Real network and deleted all the keys related to Real player or Real player cloud or real network and I got 80% success as the Real Player cloud does not show up but I still had a Light White color Icon which reads System Folder in My Computer in Windows Explorer.
Then this Idea struck in my mind that why dont I clean the registry for left over file.So I Opened CCleaner and Clicked the Registry option at the left hand side and selected all the items to scan.So I scanned the registry with CCleaner as shown in the Pic-13(e) and It fixed all the issues related ton Registry and Bingo....!!!
That Real Player Cloud has gone away...I restarted the computer and It just worked fine.
Now I repent spending that much time in Removing Real Player Cloud icon while I wonder I could just take that off My Computer within 5 minutes after scanning the registry with CCleaner and fixing all the issues.
Conclusion: To remove real Player cloud icon from computer first delete the namespace and delegated folder entry from registry as shown in the above steps and then remove from other places in registry and clean the leftover registry items using the Ccleaners the regitry fix option.
Thanks for reading...
Happy Troubleshooting..!!!
Nasir
Today we got an issue where our Tier-1 support engineer spent almost four hours in trying to get rid of Real player cloud icon which is a system folder icon that shows in my computer under others list underneath the hard drive icons.It looks just like the icons listed under other in the following picture but you can not find an easy way to remove it.Real Player Cloud icon is such a stubborn icon that you can not get rid of easily.
 |
| RealPlayer Cloud icon, Pic-13(a) |
This issue actually occurred after one of our clients uninstalled the Real player Cloud from his computer.He did not know that he would not completely get rid of the real player.So after it was uninstalled he went to Computer and found the Real Player Cloud system folder there.He tried to remove it, he checked the add remove program ( Program and features ) and scrolled through the list but did not find Real Player there.He then checked the control panel if he could find the real player cloud icon so that he could uninstall it from there but did not find any icons for Real player.Checked the start up items by going to Run-> typing "Msconfig" and in the system configuration utility clicked on start up and unchecked everything he could find related to the Real Player Cloud.So after doing all this he Googled about this issue and reached a support forum for Real Player here is the link of that support forum https://realnetworks.zendesk.com/entries/26869617-Uninstall-Realplayer-Cloud he read it and tried all the steps to get Rid of that.So he re-installed and uninstalled it but the same issue persists.
After the uninstall he was instructed to do the following
Delete the RealPlayer folders.
To delete the folders for RealPlayer located at:
c:program files ealRealPlayer
c:program filescommon files eal
1. Go to My Computer.
2. Go to C: or Local Disk (C:).
3. Go to the Program Files folder.
4. Go to the Real folder.
5. Delete the RealPlayer folder: c:program files ealRealPlayer
6. Go back to the Program Files folder.
7. Go to the Common Files folder.
8. Delete the Real folder: c:program filescommon files eal
NOTE: If you have a 64-bit operating system, the RealPlayer folders will be in a different location:
c:program files x86 ealRealPlayer
c:program files x86common files eal
1. Go to My Computer.
2. Go to C: or Local Disk (C:).
3. Go to the Program Files folder.
4. Go to the Real folder.
5. Delete the RealPlayer folder: c:program files x 86 ealRealPlayer
6. Go back to the Program Files folder.
7. Go to the Common Files folder.
8. Delete the Real folder: c:program files x86common files eal
After doing all these troubleshooting he was told to delete RPcloudview.dll file he searched through the computer and could not find that.He also checked process named recordingmanager.exe*32 and rndlresolversvc.exe*32 , Ended the process and deleted the file associated with them but could not get rid of the icon.
When I got this case escalated to me I got confused for some time as what to do next.
When I searched the Google I found apart from the Main executable file of Real Player (C:Program Files eal ealplayer ealplay.exe) there are multiple other files which were installed and they are as following.
rdsf3260.dll - RealPlayer (32-bit) (Audio Filter Plugin)
convert.exe - RealConverter
dbghelp.dll (by Microsoft) - Debugging Tools for Windows(R) (Windows Image Helper)
dunzip32.dll (by Inner Media) - DynaZIP-32 Multi-Threading UnZIP DLL
fixrjb.exe - RealNetworks RealPlayer (RealNetworks Fix RJB Application)
hxaudiodevicehook.dll - HXAudioDeviceHook Module
ierjplug.dll - ierjplug Module
mediainfo.dll (by MediaArea.net) - MediaInfo (All about your audio and video files)
mmcdda32.dll - RealNetworks CD Extract Component
realcleaner.exe - RealCleaner
realconverter.exe
realjbox.exe
realshare.exe - RealShare (RealShare Launcher)
realtrimmer.exe - RealTrimmer
rjbres.dll - RealPlayer (Resources)
rjdlg.dll - My Media Component
rjprog.dll
rjwmapln.dll - Windows Media Audio import plugin
rndevicedbbuilder.exe - rndevicedblauncher (RN Device DB Builder)
rpau3260.dll - rpautostream Module
rphelperapp.exe - RealNetworks Helper Application
rpplugprot.dll - rpplugprot module
rpshell.dll - RealPlayer Shell Extensions
rpshellextension.dll (by RealPlayer) - RealPlayer shellextension
rpshellsearch.dll - RealPlayer Search Shell Extension
rpwa3260.dll - RealPlayer Plugin
tnetdtct.dll - RealNetworks Online Utility
tpasdk.dll - RealNetworks Playback System
tsasdk.dll - RealNetworks Utility Services
wmdmhelper.dll - RealNetworks Products (32-bit) (WMDM PD Helper Plugin)
cddbcontrol.dll (by Gracenote) - CDDBControl Core Module
cddblink.dll (by Gracenote) - CddbLink Module
cddbmusicid.dll (by Gracenote) - CddbMusicID M
So in order to remove the real player cloud icon from my computer folder I am supposed to delete these files and folder too but I did not deal with any of those files.
I went to the C:/ drive and open the "Documents and Settings" folder .Go to your Windows username folder and click the "Application Data" folder and then find the "Real" folder and delete it.For windows 7 you can go to c:/users/UserName/AppData and delete the folder named Real from there.
I started researching and found this nice article to delete Namespace key contents from registry.This key lists several cryptic folders which define the icons that are displayed in My Computer in Windows Explorer.So delete all the subkeys listed under NameSpace key.To delete them do the following steps.
Steps to delete NameSpace Key contents
1). Click on start, Go to Run and Type Regedit and click ok.
2). Then navigate to the following key "HKEY_LOCAL_MACHINESOFTWAREMicrosoftWindowsCurrentVersionExplorerMyComputerNameSpace"
 |
| Remove real player cloud icon from registry Pic-13(b) |
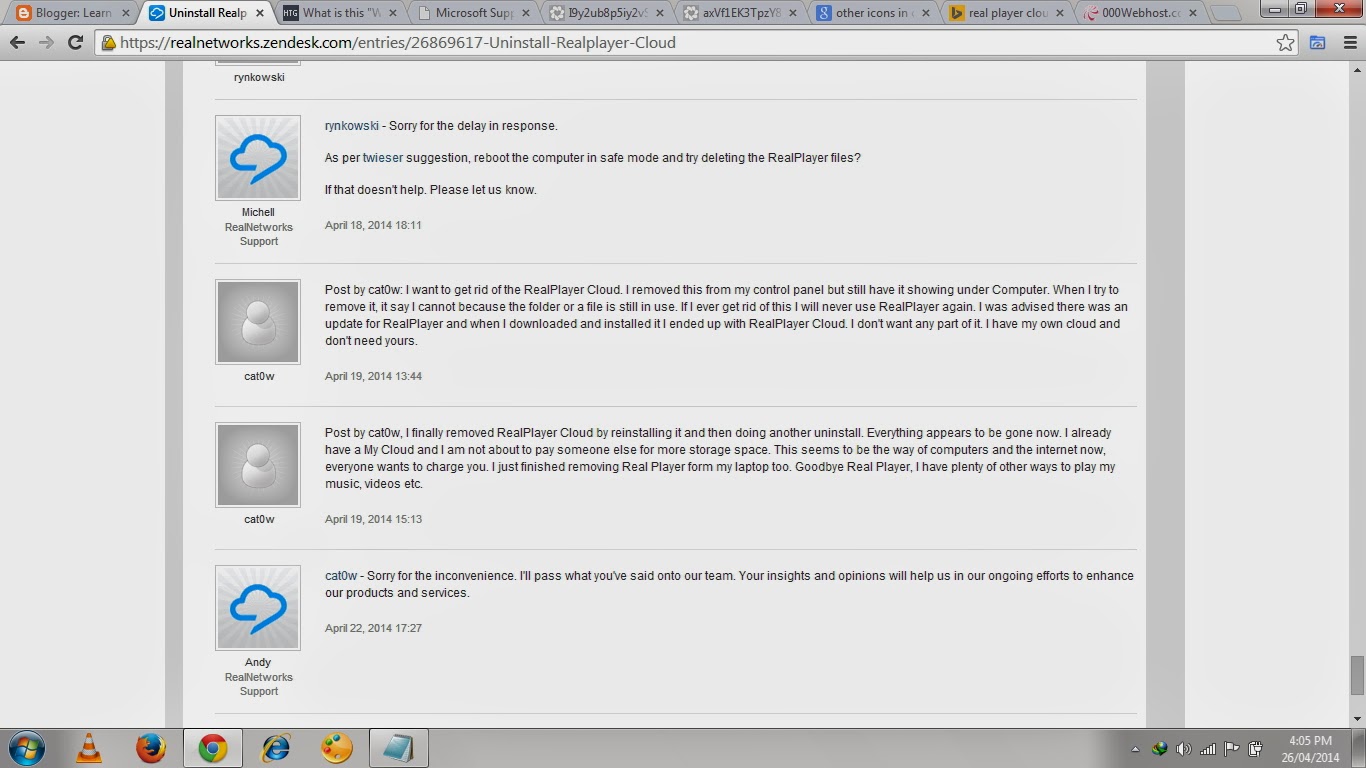
I searched the forum and found this apologies as shown in the picture- 13 (c) below from Real network support guys that they were sorry for the inconvenience and they apologize and are researching to fix this issue.
 |
| Pic-13(c) |
 |
| Pic-13(d) |
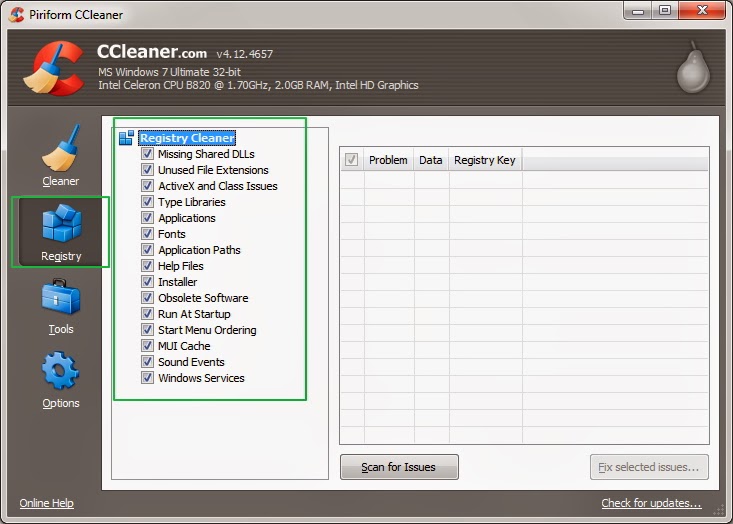
Then this Idea struck in my mind that why dont I clean the registry for left over file.So I Opened CCleaner and Clicked the Registry option at the left hand side and selected all the items to scan.So I scanned the registry with CCleaner as shown in the Pic-13(e) and It fixed all the issues related ton Registry and Bingo....!!!
That Real Player Cloud has gone away...I restarted the computer and It just worked fine.
 |
| Pic-13(e) |
Now I repent spending that much time in Removing Real Player Cloud icon while I wonder I could just take that off My Computer within 5 minutes after scanning the registry with CCleaner and fixing all the issues.
Conclusion: To remove real Player cloud icon from computer first delete the namespace and delegated folder entry from registry as shown in the above steps and then remove from other places in registry and clean the leftover registry items using the Ccleaners the regitry fix option.
Thanks for reading...
Happy Troubleshooting..!!!
Nasir
Go to link Download
Sunday, January 29, 2017
How to get data on lost
How to get data on lost
How to get data on lost
They wonder how to get your lost data from your hard drive? There are several ways to recover lost files and you can choose between them based on how to choose your data is lost, and how much would you pay to restore them.
Heres what you should consider if you want to do hard drive data recovery:
Do not write new data to disk. If you want to recover lost files, the first step to remember is never to create new data on the hard disk. If you delete files on the hard disk, the data is not actually deleted from your hard drive. If the deleted data can be used to mark the opening. The next time you write data to disk can fill your computer, the new data into the hole, which makes it much harder to recover deleted files. You should avoid writing new data to disk, you will not destroy the open, and it is easier for you to find your lost data back.
Installing recovery software. If you are missing some files from the office, Microsoft, need a comprehensive solution for recovering lost files. If the files are deleted, you are faced with one of the following situations: either the file storage system fails, which is still present, but the information is permanently or mechanical damage. If it is not mechanical failure, and it is only because the FAT system is damaged, there is good news: you can use a variety of information itself!
Some sort of recovery software is available from various manufacturers. Evaluate each type of recovery software based on your requirements and the exact cause of the missing files. If the exact recovery software, which typically costs about $ 50 to $ 100 in the recovery process is simple: install the software, select the drive is damaged and when the appointment as the source drive that can store program data recovery. Then he began to recover.
Let us consider, turn to experts for help. If your hard disk consists of mechanical damage, you can not attach it with your own. If your hard drive died due to mechanical failure, it is the best and only way to call in professional help.
But experts are expensive. It may cost $ 100, or 1000 for real estate professionals to help rebuild in the event of mechanical failure. Prices vary depending on the degree of failure and put the time in restoring the files, and you just do not get all of your files. If your budget includes experts can recover data from hard drives with mechanical failure sometimes. However, some computer users do not have enough budget to pay for it, so its inexpensive and easy way to help external hard drive and do regular backups.
How to get data on lost
They wonder how to get your lost data from your hard drive? There are several ways to recover lost files and you can choose between them based on how to choose your data is lost, and how much would you pay to restore them.
Heres what you should consider if you want to do hard drive data recovery:
Do not write new data to disk. If you want to recover lost files, the first step to remember is never to create new data on the hard disk. If you delete files on the hard disk, the data is not actually deleted from your hard drive. If the deleted data can be used to mark the opening. The next time you write data to disk can fill your computer, the new data into the hole, which makes it much harder to recover deleted files. You should avoid writing new data to disk, you will not destroy the open, and it is easier for you to find your lost data back.
Installing recovery software. If you are missing some files from the office, Microsoft, need a comprehensive solution for recovering lost files. If the files are deleted, you are faced with one of the following situations: either the file storage system fails, which is still present, but the information is permanently or mechanical damage. If it is not mechanical failure, and it is only because the FAT system is damaged, there is good news: you can use a variety of information itself!
Some sort of recovery software is available from various manufacturers. Evaluate each type of recovery software based on your requirements and the exact cause of the missing files. If the exact recovery software, which typically costs about $ 50 to $ 100 in the recovery process is simple: install the software, select the drive is damaged and when the appointment as the source drive that can store program data recovery. Then he began to recover.
Let us consider, turn to experts for help. If your hard disk consists of mechanical damage, you can not attach it with your own. If your hard drive died due to mechanical failure, it is the best and only way to call in professional help.
But experts are expensive. It may cost $ 100, or 1000 for real estate professionals to help rebuild in the event of mechanical failure. Prices vary depending on the degree of failure and put the time in restoring the files, and you just do not get all of your files. If your budget includes experts can recover data from hard drives with mechanical failure sometimes. However, some computer users do not have enough budget to pay for it, so its inexpensive and easy way to help external hard drive and do regular backups.
How to get data on lost
Go to link Download
Saturday, January 28, 2017
Get my deleted digital photos image files back from Narrative Clip 2
Get my deleted digital photos image files back from Narrative Clip 2

Digital cameras can be part of our life. Now people used to use digital cameras to record precious moments and amazing scenic. Thats why new cameras announced at CES showcase will attract broad attention. In the forthcoming CES2015, we can expect the best cameras, such as Nikon D5500, Panasonic Lumix TZ70, Canon PowerShot N2 and Narrative Clip 2 camera, the most wearable camera in the world. However, it seems digital pictures are easier to lose than paper film pictures.With the delete button , an operation mishap may delete one or all of the stored pictures in Narrative Clip camera card instantly. If you dont have a backup, you may permanently loss photos unless you have a digital photo recovery program.
If you want to have a Narrative Clip 2 or other new digital cameras, you may want to now:
Is it possible to get deleted digital photos file from camera card?

In most cases, there are some easy ways to restore accidentally erased photos. A digital camera stores the photo files as separate files on a flash memory card (also known as "digital film"). Memory cards are familiar by us as SD, CF, xD Picture Card, SmartMedia, Memory Stick, the MMC Card and more. Each card type has different brands like SanDisk, Kingston and more. Though different digital cards have different sizes, capacities and appearances, , they are just the same when acting as storage to save pictures, which kinds of your old floppy disk or hard drive does. When you delete one or more pictures file from your camera, your camera locates the picture files on the memory card, then "deletes" them and marks the leftover space as usable. In most cases, cameras, like Narrative Clip 2 doesnt delete the picture file body but leaves them as is, which makes it possible for us to retrieve them after accidentally deletion. Images and other types of files can be recovered or undeleted if the data hasnt been completely overwritten. However, the file will not be 100% recovered and perhaps some data has previously been overwritten or that specific area of the card/drive has bad sectors and is corrupt.There could be a chance that a recovered photo images might be not view-able after recovering.
Prepare to get your personal photo recovery solution? Lets get on with it.
Digital Camera Photo Recovery Reviews
1. H-Data Digital Photo Recovery ($34.95)
This is a professional photo files recovering program which can rescue deleted pictures even file system is damaged or memory card cant be accessible. The program can repair damaged photo files, such as BMP, JPEG, GIF, TIFF, Mamiya (MOS, MEF), Paint Shop Pro Image File (PSP), Picture File (PCT) and other 250+ file types. Which can help you regain deleted photos from Narrative Clip 2 or other cameras, formatted USB drive, corrupted hard drive with easy.
Now its free donwload from Softonic
2. Stellar Phoenix JPEG Repair 2 ($39)
Stellar Phoenix JPEG repair
Stellar Phoenix JPEG Repair claims to be able to repair corrupt or damaged JPEG/JPG files, even if the files are completely unreadable. It also offers to repair and save embedded thumbnails. This program is perhaps the most heavily advertised around the internet and you’ll see more about this online than most other photo repair programs. you can easily donwload from website.
3. Picture Doctor 2 ($99)
Picture Doctor
Users of PhotoShop might be interested in Picture Doctor because it lists PSD files and layers as being repairable in addition to JPEG files. Recovered files are saved as BMP files after the repair. What’s disappointing about Picture Doctor’s demo is the watermark covers most of the image so it’s hard to see if the fix has worked or not.
Narrative Clip 2 digital camera review
The Narrative Clip 2 comes with 8 GB of storage, but can also automatically upload photos and videos when connected to Wi-Fi to free space quickly.The new Clip 2 features a new 8-megapixel camera system with a range of 86°, along with a built-in Wi-Fi, GPS, and Bluetooth radios that allow for a user to access recent moments on the Narrative app for iOS. The camera also contains a new automatic photo capture feature that works with the Narrative Service to automatically sort photos into collections of moments for easy organization and access.
Go to link Download
Tuesday, January 10, 2017
How to get Mtn free afunYafun 10GB Data Via MTN StartPack For Just N1 000
How to get Mtn free afunYafun 10GB Data Via MTN StartPack For Just N1 000

enjoy the 500% bonus on any recharge of their choice, e.g. you
recharge N100, you get N600; N200 gives you N1,200; N500 gives you
N3,000; N1,000 gives you N6,000. Full details about it was already
published on this blog few months ago, just click here to view it.
When running test on MTN StartPack, we noticed that after loading
?100, you can use up to 1GB, and your money will still be intact and
the amazing part, it does not fall into the categories of MTN data
plans that zapping the internet data anyhow.
On this so called MTN StartPack, there are cloak-and-dagger in which
many of you guys haven't dig it up and it is an important thing for
you to know in order to enjoy huge gigabyte internet data with a token
amount of money. This is not cheat or tweak in which you will be
fearing of blocking it, rather it is the simple application of common
sense.
With the instruction below which is very simple, you can either get
10GB or 11.5GB worth of data (based on your choice) for just N1000,
but I think you will love that 11.5GB. MTN StartPack is not something
new to us, but many of us are unconcerned about how much "Yafun Yafun
Bonus" you can actually get from it. Let's go straight to the main
business.
To Get Yafun Yafun 10GB or More For Just N1,000
Get a New MTN Sim that is fully registered
No need to migrate to any package, just leave it in the package it came with
Load N100 airtime to it and you'll be given N500 for calling and browsing
Don't use it for calling, Just use it for browsing
Note that you don't need to load the N1,000 at a time. You will use
1GB on each of the N100 Airtime you recharged. N100 x 10 = N1,000 and
1GB x 10 = 10GB! To check your data balance, dial *556# or *559#
The accumulated N1,000 balance will still be there untouched. Use it
to subscribe to an MTN data plan of 1.5GB for 1k (dial *123# to
subscribe) making a total of 11.5GB for just 1k all together. When you
exhausted your 11.5GB, follow the initial steps to get another one.
Simple as that! That is how you'll be doing it for the next 6months.
After 6 months, your StartPack 500% Yafun Yafun Bonus will expire, you
will have to get another new sim and repeat the steps above.
Your 11.5GB works for all devices ranging from Android, iPhone/iPad,
Laptops, Modems, Blackberry, BB10, Windows phone, Symbian/Java phones;
you just name it. If you wish to enjoy this Yafun Yafun Bonus,
consider getting yourself a new MTN sim, register and activate it and
you are automatically on the MTN StartPack tariff plan. Let's hope MTN
still keeps this tariff plan for us
Written by shelaf.com
Go to link Download
Subscribe to:
Posts (Atom)