Friday, March 31, 2017
How to Fix Are there margins set automatically
How to Fix Are there margins set automatically
Are there margins set automatically?
when I try to type numerical figures on the right hand side of the form they wont print,
Keys to the Problem Are there margins set automatically?
Download SmartPCFixer for Free Now
Run CHKDSK
- Go to the Start button.
- In the Search box, type "cmd" (without quotes) and press Enter.
- At the command prompt, type "chkdsk /r /f" (without quotes) and press Enter.
- Reboot your computer.
"Access denied as you do not have significant privileges. You have to invoke this utility in elevated mode."
If you receive the above error message, it means you are not logged into you computer as an Administrator. If thats the case, follow these steps to run the command prompt in elevated mode:
- Go to theStart button.
- Go to "All Programs > Accessories" and right click on "Command Prompt".
- Select "Run as Administrator".
- In the Search box, type "cmd" (without quotes) and press Enter.
- At the command prompt, type "chkdsk /r /f" (without quotes) and press Enter.
- Reboot your computer.
Another Safe way to Repair the Problem: Are there margins set automatically?:


How to Fix Are there margins set automatically? with SmartPCFixer?
1. Download SmartPCFixer. Install it on your computer.

2. After the scan is done, you can see the errors and problems need to be repaired. Click Fix All.

3. The Fixing part is finished, the speed of your computer will be much higher than before and the errors have been fixed.

Related: AMD Radeon HD 7800M Win8 not working [Anwsered],I can access the internet, get on facebook and get to hotmail, but I cant play games on facebook and I cant open or respond to my e-mails,I keep getting this Media Player error when I log on my computer. [Anwsered],[Anwsered] System Hanging on shutdown and restart,Unable to get the Vlookup property of the WorksheetFunction class,Solution to Error: Error: "0x81000032 make sure the C: drive is online and set to NTFS" when trying to backup to external hard drive.
,Troubleshoot:External Hard Drive not listed in Windows 7 backup wizard Error
,Im always being signed off so annoying Tech Support
,Solution to Problem: Impossible to use Internet Explorer! I keep getting the same error message every time i try to use IE.
,Solution to Problem: Referencing data in another file
,Troubleshoot:Error: "0x81000032 make sure the C: drive is online and set to NTFS" when trying to backup to external hard drive. Error,External Hard Drive not listed in Windows 7 backup wizard Tech Support,Tech Support: Im always being signed off so annoying,Solution to Problem: Impossible to use Internet Explorer! I keep getting the same error message every time i try to use IE.,Referencing data in Access using Excel [Anwsered],Need Best Way To Present Data [Anwsered],Same question but for windows 7 home edition,sometimes fullscreen wont activate [Solved],Solution to Error: We bought a new computer with windows 7 and it is constantly freezing. How do we fix this?,Solution to Error: Windows 8 update crash (2013-07-22)
Read More: Fast Solution to Problem: Automatically Connects to any network,How to Resolve - Arrange google toolbar inline with IE8 address bar?,Fast Solution to Problem: Attachments from Word 2007 wont open in IE8,How to Fix Error - Are any of the IncrediMail upgrades beyond 6.01 compatible with Windows 7 Professional 32 bit??,Solution to Problem: Autosize text to fit a shape in Microsoft Word 2010,application not found error,any problems in a team where one has Windows XP and the other has Windows 7?,Application/Object-Defined Error,An Excel formula question where hours are totalled and cumulating,Anyone know the hardware email?
Go to link Download
Harga 6 Samsung Galaxy A Series Februari 2016
Harga 6 Samsung Galaxy A Series Februari 2016
Go to link Download
Funsi Root Android
Funsi Root Android
Apa fungi Root Pada Android ?
Ada yang bilang kalau punya gadget Android tapi belum di-root itu belum afdol. Sebenarnya apa sih maksud dari root itu sendiri?
Bagi kawani yang merupakan gadget freak alias kecanduan otak-atik perangkat mobile pastinya sudah sangat familiar dengan kata root ataupun kegiatan rooting Android.
Namun tak sedikit pula yang masih belum paham apa artinya rooting.
Nah kali ini Begawei akan berbicara mengenai fungsi root Android dan cara root Android yang akan menambah pengetahuan mengenai kegiatan memodifikasi gadget Android tersebut.

Root sendiri memang pada dasarnya adalah memodifikasi sebuah perangkat berbasis Android agar penggunanya lebih leluasa untuk mengakses semua file, command, serta system.
Pengguna gadget biasanya melakukan rooting agar bisa mengoptimalisasi sistem pada perangkat Android miliknya.
Proses rooting sendiri memungkinkan pengguna gadget Android untuk meng-explore semua sistem yang ada di dalam gadgetnya,
hampir serupa dengan open source pada perangkat berbasis Linux. Namun bukan berarti proses rooting selalu happy ending.
Banyak pengguna yang malah membuat gadgetnya menjadi error gara-gara salah langkah saat melakukan rooting.
So, agar lebih jelas mengenai proses rooting, ada baiknya kamu menyimak tips fungsi root Android dan cara root Android ini.

Fungsi Root Android
Meskipun memiliki resiko yang tak bisa dihindari, bukan berarti penggemar gadget meninggalkan kegiatan rooting. Jika dijalankan lewat langkah-langkah yang benar, maka fungsi root Android pun akan berjalan maksimal dan bisa membuat perangkat kamu menjadi lebih optimal.Fungsi utama root yang perlu di ketahui adalah, dengan adanya root maka pengguna Android dapat menambah, mengurangi, maupun memodifikasi file-file atau data yang terletak di dalam perangkat berbasis Android.
Untuk smartphone berbasis Android sendiri, beberapa dari file atau sistemnya memang bersifat locked, atau tidak bisa dibuka karena penggunanya tak memiliki ijin akses pada file-file tersebut.
Nah, fungsi root Android ini adalah untuk meng-unlock file tersebut sehingga bisa menjadi administrator untuk kemudian secara bebas bisa melakukan kustomisasi seperti untuk memaksimalkan kinerja Android, meng-overcloock prosesor bawaan, serta menghapus aplikasi bawaan Android yang tidak perlu. Selain itu, proses rooting juga dapat digunakan untuk meng-install ROM custom dari pihak ketiga dan juga dapat digunakan untuk mem-back up aplikasi serta sistem yang ada di Android. Fungsi root Android juga memungkinkan kawan Begawei untuk menjalankan aplikasi meskipun secara spesifikasi aplikasi tersebut tidak mendukung dijalankan di handset Android.
Namun, karena rooting ini merupakan tindakan ilegal maka akan dihadapkan pada beberapa resiko.
Salah satu resiko yang akan kamu hadapi saat melakukan fungsi root Android adalah hilangnya garansi dari vendor ponselmu.
Selain itu, jika fungsi dan cara root Android tidak dijalankan lewat langkah yang tepat dan aman bisa berakibat pada rusaknya software ponselmu. Lebih parah lagi, jika rooting dilakukan dengan cara yang salah maka gadget kamu bisa mati total akibat kesalahan sistem. Untuk itu, Begawei menghadirkan fungsi dan cara root Android lewat langkah mudah dan aman yang bisa kamu gunakan.

Cara Root Android
Setelah membaca sekilas tentang fungsi dan cara root Android di atas, sekarang kami akan memberikan langkah-langkah mudahnya, dan tentunya aman.Secara garis besar, cara root Android ada dua step. Langkah yang pertama bisa ditempuh menggunakan bantuan komputer PC.
Sedangkan cara yang kedua, bisa langsung melakukan proses rooting pada perangkat tanpa perlu menggunakan bantuan PC.
Namun perlu ingatkan bahwa proses rooting ini selalu beresiko. Jika kamu belum yakin untuk melakukannya, kamu bisa mencoba pada perangkat yang memiliki spesifiaksi tak terlalu tinggi. Dan yang paling penting, jangan sampai salah langkah ketika melakukan rooting karena dapat berakibat fatal pada perangkat Android kamu. Berikut adalah tips cara root Android:

- Cara Root Android dengan PC
Langkah pertama dari rooting menggunakan PC ini, kawan harus menggunakan aplikasi rooting for Android. Salah satu cara root hp Android dengan PC yang cukup populer adalah menggunakan aplikasi KingoRoot.
KingoRoot merupakan aplikasi root yang bisa diunduh secara gratis di laman-laman atau situs penyedia aplikasi Android.
Setelah men-download aplikasi KingoRoot, pastikan baterai pada smartphone dalam kondisi full charged atau penuh.
Hal ini untuk menghindari ponsel mati saat proses rooting sedang berjalan. Jika root berhenti di tengah jalan, bisa mengakibatkan kegagalan sistem dan mengakibatkan software dan sistem rusak. Selain itu, pastikan kawan Begawei menghubungkan smartphone dan PC dengan menggunakan kabel USB yang kompatibel.
Jika semua sudah siap, buka aplikasi KingoRoot lalu carilah menu tombol ‘Root’. Kawan cukup menekan tombol Root maka proses rooting akan berjalan secara otomatis.
Perlu kamu ketahui, proses root Android ini akan memakan waktu beberapa menit.
So, tunggu sampai prosesnya berjalan sempurna hingga selesai.
Selain tombol Root, palikasi KingoRoot juga memiliki fungsi ‘Unroot’ yang akan mengembalikan perangkat ke kondisi semula, seperti sebelum di-root. Fungsi dan cara root Android dengan PC ini sangat mudah bukan?

- Cara Root Tanpa PC
Cara root Android tanpa PC ini merupakan cara yang paling sering dilakukan karena saat ini para penggila gadget mulai meninggalkan proses rooting dengan menggunakan bantuan PC.
Selain lebih praktis, proses rooting tanpa PC ini juga bisa berjalan lebih cepat. Sama seperti root Android dengan menggunakan PC,
cara ini juga memerlukan aplikasi. Salah satu aplikasi rooting yang cukup populer adalah Framaroot dan juga Towelroot. Cara root hp Android tanpa PC dengan bantuan aplikasi-aplikasi tersebut sangatlah mudah. Kawan Begawei tinggal mengunduhnya, lalu menjalankannya di perangkat kamu.

Dengan di-root, sebuah perangkat Android memang menjadi lebih seru untuk dioperasikan. Walaupun sudah mengetahui fungsi root Android dan cara root hp Android,
Namun perlu diingat, bahwa proses rooting tetap memiliki resiko, meskipun sudah menempuh cara-cara terbaik dan teraman.
Jadi harus hati-hati saat mencoba me-root perangkat Android yang kamu miliki.
Jika masih ragu, bisa mencoba me-root dengan menggunakan bantuan PC karena jika gagal, kamu bisa memilih opsi Unroot untuk mengembalikan operasional smartphone kamu ke settingan awal.
Sekian dulu tips fungsi root Android dan cara root Android lewat langkah-langkah praktisnya.
Go to link Download
Thursday, March 30, 2017
Havij PRO Adv SQL Injection Tool 1 17 Full Version Free Download
Havij PRO Adv SQL Injection Tool 1 17 Full Version Free Download

Havij PRO (SQL Injection) is an automated SQL Injection tool that helps penetration testers to find and exploit SQL Injection vulnerabilities on a web page. It can take advantage of a vulnerable web application. By using this tool, you can perform back end database fingerprinting, retrieve DBMS login names and password hashes, dump tables and columns, fetch data from the database, execute SQL statements against the server, and even access the underlying file system and execute operating system shell commands.
Havij PRO Supported Databases:
- MsSQL Blind
- MySQL time based
- MySQL union based
- MySQL Blind
- MySQL error based
- MySQL time based
- Oracle union based
- Oracle error based
- PostgreSQL union based
- MsAccess union based
- MsAccess Blind
- Sybase (ASE)
- Sybase (ASE) Blind
- HTTPS support
- Multi-threading
- Proxy support
- MsSQL 2000/2005 with error
- MsSQL 2000/2005 no error union based
- Automatic database server detection
- Automatic type detection (string or integer)
- Automatic keyword detection (finding difference between the positive and negative response)
- Automatic scan of all parameters.
- Trying different injection syntaxes
- Options for replacing space by /**/,+,… against IDS or filters
- Avoids using strings (bypassing magic_quotes and similar filters)


How To Register Activate Or Crack Havij PRO SQL Injection Tool?
- Install Havij PRO (Setup) >> [Do Not Launch After Installation]
- Copy >> Loader.exe (In Installation Directory)
- By Default :- C:Program Files (x86)ITSecTeamHavij Pro
- Run (Loader.exe) >> [As Administrator]
- Click Register Button (That’s It)
- Enjoy! Havij PRO :)
Go to link Download
hp Pavilion dv2520ee XP Driver
hp Pavilion dv2520ee XP Driver
Microsoft Universal Audio Architecture (UAA) Bus Driver for High Definition Audio (sp33566)2006-09-20 , Version:1.00 B, 54.24M Download
Reboot after Installation, Then Install Audio Drivers:
Conexant High Definition Audio Driver
Version:3.38.0.50 A, 1.39M Download
Conexant High Definition Audio Driver (model with AMD processor )
Version:3.30.0.00 A, 1.41M Download
Chipset
Intel Chipset Installation Utility for ICH7 - Intel cpu
Version:7.2.2.1006 A, 1.07M Download
Intel Matrix Storage Manager -Intel cpu
Version:5.5.0.1035 A, 17.67M Download
Intel SATA AHCI Controller Driver - Intel cpu
Version:5.5.0.1035 A, 602.92k Download
Graphic:(choose 1)
Mobile Intel 945GM Express Chipset Family Video Driver
Version:6.14.10.4670 A, 8.12M Download
NVIDIA GeForce Go 6150 Graphics Driver
Version:8.4.8.7 A, 26.88M Download
NVIDIA GeForce Go 7200 Driver
Version:8.4.6.4 B, 27.13M Download
Input:
HP Quick Launch Buttons
Version:6.30 J, 20.39M Download
Touchpad:
Synaptics Touchpad Driver
Version:9.1.11 Q, 16.93M Download
Webcam:
HP 1.3 MegaPixel (MP) Webcam Software Drivers
Version:1.0 A, 4.91M Download
HP VGA Webcam Software Drivers
Version:1.0 A, 4.91M Download
HP Pavilion Webcam Driver
Version:1.00 A, 3.03M Download
Modem:
Conexant HDAUDIO Soft Data Fax Modem with SmartCP Driver
Version:7.56.00.00 A, 6.18M Download
Wireless:(choose 1)
Intel PRO/Wireless Drivers
Version:6.00 F, 5.85M Download
Broadcom Wireless LAN Driver
Version:6.10 A, 4.29M Download
Card Reader:
Ricoh 5-in-1 Card Reader Host Controller and Driver
Version:1.01.10 A, 2.25M Download
Application:
USB Video Device Application
Version:1.0.0.5 B, 1.8M Download
Bluetooth:
Software and Drivers for HP Integrated Module with Bluetooth Wireless
Version:4.00 I, 39.31M Download
LAN/Ethernet
Marvel LAN Ethernet Driver
Download
Go to link Download
Wednesday, March 29, 2017
How to create your own Email id associated with your Own domain
How to create your own Email id associated with your Own domain
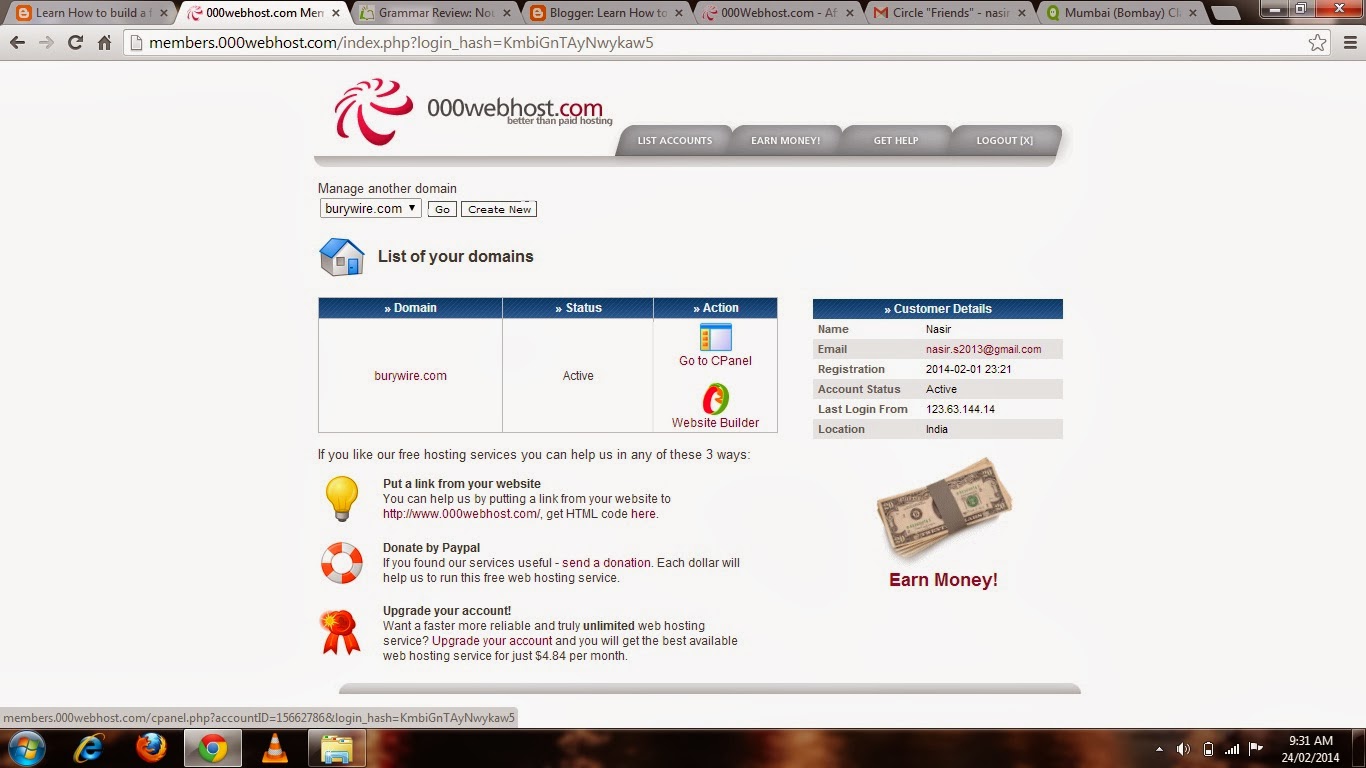
Welcome back,This is Nasir with Web learning topics again.Today we are going to learn how to create our own Email account associated with your own domain like nasir@burywire.com.
creating your Email account with your domain is very simple.So you need to first login to administrative members area of your hosting provider.In my case it will be 000webhost.com.After logging in there you go to the C panel of the domain you want to create Email account from.Look at the Picture 3-(a)below.
 |
| 3-(a) |
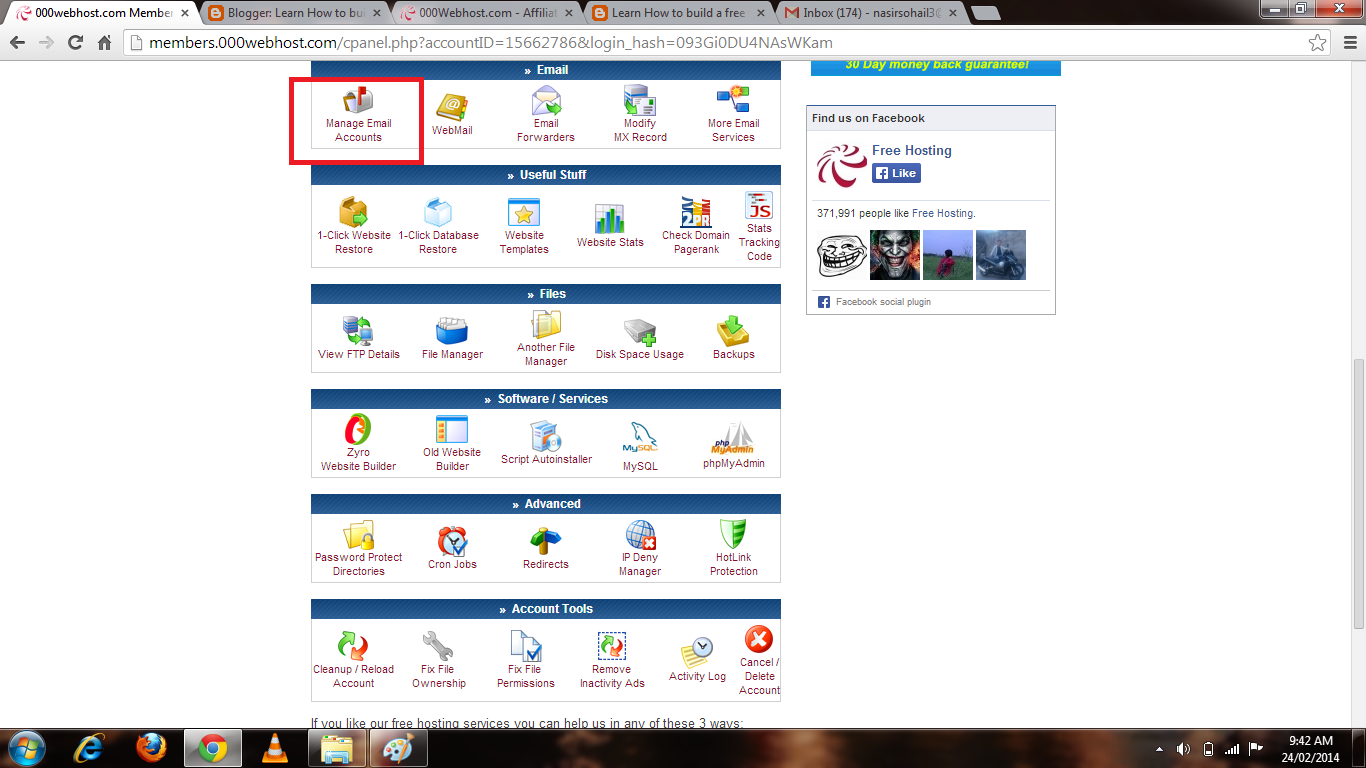
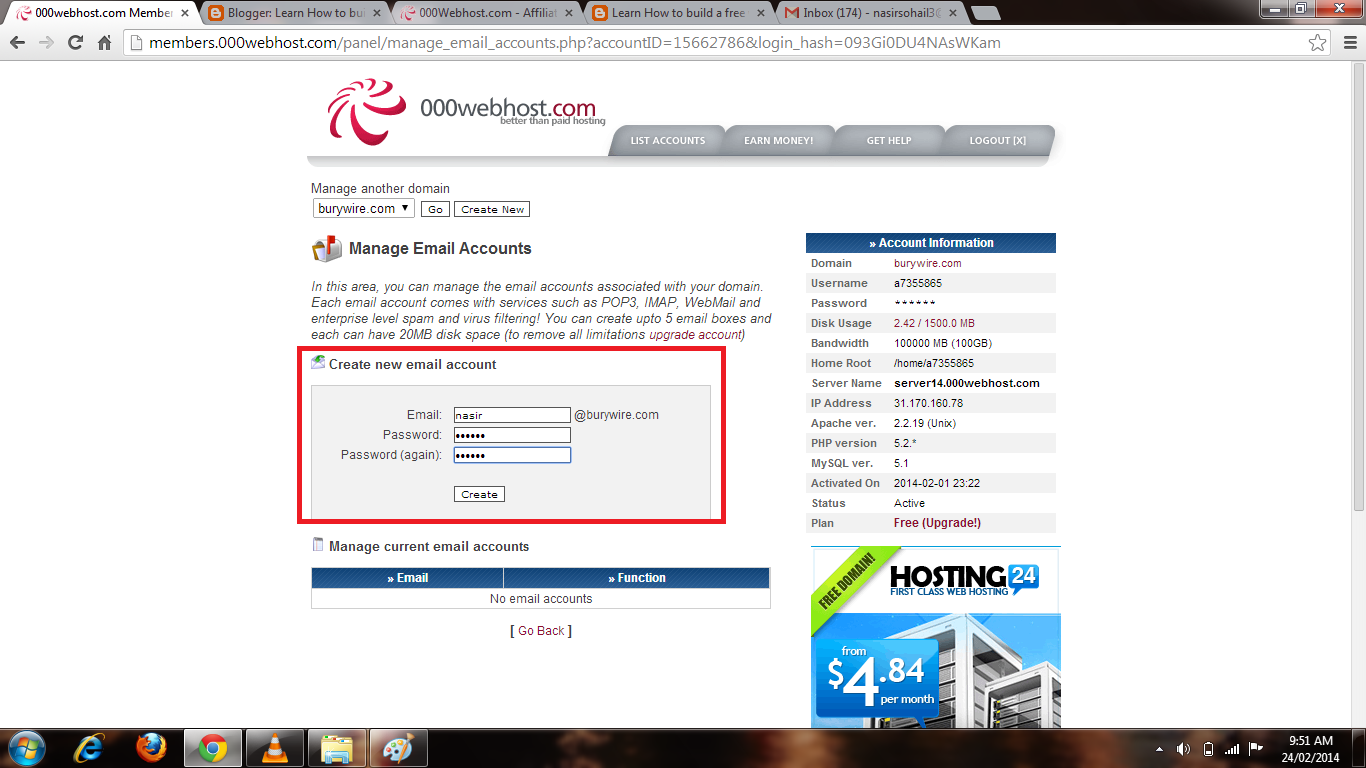
then click on the link Go to CPanel as shown in the above picture 3-(a).You will then be redirected to a handful of useful administrative stuff.Go to the Email section and click on the link Manage email as shown in picture 3-(b).
 |
| 3-(b) |
 |
| 3-(c) |
 |
| 3-(d) |
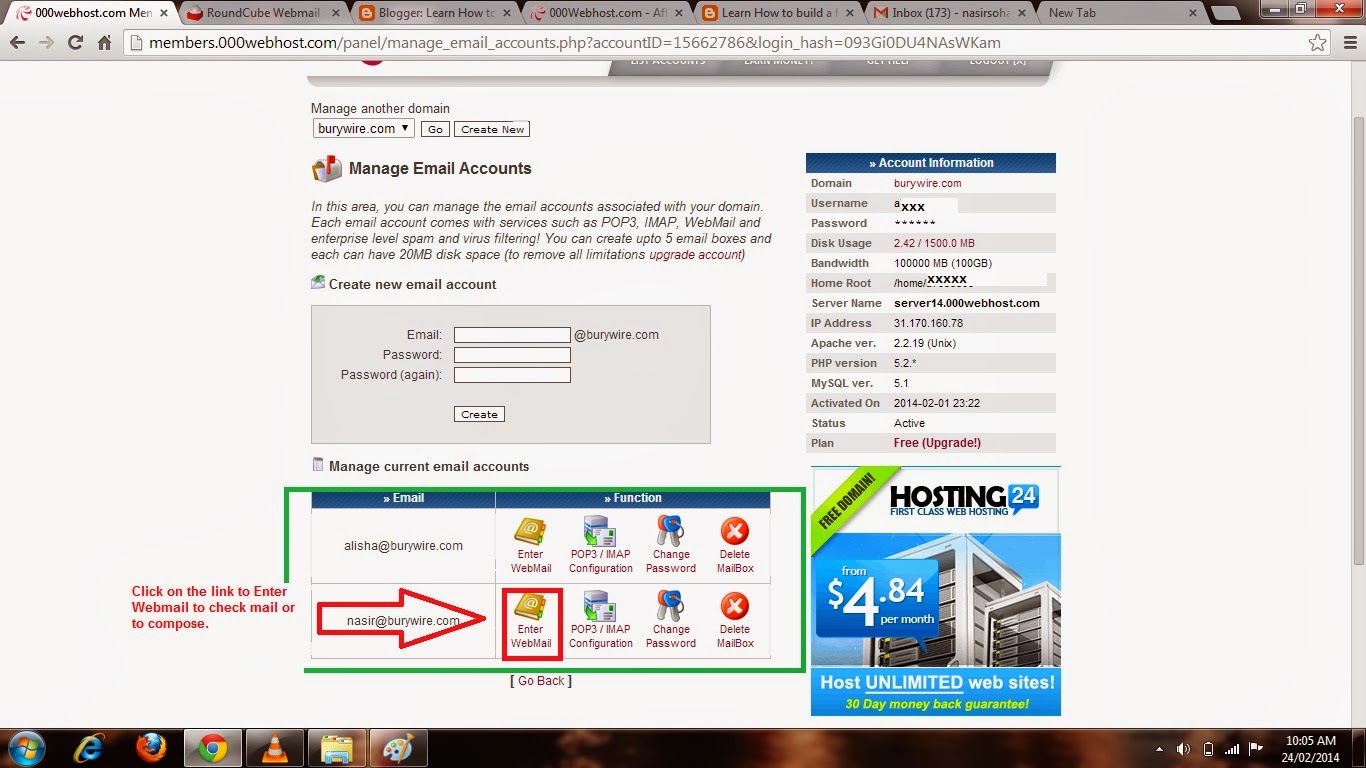
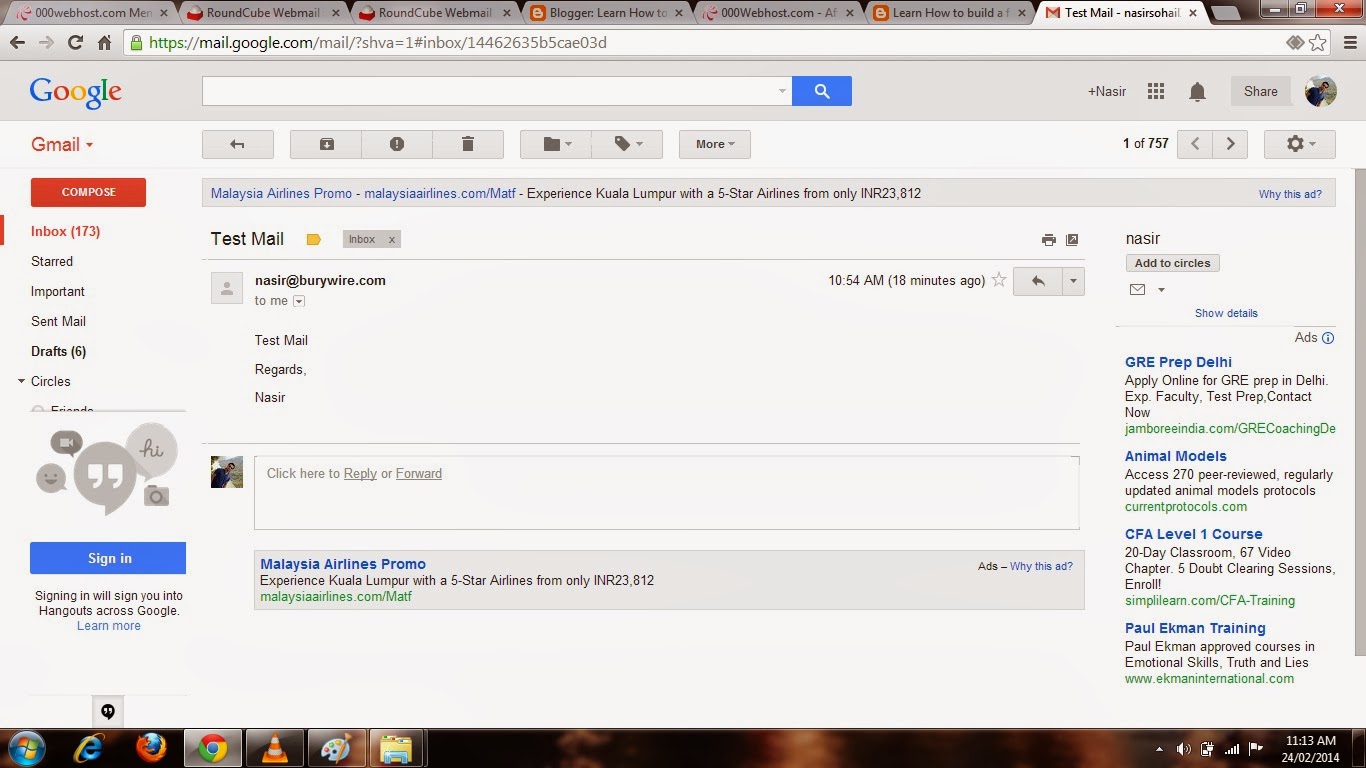
Now you have successfully created the email account and now is the time to Test it so click on the Enter web mail option as shown in the picture 3-(d).And then you will be redirected to the web mail client as shown in the picture 3-(e) where I have sent a test mail to my Gmail account and and it worked as shown in picture 3-(f).

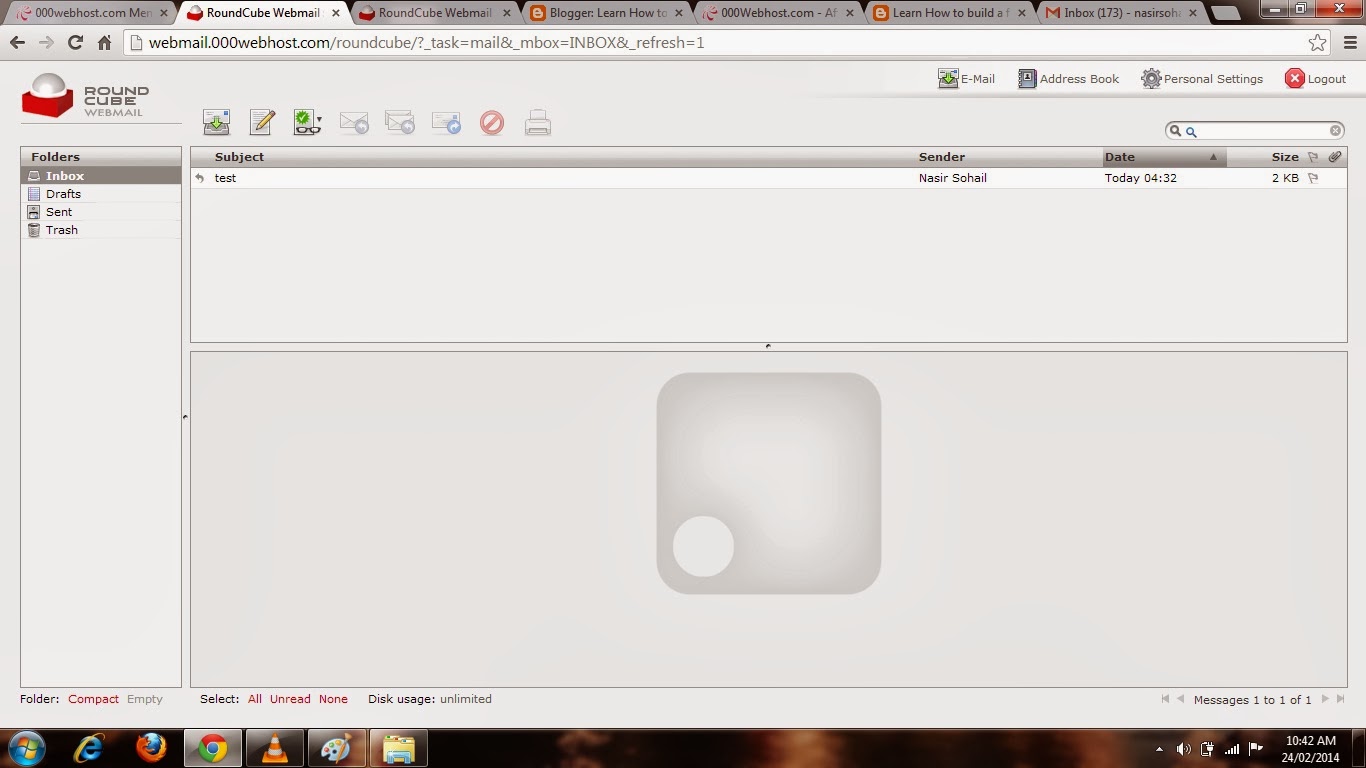 |
| 3-(e) |
 |
| 3-(f) |
 |
| 3-(g) |
Finally we have created the New Email account and Tested it.And its working Fine.In my next Post I am gonna talk over how to configure your business E-mail on outlook/ Outlook Express or on your Android Phone.So Stay connected keep visiting.
Enjoy Emailing... :-)
Nasir
Go to link Download
Tuesday, March 28, 2017
HOW TO ROLLBACK WINDOWS 10 AFTER THE OPTION HAS EXPIRED IN 30 DAYS
HOW TO ROLLBACK WINDOWS 10 AFTER THE OPTION HAS EXPIRED IN 30 DAYS

After a long wait, finally Microsoft is rolling out the windows 10 update, and it’s reported to be already running on millions of personal computers (PC) — perhaps, even yours. So far we have written tutorials on how to upgrade to windows 10 and how to downgrade windows 10 to windows 7, in case things go wrong and you encounter application compatibility issues with windows 10 or if you simply don’t like the new operating system from Microsoft. However, as we already stated in our earlier article, if you’re not really sure whether or not you like windows 10 yet, you’d better make your mind soon. With the default rollback option that comes with win 10 upgrade, you only have a month (30 days) to roll back to your previous operating system. What if it has been over 30 days and the realization strikes you that windows 10 is not for you and you’d like to rollback?
How to rollback from windows 10 to windows 7, 8 or 8.1 if windows’ rollback option is not available/working?
Whatever is your reason to downgrade from windows 10 to previous OS version, if you are experiencing issues using the default rollback option in windows 10 or not seeing the rollback option at all, then fret not! We have discovered a free tool, that will help you to uninstall windows 10 and roll back to windows 7 or 8.
Using ease us system go-back to downgrade windows 10
Whether you are having windows 10 rollback issues because you upgraded from a pirated windows 7 to windows 10 or looking for an option to be able to rollback from windows 10 after 30 days of upgrading, “system go-back” can help you achieve an easy and straightforward win 10 downgrade experience. Ease us system go-back has its own rollback features and using it you can easily restore the previous windows operating system, installed applications and games etc, without having to format and reinstall from scratch!
Step 1. Download, install and then open ease us system go-back.

Please buck-up your registry simply by export it in order to proceed
Download software here it is free!
ALSO PLEASE VISIT THIS VIDEOS AND SEE IF YOU FIND SOMETHING NEED:
Windows Registry Tools can be downloaded here:
How to kip your PC Private by deleting DATA Permanently
http://askpctech.blogspot.com/2016/03/kip-your-pc-privat.html
This tutorial is made up on request several users, is well is fallowing video:
1)How to Delete Paint Recent Pictures from List in Windows 7
https://youtu.be/9fBn1SfeMps
2)Win 7– Fix for “Safely Remove Hardware and Eject Media” not working How To
https://www.youtube.com/watch?v=xNYEE0TYS-U
3)Windows 10 How to Fix Black Screen After Booting
https://www.youtube.com/watch?v=yXClRD1CsNQ
4)How To Remove Windows 10 Upgrade Notification On Windows 7 And Windows 8
https://www.youtube.com/watch?v=11QqCzam_nI
5)How to Delete Face book Page Permanently - 2015
https://www.youtube.com/watch?v=_6AVoeCJZjU
6)How to Uninstall Windows 10 and Downgrade to Windows 7 or 8.1
https://www.youtube.com/watch?v=gJcuup_E_Uw
7)detected: not-a-virus:remoteadmin.win32
https://www.youtube.com/watch?v=V3vukcM4UVc
8)How to change pictures into icons for folders
https://www.youtube.com/watch?v=qb8i8Yowqjk
9)Speed up your PC Disable System Restore on SSD
https://www.youtube.com/watch?v=HW7zh4d7iOo
10)Speed up your PC Disable Scheduled De-fragmentation SSD
https://www.youtube.com/watch?v=drqlPnmsfXU
11)2015 Black screen of DEATH Windows 7 & 8 - with cursor at start-up SOLVED
https://www.youtube.com/watch?v=AtyAOTdfKD0
12)Upon start up only wallpaper shows FIX
http://youtu.be/HQa-QdFjKVI
13)Here is video on Windows 7 & 8 - Black screen with cursor at start-up FIX
http://youtu.be/AtyAOTdfKD0
You can also open Task Manager by pressing Ctrl+Shift+Esc.
14) I bought a windows 7 PC but it Look alike old PC FIX:
http://youtu.be/hDxpcgBo39c
15) Windows 7 & 8 - Black screen with cursor at start-up FIX:
http://youtu.be/AtyAOTdfKD0
16) How To Fix Minecraft OpenGL Error Windows 7 xp vista 720p :
http://youtu.be/JZ9u-0XJcSA
17) removing bars using regscanner regedit & file shredder 720p:
http://youtu.be/geDYSGIxTnc
18) How to Recover windows Explorer from error 2014 720p
http://youtu.be/24Q36kz7INM
19) HOW TO Save on battery online
http://youtu.be/GpGNgI-YK7E
20) Windows 7 & 8 - Black screen with cursor at start-up FIX
http://youtu.be/AtyAOTdfKD0
Upon start up only wallpaper shows no icons
CTL+ALT+DEL then click file and new task. then type explorer.exe and press ok
Best Greenhouse system 2015 http://youtu.be/mIt5Xh0Kn9k
Go to link Download
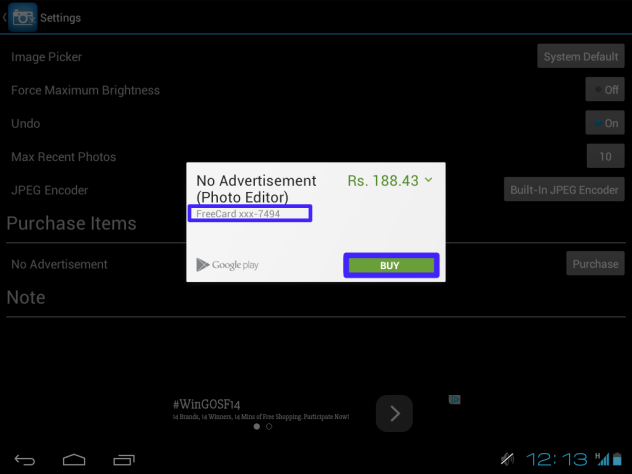
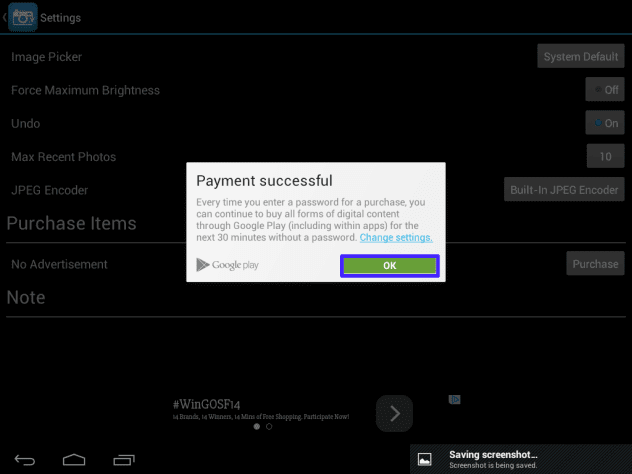
Good News Android Users Hack on Android Freedom v1 0 8d Apk Unlimited In App Purchases
Good News Android Users Hack on Android Freedom v1 0 8d Apk Unlimited In App Purchases
Apply These Secret Techniques in Using Freedom V1.0.8d Apk Unlimited In-app Purchases Hack On Android
- purchase all Coins,
- Gems,
- Levels and Lives for free!!
- It contains an inbuilt free card, which can be used on Google Play!
- You will have bug fixes
- We also have some added support for more apps/games
- For MARSHMALLOW Users, you will experience stability fixes!
- First uninstall previous Freedom apk from your device if you have any before
- Then proceed to download Latest Freedom apk file given below down this page
- Then extract the app
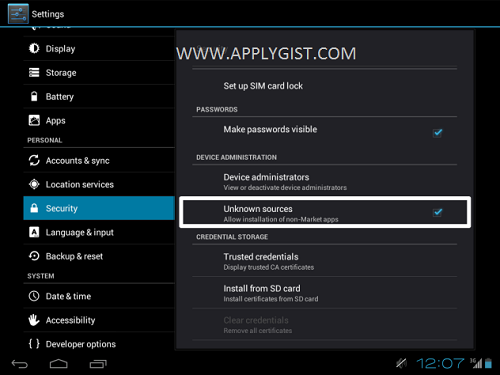
- Also Make sure that you have “Unknown sources” enabled in your security settings
- Install downloaded APK and launch it
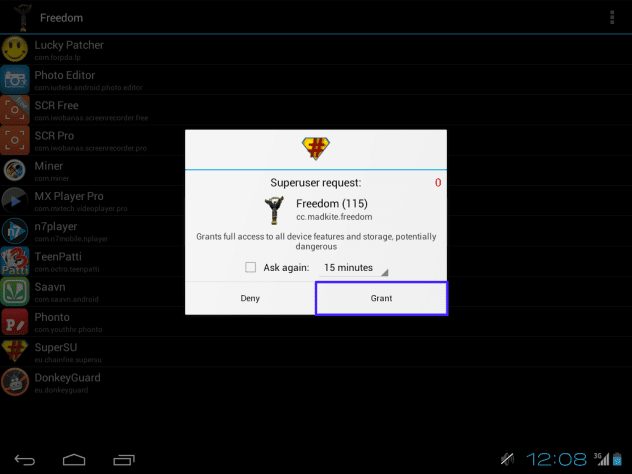
- Allow superuser permissions request(root access)
- Tap on application in which you want to use free in-app purchase, wait a little. Application should start automatically
- ensure your in-app purchase
- Finally follow the screen Shot bellow or use the comment Box to talk to us

Go to link Download
Monday, March 27, 2017
ICQ v10 0 Build 12094 Portable
ICQ v10 0 Build 12094 Portable


Go to link Download
How to Remove TermBlazer Ads Malware Uninstall Guide
How to Remove TermBlazer Ads Malware Uninstall Guide
Chances are you know exactly what TermBlazer or Term Blazer adware is and what it can do but unless youve actually had to deal with an advertising supported software infestation on your computer you might not realize what a nightmare this adware can be. Its true that adware is not as malicious as some other malware types but that doesnt mean you should grin and bear it if you do wind up with the nastier type of adware on your PC. Some online advertising is nothing more than literal adverts – links or traditional ads that are aiming to get you to click on them and visit their website and spend your hard earned cash. But there are others that display endless ads by TermBlazer and pop-up or pop-under windows that dont seem to disappear, no matter how many times you try and close them.
What is TermBlazer?
In its most innocent format, it is merely online marketing, however even that can have a rather creepy side. And thats because it customizes the adverts that you see displayed on your computer monitor to match your interests. How does it do this? By installing a component on your computer, usually web browser extension, that monitors which websites you visit and the goods or services that you view. The component records this data and sends it back to the person or company who created the adware – so that they can then decide which ads by TermBlazer you are shown. Clearly this rather aggressive form of marketing has been designed to increase the chances of you visiting a site and spending money, therefore generating revenue for the programmer and the website. As a knock on effect, this also increases traffic to the site which helps it rank higher in the search engines.

How does TermBlazer infect my computer?
Most adware programs come packaged with other programs, TermBlazer is no exception. These can be anything from a shared TV series download, to wallpapers, games or even reputable software upgrades. It doesnt even matter whether or not you pay for them; adware programmers (and advocates) show no mercy and will attach it to virtually anything downloadable, clickable or installable! So, when you download this software, file, program or download you will also be downloading the adware onto your computer too. And of course, youll also be downloading the tracking device that records which websites you visit.
The side effects of TermBlazer
Make no bones about it; a true adware problem can be a nightmare to deal with. Not only is it annoying to be bombarded with pop-up windows and spooky to think that someone knows which websites you are visiting but the tracking component can cause your computer to run much more slowly than usual. It might also slow your Internet connection down and youll find web pages are constantly crashing.
Protect yourself from adware. Install a good anti-malware and start being a little more discerning when it comes to downloading software! If its already too late in your computer is infected, then please follow the steps in the removal guide below to remove TermBlazer and related malware from the system. If you have any questions, please leave a comment down below. Good luck and be safe online!
Written by Michael Kaur, http://deletemalware.blogspot.com
TermBlazer Ads Removal Guide:
1. First of all, download anti-malware software and run a full system scan. It will detect and remove this infection from your computer. You may then follow the manual removal instructions below to remove the leftover traces of this malware. Hopefully you wont have to do that.

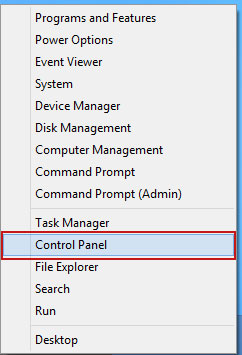
2. Remove TermBlazer related programs from your computer using the Add/Remove Programs control panel (Windows XP) or Uninstall a program control panel (Windows 7 and Windows 8).
Go to the Start Menu. Select Control Panel ? Add/Remove Programs.
If you are using Windows Vista or Windows 7, select Control Panel ? Uninstall a Program.

If you are using Windows 8, simply drag your mouse pointer to the right edge of the screen, select Search from the list and search for "control panel".
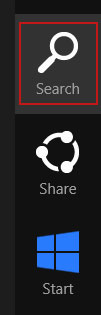
Or you can right-click on a bottom left hot corner (formerly known as the Start button) and select Control panel from there.
3. When the Add/Remove Programs or the Uninstall a Program screen is displayed, scroll through the list of currently installed programs and remove the following:
- TermBlazer
- GoSave
- Active Discount
- SaveNewaAppz
- and any other recently installed application
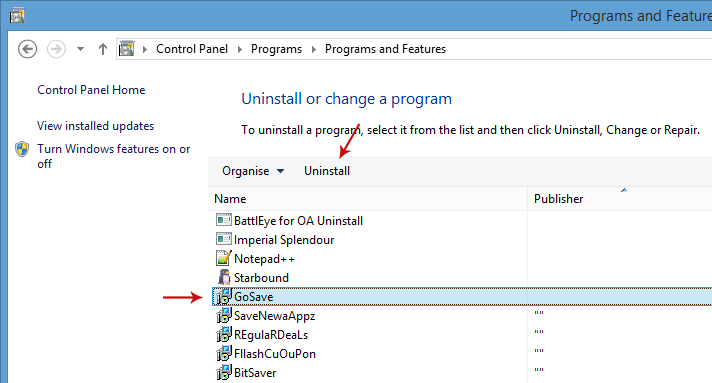
Simply select each application and click Remove. If you are using Windows Vista, Windows 7 or Windows 8, click Uninstall up near the top of that window. When youre done, please close the Control Panel screen.
Remove TermBlazer related extensions from Google Chrome:
1. Click on Chrome menu button. Go to Tools ? Extensions.
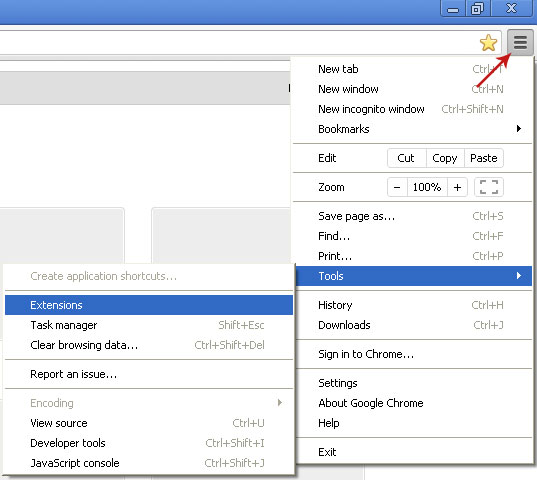
2. Click on the trashcan icon to remove TermBlazer, Active Discount, MediaPlayerV1, Gosave, HD-Plus 3.5 and other extensions that you do not recognize.
If the removal option is grayed out then read how to remove extensions installed by enterprise policy.

Remove TermBlazer related extensions from Mozilla Firefox:
1. Open Mozilla Firefox. Go to Tools ? Add-ons.

2. Select Extensions. Click Remove button to remove TermBlazer, Active Discount, Gosave, MediaPlayerV1, HD-Plus 3.5 and other extensions that you do not recognize.
Remove TermBlazer related add-ons from Internet Explorer:
1. Open Internet Explorer. Go to Tools ? Manage Add-ons. If you have the latest version, simply click on the Settings button.

2. Select Toolbars and Extensions. Click Remove/Disable button to remove the browser add-ons listed above.
Go to link Download
Hướng dẫn Unlock bootloader và cà i TWRP cho Mipad 2
Hướng dẫn Unlock bootloader và cà i TWRP cho Mipad 2

L?u ý: vi?c Unlock bootloader s? làm m?t toàn b? d? li?u trong Mipad 2 tr? v? 1 cái máy m?i hoàn toàn vì v?y các b?n c?n backup d? li?u ra máy tính tr??c khi ti?n hành.
1. Unlock bootloader
B?t Enable OEM Unlock trong Developer Options

??a máy v? fastboot
M? cmd tr? t?i th? m?c adb gõ
fastboot oem unlock

Máy b?n s? h?i có mu?n unlock k?
b?n dùng phím âm l??ng chuy?n lên Yes và ?n Power

Ng?i ch? và b?n ?ã Unlock bootloader thành công
2. Cài recovery TWRP
Link download twrp: http://www.mediafire.com/download/w7bopulo0bwocux/miuies_TWRP_MiPad_2.8.4_signed.zip
B1: Root mipad 2 theo các c? ?ã làm
B2: Cài Root Explorer vào và ??i tên file recovery-from-boot.p trong th? m?c system thành recovery-from-boot.p.bak
B3: ??a máy vào tr?ng thái fastboot r?i m? cmd lên gõ
fastboot flash recovery TWRPMIPAD2.img
V?y là b?n ?ã thành công trong vi?c cài TWRP cho Mipad 2.
Bug: ch?a nh?n b? nh? khi ? recovery. Cho nên các b?n c?n luôn luôn gi? rom trong b? nh? vì máy k có th? nh? ?âu. Wipe xong rom k có cái gì flash là ch? có flash fastboot l?i t? ??u thôi.
Ngu?n: http://en.miui.com/thread-203226-1-1.html
Go to link Download
Guest Post Healthcare application development – The things you should know how to build apps
Guest Post Healthcare application development – The things you should know how to build apps
Healthcare application development – The things you should know how to build apps

- UI/UX Considerations
- Handling security issues
- Testing healthcare apps
Go to link Download
How to recover deleted files pictures from Xiaomi SD Card
How to recover deleted files pictures from Xiaomi SD Card
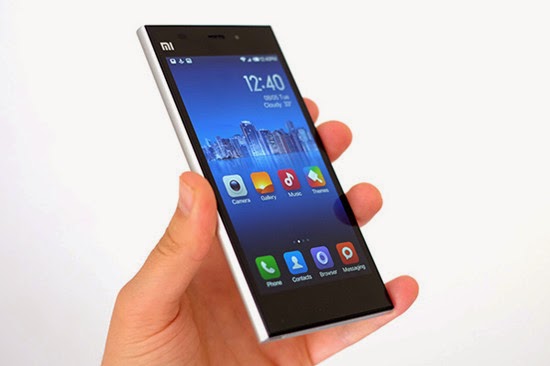
Xiaomi phone is currently the most hot smartphone in China, and it is also becoming more and more popular with its entry of overseas market. As a Xiaomi user, you may accidently delete files from your Xiaomi. However, don’t worry, you can still get them back with a professional Xiaomi file and picture Recovery.
"How to recover deleted files from Xiaomi? Hi guys, I accidentally deleted my contacts on my SD Card folder of Mi2S. Unfortunately i didn’t make a back up on Google server. Any help i can expect? Thanks in advance.You can also suggest me if you know a simple method of recovering any files in Android after accidental deletion!"
Here, you can turn to H-Data Recovery Master for Android which can fast and best recover deleted files such as videos, photos, audio, contacts, messages,Whatsapp chat history and documents from Xiaomi (MI-One/Mi2/Mi3, Redmi and Redmi Note).
Step-by-step guide below works for Windows 10/8.1/8/7/Vista/XP.
Get all your lost photo files from xiaomi

Step1: Stop updating your phone when your files lost formatted
If you kept on shooting videos or transfer movies/big data files to your phone, the deleted files might be overwritten by new data and beyond repair. So, avoid writing data to the memory until the deleted photo recovery is done.
Step2: Connet Xiaomi Android phone to Computer
For HTC one M9 and M8, take out the memory card from the phone, since the card type is micro SD, to connect the card with computer, a SD card adapter or USB card reader is needed.
For older models which doesnt support SD card, on the phone, set the connection mode to USB Mass Storage mode, to do that, go to Settings -> Connect to PC -> Default Connection Type -> Disk Drive
Step3: Run H-Data HTC Data recovery and Select the "USB disk/Card recovery" (Windows 8.1/8/7/Vista/XP...)

Step4: Scan deleted files or lost data on Xiaomi Android Smartphone
Press "Next" to start scanning for recoverable photos, videos, and music files.
Step5: Preview and recover files from Xiaomi
After the program finish scanning all files, you can preview the files you wanted. Then mark the files you need. Click the “Recover” button to recover deleted data on htc phone.

View more posts:
Simple Steps to Recover Deleted Lost Formatted Data on HTC One M9
Recover lost/formatted photos pictures from HTC Nexus 9 32GB Tablet
Recover lost deleted formatted pictures from HTC Droid Incredible
Not difficult to recover deleted data from Android cell phone
6 Steps to Prevent Data Overwritten and to Recovery Deleted Android File
Go to link Download