Showing posts with label with. Show all posts
Showing posts with label with. Show all posts
Thursday, May 25, 2017
How Can You Improve Your SEO Performance with Webmaster Tools
How Can You Improve Your SEO Performance with Webmaster Tools

The greatest advantage of Webmaster Tools is that it allows you to view one or more sites from the Google angle.
It is necessary if you want a strong SEO impact. With the toolset, you can view your site in a way Google does. It gives you insights into the indexed pages of your site, the various links that are pointing to it, the most popular keywords etc.
Hence, a site that is active in Webmaster Tools has much better chances of being fully indexed and rank well as compared to the ones that are inactive in the toolset. You can also get other deeper insights from the tool set, which can be leveraged to get the best Search Engine Optimization benefits.
If you are not yet active in Google Webmaster Tools, let me tell you that it’s pretty simple. All you need to do is sign up for an account, login to the dashboard of Google Webmaster Tools and from there, add your website. You will then be asked to prove that the domain is yours. On the basis of your host, Google may offer to do the needful through an uncomplicated pop-up process that allows you to login and verify in a few steps.
The other options include getting a Google-provided meta tag to your homepage, followed by an HTML file upload to the root folder of your site, or confirming your ownership with the help of Google Analytics, if that is already installed in your website. It generally starts populating data within 24 to 48 hours.
Google Webmaster Tools Features:
The best SEO Company India says that once you are done with the site set up, its time to log in and make yourself familiar with the interface. The toolset, at its core, is all about metrics i.e. what’s getting indexed, linked and traffic.The data you get should then be broken down in different ways to use it to formulate a plan regarding the steps you need to take to get your SEO campaign going.
The various Webmaster Tools metrics are:
Search queries:
It shows four metrics:
Impressions: It indicates the number of times a website is visited through a particular keyword. It, thus, helps you renew your web content with keywords of greater value.
Clicks: This shows the number of people who have taken action and clicked on your site in the search result.
CTR: This shows the number of users who have clicked on your website from the search results. If you find your number to be dissatisfactory, you can change your meta description to attract more traffic.
Middle position: This tells your exact rank for each keyword that you use. It helps you determine your performance and the impact you have on your traffic.
The best SEO company will always suggest you to use Google Webmaster Tools when developing an SEO strategy, as it offers you better opportunities and the perfect medium to determine the performance of your site.
Impressions: It indicates the number of times a website is visited through a particular keyword. It, thus, helps you renew your web content with keywords of greater value.
Clicks: This shows the number of people who have taken action and clicked on your site in the search result.
CTR: This shows the number of users who have clicked on your website from the search results. If you find your number to be dissatisfactory, you can change your meta description to attract more traffic.
Middle position: This tells your exact rank for each keyword that you use. It helps you determine your performance and the impact you have on your traffic.
Keywords:
In order to understand how your keywords are performing, you need to click on the terms while being on the search query section. Studying the data for individual keywords informs you about the pages that are ranking for those keywords. This way, you not only understand your overall SEO achievements but also get to know about the different elements of your content campaign.Top Pages:
Within “Search Queries”, you get the opportunity to view “top pages”. This indicates content that gets the maximum number of impressions and clicks. It, thus, offers low hanging fruit opportunities you can easily capitalize on.Page Level Strategy:
A site is structured in a way, so that each keyword points to a section of the website. Webmaster Tools enables you to identify ideal keywords for each of the sections. Once you get your keywords mapped, use them to rank tracking tool to find out extra data like competition and traffic.Author statistics:
It allows you to tie in guest posts on other websites by linking to your Google + account. It can be easily accomplished by the “rel=author’ tag that is embedded as a link in particular write-ups. Your picture appears next to your content; and readers find it easier to read your other write-ups.The best SEO company will always suggest you to use Google Webmaster Tools when developing an SEO strategy, as it offers you better opportunities and the perfect medium to determine the performance of your site.
Author Bio:
Sarmista Aun writes for a professional digital marketing company. She tries to guide all new online advertisers through her writings. Go to link Download

Saturday, May 20, 2017
Good Work with Embedupload !
Good Work with Embedupload !


Safer, Faster and... Good for Downloader use my File !
Register here:
http://www.embedupload.com/
Go to link Download
Tuesday, May 16, 2017
How to Import Video to Instagram With InstaChooser
How to Import Video to Instagram With InstaChooser
How to Import Video to Instagram With InstaChooser - Have you tried the video feature on Instagram? if it is, perhaps you also also have found a weakness, namely the lack of an option to take video of the gallery. That is, every video that you upload on Instagram will be taken directly using the iPhone camera. can you post videos on instagram.

Therefore not be too disappointed considering the jailbreak community has been trying hard to close the shortfall video Instagram. And now comes a jailbreak tweak called InstaChooser.
This jailbreak tweak allows you to import video from the Camera Roll on the iPhone that is to be uploaded to Instagram. With InstaChooser, you also can also combine your video collection and a touch of Instagram filters.
Given InstaChooser a new jailbreak, do not be surprised if it does not find many features as you might think. However InstaChooser has paved the way for those who want to upload a collection of old videos to Instagram. InstaChooser you can download via Cydia BigBoss repo for $ 0.99.
Therefore not be too disappointed considering the jailbreak community has been trying hard to close the shortfall video Instagram. And now comes a jailbreak tweak called InstaChooser.
This jailbreak tweak allows you to import video from the Camera Roll on the iPhone that is to be uploaded to Instagram. With InstaChooser, you also can also combine your video collection and a touch of Instagram filters.
Given InstaChooser a new jailbreak, do not be surprised if it does not find many features as you might think. However InstaChooser has paved the way for those who want to upload a collection of old videos to Instagram. InstaChooser you can download via Cydia BigBoss repo for $ 0.99.
Go to link Download
Wednesday, May 10, 2017
How To Improve Your Online Privacy With These Easy Steps
How To Improve Your Online Privacy With These Easy Steps
The good news is that its really easy to beef up your online security. These quick and simple steps will considerably strengthen your systems against criminals and snoops.
Getting secure online is more common sense than cost. A few straight thinking minutes can have your systems operating far more securely. VPNs are worth more than their weight in gold.
ExpressVPN will get you browsing safely within minutes. A quick install and a few clicks is all you need to increase your online security and protect your privacy. And with a 256 key encryption, it is near impossible to hack.
1. Get a quality VPN service
The quickest and easiest way to improve your online privacy is to get a quality VPN provider. The best services, like ExpressVPN, will secure your internet connection from prying eyes. A VPN will make your internet connection completely private and will keep no record of your internet activity.2. Use a password manager
It goes without saying that a strong password will protect you more. You should also always use a different password for each account you have online. The best way to do this is with a password manager. It will encrypt and store all of your credentials for every site, so that you dont have to remember them all. Logins will fill out automatically, which means youll spend less time frantically trying to remember your pets birthday. Pick a strong master password and let the program do the rest.3. Keep your system up to date
Setting your OS to update automatically requires minimal effort, and will considerably strengthen your defence against cyber attacks. Its important that you always have the latest security updates on your machine. They are released for a reason - to fight the increasingly sophisticated criminals who are constantly searching for ways to attack you and harvest your data.4. Dont forget Your Mobile Connections
Connecting from a mobile device is increasingly the way most people get online. Theres no point securing your desktop if you leave your iPad connection open. Thats why its important to choose a VPN service which will work across all devices and operating systems.5. Dont trust Free and Public Wifi.
In many cases, its free because they are harvesting your data. And thats just the provider. Criminals and snoops can also use the same connection to gain access to your files.Getting secure online is more common sense than cost. A few straight thinking minutes can have your systems operating far more securely. VPNs are worth more than their weight in gold.
VPNs Weigh Nothing
Literally. Theres no bulky equipment, Its just software. Its also lightweight software that wont hog any resources. In fact, it can often speed up your system. ISPs increasingly throttle traffic to certain websites. They do this without telling you, or even admitting it. They may use phrases such as "Traffic Shaping", but don’t be fooled. Its throttling. A VPN hides the sites you are looking at, so its impossible to have your connection "trafficked".Honorary Mentions: What about Tor?
There are other methods of securing your data online. Perhaps by using the Tor network. And while it is not as tricky (or dangerous!) as some make out, it just isnt as simple as a good VPN service.ExpressVPN will get you browsing safely within minutes. A quick install and a few clicks is all you need to increase your online security and protect your privacy. And with a 256 key encryption, it is near impossible to hack.
Go to link Download
Sunday, May 7, 2017

Sunday, April 30, 2017
FREE DOWNLOAD SMADAV 9 2 with CRACK
FREE DOWNLOAD SMADAV 9 2 with CRACK
SMADAV 9.2 with CRACK

Free Download Smadav 2013 Pro Rev. 9.2.1 FullVersion +Keygen - 2013 smadav pro rev. 9.2.1 + Keygen. Who does not know with artificial antivirus smadav Indonesian people are verygood at rooting out local viruses and even i know i was also able toeradicate the virus internationally.
In the latest version smadav already suport windows 8 and there isthe addition of a new virus database 229 with the virus also looksomewhat different.
Direct Download

Smadav 9.2
Smadav Crack +Keygen
Go to link Download
Saturday, April 29, 2017
How to Delete all Unwanted Gmail messages with Just a Single Click
How to Delete all Unwanted Gmail messages with Just a Single Click
This is How to Delete Thousands of Unwanted Messages from any Anybody disturbing your peace on Gmail

I observe That most newbies Using Gmail, Yahoo-mail, and others have thousands of email messages unread and unwanted. This often get me bewildered why liter your email box with messages from social media, Sport and News feeds. Basically your email Inbox should be void of unwanted emails. This is because you may not know which is Spam message and the real email.
Another Disadvantage for Leaving Thousands of thousands of unread and unwanted messages ion your mailinbox is that you are likely to miss the most important emails from which will appear on spam box. I am sure no one will love such occurrence
The bellow simple steps will help you resolve this issues by simply searching for the senders name, and all messages from such will appear, all you need to so is to select all and delete that is all.

After that select all Like Bellow Screen Shot
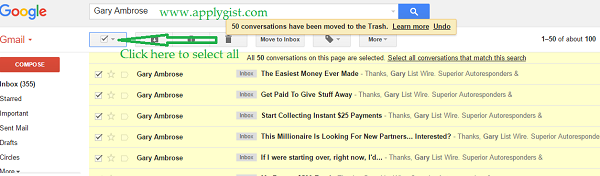
Now click the Delete Icon Tool As seen Bellow
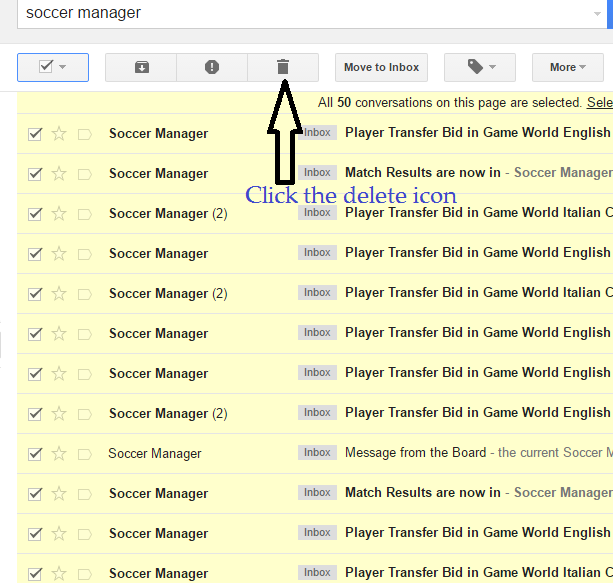
When the First Page gets deleted, click the select all Box and Click Delete till you Delete them all.
NOTE: You can reserve one of the Annoying mail. then click Report SPAM to prevent it from coming any further or unsubscribe from such sender totally
FINAL WORDS
DONT ALLOW TOO MUCH UNREAD MAILS IN YOUR INBOX USE THE ABOVE TO WIPE THEM OFF AND LEAVE YOUR MAIL BOX CLEAN AND TIDY
Go to link Download
Thursday, April 27, 2017
How to speed up internet connection only with Command Prompt
How to speed up internet connection only with Command Prompt
Read a new article that discusses about how to speed up internet connection but use the command in cmd / command prompt. usually the hell did I know it had to use the software again or set dns and so forth. who still have problems with internet speeds should try it this way. okay, just as How to speed up internet connection only with Command Prompt
following command on the run in cmd:
1. open cmd as administrator
2. after a change in his address to open the drive "C: ", I typed "cd C /" and then enter
3. Now type the following command netsh interface tcp set global autotuning = disabled
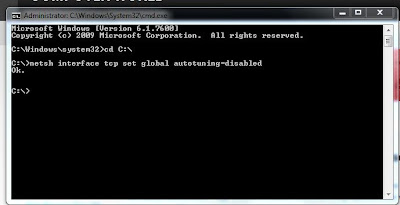
finished last press enter!!!!
now live internet connection check again here www.speedtest.net and see the difference.
note: check the internet speed here www.speedtest.net first before you try this. so I can see the difference.
following command on the run in cmd:
1. open cmd as administrator
2. after a change in his address to open the drive "C: ", I typed "cd C /" and then enter
3. Now type the following command netsh interface tcp set global autotuning = disabled
finished last press enter!!!!
now live internet connection check again here www.speedtest.net and see the difference.
note: 1. to reverse its original type the following command netsh interface tcp set global autotuning = normal
2. first you need to open cmd as administrator.
Go to link Download
Friday, April 7, 2017
Getting Started with Googles New Photos App
Getting Started with Googles New Photos App
Battle of the Photos- New Google Photos
Google and Apple have built homes in the cloud for your photos, making it easier to sync and find them on all your devices and to tweak the ones that need retouching.Once you’ve backed up your photo library to the service, all your photos and videos, including any new ones you take, are synced among all of these devices automatically.In April, Apple released Photos for iOS, Mac and the Web—a smart way to get us to pay for iCloud Drive storage. Then a couple of week ago, Google dropped big news: Its own Photos app for Android, iPhone and the Web would store all of your photos and videos free of charge.
There are many other free cloud photo storage options despite similar names and talents, picking one isn’t as easy as you think. Sure, you could choose based on what devices you own and how much you are willing to pay for cloud storage. But even if you own an iPhone and money is no object, Google Photos is a better choice for all but serious photographers. It combines the company’s unmatched search smarts with everything I’ve ever wanted in a photo service, while making it incredibly fun to relive old memories.Here is a comparison of few very famous cloud picture storage options.
 |
| Comparison between Google Photos, iCloud, Dropbox, Flickr and Amazon Cloud |
If you have thousands of photos, it could take many days to upload them all—regardless of the service you choose and even if you have a fast broadband connection to the Internet.
But like any free service, there’s a sacrifice in quality.Google compresses your images and downsizes any shots larger than 16 megapixels. I closely compared the original and compressed files, and though I could spot the differences when zoomed in, the compressed versions are still high quality enough for printing 8x10 photos or displaying on an HDTV. The services also compress video, and while files up to 1080p keep their original resolution, 4K or 5K video is downsized as well.So the maximum resolution of a picture you can keep as original without downsizing is 16 Megapixels which is the highest resolutions used by average smartphone owners.
Google does have an option to keep full-res images just as they came out of your DSLR camera but thats counted against your limited storage of 15 GB for free account.If you want unlimited storage with full resolution it’ll just cost you. At the lower end, pricing is comparable: Google Drive costs $2 a month for 100GB and Apple’s iCloud Drive is $4 for 200GB. But if you’ve been shooting digital for a decade, you may need more capacity and that’s where Google beats Apple: $10 a month will get you 1TB from Google, but only 500GB from Apple. Apple’s first 5GB are free.
You will need to choose the storage type for your account as shown in the picture and in order to do that click on the menu on the top left corner and select settings.
 |
| Getting Started with Googles New Photos App |
Here’s the really unbelievable stuff: Using visual analysis, Google assigns attributes to your many photos so you can then search by keyword. Punching in “food” returns an embarrassing amount of food photos I’ve taken over the years. “Vacation 2013” brings up shots from my trip to Bangkok that year. It really is as great—and wildly addictive—as having your own personal Google Image Search.
Explore the crazy-powerful new search feature of Google Photos-- starting with face recognition
 |
| Getting Started with Googles New Photos App |
See that blue circular icon with a magnifying glass in your main photos list? Tap it.
That icon takes you to Photos search screen, which holds some of the apps coolest and most powerful features.
At the top of the search screen, youll see the six most frequently photographed faces from your images.You can also see more faces by tapping the "More" link next to the word "People."
Tap any of those faces, and youll see all of the photos - or at least many of them -- in which that particular person appears. And heres whats crazy: Google says the app is able to track a persons face and continue to recognize it as they age over time. So in theory, at least, the current photos of my daughter as an infant will one day be grouped together with photos of her as a young child, a teenager, and an adult.
Google does it better. In fact, it’s jaw-droppingly good at recognizing faces. It identified my mom in a photo taken 30 years ago and another taken when she was only 10! Annoyingly, though, Google doesn’t yet let you assign names to faces. You just click on one face to see the other similar ones. The company says this has been a highly requested feature and, if added, it won’t tie face tagging to other Google accounts, a la Facebook.
Explore your photos by location
In addition to People, Google Photos also lets you search your photo by Places and Things. Places uses location data to group photos so you can see photos of a trip you made without needing to first creating an album. More impressive is the Things category which lets you search for photo of forests, food, stadiums, dancing and much more.
Scroll down below the faces in that same search screen, and youll find a list of locations in which your photos have been taken. Whats particularly remarkable about this is that it works even if you dont have location reporting activated.
How? Google says its technology is able to recognize known geographical landmarks from photos and then use logic (and the laws of physics) to infer your location in other nearby photos. If you took a snapshot of the Eiffel Tower on February 9th at 2 p.m., for instance, Google can safely assume you were still in Paris in that selfie you took in front of a bakery 45 minutes later. The accuracy and level of detail may surprise you.
Explore your photos by objects and themes in Google Photos
This may be the most impressive part of the new Photos app: Beneath the locations in the search screen, youll see a list of common themes found in your photos -- things like flowers, concerts, weddings, forests, nightclubs, and dancing. Tap any categorization, and youll find a selection of photos that matches that description.
 |
| Getting Started with Googles New Photos App |
Play around with Google Creations and Assistant
If you used Google+ Photos in the past, you might be wondering what happened to Auto Awesome -- the fun set of collages, animations, and videos Google automatically generated based on your images. Fear not: Theyre still here; they just have a new name.
Scroll all the way down on the Photos search screen, and youll see an option called Creations. There, youll find all the different ways Google has mashed your photos together into interesting new forms.
The Photos app will still make those mashups automatically, as the old app did in the past. But with the new app, you can also manually make any of those items anytime you want.
To do so, just select any set of photos from your collection (more on the act of selecting in a second). Tap the "+" icon that appears in the upper-right corner of the screen, then choose from any of the options that appear -- adding the images into a new album, movie, story, animation, or collage. Youll be able to view and share the resulting creation seconds later.
Your assistant shows you fun new things automatically created from your photos & helps you stay organized.
if you have taken photos quickly in a motion and uploaded them all to the Google Photos it will automatically create an animation as shown in the picture below.
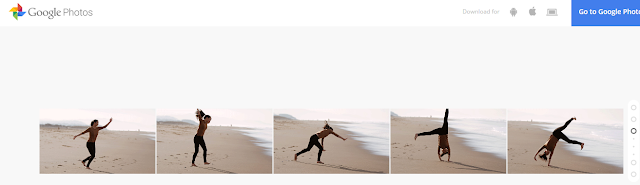 |
| Photos uploaded in sequence to Google Photos |
 |
| Animation created by Google Photos App |
Capture the full scene with Google Photos
Upload two or more photos to get a sweeping, perfectly stitched panorama.
 |
| Photos uploaded to Google Photos App |
When you upload these pictures it will automatically turn into a perfectly stitched panorama as shown below.
 |
| Panorama Created by Google Photos App |
Select photos the smarter way with Google Photos
Manually selecting a bunch of items on a phone can be a pain -- long-pressing one item, then tapping each additional item you want to be included one by one.The new Photos app has a better solution.
While viewing images in the Photos app, long-press on any photo to start the selection process. Then, without lifting your finger, drag upward or downward. Thatll allow you to quickly select a bunch of consecutive photos without having to do the typical tap-tap-tap dance.
When you want to select multiple pictures — say, for sharing or creating an album — you don’t have to tap on them one by one. You can just select the first one and then slide your finger to add others to the selection.
Navigation
Also, you can pinch and zoom to switch the view of your photo library from years to months to days.Google Photos has made this very convenient.
Free up space on your phone
One of Photos key features is the ability to automatically and continuously back up photos from your phone to the cloud for safe-keeping and universal access. Once a photo is backed up, then, theres really no reason to also keep storing it locally and thus take up precious space on your phone or tablet.
The new Photos app makes it easy as pie to free up space on your device by removing redundant local copies of images. Theres just one drawback: You have to choose to back up images at their full original resolution in order for the feature to be available. If you choose to use the free and unlimited "High quality" backup option, Photos wont offer to delete local versions of images -- since the local versions arent identical to those stored on Googles servers.
 |
| Getting Started with Googles New Photos App |
If youre uploading at full resolution, look in the Assistant section of the new Photos app. When the local storage on your device gets low, youll see a card there showing exactly how much space you can free up by deleting local copies. Youll also get a single-tap option to do the deed and remove all the local copies.
Quality
It’s true: The free tier of Google Photos uploads photos in “High Quality,” meaning that the images are compressed from their original resolution, provided said original resolution exceeds 16 megapixels. Rest assured that for most people, that’s just fine. iPhone photos and photos from small-ish point and shoots won’t suffer from a major loss of quality. Those shooting on DSLRs and higher quality cameras should note that the images won’t be stored in full resolution for free. However, you can choose to save the images in their original resolution to your Google Drive—it’ll just count against your Drive storage.
The big picture? Google Photos may not be the perfect photo backup, storage, and sharing solution for everyone, but because of its ease of use, robust feature set, and surprisingly helpful Assistant tool, it’s going to be a great pick and a new standby for many—particularly those of us who have a hard time remembering to back up. In many ways, Google Photos feels like everything we wanted iCloud to be. There are few things more precious on our phones than photos, and finally there’s a convenient place to keep them.
Sharing
Google Photos makes the work of sharing your photos relatively quick and painless as well. Google Docs users will find the process familiar: Simply click on the “Share” icon and choose to upload to Google+, Facebook, or Twitter, or opt for a shareable link.
 |
| Getting Started with Googles New Photos App |
And as someone who loathes the process of uploading and tagging and describing and titling photos on Facebook (it’s exhausting), it takes me exactly two seconds to name the album. Google knows the faces of my mom and my dad and my dog and best friends, but it doesn’t pressure me to tag them. If Google Photos finds a great picture of me and mom, I’ll decide to share it on my own—which is very easy. But I know that the rest of my photos are just for me and that I won’t get a notification in two years that a Facebook acquaintance has pawed through my old photos and “liked” a few out of the blue. (Also, never ever do that.)
On the Google Photos Web app, click the share button at the top when you have a group of photo selected and click Get sharable link. On the iOS app, select your photos, tap the share button and then tap Copy Link to Clipboard. You will then be able to paste the link into an email, and your recipient will not need any special app or login to view your photos.
 |
| Getting Started with Googles New Photos App Note:- To Download the Google Photos App go to https://photos.google.com/ and to read more about it go to https://www.google.com/photos/about/. |
******************************
Incoming Search Traffic
Getting Started with Googles New Photos App
Google Photos App
Google Photos
Battle of photo storage cloud
Photos Google
Photos Google
iCloud vs Google Photos
iCloud vs. Google Photos Vs. Flikr
Features and Jawdropping deal with Free Google Photos
Free unlimited storage with Google Photos
Go to link Download
Saturday, April 1, 2017
H Data Recovery Master with 95 recovery rate to rescue everthing lost
H Data Recovery Master with 95 recovery rate to rescue everthing lost

H-Data Recovery Master is an all-in-one Data rescue solution which supports detecting and recovering 250+ file types from documents, photos, audio, email to video. Neally everything you lost can be retrieved and repaired with 95% recovery rate. From the official website of this Windows Data recovery review, we know it runs stably on Windows 8.1/Windows 8/Windows 7/Windows Vista/Windows XP (64&32 bits).
For Windows Tablets/Laptop/Computer
The H-Data Recovery Master can dig from hard drive and external hard drive to get Data back when system crashes, accidentally power off, virus attack, partition disappears, etc. You can organize the files it finds by directory, by likelihood of recovery, by file size, or by the date they were last modified. No matter you have the latest Surface Pro 3, Lenovo Yoga 3, Pro Dell Venue 11 Pro, Lenovo ThinkPad 10, ASUS Transformer Book T200, etc or an old WinXP computer, you can handle data loss issue with 95% recovery rate.
For digital camera card, USB stick, phone card data loss
Can I get files off a corrupt SD card or from SD card that has stopped working? How to handle it when you just formatted your digital camera memory card by accident and now all of your pictures are gone? How to extract and transfer precious photos taken on holiday to other storage but your computer says "the file is inaccessible"?
Here you can get your easy solution with free download H-Data Recovery Master. The only thing you should do is to connect your camera card, USB media or phone card to a Windows computer and run the effective recovering process. The program features 6 recovery modes, you can carefully select USB disk/memory card recovery or universal rescue.
95% recovery rate wit Six Recovery Modes


Mode 1: Recover files deleted accidentally
This mode can helps you to recover the files/directories thats are "permanently" deleted from recycle bin, as well as recovering files from specific partition. Here, the most beautiful part is you can even keep the original file name and original file directory with easy.
Mode 2: Retrieve pictures, photos, movies from formatted Disk
Mode 3: Get back deleted/formatted data from USB disk/memory card
No matter your memory card is formatted or the files are deleted, you can restore files from U disk,, phone memory card, digital camera card.
Mode 4?Recover deleted files deleted from Windows Recycle Bin
Is it possible to get back files deleted from Recycle Bin? Yes, the H-Data Recovery Master can locate the path of the Windows Recycle Bin automatically. You can keep the original name after recovering(for win8.1/8/7/Vista). But for Windows XP, the file name may be changed after recovering.
Mode 5: Repair and Restore data when Partition formatted/lost
Recovery mode 6: Universal recovery - the last chance to deep dig lost file
The universal recovery mode can analyze and scan the partition deeply and recover files when file system crashes, which higher th recovery rate to get back all your lost files.
So with 6 recovery modes, all lost data could be simply restored with 95% recovery rate . No troubles or obstacles will be met by using this amazing Windows recovering program -H-Data Recovery Master. It also supports memory card data recovery, CF card data recovery, external hard drive data recovery, memory stick data recovery, USB flash drive data recovery, etc.
Go to link Download
Wednesday, March 29, 2017
How to create your own Email id associated with your Own domain
How to create your own Email id associated with your Own domain
Hi friends,
Welcome back,This is Nasir with Web learning topics again.Today we are going to learn how to create our own Email account associated with your own domain like nasir@burywire.com.
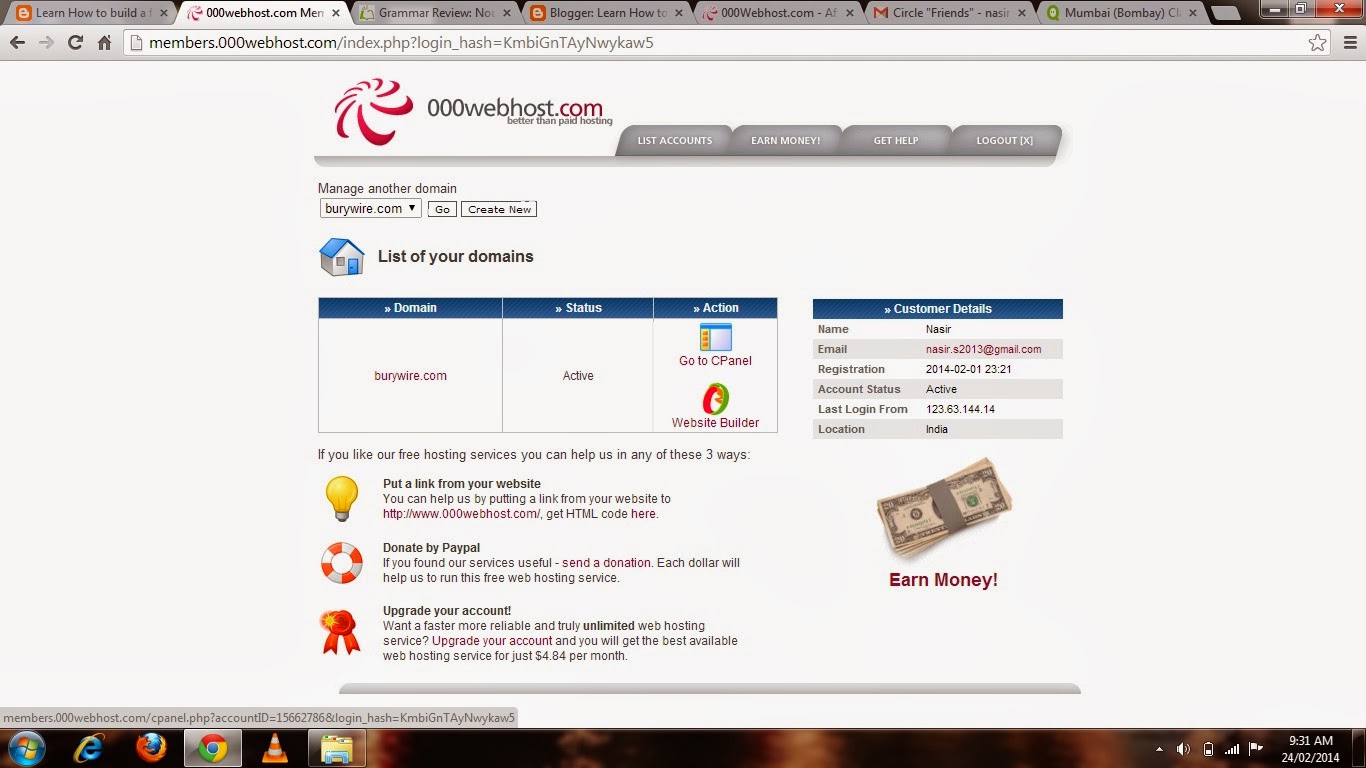
creating your Email account with your domain is very simple.So you need to first login to administrative members area of your hosting provider.In my case it will be 000webhost.com.After logging in there you go to the C panel of the domain you want to create Email account from.Look at the Picture 3-(a)below.
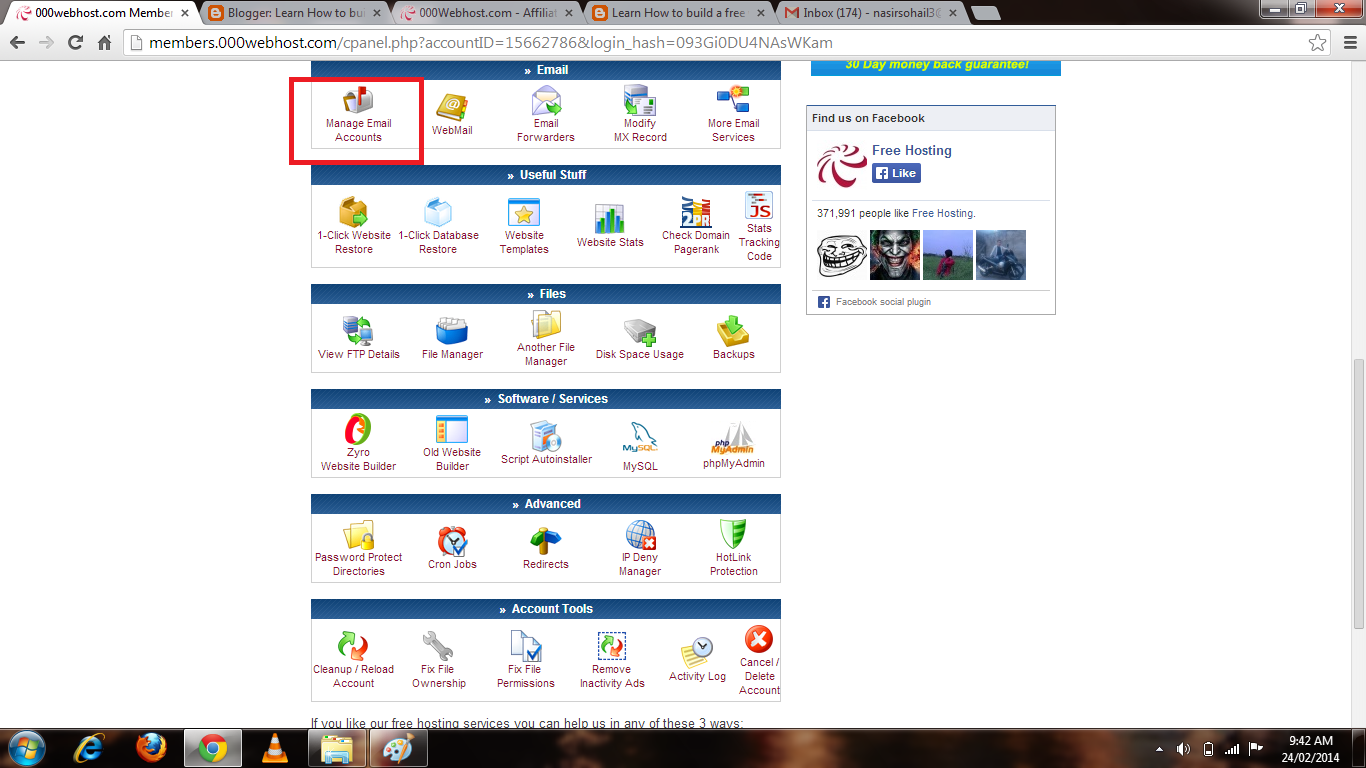
then click on the link Go to CPanel as shown in the above picture 3-(a).You will then be redirected to a handful of useful administrative stuff.Go to the Email section and click on the link Manage email as shown in picture 3-(b).
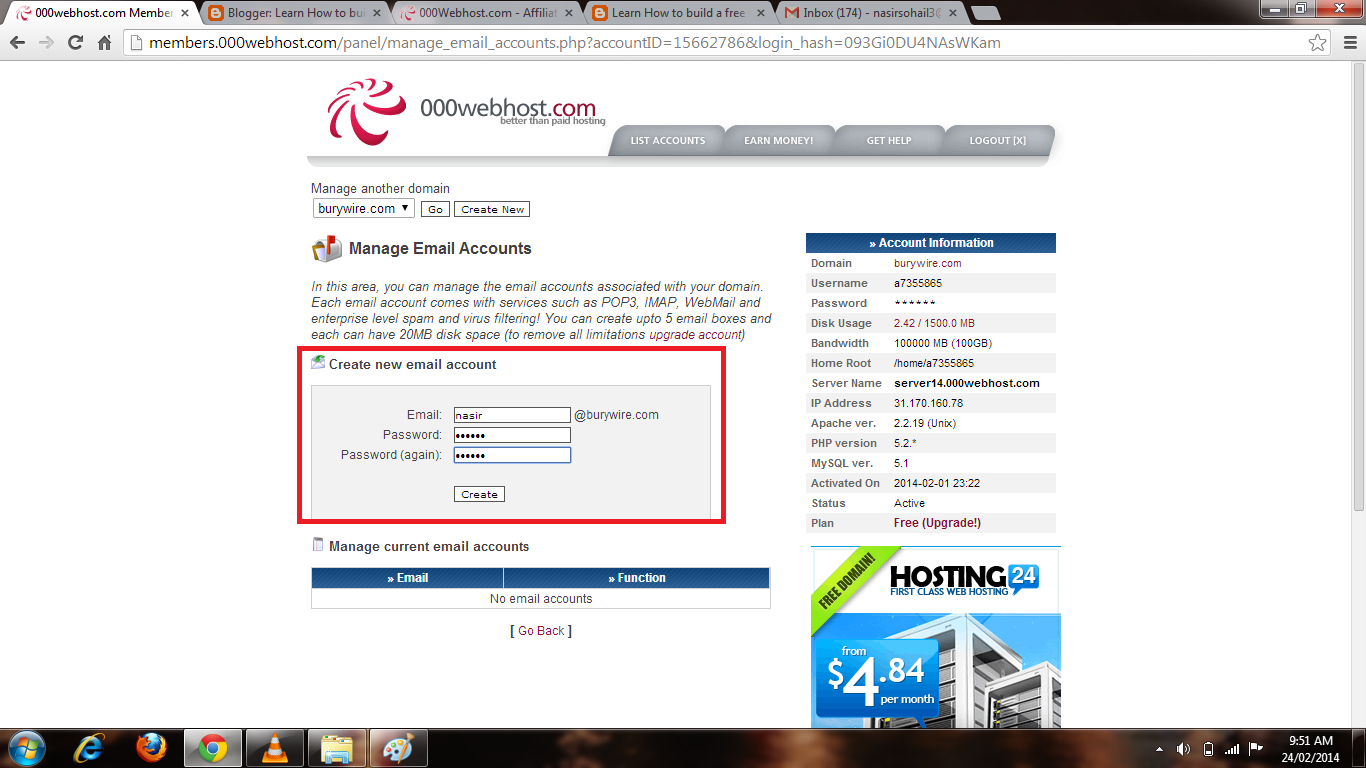
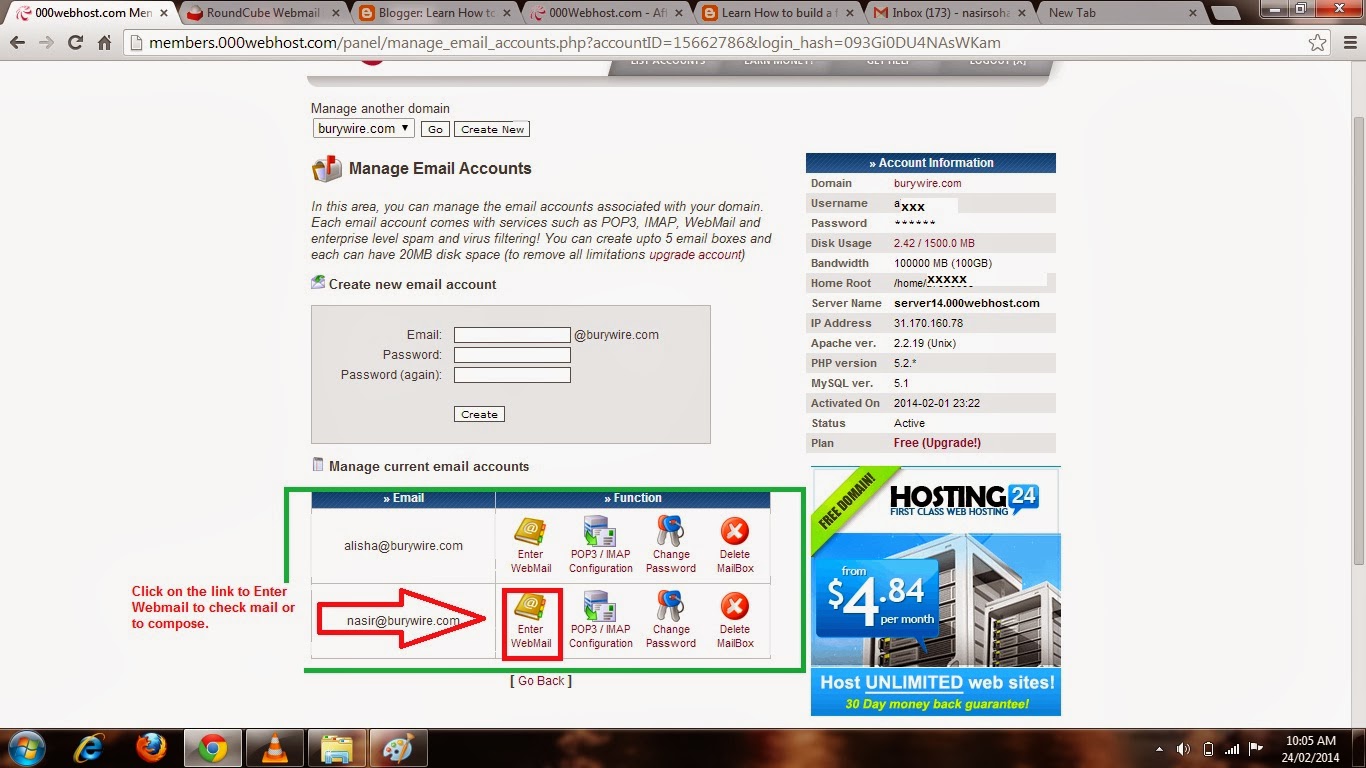
After clicking on manage email account it will ask you to type a new Email and then password and confirm the password.and then click create and it will create the email account as information provided.As shown in the below pictures 3-(c) and 3-(d) where I have just created two email account for myself and my beautiful wife.
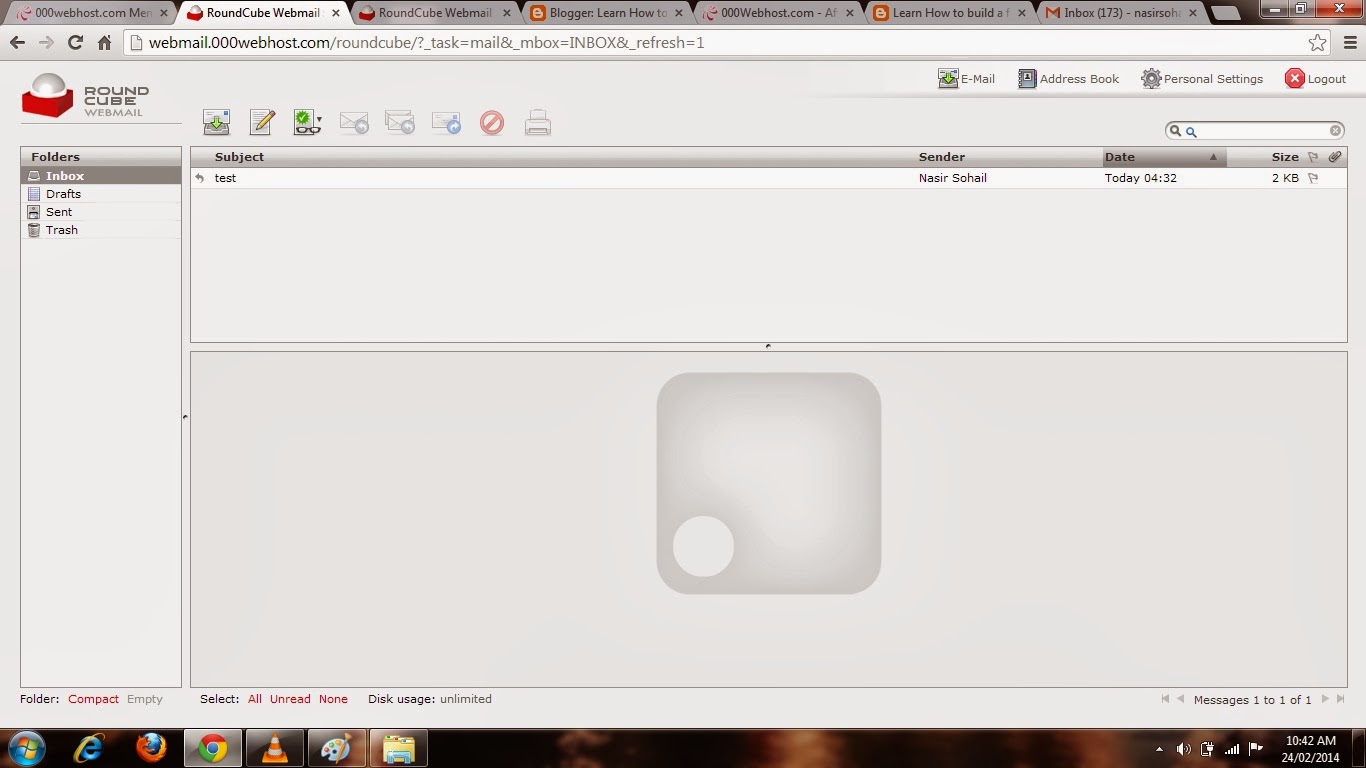
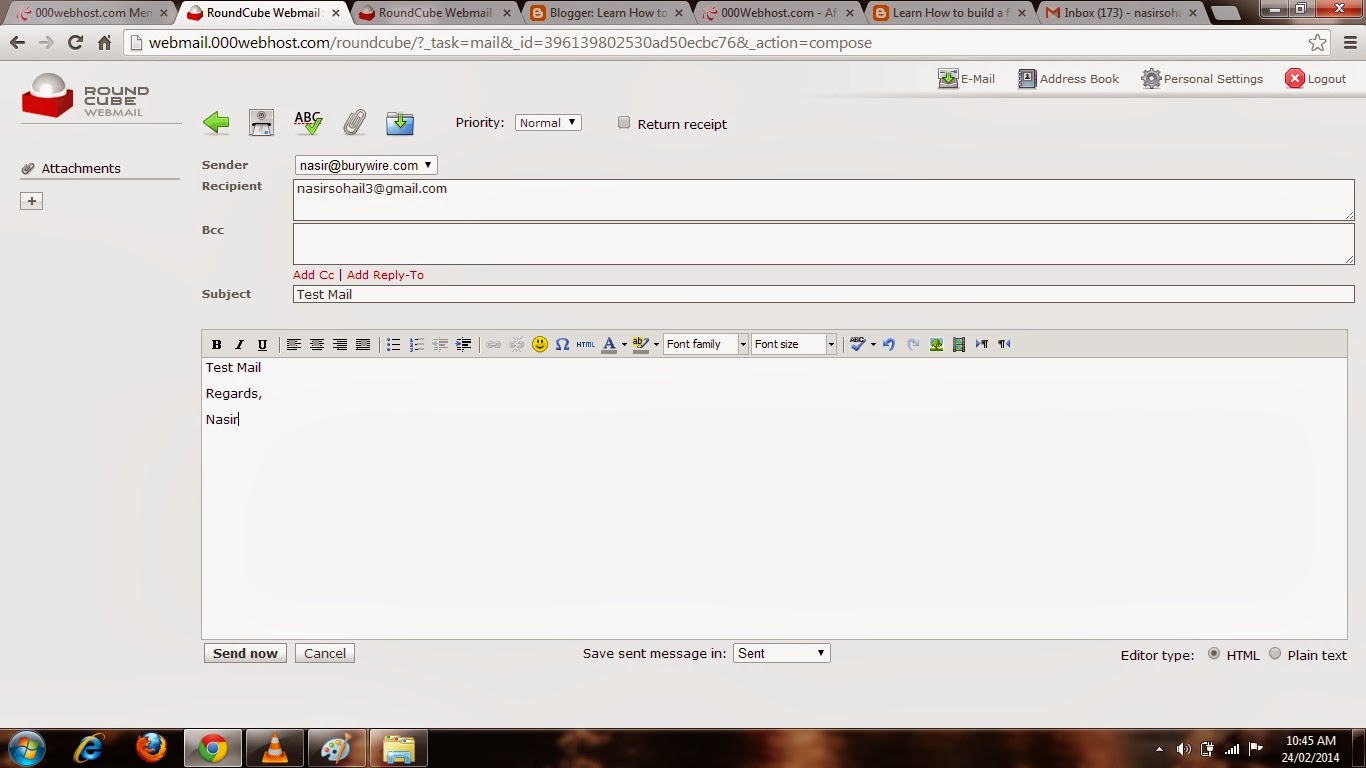
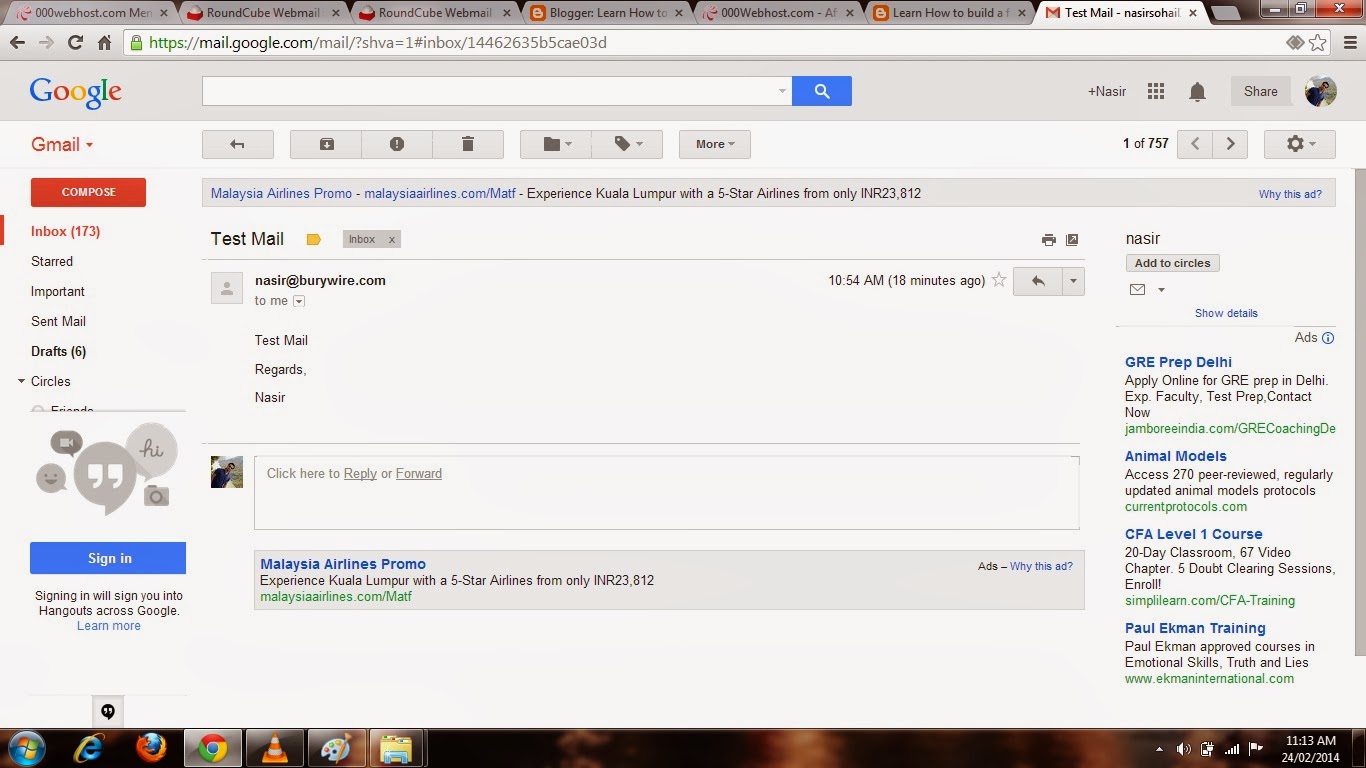
Now you have successfully created the email account and now is the time to Test it so click on the Enter web mail option as shown in the picture 3-(d).And then you will be redirected to the web mail client as shown in the picture 3-(e) where I have sent a test mail to my Gmail account and and it worked as shown in picture 3-(f).

Finally we have created the New Email account and Tested it.And its working Fine.In my next Post I am gonna talk over how to configure your business E-mail on outlook/ Outlook Express or on your Android Phone.So Stay connected keep visiting.
Enjoy Emailing... :-)
Nasir
Welcome back,This is Nasir with Web learning topics again.Today we are going to learn how to create our own Email account associated with your own domain like nasir@burywire.com.
creating your Email account with your domain is very simple.So you need to first login to administrative members area of your hosting provider.In my case it will be 000webhost.com.After logging in there you go to the C panel of the domain you want to create Email account from.Look at the Picture 3-(a)below.
 |
| 3-(a) |
then click on the link Go to CPanel as shown in the above picture 3-(a).You will then be redirected to a handful of useful administrative stuff.Go to the Email section and click on the link Manage email as shown in picture 3-(b).
 |
| 3-(b) |
 |
| 3-(c) |
 |
| 3-(d) |
Now you have successfully created the email account and now is the time to Test it so click on the Enter web mail option as shown in the picture 3-(d).And then you will be redirected to the web mail client as shown in the picture 3-(e) where I have sent a test mail to my Gmail account and and it worked as shown in picture 3-(f).
 |
| 3-(e) |
 |
| 3-(f) |
 |
| 3-(g) |
Finally we have created the New Email account and Tested it.And its working Fine.In my next Post I am gonna talk over how to configure your business E-mail on outlook/ Outlook Express or on your Android Phone.So Stay connected keep visiting.
Enjoy Emailing... :-)
Nasir
Go to link Download
Friday, March 17, 2017
How to Track BlackBerry 10 Lost With Blackberry Project
How to Track BlackBerry 10 Lost With Blackberry Project
Track Lost BlackBerry 10 Using BlackBerry Project - Currently, many people prefer to lose wallet than mobile phones. Why? Mobile phones that are now widely used to store various important data, such as data stored in e-mails or other documents, which may not be replaced by money.
Well, for the owners of devices based on BlackBerry 10 operating system, device loss might not be a scary thing anymore. All of this can happen due to the presence of features of BlackBerry Protect.

By using this feature, users have the ability to lock (lock), delete the data, giving a warning, to track the device remotely.
Users can also perform back-up data to the cloud so they can get back important information in case of device loss.
Interestingly, BlackBerry Protect is available as a standard feature on every BlackBerry device 10. That is, these features are directly available in the BlackBerry 10 devices.
Terms of Use
When users turn on the BlackBerry 10 products for the first time, they will be prompted to create or log-in to your BlackBerry ID account. Once completed, by using this account, users can directly activate the BlackBerry Protect features.
After activate it, the user can perform all functions through the BlackBerry Protect website protect.blackberry.com.
In these sites, users can see the location of the last of their 10 BlackBerry devices. By using the services of Bing Maps, the existence of a lost smartphone can be detected.
However, one feature that takes advantage of the GPS of the BlackBerry device 10 so that, when the device loses signal, it is possible that the system will be a little difficult to track the phone.
In addition, users can also create smartphone "shout" Play Sound using the feature.
Features that can also be run through the BlackBerry Protect website will make the device emits a fairly loud for a few seconds.
This is very useful when the smartphone is lost still be near the owner. If there is no hope, then the last step you can do is lock or lock all smartphone data.
The only drawback of this feature is BlackBerry Protect impossibility of back-up data wirelessly. The process can only be done through a special software BlackBerry 10.
Go to link Download
Saturday, March 11, 2017
How to Unlock Bootloader of Moto E with Screenshots
How to Unlock Bootloader of Moto E with Screenshots
CAUTION: UNLOCKING YOUR BOOTLOADER WILL VOID YOUR WARRANTY. PROCEED AT YOUR OWN RISK.
CAUTION: UNLOCKING THE BOOTLOADER WILL WIPE / FACTORY RESET YOUR DEVICE. IT WILL DELETE EVERYTHING FROM YOUR DEVICE
STEP:
- Take full backup of your device.
- Install the latest Motorola USB drivers with the help of this tutorial HERE.
- Choose either
- [ Recommended ] Download Minimal ADB and FASTBOOT and set up from my tutorial HERE.
- Download Android SDK and set up from my tutorial HERE.
- Put your device in fastboot mode [ Power off, then press the power and volume down buttons simultaneously ].

- Open command prompt either by
- Open desktop icon of Minimal ADB and FASTBOOT if you have that.
- If you have Android SDK then go to "C:androidsdkplatform-tools" open command prompt by holding shift and right click and press command window here.
- Connect your device to pc in USB DEBUGGING mode. If you dont know how to do that than follow this tutorial HERE.
- Now type this in command prompt fastboot oem get_unlock_data

- A string will appear on command prompt . Copy the whole string.

- Paste the string in notepad and remove empty spaces such that the whole string is in single line.


- Next, go HERE and sign in using your google account or Motorola ID; Scroll down and copy paste the string from step 9. Now click on "Can my device be unlocked?". A REQUEST KEY button will appear.


- Check I Agree option. After this you will receive an email ( on email id you used while signing in ) containing your unlock key.

- Copy the string form the email received from Motorola. Make sure the device is still connected.

- Now to check the connection type in command prompt fastboot devices.
- Now type fastboot oem unlock KEY and hit enter. [ IMP: Replace KEY with the sting from email ]

- Wait till Bootloader unlocked warning appears in your MOTO E.

In case in future if you want to Relock your Bootloader, than you can do it by doing this:
Go to Fastboot and give the command fastboot oem lock
Go to link Download
Subscribe to:
Posts (Atom)