Showing posts with label speed. Show all posts
Showing posts with label speed. Show all posts
Thursday, April 27, 2017
How to speed up internet connection only with Command Prompt
How to speed up internet connection only with Command Prompt
Read a new article that discusses about how to speed up internet connection but use the command in cmd / command prompt. usually the hell did I know it had to use the software again or set dns and so forth. who still have problems with internet speeds should try it this way. okay, just as How to speed up internet connection only with Command Prompt
following command on the run in cmd:
1. open cmd as administrator
2. after a change in his address to open the drive "C: ", I typed "cd C /" and then enter
3. Now type the following command netsh interface tcp set global autotuning = disabled

finished last press enter!!!!
now live internet connection check again here www.speedtest.net and see the difference.
note: check the internet speed here www.speedtest.net first before you try this. so I can see the difference.
following command on the run in cmd:
1. open cmd as administrator
2. after a change in his address to open the drive "C: ", I typed "cd C /" and then enter
3. Now type the following command netsh interface tcp set global autotuning = disabled
finished last press enter!!!!
now live internet connection check again here www.speedtest.net and see the difference.
note: 1. to reverse its original type the following command netsh interface tcp set global autotuning = normal
2. first you need to open cmd as administrator.
Go to link Download
How To Increase The Internet Speed in PC
How To Increase The Internet Speed in PC

And when it fails to deliver, there’s no telling how worse it could be.
The slow net scenario
Now, at an era largely characterised by instant gratification, the sight of a loading icon – the circling arrow or the bar of green – could inspire automatic groans. Nobody wants them, unless this slow net thing is epidemic in your neighbourhood.What are the causes of this slow internet connection? About.com’s “Internet for Beginners” has identified at least thirteen (13) causes.
- Poor hardware
- Incorrect router configuration
- Leeching internet users
- Un-upgraded NIC
- Spyware/malware infection
- Downloads
- ISP’s routing signals
- Outdated DNS
- Full browser memory cache
- Devices disrupt signals
- Old PC
- Open windows
- Unattended dialog box
Take keen note these 13 represents the different possibilities. These may or may not necessarily disrupt bandwidth connection; it is up to you (dear user) to carefully weigh these things. The key to verifying it is by careful observation and simple logic (ie, is the connection faster with a new DNS, or not?).
Through a determined cause, you are able to appropriate a targeted solution. For instance, if the problem is caused by poor hardware, then you can purchase a newer and better model. If it’s about the incorrect router configuration, try to correct it or tap your friendly IT expert to do the works.
Or if the culprit of the internet snail-pace is your leeching neighbours (most likely the case for Wi-Fi connections), strengthen your connection’s password and utilise other security features. Infections, on the other hand, could be fixed through stringent scanning software.
Obviously, the nature of addressing your internet connection speed has something to do with the basics: consistent upgrades and investment in clearing ups. All of these serve to speed up that connection, probably faster than the proverbial energy bunnies.
They’re your key to the better world of lightning speed connection. And though you might approach them for professional service, they would be willing to extend support if you’re consistently nice to them.
Image Credit: ddpavumba
Faster than energy bunnies
There are many ways of increasing your internet connections speed. The best way to do it is to start with diagnosis. See through those aforementioned causes and learn which among those are causing your internet speed to drop.Through a determined cause, you are able to appropriate a targeted solution. For instance, if the problem is caused by poor hardware, then you can purchase a newer and better model. If it’s about the incorrect router configuration, try to correct it or tap your friendly IT expert to do the works.
Or if the culprit of the internet snail-pace is your leeching neighbours (most likely the case for Wi-Fi connections), strengthen your connection’s password and utilise other security features. Infections, on the other hand, could be fixed through stringent scanning software.
Obviously, the nature of addressing your internet connection speed has something to do with the basics: consistent upgrades and investment in clearing ups. All of these serve to speed up that connection, probably faster than the proverbial energy bunnies.
Tech buddies
Apart from those, don’t skimp on tech savvy relationships. Try to foster a friendly (and not hostile) bond with that tech – the ones from the hardware distributor, the internet connection provider, the tech support team, and so on.They’re your key to the better world of lightning speed connection. And though you might approach them for professional service, they would be willing to extend support if you’re consistently nice to them.
Awakened consciousness
Lastly, to increase the speed of your internet connection, try not to do things that could disrupt it. Avoid these disruptive things if it can be helped. And if the PC or any other device is shared among the members of the family, encourage them to perform the same measures.Image Credit: ddpavumba
Author Bio:
Manuella Theissen works as a tech support for a widely recognised hardware brand. If not busy with clients, or writing stuff, Manuella can be observed at the local community service office, as she does code-writing tutorials for free.Go to link Download
Saturday, April 15, 2017
How To Speed Up Windows 8
How To Speed Up Windows 8

1. Remove programs from startup
When programs are installed, a shortcut is created in the startup. This enables services from the program to be launched once a computer is booted. With time, the computer has many services set to be running on startup. This consumes the primary memory of the computer and exhausts the processor as unused programs are also in operation. The following steps are used to remove unwanted programs from the startup and ensure the computer achieves required speeds in booting and its operations.- Open the task manager.
- Click on Startup tab. A list of the programs running at startup is displayed.
- Right click on a program and select disable. On the status column, it should now show disabled.
2. Manage computer space
Unwanted files accumulate over time and take up disk space in computers. Once the primary partition holding the operating system is congested, the computers speeds go down tremendously. Removing unwanted files from the recycle bin, caches and cookies formed by browsers and other temporary files can all be done an application incorporated in windows through following the following steps;- Open disk cleanup.
- Select drive to work on then select ok.
- Select file types to be deleted then ok.
- A message appears. Select delete files.
3. Hard disk defragmentation
Data saved in computers is stored in forms of files. These files are kept as data blocks in the computer’s hard disk. The continuous addition and deletion of files leaves huge gaps in between the data blocks created. The computer then gets hard time accessing data in the hard disk. Files that should be concurrent for easy access but are separate are said to be fragmented. To keep data in an organized format, the hard disks need to be regularly defragmented. The following steps are taken in implementing this.- Open Computer. The hard disks present are displayed.
- Right click on any drive and select properties.
- Click on Tools tab.
- Select Optimize. A list of all active drives is shown.
- Select required drive and click on optimize.
4. Computer graphics
Computers with low RAM require their graphics to be allocated minimum space so that other important features can be worked on. The following steps are used in effecting this.- Click on start and type performance information and tools. It will appear under settings.
- Click it and select adjust visual effects.
- You can then select what you require by clicking on the checkboxes. For critical situations, adjusting for best performance is recommended.
5. Uninstall unused programs
There are many programs that users install by visiting internet sites and making downloads. These programs are installed and consume space in the computer. Computer users are advised to keep only the programs they use and remove unused programs. In order to uninstall a program, a user has to;- Click on control panel.
- Ensure the view is set to category view and click on uninstall a program.
- Go through installed programs and click uninstall on those unused programs to remove them completely.
6. Cleaning up of the computer
Computers are easily affected by unwanted programs that include Viruses, Worms and Trojans. Getting the right antivirus solution is the best solution. Windows 8 however comes preinstalled with windows defender which can be updated regularly to prevent from attacks from malware programs.With the above solutions, a computers performance is bound to be at its best. Upgrading of computer components such as the RAM, processor and hard disk can also be considered.
Author Bio:
The Author is a professional writer with grown interests in computer interaction to help novices make the best of their computers. He writes for Essay Jedi.Go to link Download
Sunday, March 5, 2017
How to speed up a folder load in Windows
How to speed up a folder load in Windows
How to Speed Up a Windows Folder that Loads Very Slowly

There is a curious phenomenon many of you have likely come across: even with a fast computer, there are some folders Windows loads with agonizing slowness. Fortunately the fix is simple and the results are immediate.
Why Your Folders Load So Slowly
There is a long standing Windows Explorer feature that dates all the way back to Windows Vista wherein you can tell Windows Explorer what kind of content is in specific folders, in order to optimize how that content is displayed.
For example: you can tell Windows Explorer that a particular folder is where you store your music files, and it will present those files in a way most useful for browsing music (e.g. in detailed list format with column options like file playtime automatically enabled). Even if you never tell Windows Explorer what to do, it automatically defaults some folders to various settings (the “Music” library folder is, naturally, defaulted to music-type file display) and then uses a feature called Automatic Folder Type Discovery on the rest. The automatic discovery system is a best-guess as to what is in the folder based on the number of files of various types, last files added, and so on.

When it works, it’s a great feature. When it doesn’t work, it’s a rather annoying bug: when a folder with a large number of files is optimized for “pictures”, it immediately churns through all the files in the folder, regardless of whether or not the folder is in thumbnail view, in order to check and refresh all the thumbnails for all the files found therein.
Even on a beefy computer with a modern processor, plenty of RAM, and a speedy solid state drive, this process can take anywhere from 10-15 seconds to in excess of a minute depending on how many files are in the folder. On older computers it can even completely lock up Windows Explorer (not just the folder in question).
A prime example of this agonizingly slow file-churn-bug in action is the Windows “Downloads” folder which, thanks to that whole Automatic Folder Type Discovery feature, is typically set to picture mode on most computers. If we were placing wagers on what brought you to this article, we’d happily wager that you came in search of a solution to your Downloads folder taking minutes to load and display the files. Don’t worry, we won’t judge your cluttered Downloads folder if you don’t judge ours.
Fortunately solving the problem is as simple as telling Windows to stop treating the folder like an image gallery.
How to Change Your Folder Optimizations
As long as you know where to look, it’s easy peasy to change your folder optimizations. First, locate the folder you’re having problems with. Typically most people only have one folder that is particularly sluggish, but if you have a whole host of folders that are misbehaving you can take a top-down approach and change the settings for the parent folder to apply the changes to all the subfolders.
Once you’ve located the folder, simply right-click on either the folder itself in Windows Explorer or, if you have the folder open, on a blank area within the Windows Explorer pane. Select, from the right-click context menu, “Properties”.

Within the Properties menu, select the “Customize” tab.

In the customize tab, you’ll find an entry “Optimize this folder for:” with a drop down menu. The options in the drop down menu are: “General items”, “documents”, “pictures”, “music”, and “videos”. Select “General items”.

If you wish to apply the changes to all the folders within that folder, select “Also apply this template to all subfolders” beneath the drop down menu.

Click “Apply” then “OK” at the bottom of the Properties menu. Back in the troublesome folder, press F5 to reload the folder.

The changes should take place immediately and the dreaded waiting-for-folder-to-load time should be long gone.
Go to link Download
Thursday, March 2, 2017
How to Speed Up PC Laptop to run Windows
How to Speed Up PC Laptop to run Windows
To increase speed of PC/Laptop, to run operating system windows XP Vista 7 8 8.1, there are 13 easy ways . You can do it and make you PC or Laptop run more fast. Here is a setting that must be done:
1. Disable the Sound Scheme (for Win XP, Vista, 7, 8)
This method can be applied to Windows XP, Vista, 7, 8. How, press START - Control Panel - Sounds and Audio Devices - Sounds - Sound scheme - No Sounds - Apply - OK.

This method can be applied to Windows XP, Vista, 7, 8. How, press START - Control Panel - System - Advanced - Startup and Recovery - Settings - System startup

- Time to display list of operating systems = 30 seconds, changed to = 1 seconds
- Time to display recovery options when needed = 30 seconds, changed to = 10 seconds

3. Performance Options (for Win XP, Vista, 7, 8)
This method can be applied to Windows XP, Vista, 7, 8. How, press START - Control Panel - System - Advanced - Performance - Settings - Visual Effects - Let windows choose whats best for my computer, changed to - Adjust for best performance - Apply - OK

After that, follow next step
For Win XP
START - Control Panel - Display - Appearance - Windows and buttons - from Windows Classic style - changed to Windows XP style - Apply. Then, click Effects - remove all check - OK - OK.

For Win 7, 8
Right click on desktop - Personalization - select themes

4. Delete all Scheduled Tasks (for Win XP, Vista, 7, 8)
This method can be applied to Windows XP, Vista, 7, 8. How, press START - Control Panel - Scheduled Tasks - delete all Scheduled Tasks. Delete Scheduled Tasks can be do with CCleaner software.
5. System Configuration Utility, Startup and Services (for Win XP, Vista, 7, 8)
This method can be applied to Windows XP, Vista, 7, 8. How, press START - run - msconfig - OK

Startup: only activate anti virus, for other programs, can be disabled, if you think not required.

Services: only activate anti virus, for other programs, can be disabled, if you think not required.
When finished, do the restart.

6. Window Metrics - MinAnimate=1 (for Windows XP)
This method can be applied to Windows XP. How, press START - run - regedit - OK


After that, follow next step
For Win XP
START - Control Panel - Display - Appearance - Windows and buttons - from Windows Classic style - changed to Windows XP style - Apply. Then, click Effects - remove all check - OK - OK.

For Win 7, 8
Right click on desktop - Personalization - select themes

4. Delete all Scheduled Tasks (for Win XP, Vista, 7, 8)
This method can be applied to Windows XP, Vista, 7, 8. How, press START - Control Panel - Scheduled Tasks - delete all Scheduled Tasks. Delete Scheduled Tasks can be do with CCleaner software.
 |
| for Win XP |
 |
| for XP, Vista, 7, 8 |
This method can be applied to Windows XP, Vista, 7, 8. How, press START - run - msconfig - OK

Startup: only activate anti virus, for other programs, can be disabled, if you think not required.

Services: only activate anti virus, for other programs, can be disabled, if you think not required.
When finished, do the restart.

6. Window Metrics - MinAnimate=1 (for Windows XP)
This method can be applied to Windows XP. How, press START - run - regedit - OK

HKEY_CURRENT_USER - Control Panel - Desktop - WindowMetrics - MinAnimate - Value data=1 - OK - restart.
7. Disk Cleanup for all drives (for Win XP, Vista, 7, 8)
7. Disk Cleanup for all drives (for Win XP, Vista, 7, 8)
This method can be applied to Windows XP, Vista, 7, 8. How, right click drive C - Properties - Disk Cleanup - give a check all items. Then, click More Options - System Restore - Clean up - Yes - OK. Repeat process to drive D, E, F.


8. Check disk for all drives (for Win XP, Vista, 7, 8)
This method can be applied to Windows XP, Vista, 7, 8. How, right click drive C - Properties - Tools - Error checking - Check now - give a check all items (automatically fix file system errors, and scan for and attempt recovery of bad sectors) - Start. Repeat process to drive D, E, F.


9. Disk Defragmenter (for Win XP, Vista, 7, 8)
This method can be applied to Windows XP, Vista, 7. How, right click drive C - Properties - Tools - Defragmentation - Defragment Now - select drive - Defragment. Repeat process to drive D, E, F.


10. Delete installed programs, that you no longer use (for Win XP, Vista, 7, 8)
This method can be applied to Windows XP, Vista, 7, 8

11. Download and install CCleaner free (support Win XP, Vista, 7, 8)

11. Download and install CCleaner free (support Win XP, Vista, 7, 8)
This method can be applied to Windows XP, Vista, 7, 8. Download and install CCleaner
Cleaner = Windows and Application files
Cleaner = Registry


12. Disable Unwanted Firewall
This method can be applied to Windows XP, Vista, 7, 8

13. Turn ReadyBoost (for Windows 7)
ReadyBoost can speed up your computer by using, USB flash drives and memory cards.

Cleaner = Windows and Application files
Cleaner = Registry


12. Disable Unwanted Firewall
This method can be applied to Windows XP, Vista, 7, 8

13. Turn ReadyBoost (for Windows 7)
ReadyBoost can speed up your computer by using, USB flash drives and memory cards.
- Plug a flash drive into your computer.
- In the Autoplay, under General options, click Speed up my system.
- Right click a flash drive - Properties - ReadyBoost, and then do one of the following:
- Dedicate this device to ReadyBoost : to use the maximum available space on the flash drive for ReadyBoost. Windows will leave any files already stored on the device, but itll use the rest to boost your system speed.
- Use this device : to use less than the maximum available space on the device for ReadyBoost, and then move the slider to choose the amount of available space on the device you want to use.

Go to link Download
Saturday, February 11, 2017
How to speed up your Computer and clean it from all the Malwares Spywares Ransomwares and Adwares
How to speed up your Computer and clean it from all the Malwares Spywares Ransomwares and Adwares
Speed up or tune up a slow computer
Why does a computer run slow?
A computer may run slow because of Two reasons, Hardware or Software.
Hardwares which cause slow performance issue are RAM(Random Access Memory- Physical Memory Stick ), Processor, Bad or Malfunctining Hard drive or any other Malfunctioning devices (like Malfunctioning Printer, Network Card, Keyboard or Mouse) connected.To resolve slow performance issue you have to either replace or upgrade them which I am gonna talk about later.
While Software issues are the major reasons to make your computer run slow.Software issues could be numerous which make your computer slow for example viruses in your computer, startup items, unwanted softwares, Low disk space , junk files , Malwares , spywares , adwares, Ransomware, browser addon softwares, Bad or outdated driver softwares, Outdated operating system files, Incompatible or outdated software in your computer, Leftover files and registry entries of uninstalled software.So I am gonna talk about all these reasons step by step and the tools used to fix them with description.
After doing all this troubleshooting I guarantee that your computer would definitely run at least 3 times Faster than before .
And this article is also gonna helpful for fellows who are working in a BPO for Tech support Position or who are going to appear for an interview for Tech Support Position.
So I start the troubleshooting with removing Junk and unnecessary files and software from computer to free the precious disk space.
Speed up or Tune up a Slow PC
Step 1. Remove Temporary Files to Tune up computer.
Temporary files, or foo files (.TMP), are files created to temporarily contain information while a new file is being made. It may be created by computer programs for a variety of purposes; principally when a program cannot allocate enough memory for its tasks, when the program is working on data bigger than the architectures address space.It is normally created when working on a program or installing a software.
run the DOS or Windows disk checking programs they can find errors and may write these out as file fragments in .CHK files.
CHK is a file extension for a temporary file format used by WordPerfect for Windows. A CHK file can be created before and in between saves to safeguard data or to recover data after aprogram crash.The CHK file extension is also associated with file fragments saved by Windows Disk Defragmenter or ScanDisk.Temp files are typically deleted automatically when the program is closed normally, but if the program quits unexpectedly, the temp files are not deleted.So to delete Temp file first close all the open and running program even exit or stop the Antivirus running then press Windows Logo key+R to open Run dialog box as shown in the picture 6(a).Windows Logo key is Located at the bottom row of your keypad which could be second from left and looks like Windows Flag Logo. Now type %temp% and click okay , Its gonna show all the temporary files so click any one of the files and press CTRL + A to highlight them all and then hit Delete button.Confirm yes you want to delete them all as in the picture 6(b) and they all are gone.Some of the files will not be deleted and will show a message that the action cant be completed as the file is associated or open in a program as in the picture 6(c) so just check do this for all current items and click Skip.and close this window.
 |
| 6(a) tune up slow computer |
 |
| 6(b)- tune up slow computer |
 |
| 6(c)- tune up slow computer |
I am gonna first Laugh before I will write something because I remember the days when I was working as a Technical Support Engineer for one of the reputed Computer Manufacturer.The reason is people used to empty this prefetch folder assuming this will speed up the computer.There is a controversial topic and I believe Microsofts website for these kind of topics.So according to Microsoft prefetch is something as written below.
"Each time you turn on your computer, Windows keeps track of the way your computer starts and which programs you commonly open. Windows saves this information as a number of small files in the prefetch folder. The next time you turn on your computer, Windows refers to these files to help speed the start process."
The prefetch folder is a subfolder of the Windows system folder. The prefetch folder is self-maintaining, and theres no need to delete it or empty its contents. If you empty the folder, Windows and your programs will take longer to open the next time you turn on your computer."
There is NO benefit aside from an absolutely laughable disk space gain of a couple kilobytes, and that is temporary. Do NOT delete the prefetch folder or its contents.
If you already have deleted it unknowingly you better need to build the layout.ini file to speed up the boot process. Yes, The "Layout.ini" file contains list of system programs and files accessed during boot. It, also, contains a list of the most commonly used programs. This allows Windows and Applications to start more quickly. Sometimes, When a Service Pack is installed the layout.ini file fails to rebuild. Even under normal operation the layout.ini file can take up to 72 hours to rebuild.This will impact performance. I like to make sure the layout.ini has been rebuilt before applying any other Service Packs or Updates and I dont want to wait for the OS to do it.
The layout.ini file is located in the "C:WindowsPrefetch" folder.To manually rebuild it: (click) the Start Button >>> Run >>> type-in the following command,
"Rundll32.exe Advapi32.dll, ProcessIdleTasks" >>> OK.
Check the "C:WindowsPrefetch" folder and make sure the file has been rebuilt. An alternative command is "%windir%system32Rundll32.exe Advapi32.dll, ProcessIdleTasks".
The processed result is stored in Layout.ini in the Prefetch directory, and is subsequently passed to the Disk Defragmenter, instructing it to re-order those files into sequential positions on the physical hard drive.
This will further improve performance by minimising the distance that the hard drives heads have to be moved from one file to the next.
It is possible to trigger this re-ordering (by running "Defrag.exe %systemdrive% -b" from the command line) without running a full defragmentation. (click) the Start Button >>> Run >>> type-in the following command, "Defrag %systemdrive% -b" >>> OK, this will run the command as shown in the picture 6(C-1).
 |
| 6(C-1)- tune up slow computer |
Step 3. Delete other temporary files using command prompt to speed up your PC.
Here I am referring to all the temp file which could not be deleted from %temp%.So we will be deleting all the .tmp, .temp, .chm, and files starting with tild(~) sign.And to do this you must start command prompt as an administrator.So go to Start search and type CMD look at the top search result it will be CMD,Right click CMD and choose Run As Administrator as shown in the picture 6(d). It will open the black command prompt window with prompt C:Windowssystem32> with a blinking cursor as shown in the picture 6(e).
 |
| 6(d)- tune up slow computer |
 |
| 6(e)- tune up slow computer |
1. C:> del *.temp /s /a
2. C:> del *.chk /s /a
3. C:> del *.tmp /s /a
4. C:> del ~*.* /s /a
5. C:> del /f /s /q %systemdrive%*.log
5. C:> del /f /s /q %systemdrive%*.log
6. C:> del /f /s /q %systemdrive%*.old
7. C:>del /f /s /q %systemdrive%*._mp
8. C:>del /f /s /q %userprofile%Local SettingsTemporary Internet Files*.*
9. C:>del /f /q %userprofile%cookies*.*
10. C:>del /f /s /q %systemdrive%recycled*.*
11. C:>del /f /q %userprofile%recent*.*
12. C:>del /f /s /q %userprofile%Local SettingsTemp*.*
13. C:>del /f /s /q %systemdrive%*.gid
Step 4. Delete Index.dat file to Tune up your PC.
Index.dat file is just like index at the end of your book which tells you where to find which information.Whenever you visit a website on the Internet; the address, time of visit, images, scripts, tracking cookies and web page contents are saved to your hard drive. The primary reason Internet Explorer does this is to allow quicker access to the site if you revisit again because the contents can be opened from your computer disk drive rather than downloaded over the Internet a second time. Information about these cache files, cookies and where Internet Explorer can find them on your hard drive is stored in the hidden index.dat file.The problem with Index.dat file is that it is never deleted or resized by itself or by windows and its size keep increasing and its also a privacy threat to your computer.
Clearing the Internet Explorer history by clicking the Clear History button on the General tab in the Internet Options dialog box does not change the size of the Index.dat file. Also, setting the Days to keep pages in history value to 0 (zero) on the General tab does not change the size of the Index.dat file. So it also keeps entry for thole files which are not saved in your computer and was deleted long time ago.IE uses three different types of index.dat files which are Cache index.dat files, history index.dat files and cookies index.dat files.7. C:>del /f /s /q %systemdrive%*._mp
8. C:>del /f /s /q %userprofile%Local SettingsTemporary Internet Files*.*
9. C:>del /f /q %userprofile%cookies*.*
10. C:>del /f /s /q %systemdrive%recycled*.*
11. C:>del /f /q %userprofile%recent*.*
12. C:>del /f /s /q %userprofile%Local SettingsTemp*.*
13. C:>del /f /s /q %systemdrive%*.gid
This is gonna delete all the junks and temporary files from your computer.You can simply copy this command and paste it at black command prompt. To.To do this click at the top left hand corner of this command prompt window where you see a tiny c:. logo and then go to Edit and select Paste as shown in the picture below.
 |
| tune up slow computer |
 |
| tune up slow computer |
Index.dat file is just like index at the end of your book which tells you where to find which information.Whenever you visit a website on the Internet; the address, time of visit, images, scripts, tracking cookies and web page contents are saved to your hard drive. The primary reason Internet Explorer does this is to allow quicker access to the site if you revisit again because the contents can be opened from your computer disk drive rather than downloaded over the Internet a second time. Information about these cache files, cookies and where Internet Explorer can find them on your hard drive is stored in the hidden index.dat file.The problem with Index.dat file is that it is never deleted or resized by itself or by windows and its size keep increasing and its also a privacy threat to your computer.
These files are located in C:UsersuserAppDataRoamingMicrosoftWindowsCookies/contents/history(In windows 7) and in C:Documents and SettingsusernameLocal SettingsTemporary Internet FilesContent.IE5 or cookies.IE5/history.IE5 (in windows XP).
To delete index.dat file make sure all of your browser is closed, Open Command prompt again as administrator and type command go to C:> prompt and here type command Del index.bat /s /a and hit enter as shown in the picture 6(g).Some of the index.dat file will not be deleted as its protected by logged in user. so you might need to login with a newly created user or login to safe mode with command prompt. |
| 6(g) tune up slow computer |
It removes Temporary Internet files, Temporary Windows files, Downloaded program files, Recycle Bin, Removal of unused applications or optional Windows components, Setup log files, Off-line files. empties the Recycle Bin, and removes a variety of system files and other items that you no longer need.
To delete files using Disk Cleanup
The following procedure cleans up files associated with your user account as shown in the picture.
- Open Disk Cleanup by clicking the Start button
 . In the search box, type Disk Cleanup or Cleanmgr, and then, in the list of results, click Disk Cleanup.
 - In the Drives list, click the hard disk drive that you want to clean up, So select c: drive and then click OK.
- In the Disk Cleanup dialog box, on the Disk Cleanup tab, select the check boxes for the file types that you want to delete, and then click OK.
- In the message that appears, click Delete files.
 |
| 6(h) tune up slow computer |
 Go to link Download
Read more » Go to link Download
Read more »
Monday, January 30, 2017How to boost internet speed by 20 without any softwareHow to boost internet speed by 20 without any softwareBEST GREENHOUSES FOR GROOVING VEGETABLES ? ? 1(360)241-1624 ?  ? ? 360organic.us ? DURABLE! AFFORDABLE! ALUMINUM + UV POLYCARBONATE Old trick but it work very well! *** Microsoft reserves 20% of your available bandwidth for their own purposes like Windows Updates and interrogating your PC etc. By using reserved bandwidth, you can make your internet connection faster by 20%. Below steps will guide you to increase speed of your Internet. important: Speed up your PC Disable System Restore on SSD ***Limit Reservable Bandwidth Setting in Windows XP,Windows 7, Windows 81. Press Windows Key + R combination, type put gpedit.msc in Run dialog box and hit Enter to open the Local Group Policy Editor. 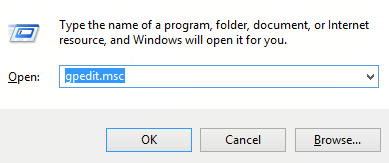%2B-%2BCopy.png) 2. Navigate here:
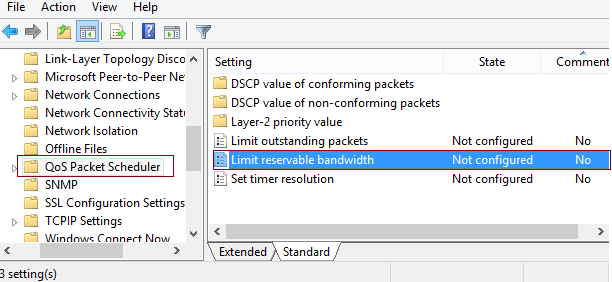 3. In the right pane of this window, look for the settings named Limit reservable bandwidth, it must be showing a Not Configured status by default. Double click on the same setting to modify it: 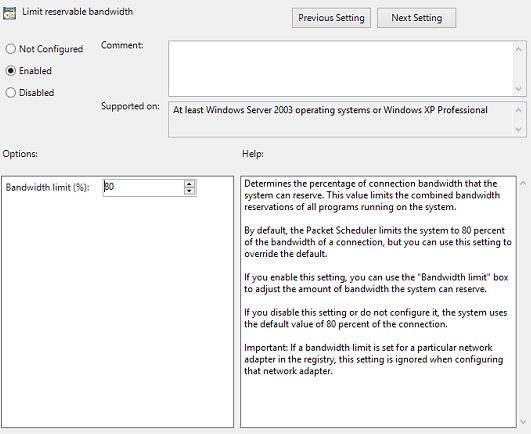 This policy setting determines the percentage of connection bandwidth that the system can reserve. This value limits the combined bandwidth reservations of all programs running on the system. By default, the Packet Scheduler limits the system to 80 percent of the bandwidth of a connection, but you can use this setting to override the default. If you enable this setting, you can use the “Bandwidth limit” box to adjust the amount of bandwidth the system can reserve. If you disable this setting or do not configure it, the system uses the default value of 80 percent of the connection. If a bandwidth limit is set for a particular network adapter in the registry, this setting is ignored when configuring that network adapter. 4. Now, in the above shown window, select Enabled and in the Options section; you could input the percentage for limiting the bandwidth. If you input 0 percent here, you can gain the reserved bandwidth reserved by the system. Click Apply followed by OK then. You may now close the Local Group Policy Editor and reboot the system with gained bandwidth. For these who dont have gpedit in there systems: Thanks to "jwils876" @ DA has shared a small setup file to enable Group Policy Editor in Windows 7 Starter, Home Basic and Home Premium editions. The installer has been originally created by "davehc" @ Windows7forums, so thanks goes to him as well. For Windows 7 64-bit (x64) users! Youll also need to go to "SysWOW64" folder present in "C:Windows" folder and copy "GroupPolicy", "GroupPolicyUsers" folders and gpedit.msc file from there and paste them in "C:WindowsSystem32" folder. If you are getting "MMC could not create the snap-in" error message while running gpedit.msc, check out following steps to fix the problem. Basically it happens when your username in Windows contains more than one word. Run the installer and leave it at the last step (do not click on the "Finish" button). Now go to C:WindowsTempgpedit folder. If you are running 32-bit (x86) edition of Windows 7, right-click on x86.bat file and choose Open With Notepad option. If you are running 64-bit (x64) edition of Windows 7, right-click on x64.bat file and choose "Open With -> Notepad" option. Youll find a total of 6 lines containing the following string in the file: %username%:f Edit those lines and replace %username% with "%username%" For example: Original: %WinDir%SysWOW64gpedit.dll /grant:r %username% New: %WinDir%SysWOW64gpedit.dll /grant:r "%username%" Save and run the file (right-click -> Run as Administrator. Thats it. Youll have working gpedit.msc. Additional information What is the difference between BIOS and CMOS? What are the F1 through F12 keys? How to use system recovery options in Windows? Random black screen while playing gamesHow to Delete and Clear Recent Items in Windows 7 Jump Lists How to enter the BIOS or CMOS setup What is the difference between BIOS and CMOS? What are the F1 through F12 keys? MISSCELLENIOUS ITEMS Durable Greenhouses made from Polycarbonate UV Protected material and Aluminum  ALSO PLEASE VISIT THIS VIDEOS AND SEE IF YOU FIND SOMETHING NEED: Windows Registry Tools can be downloaded here: How to kip your PC Private by deleting DATA Permanently http://askpctech.blogspot.com/2016/03/kip-your-pc-privat.html This tutorial is made up on request several users, is well is fallowing video: 1)How to Delete Paint Recent Pictures from List in Windows 7 2)Win 7– Fix for “Safely Remove Hardware and Eject Media” not working How To 3)Windows 10 How to Fix Black Screen After Booting 4)How To Remove Windows 10 Upgrade Notification On Windows 7 And Windows 8 5)How to Delete Face book Page Permanently - 2015 6)How to Uninstall Windows 10 and Downgrade to Windows 7 or 8.1 7)detected: not-a-virus:remoteadmin.win32 8)How to change pictures into icons for folders 9)Speed up your PC Disable System Restore on SSD 10)Speed up your PC Disable Scheduled De-fragmentation SSD 11)2015 Black screen of DEATH Windows 7 & 8 - with cursor at start-up SOLVED 12)Upon start up only wallpaper shows FIX 13)Here is video on Windows 7 & 8 - Black screen with cursor at start-up FIX You can also open Task Manager by pressing Ctrl+Shift+Esc. 14) I bought a windows 7 PC but it Look alike old PC FIX: 15) Windows 7 & 8 - Black screen with cursor at start-up FIX: 16) How To Fix Minecraft OpenGL Error Windows 7 xp vista 720p : 17) removing bars using regscanner regedit & file shredder 720p: 18) How to Recover windows Explorer from error 2014 720p 19) HOW TO Save on battery online 20) Windows 7 & 8 - Black screen with cursor at start-up FIX Upon start up only wallpaper shows no icons CTL+ALT+DEL then click file and new task. then type explorer.exe and press ok Best Greenhouse system 2015 Go to link Download
Subscribe to:
Comments (Atom)
|