Showing posts with label and. Show all posts
Showing posts with label and. Show all posts
Sunday, May 28, 2017
Friday, May 26, 2017
HWiNFO 4 64 x86 And x64
HWiNFO 4 64 x86 And x64

Description:-
In-depth Hardware Information
From a quick overview unfolding into the depth of all hardware components. Always up-to date supporting latest technologies and standards.
Real-Time System Monitoring
Accurate monitoring of all system components for actual status and failure prediction. Customization interface with variety of options.
Extensive Reporting
Multiple types of reports, status logging and interfacing with other tools or add-ons.
Requirements:-
Windows XP
Window 7
Window 8
Window 8.1
Windows 10

Window 7
Window 8
Window 8.1
Windows 10
Preview:-
Download Link:-

Go to link Download
Thursday, May 25, 2017
How to Concatenate Join and Sort Array in JavaScript
How to Concatenate Join and Sort Array in JavaScript
In the previous post, I have already described about "How to Loop Through JavaScript Array". Along with accessing an element of an array using looping statements, you can also concatenate, join and sort an array in JavaScript. In this post you will learn about How to Concatenate, Join and Sort Array in JavaScript.
How to Join Two Arrays using Concat()
Using concat() method, you can join to arrays array1 and array2 as below.
var array1=new Array(3);
array1[0]="Saab"
array1[1]="Volvo"
array1[2]="BMW"
var array2=new Array(3);
array2[0]="Yamaha"
array2[1]="Honda"
array2[2]="Bajaj"
var array3=array1.concat(array2);
for(i=0; i<array3.length;i++)
{
document.write(array3[i]+"<br/>")
}
</script>
Preview:
Here the method array1.concat(array2) concentrates two arrays array1 and array2.
How to Put Array Elements Into a String using Join()
You can use the join() method to put all the elements of an array into a string as the following script.
<script>
var array1=new Array(3);
array1[0]="Yamaha"
array1[1]="Honda"
array1[2]="Bajaj"
document.write(array1.join()+"<br/>");
document.write (array1.join("."));
</script>
Preview:
How to Sort String Array using sort()
Using sort() method, you can sort the elements of string array as given below.
<script>
var array1=new Array(6);
array1[0]="Saab"
array1[1]="Volvo"
array1[2]="BMW"
array1[3]="Yamaha"
array1[4]="Honda"
array1[5]="Bajaj"
document.write(array1+"<br/>");
document.write (array1.sort());
</script>
Preview:
How to Sort Numeric Array using sort()
Using sort() method, you can sort the elements of numeric array as given below.
<script>
var array2=new Array(6);
array2[0]=10
array2[1]=5
array2[2]=40
array2[3]=25
array2[4]=35
array2[5]=95
function sortNumber(a,b) {return a - b;}
document.write(array2+"<br/>");
document.write (array2.sort(sortNumber));
</script>
Preview:
There are also other more methods for manipulating array elements, which are listed below along with their description. You can use them as the methods given above.
- pop(): Removes and returns the last element of an array
- push(): Adds one or more elements to the end of an array and returns the new length.
- reverse(): Reverses the order of the elements in an array
- toString(): Converts an array to string and returns the result.
Read Next:How to use Round, Random, Min and Max in JavaSript
Related Search Terms
Concate Array in JavaScript
Join Array in JavaScript
Sort Array in JavaScript
Related Posts:
How to Show Pop Up Boxes Using JavaScript?
How to Write Conditional Statements in JavaScript?
How to Write JavaScript With HTML?
How to Loop using JavaScript?
Image Slideshow with Navigation Buttons Using JavaScript
How to create Changeable Date and Time Using JavaScript?
How to Create JavaScript Image Slideshow with LInks
How to Display Date Format in JavaScript?
How to Validate a HTML Form Using JavaScript?
What are the Different Ways to Redirect Page in JavaScript?
How to Detect Visitors Browser Using JavaScript?
How to make rounded corners border using CSS
How to Create Custom CSS Template for Printing
How to create a simple form using HTML?
Go to link Download
Wednesday, May 24, 2017
HDR Light Studio 4 x64 2015 Portable CRACK and CLEAN
HDR Light Studio 4 x64 2015 Portable CRACK and CLEAN

Lightmap - HDR Light Studio 4 Portable (x64) | 2.41GB
Provides real-time HDRI map creation and editing with leading 3D software. Includes HDR Light Studio 4 with LiveLight, plus all currently available plug-ins/connectivity. The Single User License replaces the old node locked license. When you buy a Single User License of HDR Light Studio, a 3D artist can now install and activate HDR Light Studio on up to 2 computers for non?concurrent use. i.e. one seat at work and one seat for home/laptop. HDR Light Studio – Complete is a cross platform product and provides installers and connectivity for Windows, Mac OS X and Linux platforms. Customers can choose to install and license their software on any platform. This replaces the old Windows, Mac and Linux specific node locked products.
Features: http://www.hdrlightstudio.com/image_based_lighting.htm
Download Links :
http://ul.to/...4Port.part1.rar
http://ul.to/...4Port.part2.rar
http://ul.to/...4Port.part3.rar
http://ul.to/...4Port.part4.rar
http://ul.to/...4Port.part5.rar
http://www.nitroflare.com/...067D4A2AE433F7A
http://www.nitroflare.com/...36DB4C66651E20A
http://www.nitroflare.com/...2BFFA077AF0D337
http://www.nitroflare.com/...ED6A0BD7BF8A059
http://www.nitroflare.com/...CCB75C7624B7C25
http://rapidgator.net/....part1.rar.html
http://rapidgator.net/....part2.rar.html
http://rapidgator.net/....part3.rar.html
http://rapidgator.net/....part4.rar.html
http://rapidgator.net/....part5.rar.html
Go to link Download
Monday, May 22, 2017
How to Fix Searching and Indexing issue and Rebuild the Index
How to Fix Searching and Indexing issue and Rebuild the Index
Searching feature in windows is one of the greatest advantage.It lets you access your files quickly and easily without you peeping into different folders one by one.It very useful when you have forgot the place of the file or the exact name of the file.Have you ever wondered how this search option is powered or built.It is actually built or powered by Indexing in Windows just like an index of a book.But here in windows you can choose the location to include or exclude in indexing.Or you can delete or add entry or remove old unavailable entry or rebuild the whole index to optimize the search feature for enabling the fast searching.
Windows uses the index to perform very fast searches on your computer. Here are some advanced indexing settings you can change.
1. To add a file type to the index
Note:Windows BitLocker is only included in Windows 7 Enterprise and Windows 7 Ultimate.
Note that the index will automatically rebuild each time this setting is changed. This can take a long time, and might cause searches to be incomplete until the process is complete.
Notes
Although you can use a non-Microsoft program to encrypt your system drive, non-Microsoft file encryption programs are not supported. Windows only supports files encrypted using Encrypting File System (EFS).
EFS is only included in Windows 7 Enterprise, Windows 7 Professional, and Windows 7 Ultimate.
If you add encrypted files to the index and youre not using full-volume encryption for the location of the index, encrypted data from your files for example, text from an encrypted Microsoft Word document will be added to the index and will be available for searching. The index is obscured so that its not easily readable if someone tries to open the index files, but it doesnt have strong data encryption. If someone were to gain access to your computer, they could extract your data from the index. Therefore, the location of the index should also be encrypted to help protect your indexed data.
The index will automatically be rebuilt each time this setting is changed. This can take a long time and might cause searches to be incomplete until the process is complete.
Note
When you change the index location, you should choose a location on a non-removable hard disk that is formatted using the NTFS file system.
Depending on the severity of the problem, the Search and Indexing troubleshooter might need to restart the Windows Search service.After the Windows search service it restarted it might take few minutes to enable searching feature.
Here is a list that troubleshooter checks and fix
 |
| Pic-26(a) Fix Searching and Indexing issue and Rebuild the Index |
What is Index?
A collection of detailed information about the files on your computer.Windows uses the index to perform very fast searches on your computer. Here are some advanced indexing settings you can change.
What files are indexed?
By default, all of the most common files on your computer are indexed. Indexed locations include all folders included in libraries (anything you see in the Documents library, for example), e?mail, and offline files. Files that arent indexed include program files and system files—files that most people rarely need to search.Can I index my entire computer so all searches are fast?
You shouldnt do this. If you make the index too large, or if you include system file locations (such as the Program Files folder), your routine searches will slow down. For best search results, we recommend that you only add folders that you search frequently to enable fast searching.What if Im using Windows Server 2008 R2?
You might need to install the File Services role on your computer before all search and indexing options are available. You can do this from the Server Manager console. To open the console, click Start, type Server Manager into the search box, and then click Server Manager. For more information about installing the File Services role, in the Server Manager console toolbar, click Roles, and then click Roles Summary Help.
How to fix Searching and Indexing issue
1. To add a file type to the index
If you use an unusual file type thats not currently recognized by the index, you can add it to the index so you can search in Windows by that file type.
- Open Indexing Options from control panel.
- Click Advanced.
 |
| Pic-26(b)-Fix Searching and Indexing issue and Rebuild the Index |
- In the Advanced Options dialog box, click the File Types tab.
- In the Add new extension to list box, type the file name extension (for example, "txt"), and then click Add to enable searching the file type.
 |
| Pic-26(c)-Fix Searching and Indexing issue and Rebuild the Index |
- Click Index Properties Only or Index Properties and File Contents, and then click OK.After this method you should be able to search the added file type.
2. To rebuild the index
The index requires almost no maintenance. However, if the index cant find a file that you know exists in an indexed location, you might need to rebuild the index. Rebuilding the index can take several hours, and searches might be incomplete until the index is fully rebuilt.
- Go to Control panel and then open Indexing Options.
- Click Advanced.
 |
| Pic-26(d)-Fix Searching and Indexing issue and Rebuild the Index |
- In the Advanced Options dialog box, click the Index Settings tab, and then click Rebuild. If you are prompted for an administrator password or confirmation, type the password or provide confirmation.
3. To index encrypted files for searching encrypted files too
Before you add encrypted files to the index, we recommend that you have Windows BitLocker (or a non-Microsoft encryption program) enabled on your system drive (the drive that Windows is installed on).Note:Windows BitLocker is only included in Windows 7 Enterprise and Windows 7 Ultimate.
Note that the index will automatically rebuild each time this setting is changed. This can take a long time, and might cause searches to be incomplete until the process is complete.
- Go to Control panel and then open Indexing Options.
- Click Advanced. If you are prompted for an administrator password or confirmation, type the password or provide confirmation.
- In the Advanced Options dialog box, click the Index Settings tab, select the Index encrypted files check box, and then click OK. If you are prompted for an administrator password or confirmation, type the password or provide confirmation.
Notes
Although you can use a non-Microsoft program to encrypt your system drive, non-Microsoft file encryption programs are not supported. Windows only supports files encrypted using Encrypting File System (EFS).
EFS is only included in Windows 7 Enterprise, Windows 7 Professional, and Windows 7 Ultimate.
If you add encrypted files to the index and youre not using full-volume encryption for the location of the index, encrypted data from your files for example, text from an encrypted Microsoft Word document will be added to the index and will be available for searching. The index is obscured so that its not easily readable if someone tries to open the index files, but it doesnt have strong data encryption. If someone were to gain access to your computer, they could extract your data from the index. Therefore, the location of the index should also be encrypted to help protect your indexed data.
4. To index words with and without diacritics as different words
If you commonly use diacritics (small signs added to letters to change the pronunciation of words) in your file and folder names, you can configure the index to recognize words with diacritics differently. By default, Windows recognizes diacritics according to the language version you are using. If you change this setting, all diacritics will be recognized.The index will automatically be rebuilt each time this setting is changed. This can take a long time and might cause searches to be incomplete until the process is complete.
- Click to open Indexing Options.
- Click Advanced. If you are prompted for an administrator password or confirmation, type the password or provide confirmation.
- In the Advanced Options dialog box, click the Index Settings tab.
- Under File Settings, select the Treat similar words with diacritics as different words check box, click OK, and then click OK again.
5. To change the location where the index is stored
If you need to free up space on a hard disk, you can change the location of the index. If you change this location, the Windows Search service will automatically be restarted, and the change will not go into effect until the restart is complete.- Click to open Indexing Options.
- Click Advanced. If you are prompted for an administrator password or confirmation, type the password or provide confirmation.
- In the Advanced Options dialog box, click the Index Settings tab.
 |
| Pic-26(e)-Fix Searching and Indexing issue and Rebuild the Index |
- Under Index location, click Select new, click a new location, click OK, and then click OK again.
Note
When you change the index location, you should choose a location on a non-removable hard disk that is formatted using the NTFS file system.
What does it mean when I see a message that search results might be incomplete?
It means that the files are still being indexed. To perform fast and accurate searches, Windows collects information about files on your computer. This information is stored in the index. Periodically, Windows needs to update the index. If you perform a search while the index is being updated, the results might be out of date.What does it mean when I see a message that a location cant be searched or theres no media present in the search location?
Theres a problem searching one or more of your selected locations. Usually thats because youve selected a network location or a device thats not currently connected to your computer. Its also possible that youve selected a removable media device with no media (such as a memory card or a CD) in the device. Check your locations, and then try the search again.How do I troubleshoot problems with searching and indexing?
If you are experiencing problems with searching, such as unusually slow searches or incomplete search results,or no search results at all run the Search and Indexing troubleshooter to see if it can diagnose the problem.- Go to control panel and open Troubleshooting.
- Click on System and Security.
 |
| Pic-26(f)-Fix Searching and Indexing issue and Rebuild the Index |
- Now Click on Search and Indexing.
- Its gonna ask the problem you are facing so select the problems and click next to troubleshoot and fix.
 |
| Pic-26(g)-Fix Searching and Indexing issue and Rebuild the Index |
Depending on the severity of the problem, the Search and Indexing troubleshooter might need to restart the Windows Search service.After the Windows search service it restarted it might take few minutes to enable searching feature.
Here is a list that troubleshooter checks and fix
| ||||
When permissions on the Windows Search data directories are set incorrectly, the search service might not be able to access or update the computers search index. This can result in slow searches or incomplete search results. | ||||
| ||||
Problems with the Search Filter Host might indicate errors in the Windows Search service, which can cause searches to fail or return incomplete search results. | ||||
| ||||
When the Windows Search service is forcibly shut down while performing maintenance, searches might fail or return incomplete search results. | ||||
| ||||
When the Windows Search service is forcibly shut down, searches might fail or return incomplete search results. | ||||
| ||||
When the Windows Search service is not running, searches might be slower, and you might not be able to find all items. | ||||
| ||||
Problems with the Windows Search service can cause searches to fail or return incomplete search results. | ||||
| ||||
Problems with the Search Protocol Host might indicate errors in the Windows Search service, which can cause searches to fail or return incomplete search results. |
**************End of Article*******************
Read more »
Incoming Search Terms
- Windows Searching and indexing issues
- Enable fast Searching
- Searching
- searching the encrypted files.
- Rebuild index
- Can not search file
- Windows Search does not work
- Could not find the known file if search for it
People also read following top most searched issue
Best Google Search Tips and Tricks
Windows takes long time or ages to shut down
how to fix Weather gadget could not connect to service
Go to link Download
Saturday, May 20, 2017
GRAND THEFT AUTO 4 LOST AND DAMNED CHEATS PS3 by Wolfington
GRAND THEFT AUTO 4 LOST AND DAMNED CHEATS PS3 by Wolfington
| Name: | Grand Theft Auto 4 Lost And Damned Cheats Ps3 |
| File size: | 14 MB |
| Date added: | June 27, 2013 |
| Price: | Free |
| Operating system: | Windows XP/Vista/7/8 |
| Total downloads: | 1997 |
| Downloads last week: | 81 |
| Product ranking: | ★★★☆☆ |
 | |
I often have nightmares. I think its sad to not have any friends. I think it will be hot today. She was advised by him to go abroad while she was still young. Grace looked angry. Sorry, I dont have a pencil. Can you give me a hand with this? Shes smarter than him. Where do we get the textbooks? Her older sister got married last month.
Grand Theft Auto 4 Lost And Damned Cheats Ps3: - Do you work on Sundays?
- How is your dad?
- How do you go to office?
- Im leaving on Sunday. Were going to Canada.
- You should have replied to his letter.
- She didnt have any money, so she couldnt go with me.
- She told him a joke.
- Tom and Sue have known each other since 1985.
- The road is too narrow for cars.
- GRAND THEFT AUTO 4 LOST AND DAMNED CHEATS PS3
- She dumped him because she thought he was a jerk.
I cant believe youre taking pictures of cockroaches. Wow, thats a nice story. What are you reading? This chair is too low for me. Can she endure a long trip? How was your afternoon? I couldnt call you; the telephone was out of order. I agree with you. He secretly showed me her picture. Choose whichever you like.
Grand Theft Auto 4 Lost And Damned Cheats Ps3 charts
Grand Theft Auto 4 Lost And Damned Cheats Ps3 location
Grand Theft Auto 4 Lost And Damned Cheats Ps3 google search
Grand Theft Auto 4 Lost And Damned Cheats Ps3 ask google support
Grand Theft Auto 4 Lost And Damned Cheats Ps3 chrome extensions
Grand Theft Auto 4 Lost And Damned Cheats Ps3 for android
Grand Theft Auto 4 Lost And Damned Cheats Ps3 videos
Grand Theft Auto 4 Lost And Damned Cheats Ps3 twitter search
Grand Theft Auto 4 Lost And Damned Cheats Ps3 wiki
Grand Theft Auto 4 Lost And Damned Cheats Ps3 photos
Grand Theft Auto 4 Lost And Damned Cheats Ps3 world
Grand Theft Auto 4 Lost And Damned Cheats Ps3 youtube videos
Grand Theft Auto 4 Lost And Damned Cheats Ps3 bing photo search
Grand Theft Auto 4 Lost And Damned Cheats Ps3, Inc. 94272 Las Vegas Street, Nevada 4009 - USA, CA 89114 Tel: 450-513-3012 - Fax 357-211-6230 E-mail:James_Wolfington@gmail.com
Grand Theft Auto 4 Lost And Damned Cheats Ps3 address

Grand Theft Auto 4 Lost And Damned Cheats Ps3 world
Go to link Download
Sunday, May 7, 2017
How to Forward SMS or iMessage on iPhone and iPad
How to Forward SMS or iMessage on iPhone and iPad

If your iPhone or iPad that you have today is new to you and takes time to be able to operate seamlessly, I gladly share information with you. And we want to give this time is the way forward SMS also iMessage on your iPhone or iPad.
1. Through the Message app, open the SMS / iMessage that you want to forward.
2. Tap Edit button located at the upper-right corner of the screen.
3. Select the message you want to forward.
4. Tap on the Forward on the bottom-right corner.

5. Now the iPhone / iPad you are ready to forward SMS / iMessage, just enter the phone number or contact details available on the contact list and tap on the Send to send.
Thats all you need to do. Easy, is not it? Hopefully these tips useful;)
Go to link Download
Thursday, May 4, 2017
How To Install Apps Without Google Play Store and Internet
How To Install Apps Without Google Play Store and Internet

Why I decided to post this topic. Imagine following situations:
- You dont want to connect your Google account because you afraid of "To many Pattern Attempt"
- Google Play Store Slow Down Your Smartphone and Internet. So You want to keep it Off
- You have a Google Android device but you dont have Internet connectivity
- You have Internet connectivity but you dont have Google Play Store in your device
- You have Google Play Store but you dont have a Google account to sign in
- Your desired app is not compatible with your Android device
- Your desired app has been removed from Google Play Store
- You cant download your desired app due to any other reason
In any of the above mentioned situations, you wont be able to download and install apps in your Google Android device whether its a mobile phone or tablet. It might be possible that you purchased an Android mobile or tablet which didnt contain Google Play Store (e.g. Nokia X) or it might be also possible that you dont have a Gmail account and you dont want to create a new Google account to sign into Play Store.
Now the question comes how would you install apps in your Android device if you dont have Play Store or Google account or Internet connection in your device? The answer is using Sideloading feature.
Sideload an application means offline installation of the app without using Google Play Store in your Android device. In this way you wont need Google Play Store, Google account and Internet connection in your Android device.
With the help of sideloading feature, you can directly install any desired app in your Android mobile phone or tablet just like you install a software in your Windows PC.
If you also want to learn this method to install apps offline in your Android device, just check out following simple steps:
Step 1:
Download .APK File From InternetFirst of all youll need the .APK file of your desired Android app. Actually all Android apps come in form of a .APK file (Android Package file). When you install an app using Play Store, your Android device automatically downloads and installs its .APK file.
Since you dont want to download apps using Play Store, youll need to download the .APK file of your desired app from Internet.
If you can access Internet in your Android device, then you can download the .APK files using a web browser. If you cant access Internet in your device, then youll need to download the .APK files using a computer with Internet connection.
There are many websites offering .APK files of free apps for download. You just need to search for "App name APK file" on Google and youll get several websites containing the .APK file of your app. For example if you want to download Subway Surfer games .APK file, just search for "Angry Birds APK file" and youll get many download links.
But if You want to download Purchased or Modded App for free then you can find it on our website at Black Eyezs Software Android Apps & Games.
Step 2:
Copy .APK File to SD Card of Android DeviceOnce you grab the .APK files of your desired apps, its time to copy those .APK files to SD card (memory card) of your Android mobile or tablet.
You can either attach the SD card to your computer using a card holder/reader and copy .APK files to it or you can connect your Android device to your computer using data cable and then copy .APK files to its drives using My Computer window.
Step 3:
Enable "Apps Installation from Unknown Sources" OptionBy default your Android device doesnt allow sideloading feature which means you cant install apps from your SD card but you can enable this feature with the help of following easy steps:
1. Open Settings page in your Android device and go to Security settings.
2. Now look for "Unknown Sources" option which contains following information:
Allow installation of apps from sources other than the Play Store
OR
Allow installation of apps from unknown sources
The option is not enabled by default, just tap on it to enable the option. Itll ask for confirmation, accept it.
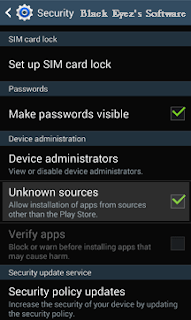
You may also need to disable "Verify Apps" option which disallows or warns you when you try to install apps from unknown sources.
After changing options, exit from Settings page.
Step 4:
Run .APK File Using File ManagerThats the final step. Now you can install the apps directly using the built-in File Manager app in your Android device or Download ES File Explorer (best Android file manager) from our site.
Just Open ES file Explorer or similar apps in your Android device and then navigate to SD card and tap on the downloaded .APK file.
Itll ask for confirmation, tap on Install button and itll start the installation process.
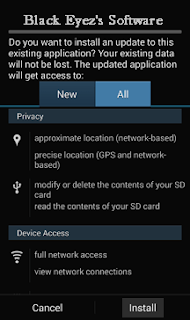
Itll take a few seconds and your desired app will be installed in your Android mobile phone or tablet without need of Google Play Store and Internet connection.
This method also helps when you have more than one Google Android mobile phone or tablet and want to install same apps and games in those devices. With the help of this method, you just need to download those apps only once and then you can install them in multiple devices and also can use as backup without any need of downloading them again and again in all devices. Itll save your time and money.
Note:-
If you need any Paid .APK for free contact us, we will upload it in two or three business days.
Go to link Download
Monday, May 1, 2017
How to Export and Backup Instagram Photos
How to Export and Backup Instagram Photos
How to Export and Backup Instagram Photos - Instagram has become the most popular application in a short time, both for iOS and Android devices. You must have been using Instagram on your mobile phone to make cool pictures and sharing with colleagues in online media.
Of all the advantages of Instagram, there is one thing that is not available to him, namely storage option. If you want to be able to save the photos from Instagram website and to your computer hard drive, you need the help Instaport; a simple web app that has the ability to backup Instagram photos in a zip file.
To export Instagram photo and store it in the local hard drive in the computer, open a website http://instaport.me/. Please sign in using Instagram ID then click Yes to open access through Instaport Instagram.

When access has opened, select download.zip file and select the option to download all the photos, click the Start Export

Instaport will start doing your request to export the photos from Instagram. It took some time until this process is complete, depending on the amount of your photo collection on Instagram. Once the process is complete, Instaport will provide a donwload link, click on the link to download all the Instagram photos belong to you in a zip file.

Well, if you want all tersimpand Instagram photo collection on your computer, please use Instaport as the steps we have given above. Good luck.
Go to link Download
Thursday, April 27, 2017
How to download YouTube Video MP3 Playlist for iPhone 5S and 5C For Free
How to download YouTube Video MP3 Playlist for iPhone 5S and 5C For Free
Finally, iPhone 5s and iPhone 5 C have been released. If you are about to get your new Apple product, you might be interested how to fill it with your favorite songs and video clips. That’s where you need a good and free YouTube Converter. Let’s learn how it works.
First of all, let’s install free software that will help you. I recommend Freemake YouTube Converter because it can download various YouTube files such as video, songs, playlists and so on.
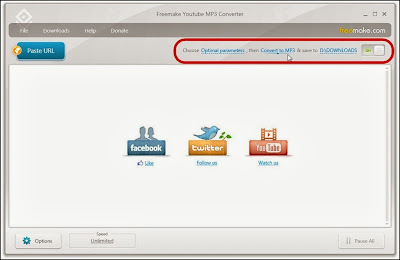
Click “Download” button on a site to start the downloading process. Then start the installation. Please, be attentive. The software will offer you to install some other programs. If you don’t want to have them on your PC, opt out of any offers. However, it’s the only disadvantage of Freemake YouTube Converter.
If you download YouTube on a regular basis, agree to install a special browser extension. It will let you grab YouTube in one click.
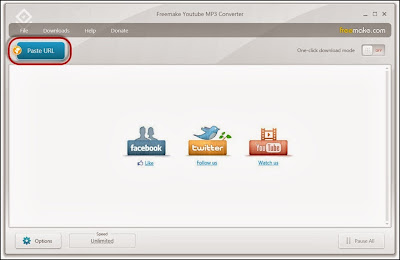
As soon as you are done with the installation, run the software. As you see the interface looks pretty much easy to use. Everything you need to do it to copy and paste YouTube link into it.
First of all, let’s install free software that will help you. I recommend Freemake YouTube Converter because it can download various YouTube files such as video, songs, playlists and so on.
Click “Download” button on a site to start the downloading process. Then start the installation. Please, be attentive. The software will offer you to install some other programs. If you don’t want to have them on your PC, opt out of any offers. However, it’s the only disadvantage of Freemake YouTube Converter.
If you download YouTube on a regular basis, agree to install a special browser extension. It will let you grab YouTube in one click.
As soon as you are done with the installation, run the software. As you see the interface looks pretty much easy to use. Everything you need to do it to copy and paste YouTube link into it.
Now choose what you want to do:
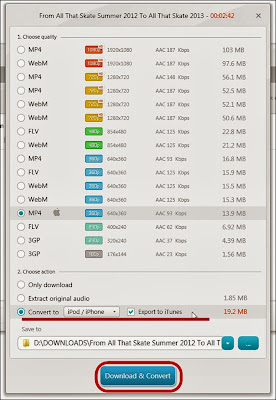
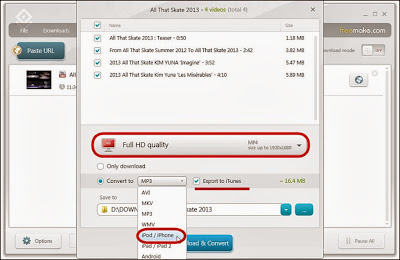
1) Download YouTube video:
When you paste the link into the program, choose a desirable video quality and “Convert to iPhone/iPod” option. Click “Download&Convert” to save videos onto a PC.
When you paste the link into the program, choose a desirable video quality and “Convert to iPhone/iPod” option. Click “Download&Convert” to save videos onto a PC.
.jpg)
2) Download YouTube song:
Paste a link to music video that you want to save in MP3. Again, choose a quality and “Convert to MP3” option. Select “Export to iTunes” if you want to send new files right to your iTunes media library.
.jpg)
3) Download YouTube playlist, channel, favorites:
Go to YouTube playlist or channel you want to download and copy its link. Paste in into the software and choose if you want to save the playlist in MP3 or as video files. Don’t forget to select “Export to iTunes”.
.jpg)
Now, when you have all the content you need, go to iTunes and synchronize it with your iPhone 5S or 5C.
Tips:
1) For those who download YouTube on a regular basis, it’s better use “one-click” download mode. Activate it in the top right corner of the software. Choose “Action” (download, convert to…), “Quality”(best, medium, low) and “Destination” folder.
.jpg)
2) In case you have a slow Internet connection, you may limit download speed. Just click “speed” at the bottom of the software and choose the speed you need.
Author Bio:
This post is written by Selin Longhkaster from Freemake. She is fond of ice skating, technology, photography, music and writing for tech blogs. Go to link Download
Monday, April 24, 2017
How To Repair and Maintain Your Crashed Hard Disk and Recover Data
How To Repair and Maintain Your Crashed Hard Disk and Recover Data
- How To Backup or Save Your Important Data When Your Hard Disk Crash and Shows Disk Boot Failure While Booting Or Badly Effected By Virus :
Process 1: Download Hirens Boot CD ISO file from any web site.. Its Free. Then burn the ISO file to a blank CD or DVD. And run the disk while booting(Make sure Boot From CD/DVD is Enable or Make CD/DVD your 1st boot device in priority). Select any one operating system listed there. After that you can transfer all of your important data in any kind of external Hard Drive.
----------------------------------------------------------------------------------------------------
 |
| Hirens Boot CD (Boot Menu) |
Process 2: This Process may not work every time. But you can try.
1st run your computer in SAFE MODE. To run in safe mode Strat/Restar your computer, and while starting keep pressing F8 key. After boot you will see a black screen with some options. Select SAFE MODE from these options. Run your PC. Then you can make a back up of your important data.
- How To Check For Errors In Your Hard Disk With Software:
Step 1.
1. First Open My Computer.
2. Click on a local Hard Drive(You can also check error for pen drive or any kind of external hard drive)
3. Now right click on the drive that you want to check for errors and click on properties.
4. Now on the Tool tab click on Check and Check for hard disk error.
Step 2.
Install Tune Up Utilities first and Run it. Click on "Overview of All Function" And Click On "Check Error" option. This will run Tune Up Disk Doctor. And Select all your Hard Drives and run "Through Analysis". It will take a long time to complete, depending on your computer speed. If you dont have much time then you can go for a quick analysis. And just wait. After completion Restart your computer.
Frequent Defragmentation Of your Hard Disk make your computer run smoothly. So run disk defragmentation regularly. Here is some easy step to run Hard Disk Defragmentation.
Step 1.
1. First Open My Computer.
2. Right Click On a Local Drive that you want to defragment. And click on Properties.
3. Now on the Tool tab click on Defragment Now/Optimize
4. Now Analyze/Defragment your local drive to make it fast and smooth.
Step 2.
1. Run Computer Management MMC.
2. To Run Go to: Start > Run> Type "Compmgmt.msc".
3. Now click Disk Defragmenter.
4. Select the volume that you want to defragment and then on Defragment.
Step 3.
1. Strat Disk Defragmenter.
2. To start Go to: Start > Run> Type "defrag"
3. Now select the volume and start defragmenting.
NOTE: Defragmentation may take a long time.
Some Additional Tips:
1. First Open My Computer.
2. Click on a local Hard Drive(You can also check error for pen drive or any kind of external hard drive)
3. Now right click on the drive that you want to check for errors and click on properties.
4. Now on the Tool tab click on Check and Check for hard disk error.
Step 2.
Install Tune Up Utilities first and Run it. Click on "Overview of All Function" And Click On "Check Error" option. This will run Tune Up Disk Doctor. And Select all your Hard Drives and run "Through Analysis". It will take a long time to complete, depending on your computer speed. If you dont have much time then you can go for a quick analysis. And just wait. After completion Restart your computer.
- Hard Disk Defragmentation:
Frequent Defragmentation Of your Hard Disk make your computer run smoothly. So run disk defragmentation regularly. Here is some easy step to run Hard Disk Defragmentation.
Step 1.
1. First Open My Computer.
2. Right Click On a Local Drive that you want to defragment. And click on Properties.
3. Now on the Tool tab click on Defragment Now/Optimize
4. Now Analyze/Defragment your local drive to make it fast and smooth.
Step 2.
1. Run Computer Management MMC.
2. To Run Go to: Start > Run> Type "Compmgmt.msc".
3. Now click Disk Defragmenter.
4. Select the volume that you want to defragment and then on Defragment.
Step 3.
1. Strat Disk Defragmenter.
2. To start Go to: Start > Run> Type "defrag"
3. Now select the volume and start defragmenting.
NOTE: Defragmentation may take a long time.
Some Additional Tips:
- Keep your Hard Drive away from phones and signals.
- Keep it away from any kind of magnetic field.
- Make sure your hard disk is installed properly. Hard Disk should be install either Horizontally or Vertically.
- Keep your Hard Disk cool. Excessive heat may damage or degrade your Hard Disk.
Go to link Download
Saturday, April 22, 2017
How to create a Simple calculator Using HTML and JavaScript
How to create a Simple calculator Using HTML and JavaScript
Here are the steps to create a simple calculator using HTML and JavaScript which can evaluate simple arithmetic on integer numbers. Two types of inputs text and button are used here on a table within a form element and OnClick event was used to insert button values on the screen or to evaluate the numbers.
1. At first Insert a <form> element within <body> tag.
2. Create a table using <table> .....</table> tag.
3. Insert two types of Input text and button within table data of table row using <tr><td>....</td></tr> tag.
4. Assign OnClick event for all the buttons having numbers and arithmetic operators.
5. Give blank value for Clear(C) button.
6. Use eval() function to evaluate the numbers on OnClick event of equal to sign button.
Steps to create a Simple calculator Using HTML and JavaScript
1. At first Insert a <form> element within <body> tag.
2. Create a table using <table> .....</table> tag.
3. Insert two types of Input text and button within table data of table row using <tr><td>....</td></tr> tag.
4. Assign OnClick event for all the buttons having numbers and arithmetic operators.
5. Give blank value for Clear(C) button.
6. Use eval() function to evaluate the numbers on OnClick event of equal to sign button.
Full HTML code for a Simple HTML calculator
<html>
<head></head>
<body>
<h3>Simple Calculator</h3>
<br/>
<form Name="calc">
<table border=2>
<tr>
<td colspan=4><input type=text Name="display"></td>
</tr>
<tr>
<td><input type=button value="0" OnClick="calc.display.value+=0"></td>
<td><input type=button value="1" OnClick="calc.display.value+=1"></td>
<td><input type=button value="2" OnClick="calc.display.value+=2"></td>
<td><input type=button value="+" OnClick="calc.display.value+=+"></td>
</tr>
<tr>
<td><input type=button value="3" OnClick="calc.display.value+=3"></td>
<td><input type=button value="4" OnClick="calc.display.value+=4"></td>
<td><input type=button value="5" OnClick="calc.display.value+=5"></td>
<td><input type=button value="-" OnClick="calc.display.value+=-"></td>
</tr>
<tr>
<td><input type=button value="6" OnClick="calc.display.value+=6"></td>
<td><input type=button value="7" OnClick="calc.display.value+=7"></td>
<td><input type=button value="8" OnClick="calc.display.value+=8"></td>
<td><input type=button value="x" OnClick="calc.display.value+=*"></td>
</tr>
<tr>
<td><input type=button value="9" OnClick="calc.display.value+=9"></td>
<td><input type=button value="C" OnClick="calc.display.value="></td>
<td><input type=button value="=" OnClick="calc.display.value=eval(calc.display.value)"></td>
<td><input type=button value="/" OnClick="calc.display.value+=/"></td>
</tr>
</table>
</form>
</body>
</html>
Preview of Simple HTML calculator
Related Search Terms
Simple Calculator Usnig JavaScript
Simple Calculator Usnig HTML
How to create a Calculator
Related Posts:
How to use Round, Random, Min and Max in JavaSript
How to Concatenate, Join and Sort Array in JavaScript?
How to Loop Through JavaScript Array?
How to Loop using JavaScript?
How to Show Pop Up Boxes Using JavaScript?
How to Write Conditional Statements in JavaScript?
How to Write JavaScript With HTML?
How to create Changeable Date and Time Using JavaScript?
How to Validate a HTML Form Using JavaScript?
How to create a simple form using HTML?
How to Create JavaScript Image Slideshow with LInks
How to Display Date Format in JavaScript?
How to Validate a HTML Form Using JavaScript?
What are the Different Ways to Redirect Page in JavaScript?
How to Detect Visitors Browser Using JavaScript?
How to make rounded corners border using CSS
How to Create Custom CSS Template for Printing
How to create a simple form using HTML?
Go to link Download
Subscribe to:
Comments (Atom)