Friday, September 30, 2016
How to Create Simple Blogger Template Easily
How to Create Simple Blogger Template Easily
To create successful blog, it needs to create blogger template more attractive and looks more professional. Even you can buy professional blogger template on the web, you may want to create blogger template by yourself for your blog. Creating a professional blogger template is more challenging task, but if you have some knowledge on HTML, XML, CSS and JavaScript, it is possible to create professional blogger template easily by yourself. In this series of tutorial, I am going to teach you basic to advanced steps to create blogger template. Today I am telling you "steps for creating a simple blogger template" with describing basic elements and along with its corresponding style sheet codes.
Step1: Preparing demo blog for creating blogger template
To test blogger template you have created, at first you need to set up a blogger blog and have to add some posts on the blog. To create a blog, go to blogger home page, log in using your Google user name and password and then click on create a blog link to get started. Write posts for a blog by clicking on create a new post button from the blogger dashboard.
Step2: Creating basic elements for blogger template
Open Notepad file write the codes according to the following format and save it as .xml extension.
# Creating XML Part
At first, add the following codes for Document Type Deceleration(DTD) on XML part.
<?xml version="1.0" encoding="UTF-8" ?>
<!DOCTYPE html PUBLIC "-//W3C//DTD XHTML 1.0 Strict//EN" "http://www.w3.org/TR/xhtml1/DTD/xhtml1 -strict.dtd">
<html expr_dir=data:blog.languageDirection ># Creating Header Part
After that, add the following header elements like head and title of the blog.<head>
<title>
<b:if cond=data:blog.pageType == "index">
<data:blog.pageTitle/>
<b:else/>
<b:if cond=data:blog.pageType != "error_page">
<data:blog.pageName/> | <data:blog.title/>
<b:else/>
Page Not Found | <data:blog.title/>
</b:if>
</b:if>
</title>
</head># Creating CSS Part
Add custom css codes for your template in the following format. The css codes must be placed inside<![CDATA[*/ and ]]>
body{
font:normal normal 14px Verdana,Geneva,sans-serif;
color:#000;padding:0 40px 40px 40px;
background:#fff;
font-size:14px;
}
#outer-wrapper{
CSS for outer-wrapper
}
#header-wrapper{
CSS for header-wrapper
}
#titlewrapper{
CSS for titlewrapper
}
#descriptionwrapper{
CSS for descriptionwrapper
}
#menuwrapper{
CSS for menuwrapper
}
#contentwrapper{
CSS for contentwrapper
}
#mainwrapper{
CSS for mainwrapper
}
# Creating a Menu
To create menu for a blog, add the code in the following format. Replace URL and name of the tabs.
<div id=menuwrapper>
<ul class=FirstLevel>
<li><a href=http://www.homepage.com/ target=_self>Home
</a></li>
<li><a href=http://www.homepage.com/menu1.html target=_self>Menu1
</a></li>
<li><a href=http://www.homepage.com/menu2.html target=_self>Menu2
</a></li>
<li><a href=http://www.homepage.com/menu3.html target=_self>Menu3
</a></li>
</ul></div>
# Creating blog content
To add main blog content part, add these codes to create a widget named Blog1.<div id=outer-wrapper>
<div id=header-wrapper>
<b:section class=header id=header maxwidgets=1 showaddelement=no>
<b:widget id=HTML1 locked=true title=Header type=HTML>
</b:widget>
</b:section>
</div>
<div id=content-wrapper>
<div id=main-wrapper>
<b:section class=main id=main showaddelement=no>
<b:widget id=Blog1 locked=true title=Blog Posts type=Blog>
</b:widget>
</b:section>
</div>
</div>
</div>
Step3: Creating gadgets on sidebar and footer.
To create sidebar and footer and to add widgets for them add these code, which allows you to add widgets on sidebar and footer.
<div id=sidebar-wrapper>
<b:section class=sidebar id=sidebar showaddelement=yes>
</b:section>
</div>

<div id=footer-wrapper>
<b:section class=footer id=footer showaddelement=yes>
</b:section>
</div>
Step4: Installing blogger template on required blog.
After creating a code file on Notepad in XML format, test it on demo blog. To install prepared template, click on backup and restore button from template option on blogger dashboard. Click on download full template, the xml file will be downloaded. Then go to the required blog then go to Template › Backup / Restore option and browse and upload that xml file. The template will be applied on your blog.
Related Posts:
- How To Make Simple CSS Stylesheet for a Website ?
- How To Create Simple Menu Using CSS ?
- How to validate required field in a form using javascript
- How to Display Date Format in JavaScript?
- How to Create a Digital Clock in JavaScript?
- What are the Different Ways to Redirect Page in JavaScript?
- How to Detect Visitors Browser Using JavaScript?
- Image Slideshow with Navigation Buttons Using Javascript
- How to Create Simple JavaScript Fade Effect Animation?
- Simple JavaScript Fade Effect Animation Using Jquery
Go to link Download
How to rollback Windows 10 after 30 days limit
How to rollback Windows 10 after 30 days limit
BEST GREENHOUSES FOR GROOVING VEGETABLES
? ? 1(360)241-1624 ?

? ? 360organic.us ?
DURABLE! AFFORDABLE! ALUMINUM + UV POLYCARBONATE

If you upgraded to Windows 10, from Windows 8.1 or Windows 7, the new operating system allows you to rollback Windows 10 to your previous version, provided you carry out the rollback operation within 30 days. But if you use this trick, you should be able to roll back Windows 10 to your previous version, even after the 30 day limit. Let us see how.
After you upgrade to Windows 10 you may notice two folders on your System or C Drive named $Windows.~BT and $Windows.~WS. These folders are hidden and are created by Windows, during the upgrade process. To see them, open Folder Options, and set Windows to show hidden and operating system files and folders. You will then be able to see them.
These $Windows.~BT, $Windows.~WS and Windows.old folders are required by the system to perform the rollback operation. After 30 days, Windows 10 automatically deletes these folders during Automatic Maintenance. After 30 days, you may not see the option to Rollback in the Settings app or you may receive a message We’re sorry, but you can’t go back.
Rollback Windows 10 after 30 days
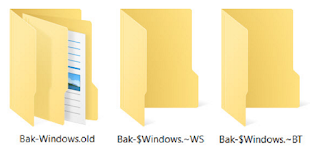
What you can do is rename these folders, as soon as you upgrade, and definitely before the 30 day period.
Rename $Windows.~BT to say Bak-$Windows.~BT, $Windows.~WS to Bak-$Windows.~WS and Windows.old folder to Bak- Windows.old.
When you do this, Windows 10 will not be able to delete these folders as you will have changed their names.
If you decide to rollback after 30 days, rename these folders back to their original names and visit Settings > Update & Security > Recovery to Go back to Windows 8.1 or Windows 7.
If you wish, you may also back up these 3 folders to an external drive with their original names.
If you do feel the need, you should now be able to rollback even after 30 days. But then you will have to backup your latest data before you carry out the rollback operation.
This should work – but I cannot guarantee that it will, since I have not tried it! Let us know if this works for you or not.
- Rollback from Windows 10 to your previous version of Windows
Durable Greenhouses made from Polycarbonate UV Protected material and Aluminum

ALSO PLEASE VISIT THIS VIDEOS AND SEE IF YOU FIND SOMETHING NEED:
Windows Registry Tools can be downloaded here:
How to kip your PC Private by deleting DATA Permanently
http://askpctech.blogspot.com/2016/03/kip-your-pc-privat.html
This tutorial is made up on request several users, is well is fallowing video:
1)How to Delete Paint Recent Pictures from List in Windows 7
2)Win 7– Fix for “Safely Remove Hardware and Eject Media” not working How To
3)Windows 10 How to Fix Black Screen After Booting
4)How To Remove Windows 10 Upgrade Notification On Windows 7 And Windows 8
5)How to Delete Face book Page Permanently - 2015
6)How to Uninstall Windows 10 and Downgrade to Windows 7 or 8.1
7)detected: not-a-virus:remoteadmin.win32
8)How to change pictures into icons for folders
9)Speed up your PC Disable System Restore on SSD
10)Speed up your PC Disable Scheduled De-fragmentation SSD
11)2015 Black screen of DEATH Windows 7 & 8 - with cursor at start-up SOLVED
12)Upon start up only wallpaper shows FIX
13)Here is video on Windows 7 & 8 - Black screen with cursor at start-up FIX
You can also open Task Manager by pressing Ctrl+Shift+Esc.
14) I bought a windows 7 PC but it Look alike old PC FIX:
15) Windows 7 & 8 - Black screen with cursor at start-up FIX:
16) How To Fix Minecraft OpenGL Error Windows 7 xp vista 720p :
17) removing bars using regscanner regedit & file shredder 720p:
18) How to Recover windows Explorer from error 2014 720p
19) HOW TO Save on battery online
20) Windows 7 & 8 - Black screen with cursor at start-up FIX
Upon start up only wallpaper shows no icons
CTL+ALT+DEL then click file and new task. then type explorer.exe and press ok
Best Greenhouse system 2015
Go to link Download
How To Compile Java Program In Windows Command Prompt
How To Compile Java Program In Windows Command Prompt
This time I will discuss about How To Compile Java Program In Windows Command Prompt. Actually, this post should be in the early days before I post the java program, but rather than not, I will share the stages ...
1. you install Platform (JDK) first, if not there you can download HERE
2. After installing the JDK, you set java path by opening Explorer, right click on Computer -> Properties -> Advanced System Settings -> Environment Variables
3. Then select the "path" and select edit.
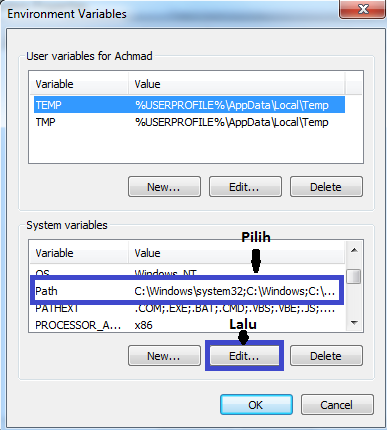
4. Enter the address of java bin folder already installed (example: C: Program Files Java jdk1.7.0 bin) to the Path earlier by:
-. Add mark; (semicolon) at the end of the variable value and copy the bin folder above address.
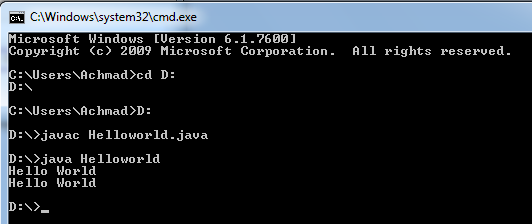
5. After that, check on your CMD (click the Windows icon, type CMD) is already in place or not. Previously moved first directory where you saved the java file, for example stored in the directory "D", then typing cd D: then D:.
Then, typing javac nameclass.java (Change nameclass with namakelas your files), then typing java nameclass.
6. Completed. (^ _ ^)
A few of my discussion on How to Compile Java Programs in Command Prompt, may be useful.
1. you install Platform (JDK) first, if not there you can download HERE
2. After installing the JDK, you set java path by opening Explorer, right click on Computer -> Properties -> Advanced System Settings -> Environment Variables
3. Then select the "path" and select edit.
4. Enter the address of java bin folder already installed (example: C: Program Files Java jdk1.7.0 bin) to the Path earlier by:
-. Add mark; (semicolon) at the end of the variable value and copy the bin folder above address.
5. After that, check on your CMD (click the Windows icon, type CMD) is already in place or not. Previously moved first directory where you saved the java file, for example stored in the directory "D", then typing cd D: then D:.
Then, typing javac nameclass.java (Change nameclass with namakelas your files), then typing java nameclass.
6. Completed. (^ _ ^)
A few of my discussion on How to Compile Java Programs in Command Prompt, may be useful.
Go to link Download
Hotspot Shield v3 35 Elite Incl Crack
Hotspot Shield v3 35 Elite Incl Crack

Description:-
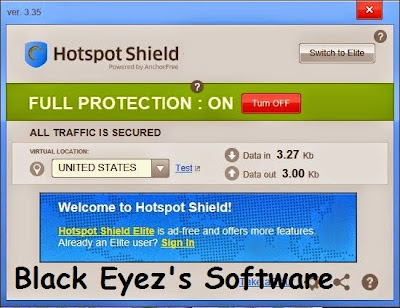
Hotspot Shield is a versatile internet security and privacy solution. In addition to protecting you from dangerous online threats, it also protects your privacy and enables you to access any blocked websites and content.
Hotspot Shield creates a virtual private network (VPN) between your device and its Internet gateway. This impenetrable tunnel prevents snoopers, hackers, and ISP‘s from spying on your web browsing activities, instant messages, downloads, credit card information or anything else you send over the network.
Features:-
Unblock any websites – Can’t access YouTube or Facebook at school or work? By using Hotspot Shield VPN software you can unblock YouTube, unblock Facebook or unblock any sites from anywhere.
Protect your IP address – VPN software enables you to protect your IP address so you can enjoy private browsing and prevent hackers and spammers from monitoring your online activities.
Surf the Web anonymously – By creating an encrypted tunnel between your computer and Hotspot Shield servers, Hotspot Shield enables you to surf the Web anonymously without being tracked or spied on.
Protect yourself from snoopers and hackers at WiFi hotspots, hotels, airports and corporate offices with the Hotspot Shield WiFi security feature.
Secure your web session – Secure your data, online shopping, and personal information online with HTTPS encryption.
Protect your devices from malware attacks – The latest version of our software now offers complete malware protection!
Requirements:-
Windows XP / Windows 7/ Windows 8 / Windows 8.1 or above running 1GB or above RAM
Previews:-
Download Link:-
 |
| Download Hotspot Shield Password is: blackeyez007.blogspot.com |
Go to link Download
Thursday, September 29, 2016
Inject Polosan Tsel Asmad Asjat Nusa Bali
Inject Polosan Tsel Asmad Asjat Nusa Bali
Inject Polosan Telkomsel As jatim, langsung Pancal
jangan Lupa sesuaikan Port 9999 Di Mozzila dan Idm
Happy browsing :)
Go to link Download
icolor Folder
icolor Folder

Icon Pack

About
iColorFolder allows to customize the color of every Windows XP folder
Organise your files more easily
With iColorFolder, give some color to Windows XP folders. With just a right-click, colorize your folders, and discover a new intuitive way to classify your files. A quick look is now enough to identify the folder you are looking for !
Classify your folders by Family
You can now classify your folders by Family. Red is an Important folder, Orange is Urgent, Green is Familial… Choose the attributions that you like, so you’ll never delete an important folder by error.
A fast and light tool
iColorFolder is a very light soft, that doesn’t stay in memory. It uses a native functionnality of Windows XP to be more efficient. Discover it’s simplicity : with a single right-click on a folder you colorize it ; the necessary and only the necessary. iColorFolder is proudly an Open-Source software.
Fully skinnable
iColorFolder is bundled with three apparences : the default apparence of Windows XP folders, a Mac OS X skin and a Snow.E2 skin. If your system is already customized with shellpacks like WinOSX, you’ll keep the same folder apparence. If you want more skins, you can download the Screenshots Section some images describing iColorFolder and presenting it’s functionalities. Try it ! If you don’t like it, you can uninstall it fully and quickly.
Go to link Download
How to Survive PC Game Compressed Full Version Free Download
How to Survive PC Game Compressed Full Version Free Download
How to Survive PC Game Compressed Full Version Free Download : An unknown how the crash on a remote island off the coast of Colombia strands develop a robust system for players to avoid , unique survival guide and a host of playable characters , featuring ... But you re not alone . To survive , you must meet the most basic of needs - food , water and shelter , finding the Molotov cocktails , as well as fishing rods produced dozens of tools and weapons . Infected players to take on an increasing array of local and online multiplayer story and challenge modes can team up with other survivors .
It will survive and slap on a remote island off the zombies , are dangerous ?finally able to avoid the automatic guns , crafts , knives and Molotov cocktails over 100 different weapons , including the game dark and scary island , and there is less access to the game .
 |
| How to Survive PC Game Compressed Full Version Free Download |
 |
| How to Survive PC Game Compressed Full Version Free Download |
 |
| How to Survive PC Game Compressed Full Version Free Download |
 |
| How to Survive PC Game Compressed Full Version Free Download |
Download
Go to link Download
How to Remove Dragon Branch Ads Malware Uninstall Guide
How to Remove Dragon Branch Ads Malware Uninstall Guide
Dragon Branch has been created to display adverts "Dragon Branch Ads" to you whenever youre connected to the internet and looking at websites, is something that anyone who goes online needs to be aware of. Yes, you guessed it right! Its adware. Adware is short for advertising supported software and its reason for existing is to generate income for a software programmer. Usually because they have created a free program and the adware is covering their costs.
Dragon Branch adware is not usually considered to be as bad as the other types of malicious software, mostly because most people fall on either side of the fence when it comes down to it. A lot of people arent bothered in the slightest by adware. After all, if you dont want to pay for your downloaded files or applications then seeing Dragon Branch Ads can seem like a small price to pay.

However, there are others who strongly resent adwares presence on their computer. The Dragon Branch ads can be distracting and annoying, and may affect your browsing experience. Even worse though, adware becomes more worrying when it spies on you, rather like the type of malware known as spyware. The adware installs a component on your PC or phone during the installation process and uses this to monitors your online activity. That means it, well someone is fully aware of everything you do when youre looking at websites.
The adware component collects your browsing data, making note of the services or goods that you look at and then sends this information back to the programmer. They are then able to show you ads by Dragon Branch that closely, or even exactly, match the things you have recently been looking at. A pretty aggressive marketing tactic, we think youll agree. Not to mention a complete invasion of your privacy.
Other problems caused by Dragon Branch
But thats not all – although by now you may well be thinking that was already more than enough unwanted behavior, but it can also have a disastrous effect on your PC security. Thats because the adware on your machine can interact negatively with other programs or apps that you have installed – including your anti-virus or anti-malware software. The adware component causes programs to run slowly or become unstable, which in turn can create security breaches that leave your system weakened and more vulnerable to attack.
How does Dragon Branch get on to your device?
Dragon Branch is most often found bundled with other programs – often free ones. However because most adware programmers dont see why you would have an issue with their marketing strategy, it is often mentioned in license agreements. That means instead of clicking through the check boxes to install your software or download your file as quickly as possible, you should make sure that you slow down and stop to read the small print.
It is important that you pay attention when downloading and installing anything however if that something is a free program such as a game or other app then you should especially take care.
If your computer is already infected and you dont know how to stop Dragon Branch ads and remove this aggressive adware from the system, please follow the steps in the removal guide below. If you have any questions, please leave a comment down below. Good luck and be safe online!
Written by Michael Kaur, http://deletemalware.blogspot.com
Dragon Branch Ads Removal Guide:
1. First of all, download anti-malware software and run a full system scan. It will detect and remove this infection from your computer. You may then follow the manual removal instructions below to remove the leftover traces of this malware. Hopefully you wont have to do that.

2. Remove Dragon Branch related programs from your computer using the Add/Remove Programs control panel (Windows XP) or Uninstall a program control panel (Windows 7 and Windows 8).
Go to the Start Menu. Select Control Panel ? Add/Remove Programs.
If you are using Windows Vista or Windows 7, select Control Panel ? Uninstall a Program.

If you are using Windows 8, simply drag your mouse pointer to the right edge of the screen, select Search from the list and search for "control panel".
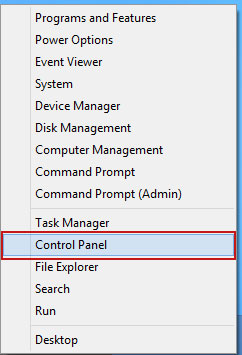
Or you can right-click on a bottom left hot corner (formerly known as the Start button) and select Control panel from there.
3. When the Add/Remove Programs or the Uninstall a Program screen is displayed, scroll through the list of currently installed programs and remove the following:
- Dragon Branch
- GoSave
- Active Discount
- SaveNewaAppz
- and any other recently installed application
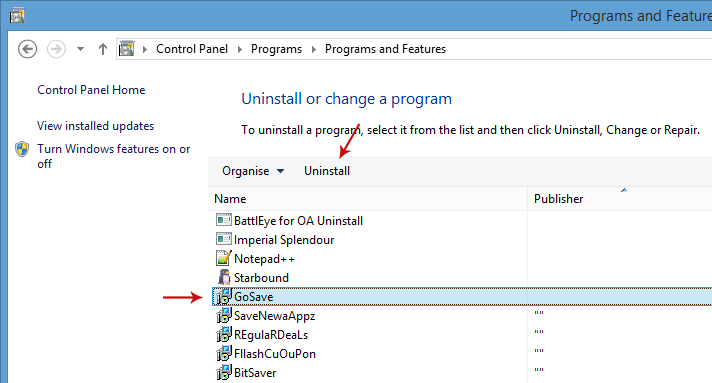
Simply select each application and click Remove. If you are using Windows Vista, Windows 7 or Windows 8, click Uninstall up near the top of that window. When youre done, please close the Control Panel screen.
Remove Dragon Branch related extensions from Google Chrome:
1. Click on Chrome menu button. Go to Tools ? Extensions.
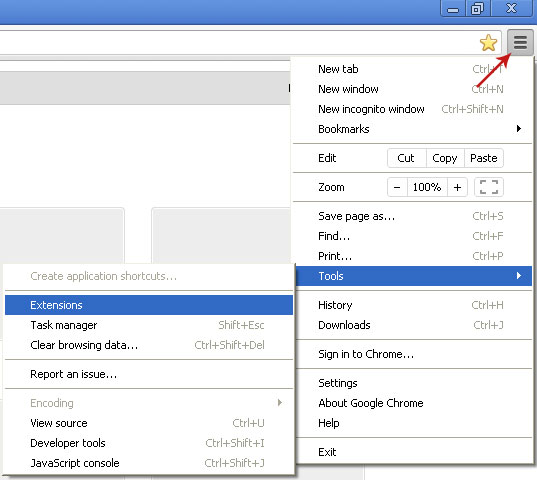
2. Click on the trashcan icon to remove Dragon Branch, Active Discount, MediaPlayerV1, Gosave, HD-Plus 3.5 and other extensions that you do not recognize.
If the removal option is grayed out then read how to remove extensions installed by enterprise policy.

Remove Dragon Branch related extensions from Mozilla Firefox:
1. Open Mozilla Firefox. Go to Tools ? Add-ons.

2. Select Extensions. Click Remove button to remove Dragon Branch, Active Discount, Gosave, MediaPlayerV1, HD-Plus 3.5 and other extensions that you do not recognize.
Remove Dragon Branch related add-ons from Internet Explorer:
1. Open Internet Explorer. Go to Tools ? Manage Add-ons. If you have the latest version, simply click on the Settings button.

2. Select Toolbars and Extensions. Click Remove/Disable button to remove the browser add-ons listed above.
Go to link Download
Game Racing yang Wajib dimiliki
Game Racing yang Wajib dimiliki
Met pagy sista2 n agan2 sekalian, nie ane mw sharing2 tentang game racing atau game balapan yg d rekomendasikan untuk ponsel android agan2 sekalian,. ane mnta maaf qlo kaga mencantumkan game yg lain, karena ane cuma cri yang pernah ane mainin, hehehehe,,.. (bhasanya blepotan ea.. hehehehe)
1. GT Racing

Game racing ini keren loch gan, tampilan yang real untuk sebuah game. ayo mainkan game ini di androidmu. Download disini atau di google play
2. Asphalt 7

Game ini gam yang paling ane suka gan, sama sprti GT Racing, tampilan game ini sangat keren. hehehehe...... Download disini atau di google play
3. Need For Speed Shift (NFS Shift)

Game ini sangat di gandrungi yang versi PC nya, tp d android game ini juga di gilai oleh gamers ponsel android. mau memainkannya? download game nya disini atau di google play.
4. Drag Racing

ini adalah game racing yang bisa digunakan online. kita bisa drag dengan orang lain di game ini. pasti dijamin seru. download game nya disini atau di google play
5. Riptide GP

Game ini juga ajib loch gan.. grafiknya sip dach. hehehehe.. agan dapat download disini atau di google play.
6. Recless Gateway

Game racing yang lumayan bagus gan, dan grafiknya cukup ciamik. agan dapat download game nya disini atau di google play.
7. Jet Cars Stunt

game ini juga wajib untuk di miliki, game dengan jalanan yang sangat mendebarkan. agan dapatg downlod game nya disini atau di google play.
8. Trial Xtreme

Game ini beda ama yang di atas gan, kan qlo di atas game racing car, kali ini game yang menggunakan motorcross. hmmm, seru kali ya... download aja langsung disini atau di google play.
9. Moto GP 2012

Nah selain menggunakan motorcross, game yang satu ini adalah game racing yang mengadopsi Moto GP. seru loch ini gan, agan dapat langsung download disini atau di Google play
10. Final Free Way 2r

kembali game yang menggunakan mobil,,, game ini juga asyik untuk dimiliki. agan dapat download gamnya disini atau di google play.
nah, sekian postingan tentang game racing yang wajib di coba atau wajib ada di ponsel androidmu.
Go to link Download
Wednesday, September 28, 2016
How to Reset Your Forgotten Windows Password the Easy Way
How to Reset Your Forgotten Windows Password the Easy Way

Forgetting your password is never any fun, but luckily there’s a really easy way to reset the password. All you need is a copy of the Windows installation disk and one simple command line trick.
Resetting Your Forgotten Windows Password
Boot off the Windows disk and select the “Repair your computer” option from the lower left-hand corner.

Follow through until you get to the option to open the Command Prompt, which you’ll want to select.

First you will be sure in which drive your windows will be installed.
Follow through until you get to the option to open the Command Prompt, which you’ll want to select.
First you will be sure in which drive your windows will be installed.
You’ll want to type in the following command to backup the original sticky keys file:
copy c:windowssystem32sethc.exe c:
(Note:-If your windows on D: replace D with C.
Then you’ll copy the command prompt executable (cmd.exe) over top of the sticky keys executable:
copy c:windowssystem32cmd.exe c:windowssystem32sethc.exe

Now you can reboot the PC.
Then you’ll copy the command prompt executable (cmd.exe) over top of the sticky keys executable:
copy c:windowssystem32cmd.exe c:windowssystem32sethc.exe
Now you can reboot the PC.
Resetting the Password
Once you get to the login screen, hit the Shift key 5 times, and you’ll see an administrator mode command prompt.

Now to reset the password—just type the following command, replacing the username and password with the combination you want:
net user geek MyNewPassword

That’s all there is to it. Now you can login.
Go to link Download
Get 40 OFF Blu ray DVD Copy to Copy Thanksgiving Blu ray DVDs on PC Mac
Get 40 OFF Blu ray DVD Copy to Copy Thanksgiving Blu ray DVDs on PC Mac
Thanksgiving Day is coming. Some of you are probably planning the Thanksgiving menus for your family while some are ready for selecting the best Thanksgiving present for their parents. With great blessing and best wishes, Pavtube Studio also prepared a big gift for their consumer - Thanksgiving Promotion 2015 to celebrate Thanksgiving Day with our friends. Focusing on product quality and customer needs, Pavtube offers up to 40% discount for hot products to reward our customers.

Thanksgiving Day always comes with movies. I believe you must have prepared some Thanksgiving movies for enjoy with your family after dinner. With this wish, how can you bear the incompatibility issue when playing Thanksgiving Blu-ray/DVD movies on your HD TV, iPad, 4K Projector, etc. To avoid the embarrassing situation, you’d better rip the Blu-ray/DVD movies to your multimedia players with most compatible format and specs by using
Pavtube BDMagic for Windows / Mac
Pavtube DVDAid for Windows / Mac
Pavtube ByteCopy for Windows / Mac
When enjoying the Thanksgiving movies and having the Thanksgiving dinner together, how can you not record the scene to remember the warm time? After you record the happy time, you maybe want to edit the shooting in iMovie, FCP, Premiere Pro CC, etc before you sent it to your other family members or share it on Facebook. While putting the shoot into video editing program, you probably need the help of Pavtube Video Converter Ultimate and iMedia Converter for Mac, which can convert your HD/4K shoot to H.265 MKV/MP4, HD MP4, QuickTime, MOV, ProRes, AIC, DNxHD, MPEG-2, WMV, H.264, MPEG-4, etc. for your FCP X, iMovie, Premiere Pro CC, Sony Vegas Pro 13, Windows Media Player, VLC, Youtube, etc. On Windows 10/8.1/8/7/XP and Mac OS X 10.11 El Capitan, 10.10 Yosemite, 10.9 Mavericks, 10.8 Mountain Lion, 10.7, 10.6, 10.5.
Pavtube Video/BD/DVD software can convert Blu-ray/DVD, 4K/SD/HD video in any format to H.265 MP4/MKV, M3U8, MP4, MOV, MKV, AVI, M4V, etc. Especially, ByteCopy can rip Blu-ray/DVD to lossless MKV keeping multi-track subtitle/audio and all chapter markers. What’s more, Pavtube adds optimized preset profile for main digital products, like TV series, iPad, iPhone, Samsung, Sony, PS3/PSP, Xbox One/360, Android Tablet/Phone, Surface, etc.
Hot Search: Blu-ray Tips | DVD Tips | Chromecast Tips | Roku Tips | PS4 Tips
All of the products can be get now at up to 40% off discount. Below is the list:
1. 40% OFF Pavtube DVDAid for Windows/Mac
Original price: $35
Now: $21
Reasons to choose Pavtube DVDAid


2. 30% OFF Pavtube BDMagic for Windows/Mac
Original price: $49
Now: $34.3
Reasons to choose Pavtube BDMagic
3. 20% OFF Pavtube ByteCopy for Windows/Mac
Original price: $42
Now: $33.6
Reasons to choose Pavtube ByteCopy
4. 20% OFF Pavtube Video Converter Ultimate for Windows/Mac
Original price: $65
Now: $52
You won’t get a Blu-ray/DVD Software at such low price in normal days. So if you have a plan to purchase a BD/DVD/Video Converter in the near future, why not push the schedule forward and get it in Pavtube Thanksgiving Promotion activity.
Additional: To help you make a wise choice, I did a deep review and comparison between the four backup tools. You can check out the differences and then choose the favorite to create high quality Blu-ray/DVD/ISO/4K/HD Video and Movie backups: Pavtube Softwares Comparison: ByteCopy vs BDMagic vs DVDAid vs Video Converter Ultimate
Related Guides
1. Pavtube DVDAid for Windows/Mac Guides
PS. Have more questions about how to download, buy and use our Blu-ray/DVD Ripper, various Video Converter programs, please feel free to contact us>> or leave a message on our Official Facebook.
Thanksgiving Day always comes with movies. I believe you must have prepared some Thanksgiving movies for enjoy with your family after dinner. With this wish, how can you bear the incompatibility issue when playing Thanksgiving Blu-ray/DVD movies on your HD TV, iPad, 4K Projector, etc. To avoid the embarrassing situation, you’d better rip the Blu-ray/DVD movies to your multimedia players with most compatible format and specs by using
Pavtube BDMagic for Windows / Mac
Pavtube DVDAid for Windows / Mac
Pavtube ByteCopy for Windows / Mac
When enjoying the Thanksgiving movies and having the Thanksgiving dinner together, how can you not record the scene to remember the warm time? After you record the happy time, you maybe want to edit the shooting in iMovie, FCP, Premiere Pro CC, etc before you sent it to your other family members or share it on Facebook. While putting the shoot into video editing program, you probably need the help of Pavtube Video Converter Ultimate and iMedia Converter for Mac, which can convert your HD/4K shoot to H.265 MKV/MP4, HD MP4, QuickTime, MOV, ProRes, AIC, DNxHD, MPEG-2, WMV, H.264, MPEG-4, etc. for your FCP X, iMovie, Premiere Pro CC, Sony Vegas Pro 13, Windows Media Player, VLC, Youtube, etc. On Windows 10/8.1/8/7/XP and Mac OS X 10.11 El Capitan, 10.10 Yosemite, 10.9 Mavericks, 10.8 Mountain Lion, 10.7, 10.6, 10.5.
Pavtube Video/BD/DVD software can convert Blu-ray/DVD, 4K/SD/HD video in any format to H.265 MP4/MKV, M3U8, MP4, MOV, MKV, AVI, M4V, etc. Especially, ByteCopy can rip Blu-ray/DVD to lossless MKV keeping multi-track subtitle/audio and all chapter markers. What’s more, Pavtube adds optimized preset profile for main digital products, like TV series, iPad, iPhone, Samsung, Sony, PS3/PSP, Xbox One/360, Android Tablet/Phone, Surface, etc.
Hot Search: Blu-ray Tips | DVD Tips | Chromecast Tips | Roku Tips | PS4 Tips
All of the products can be get now at up to 40% off discount. Below is the list:
1. 40% OFF Pavtube DVDAid for Windows/Mac
Original price: $35
Now: $21
Reasons to choose Pavtube DVDAid
2. 30% OFF Pavtube BDMagic for Windows/Mac
Original price: $49
Now: $34.3
Reasons to choose Pavtube BDMagic
3. 20% OFF Pavtube ByteCopy for Windows/Mac
Original price: $42
Now: $33.6
Reasons to choose Pavtube ByteCopy
4. 20% OFF Pavtube Video Converter Ultimate for Windows/Mac
Original price: $65
Now: $52
You won’t get a Blu-ray/DVD Software at such low price in normal days. So if you have a plan to purchase a BD/DVD/Video Converter in the near future, why not push the schedule forward and get it in Pavtube Thanksgiving Promotion activity.
Additional: To help you make a wise choice, I did a deep review and comparison between the four backup tools. You can check out the differences and then choose the favorite to create high quality Blu-ray/DVD/ISO/4K/HD Video and Movie backups: Pavtube Softwares Comparison: ByteCopy vs BDMagic vs DVDAid vs Video Converter Ultimate
Related Guides
1. Pavtube DVDAid for Windows/Mac Guides
- Rip DVD with 99 Titles Strict Copy Protections on Win/Mac
- Upload DVDs to Google Drive for accessing on Phone/Tablet
- Stream DVD Movies to Watch on PS4 with Plex Media Server
- Add SRT/ASS/SSA Hard Subtitles to DVD Movies
- Stream Blu-ray/DVD Movies for Playing on Roku 4
- Backup Blu-rays to Dropbox for Easy Viewing and Sharing
- Backup Blu-ray to Synology DiskStation DS215j for Smart TV
- Watch Blu-ray/DVD on Mac Mini HTPC via XBMC With Lossless Quality
- Encode Blu-ray to TrueHD 7.1 Audio MKV on Windows 10/8.1/8
- Play 3D Blu-ray Movies on WD TV Live/Live Plus/Live Hub/Live Streaming
- How to preserve Blu-ray chapter markers in digital copies?
- Rip Blu-ray movies to MKV/MP4 for playing with Kodi (XBMC)
- Enjoy Blu-ray/DVD/Video on LG Ultra 4K TV Windows and Mac
- Watch 3D Yify Movie on Samsung Gear VR with 3D SBS format
- Save Movies and Videos on Dropbox, Google Drive, OneDrive, Box
- Edit BDMV Files with QuickTime, iMovie, FCP on Mac OS X El Capitan
PS. Have more questions about how to download, buy and use our Blu-ray/DVD Ripper, various Video Converter programs, please feel free to contact us>> or leave a message on our Official Facebook.
Source:http://open-media-community.com/2015/11/11/pavtube-thanksgiving-coupon/
Go to link Download
Subscribe to:
Posts (Atom)