Tuesday, January 31, 2017
How to Delete and Clear Recent Items in Windows 7 Jump Lists
How to Delete and Clear Recent Items in Windows 7 Jump Lists

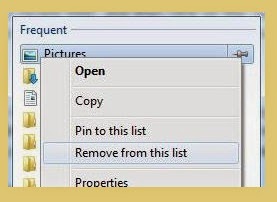
Windows 7 has a new feature called Jump list which provides an easy access to various functions or features related to the programs directly on the applications’ icons or buttons on the Taskbar. Jump Lists, which is popping up and displayed whenever user right clicks on an icon or button on Taskbar, also shows recent items that opened or closed by the app, or frequently used or most visited items by the program. While the recent items that appear on the JumpLists allows user to quickly re-open the files, these access information may be deemed private and sensitive to some users. Windows 7 provides an easy way to delete and remove the recent item from the Jump Lists: .On the Jump Lists, right-click a recent item, and then click on the Remove from this list option.
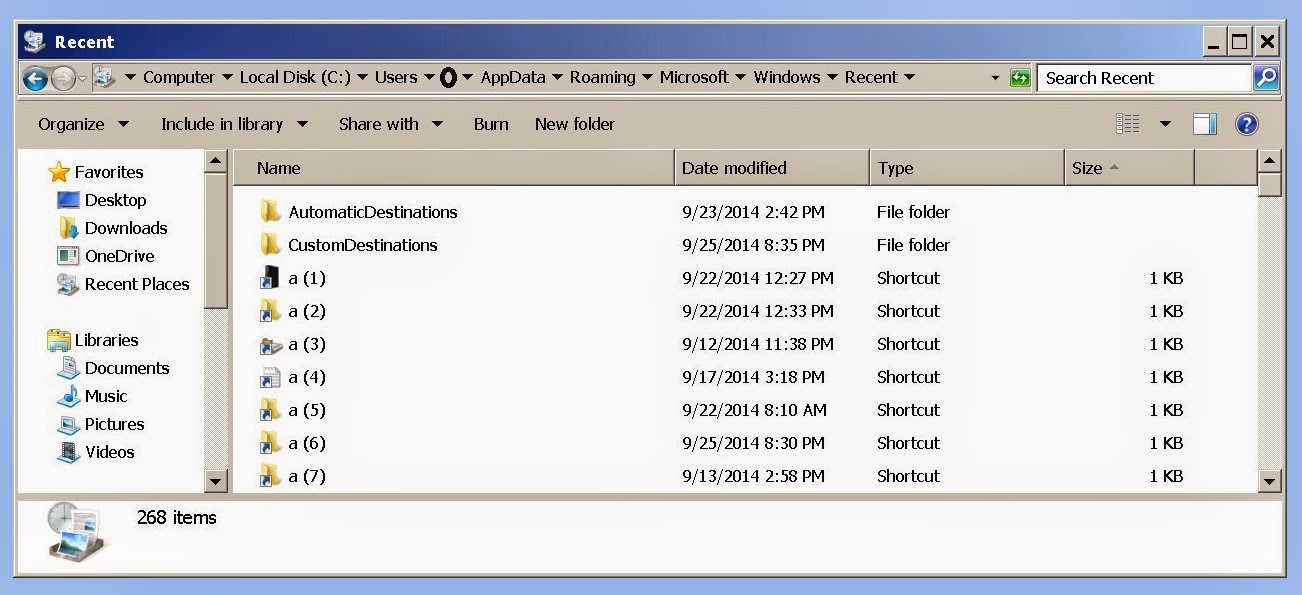
In the address bar, enter (or copy and paste) the following file location:
%AppData%MicrosoftWindowsRecentAutomaticDestinations
Random black screen while playing games
Durable Greenhouses made from Polycarbonate UV Protected material and Aluminum

Go to link Download
Monday, January 30, 2017
How To Hide Folder in Windows 7 With Command Prompt
How To Hide Folder in Windows 7 With Command Prompt
1. Open the command prompt application. Or press Win + R. Then type cmd. then Enter
After Open a Command Prompt window. Type the disk where the file your secret. eg I will hide the folder named Fathin Disks are located in the "D" >> Songs >> Fathin. I then type D:. Enter. Type cd tracks again. Once the folder named Fathin invisible attributes are now staying put for menghidden. Just type attrib + s + h Fathin.
Click the image to make it more clear
Description of each attribute command can be seen by typing attrib /? .
So a little review about Tricks How to hide Secret Files using CMD. May be useful.
Go to link Download
How to Fix Error Am trying to run office 2010 starter but it says it cannot complete the installation
How to Fix Error Am trying to run office 2010 starter but it says it cannot complete the installation
Am trying to run office 2010 starter but it says it cannot complete the installation
My sister bought a new acer PC with pre-installed win7 starter.
they initially installed open office but upon telling them that there is a free office 2010 starter included we tried running it but it says it cannot complete the installation and to contact
support.please kindly advise how we can use the prduct
Solutions to the Problem Am trying to run office 2010 starter but it says it cannot complete the installation
Download Error Fixer (Free)
Its supposed to work, "out of the box".
Ive seen this "initialization process", that appears to not work for you:
Initialize Starter
You have to initialize starter before it will run.
Type Office Starter into search programs and files text box, using the resulting shortcut, a window should open, select starter and initialize, it will take a few minutes.
If there is still a problem call the PC makers support, office starter is a preinstalled version supported by that PC maker, and not MS, despite what they may tell you.
One thing you can do is take a look in the event viewer to see if you can locate the error associated with your startup attempts.
If you find it, there is often a hyperlink to possible solutions.
You can also google for the error code.
Examine the Vista/Win7 Event Viewer
http://windows.microsoft.com/en-US/windows-vista/Open-Event-Viewer how to start event viewer
http://www.petri.co.il/vista-event-viewer.htm - what you are seeing in the event viewer & how to use it
Vista and Win7 Event Viewer are essentially the same.
Something is “broke”.
Is there an error message? It should be recorded in the Event Viewer, along with more details.
To take a look in the Event viewer, go to the Start menu, enter "event" in the search window, click on "Event Viewer".
In event viewer, open the Error and Warning message categories.
Look for a source like Outlook or MS Office and also look for the time that you had the problem (ie just a couple of minutes ago).
Report the error code and full, exact error message text you find that appear relevant.
If you cant get it to work, contact the computer builder.
The are responsible for providing support for Starter
Support for Starter - OEM responsibility by the license
Starter is only installed by the manufacturer.
If you have a problem with it, you have to go back to them for support because it is installed under the "OEM" license.
They will try to fob you off on MS, but that is not the terms of the license they
agreed to when they installed it.
2. OEM LICENSE TERMS
These license terms are an agreement between you and
• the device manufacturer that distributes the software with the device;
or
• the software installer that distributes the software with the device.
Please read them.
They apply to the software that accompanies these license terms, which includes the media on which you received it, if any.
Printed-paper license terms, which may come with the software, take the
...
17.
SUPPORT SERVICES.
For the software generally, contact the manufacturer or installer for support options.
Refer to the support number provided with the software.
8.
End User Support:
For Microsoft Office Starter 2010, under the License Terms, you are the licensor and are responsible for providing end user support.
Check memory problems
Memory management issues can also cause a BSOD in Windows 7. Thankfully, Windows 7 has a Memory Management Diagnostic tool that detects and solves problems related to system memory.
- Click on the Start button on the Taskbar.
- Type "Windows Memory Diagnostic Tool" or "Memory" (without quotes) in the Search box or,
- Click on Windows Memory Diagnostic Tool (in the search results).
- Click on "Restart now and check for problems (Recommended)".
- The system will restart, and you need to follow the instructions given on the screen.
Another Safe way to Fix the Problem: Am trying to run office 2010 starter but it says it cannot complete the installation:


How to Fix Am trying to run office 2010 starter but it says it cannot complete the installation with SmartPCFixer?
1. Click the button to download SmartPCFixer . Install it on your computer. Open it, and it will perform a scan for your computer. The errors will be shown in the list.

2. After the scan is finished, you can see the errors and problems need to be repaired. Click Fix All.

3. The Repair part is done, the speed of your computer will be much higher than before and the errors have been removed. You can also use other functions in SmartPCFixer. Like dll downloading, windows updating and print spooler error repair.

Related: error message fsui.exe/ wlidcli.dll is missing
,Solution to Error: Excel: Automatic number generation
,Troubleshoot:i wanna change language of all windows in Windows 7 Home Premium
,Troubleshooting:IF Function, if the vendor ID in column A matches any of the vendor IDs in column F, I want 1099 to appear in column D. Error
,Fast Solution to Problem: ReadyBoost is not working properly in my computer
,Troubleshoot:Error: "0x81000032 make sure the C: drive is online and set to NTFS" when trying to backup to external hard drive. Error,External Hard Drive not listed in Windows 7 backup wizard Tech Support,Tech Support: Im always being signed off so annoying,Solution to Problem: Impossible to use Internet Explorer! I keep getting the same error message every time i try to use IE.,Referencing data in Access using Excel [Anwsered],Need Best Way To Present Data [Anwsered],Same question but for windows 7 home edition,sometimes fullscreen wont activate [Solved],Solution to Error: We bought a new computer with windows 7 and it is constantly freezing. How do we fix this?,Solution to Error: Windows 8 update crash (2013-07-22),brclr.dll.mu_ Missing Error Fixer,How To Resolve Missing fin_myagtui.eng Problem,Corrupted f_0006ad File - How to Fix,nkebigvg.cpl Not Found Error Fixer,Corrupted olcontrols.ocx File - How to Fix
Read More: Troubleshooting:Apparently my Acer Aspire cannot reliably support Win 7. What do you advise for a downgrade - Vista or XP? Error,[Anwsered] AppHangXProcB1 - explorer.exe - svchost.exe,Troubleshooting:AMD Radeon HD 7730m not working Dell Inspiron 15r SE 7520 Error,Troubleshoot:Anyone have an ACER computer that has had virus problems Error,Fast Solution to Problem: Am using Acer Aspire 1692WLMi with Windows XP Home Edition. Problem is could not shut down windows normally with "shut down" and "restart" buttons. Currently, could only shut down by hybernating or standby. Please assist. Thanks! Cheers!,After Windows Update CD/DVD drive does not work,After installing windows 7 to laptop the labels print out of line how can I fix it,After my computer sleeps the wireless always disconnects and will no reconnect,After signing into Pogo.com, I get a message" This tab has been recovered"....what does this mean and how do I fix it.....,All desktop icons changed to windows live and does not open
Go to link Download
How to Write Conditional Statements in JavaScript
How to Write Conditional Statements in JavaScript
If Statement
This statement is used to execute some code only if a specified condition is true.
Syntax:
{
code to be executed if condition is true
}
Example:
var d=new Date()
var time=d.getHours()
if (time<10)
{
document.write("<b>Good morning</b>")
}
</script>
This script writes "Good morning" greeting if the time is less than 10
If .... elese statement
This statement is used to execute some code only if the condition is true and another code if the condition is false.
Syntax:
{
code to be executed if condition is true
}
else
{
code to be executed if condition is not true
}
Example:
var d=new Date()
var time=d.getHours()
if (time<10)
{
document.write("Good morning")
}
else
{
document.write("Good Day")
}
</script>
Preview:
If .... else If ..... else statement
This statement is used to select one of many blocks of code to be executed.
Syntax:
{
code to be executed if condition1 is true
}
else if {condition2}
{
code to be executed if condition2 is true
}
else
{
code to be executed if condition1 and condition2 are not true.
}
Example:
var d=new Date()
var time=d.getHours()
if (time<10)
{
document.write("Good morning")
}
else if (time>=10 && time<16)
{
document.write("Good Day")
}
else
{
document.write("Hello World")
}
</script>
Preview:
Switch statement
This statement is used to select one of many blocks of code to be executed.
Syntax:
{
case 1:
execute code block 1
break;
case 2:
execute code block 2
break;
default:
code to be executed if n is different from case 1 and 2
}
Example:
var d=new Date();
theDay=d.getDay();
switch(theDay)
{
case 5:
document.write("Good Friday");
break;
case 6:
document.write("Super Saturday");
break;
case 0:
document.write("Sleepy Sunday");
break;
default:
document.write("I am looking forward to this weekend!");
}</script>
Preview:
Read Next: How to Show Pop Up Boxes Using JavaScript?
Related Search Terms
Javascript Conditional Statements
Javascript if and if else Statement
JavaScript if Condition Example
Related Posts:
How To Create Simple Image Slideshow Using JavaScript ?
Image Slideshow with Navigation Buttons Using JavaScript
How to create Changeable Date and Time Using JavaScript?
How to Create JavaScript Image Slideshow with LInks
How to Display Date Format in JavaScript?
How to Validate a HTML Form Using JavaScript?
What are the Different Ways to Redirect Page in JavaScript?
How to Detect Visitors Browser Using JavaScript?
How to make rounded corners border using CSS
How to Create Custom CSS Template for Printing
How to create a simple form using HTML?
Go to link Download
Free Download TrapCode Suite 13 Full Serial Key
Free Download TrapCode Suite 13 Full Serial Key
 |
| TrapCode Suite 13 |
Kali ini saya akan membagikan TrapCode Suite 13.0.1 atau lebih dikenal dengan Red Giant Complete Suite for Adobe.
:: OFFICIAL WEBSITE ::
https://www.redgiant.com/products/trapcode-suite/
:: INFO ::
Red Giant Software sells digital video plug-ins for compositing software and NLEs such as Adobe After Effects, Apple Final Cut Pro, Adobe Premiere, Nuke and Sony Vegas. |
| Red Giant Complete Suite For Adobe |
:: Features ::
- Essential tools for color correction, finishing & looks
- Footage prep & delivery tools for the shoot and the timeline
- The industry standard for broadcast & 3D design
- The complete solution from key to composite
- Creative effects & flares with a truly professional appeal
:: Includes ::
- Effects Suite v11.1.6
- Keying Suite 11.1.3
- Shooter Suite 12.7.2
- Trapcode Suite 13.0
- Color Suite 11.1.4
- Magic Bullet Suite v12.1.3 *
- Red Giant Universe 1.5.0
- Red Giant Automatic Duck Media Copy v4.0.1 *
- TRAPCODE PARTICULAR 2.5
- TRAPCODE FORM 2.1
- TRAPCODE TAO 1.0
- TRAPCODE MIR 2.0
- TRAPCODE SHINE 2.0
- TRAPCODE LUX 1.3
- TRAPCODE ECHOSPACE 1.1
- TRAPCODE STARGLOW 1.7
- TRAPCODE SOUND KEYS 1.3
- TRAPCODE HORIZON 1.1
:: DOWNLOAD LINK ::
- DU | OL | KumpulBagi | Copiapop
- DU | OL | KumpulBagi | Copiapop
:: System requirements ::
- Adobe After Effects CC 2015, CC 2014, CC, CS6, CS5.5, CS5
- Adobe Premiere Pro CC 2015, CC 2014, CC, CS6, CS5.5, CS5
- Adobe Photoshop CC 2015, CC 2014, CC, CS6, CS5.5, CS5
- Sony Vegas 12,13
- Davinci Resolve 11, 12
- Avid Media Composer 5.5, 6, 6.5 or later
Source: Red Giant Complete Suite For Adobe Cs5-cc 2015 (12.2015)-=team Os=- (Thanks)
Go to link Download
How to Fix Canon Cartridge Clogged
How to Fix Canon Cartridge Clogged
How to Fix Cartridge Canon Clogged
- Remove the cartridge
- Turn on the matchsticks
- Heat the print head (with fire), he moved forward and backward, approximately 3-5 seconds
- Clean the print head with tissue paper
- Make a check, with a test print.
- Print head is designed to heat resistant (resistant to high temperatures)
- Frozen ink in the print head, resulting in clogged print head
- By burning the print head (with fire), the frozen ink in the print head, it can melt

2. Clean the print head with ink vacuum
How;
- Dip the print head into the water (about 3 seconds)
- Clean the print head with a vacuum

Cleaning is eliminates unwanted smudges and lines in the print result
Deep cleaning is unclogs nozzles that cannot be cleared by regular cleaning

4. Open the cartridge, then wash the foam inside the cartridge
 |
| open cartridge |
 |
| wash the foam inside the cartridge and fill the ink |
Read more about this method Fix Canon Cartridge
Go to link Download
How to boost internet speed by 20 without any software
How to boost internet speed by 20 without any software
Old trick but it work very well!
Microsoft reserves 20% of your available bandwidth for their own purposes like Windows Updates and interrogating your PC etc. By using reserved bandwidth, you can make your internet connection faster by 20%. Below steps will guide you to increase speed of your Internet.
***
Limit Reservable Bandwidth Setting in Windows XP,Windows 7, Windows 8
%2B-%2BCopy.png)
Computer Configuration -> Administrative -> Network -> Qos Packet Scheduler
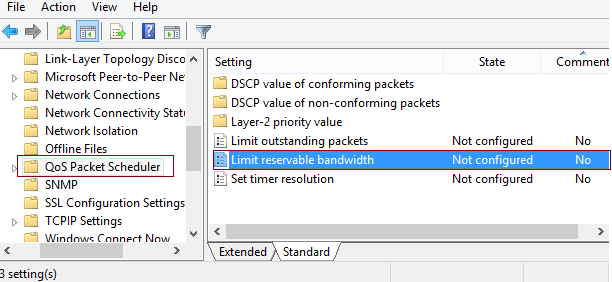
3. In the right pane of this window, look for the settings named Limit reservable bandwidth, it must be showing a Not Configured status by default. Double click on the same setting to modify it:
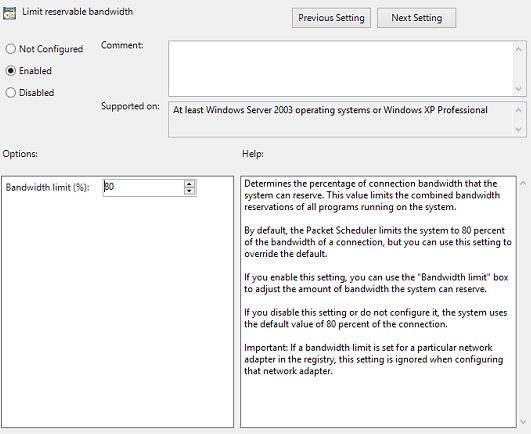
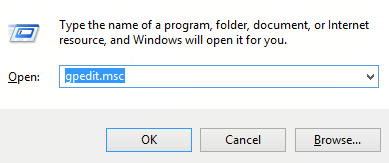
For these who dont have gpedit in there systems:
Random black screen while playing games
MISSCELLENIOUS ITEMS
Go to link Download
HTC Hero
HTC Hero
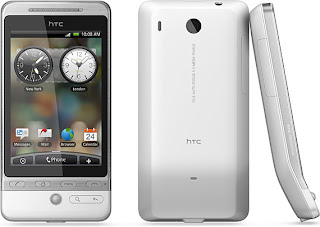
Ponsel pintar terbaru dari HTC dengan system Android yaitu HTC Hero. ( Namanya lumayan keren, tapi bagaimana dengan fiturnya? berikut informasinya ).
HTC Hero memilki layar sebesar 3.2 inch dengan resolusi HVGA yang dioptimalkan bagi pengguna yang suka internet-an, selain itu Layar ini memiliki lapisan anti-fingerprint yang mencegah layar kotor akibat sentuhan jari.
Di sisi kamera, HTC Hero dilengkapi dengan kamera 5 megapixel dan slot kartu memori micro Sd untuk penyimpanan data.
Sebuah fitur pencarian yang disertakan pada Hero mampu menemukan berbagai informasi, seperti daftar kontak, e-mail, dan juga SMS.
Selain itu, fitur penting lainnya sperti AGPS, kompas digital,sensor gravitasi, dan jack headphone 3.5 mm juga disertakan.
( Ternyata fiturnya juga keren )
Ponsel ini memiliki kapasitas penyimpanan internal 512 MB dan 288 MB RAM dan processor Qualcomm 528 Mhz.
Pada baterai yang digunakan berkapasitas 1350 mAH menunjang kinerja serta dukungan Adobe Flash
info>> htc.com
Go to link Download
How do I get real player cloud icon off my computer
How do I get real player cloud icon off my computer
Today we got an issue where our Tier-1 support engineer spent almost four hours in trying to get rid of Real player cloud icon which is a system folder icon that shows in my computer under others list underneath the hard drive icons.It looks just like the icons listed under other in the following picture but you can not find an easy way to remove it.Real Player Cloud icon is such a stubborn icon that you can not get rid of easily.
 |
| RealPlayer Cloud icon, Pic-13(a) |
This issue actually occurred after one of our clients uninstalled the Real player Cloud from his computer.He did not know that he would not completely get rid of the real player.So after it was uninstalled he went to Computer and found the Real Player Cloud system folder there.He tried to remove it, he checked the add remove program ( Program and features ) and scrolled through the list but did not find Real Player there.He then checked the control panel if he could find the real player cloud icon so that he could uninstall it from there but did not find any icons for Real player.Checked the start up items by going to Run-> typing "Msconfig" and in the system configuration utility clicked on start up and unchecked everything he could find related to the Real Player Cloud.So after doing all this he Googled about this issue and reached a support forum for Real Player here is the link of that support forum https://realnetworks.zendesk.com/entries/26869617-Uninstall-Realplayer-Cloud he read it and tried all the steps to get Rid of that.So he re-installed and uninstalled it but the same issue persists.
After the uninstall he was instructed to do the following
Delete the RealPlayer folders.
To delete the folders for RealPlayer located at:
c:program files ealRealPlayer
c:program filescommon files eal
1. Go to My Computer.
2. Go to C: or Local Disk (C:).
3. Go to the Program Files folder.
4. Go to the Real folder.
5. Delete the RealPlayer folder: c:program files ealRealPlayer
6. Go back to the Program Files folder.
7. Go to the Common Files folder.
8. Delete the Real folder: c:program filescommon files eal
NOTE: If you have a 64-bit operating system, the RealPlayer folders will be in a different location:
c:program files x86 ealRealPlayer
c:program files x86common files eal
1. Go to My Computer.
2. Go to C: or Local Disk (C:).
3. Go to the Program Files folder.
4. Go to the Real folder.
5. Delete the RealPlayer folder: c:program files x 86 ealRealPlayer
6. Go back to the Program Files folder.
7. Go to the Common Files folder.
8. Delete the Real folder: c:program files x86common files eal
After doing all these troubleshooting he was told to delete RPcloudview.dll file he searched through the computer and could not find that.He also checked process named recordingmanager.exe*32 and rndlresolversvc.exe*32 , Ended the process and deleted the file associated with them but could not get rid of the icon.
When I got this case escalated to me I got confused for some time as what to do next.
When I searched the Google I found apart from the Main executable file of Real Player (C:Program Files eal ealplayer ealplay.exe) there are multiple other files which were installed and they are as following.
rdsf3260.dll - RealPlayer (32-bit) (Audio Filter Plugin)
convert.exe - RealConverter
dbghelp.dll (by Microsoft) - Debugging Tools for Windows(R) (Windows Image Helper)
dunzip32.dll (by Inner Media) - DynaZIP-32 Multi-Threading UnZIP DLL
fixrjb.exe - RealNetworks RealPlayer (RealNetworks Fix RJB Application)
hxaudiodevicehook.dll - HXAudioDeviceHook Module
ierjplug.dll - ierjplug Module
mediainfo.dll (by MediaArea.net) - MediaInfo (All about your audio and video files)
mmcdda32.dll - RealNetworks CD Extract Component
realcleaner.exe - RealCleaner
realconverter.exe
realjbox.exe
realshare.exe - RealShare (RealShare Launcher)
realtrimmer.exe - RealTrimmer
rjbres.dll - RealPlayer (Resources)
rjdlg.dll - My Media Component
rjprog.dll
rjwmapln.dll - Windows Media Audio import plugin
rndevicedbbuilder.exe - rndevicedblauncher (RN Device DB Builder)
rpau3260.dll - rpautostream Module
rphelperapp.exe - RealNetworks Helper Application
rpplugprot.dll - rpplugprot module
rpshell.dll - RealPlayer Shell Extensions
rpshellextension.dll (by RealPlayer) - RealPlayer shellextension
rpshellsearch.dll - RealPlayer Search Shell Extension
rpwa3260.dll - RealPlayer Plugin
tnetdtct.dll - RealNetworks Online Utility
tpasdk.dll - RealNetworks Playback System
tsasdk.dll - RealNetworks Utility Services
wmdmhelper.dll - RealNetworks Products (32-bit) (WMDM PD Helper Plugin)
cddbcontrol.dll (by Gracenote) - CDDBControl Core Module
cddblink.dll (by Gracenote) - CddbLink Module
cddbmusicid.dll (by Gracenote) - CddbMusicID M
So in order to remove the real player cloud icon from my computer folder I am supposed to delete these files and folder too but I did not deal with any of those files.
I went to the C:/ drive and open the "Documents and Settings" folder .Go to your Windows username folder and click the "Application Data" folder and then find the "Real" folder and delete it.For windows 7 you can go to c:/users/UserName/AppData and delete the folder named Real from there.
I started researching and found this nice article to delete Namespace key contents from registry.This key lists several cryptic folders which define the icons that are displayed in My Computer in Windows Explorer.So delete all the subkeys listed under NameSpace key.To delete them do the following steps.
Steps to delete NameSpace Key contents
1). Click on start, Go to Run and Type Regedit and click ok.
2). Then navigate to the following key "HKEY_LOCAL_MACHINESOFTWAREMicrosoftWindowsCurrentVersionExplorerMyComputerNameSpace"
 |
| Remove real player cloud icon from registry Pic-13(b) |
I searched the forum and found this apologies as shown in the picture- 13 (c) below from Real network support guys that they were sorry for the inconvenience and they apologize and are researching to fix this issue.
 |
| Pic-13(c) |
 |
| Pic-13(d) |
Then this Idea struck in my mind that why dont I clean the registry for left over file.So I Opened CCleaner and Clicked the Registry option at the left hand side and selected all the items to scan.So I scanned the registry with CCleaner as shown in the Pic-13(e) and It fixed all the issues related ton Registry and Bingo....!!!
That Real Player Cloud has gone away...I restarted the computer and It just worked fine.
 |
| Pic-13(e) |
Now I repent spending that much time in Removing Real Player Cloud icon while I wonder I could just take that off My Computer within 5 minutes after scanning the registry with CCleaner and fixing all the issues.
Conclusion: To remove real Player cloud icon from computer first delete the namespace and delegated folder entry from registry as shown in the above steps and then remove from other places in registry and clean the leftover registry items using the Ccleaners the regitry fix option.
Thanks for reading...
Happy Troubleshooting..!!!
Nasir
Go to link Download