Showing posts with label without. Show all posts
Showing posts with label without. Show all posts
Thursday, May 4, 2017
How To Install Apps Without Google Play Store and Internet
How To Install Apps Without Google Play Store and Internet
Why I decided to post this topic. Imagine following situations:
- You dont want to connect your Google account because you afraid of "To many Pattern Attempt"
- Google Play Store Slow Down Your Smartphone and Internet. So You want to keep it Off
- You have a Google Android device but you dont have Internet connectivity
- You have Internet connectivity but you dont have Google Play Store in your device
- You have Google Play Store but you dont have a Google account to sign in
- Your desired app is not compatible with your Android device
- Your desired app has been removed from Google Play Store
- You cant download your desired app due to any other reason
In any of the above mentioned situations, you wont be able to download and install apps in your Google Android device whether its a mobile phone or tablet. It might be possible that you purchased an Android mobile or tablet which didnt contain Google Play Store (e.g. Nokia X) or it might be also possible that you dont have a Gmail account and you dont want to create a new Google account to sign into Play Store.
Now the question comes how would you install apps in your Android device if you dont have Play Store or Google account or Internet connection in your device? The answer is using Sideloading feature.
Sideload an application means offline installation of the app without using Google Play Store in your Android device. In this way you wont need Google Play Store, Google account and Internet connection in your Android device.
With the help of sideloading feature, you can directly install any desired app in your Android mobile phone or tablet just like you install a software in your Windows PC.
If you also want to learn this method to install apps offline in your Android device, just check out following simple steps:
Step 1:
Download .APK File From InternetFirst of all youll need the .APK file of your desired Android app. Actually all Android apps come in form of a .APK file (Android Package file). When you install an app using Play Store, your Android device automatically downloads and installs its .APK file.
Since you dont want to download apps using Play Store, youll need to download the .APK file of your desired app from Internet.
If you can access Internet in your Android device, then you can download the .APK files using a web browser. If you cant access Internet in your device, then youll need to download the .APK files using a computer with Internet connection.
There are many websites offering .APK files of free apps for download. You just need to search for "App name APK file" on Google and youll get several websites containing the .APK file of your app. For example if you want to download Subway Surfer games .APK file, just search for "Angry Birds APK file" and youll get many download links.
But if You want to download Purchased or Modded App for free then you can find it on our website at Black Eyezs Software Android Apps & Games.
Step 2:
Copy .APK File to SD Card of Android DeviceOnce you grab the .APK files of your desired apps, its time to copy those .APK files to SD card (memory card) of your Android mobile or tablet.
You can either attach the SD card to your computer using a card holder/reader and copy .APK files to it or you can connect your Android device to your computer using data cable and then copy .APK files to its drives using My Computer window.
Step 3:
Enable "Apps Installation from Unknown Sources" OptionBy default your Android device doesnt allow sideloading feature which means you cant install apps from your SD card but you can enable this feature with the help of following easy steps:
1. Open Settings page in your Android device and go to Security settings.
2. Now look for "Unknown Sources" option which contains following information:
Allow installation of apps from sources other than the Play Store
OR
Allow installation of apps from unknown sources
The option is not enabled by default, just tap on it to enable the option. Itll ask for confirmation, accept it.
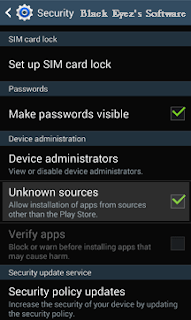
You may also need to disable "Verify Apps" option which disallows or warns you when you try to install apps from unknown sources.
After changing options, exit from Settings page.
Step 4:
Run .APK File Using File ManagerThats the final step. Now you can install the apps directly using the built-in File Manager app in your Android device or Download ES File Explorer (best Android file manager) from our site.
Just Open ES file Explorer or similar apps in your Android device and then navigate to SD card and tap on the downloaded .APK file.
Itll ask for confirmation, tap on Install button and itll start the installation process.
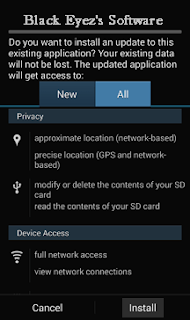
Itll take a few seconds and your desired app will be installed in your Android mobile phone or tablet without need of Google Play Store and Internet connection.
This method also helps when you have more than one Google Android mobile phone or tablet and want to install same apps and games in those devices. With the help of this method, you just need to download those apps only once and then you can install them in multiple devices and also can use as backup without any need of downloading them again and again in all devices. Itll save your time and money.
Note:-
If you need any Paid .APK for free contact us, we will upload it in two or three business days.
Go to link Download

Friday, April 7, 2017
How to Get Data From an Old Hard Drive without pc
How to Get Data From an Old Hard Drive without pc
How to Get Data Off an Old Hard Drive (Without Putting It in a PC)

You saved an old hard drive (or three) from previous computers and now you’d like to get at the data on it. Is there an easy way to access the data without cracking open your current computer and mounting the hard drives inside?
On the expensive side of things, you can pick up a hot swap dock for around $30-40 like this Anker USB 3.0 dock. The only problem is that hardly anyone makes a dock that supports both IDE and SATA connections anymore (neither the product sample we linked to nor it’s competitors do).
How to Get Data from an Old Hard Drive, install hard drive, how to use old hard drive, how to mount old hard drive, how to get data off old hard drive, retrieve data from old hard drive,
If you’re doing a lot of work with bare SATA drives, the dock makes sense; for your application, and most home users, the dock is overkill.

Sabrent USB to SATA/IDE Adapter
How to Get Data from an Old Hard Drive, install hard drive, how to use old hard drive, how to mount old hard drive, how to get data off old hard drive, retrieve data from old hard drive,
How to Get Data from an Old Hard Drive, install hard drive, how to use old hard drive, how to mount old hard drive, how to get data off old hard drive, retrieve data from old hard drive,
If you’re doing a lot of work with bare SATA drives, the dock makes sense; for your application, and most home users, the dock is overkill.
Sabrent USB to SATA/IDE Adapter
How to Get Data from an Old Hard Drive, install hard drive, how to use old hard drive, how to mount old hard drive, how to get data off old hard drive, retrieve data from old hard drive,
What you want is an adapter/converter cable that allows you to mount the HDDs like you’re simply attaching a portable HDD or flash drive to the computer.
How to Get Data from an Old Hard Drive, install hard drive, how to use old hard drive, how to mount old hard drive, how to get data off old hard drive, retrieve data from old hard drive, Historically these adapters were pretty flaky, but improvements in both Windows and the hardware itself has yielded dependable functionality at really reasonable prices. The model we use around the office is the Sabrent USB 3.0 to SATA/IDE Adapter.
How to Get Data from an Old Hard Drive, install hard drive, how to use old hard drive, how to mount old hard drive, how to get data off old hard drive, retrieve data from old hard drive, It’s reliable, speedy, and, handily, it comes with its own molex transformer so you can power the drives. This is where most of the adapters you find on eBay, Amazon, etc. all fall short: they provide a cable but you’re expected to provide the power via an old PSU or such.
How to Get Data from an Old Hard Drive, install hard drive, how to use old hard drive, how to mount old hard drive, how to get data off old hard drive, retrieve data from old hard drive, The Sabrent model packages both the adapter and power supply together so you’re not left trying to figure out how to power your drives (and hoping you have an old PSU stashed along with all those old drives).
How to Get Data from an Old Hard Drive, install hard drive, how to use old hard drive, how to mount old hard drive, how to get data off old hard drive, retrieve data from old hard drive,
How to Get Data from an Old Hard Drive, install hard drive, how to use old hard drive, how to mount old hard drive, how to get data off old hard drive, retrieve data from old hard drive, Historically these adapters were pretty flaky, but improvements in both Windows and the hardware itself has yielded dependable functionality at really reasonable prices. The model we use around the office is the Sabrent USB 3.0 to SATA/IDE Adapter.
How to Get Data from an Old Hard Drive, install hard drive, how to use old hard drive, how to mount old hard drive, how to get data off old hard drive, retrieve data from old hard drive, It’s reliable, speedy, and, handily, it comes with its own molex transformer so you can power the drives. This is where most of the adapters you find on eBay, Amazon, etc. all fall short: they provide a cable but you’re expected to provide the power via an old PSU or such.
How to Get Data from an Old Hard Drive, install hard drive, how to use old hard drive, how to mount old hard drive, how to get data off old hard drive, retrieve data from old hard drive, The Sabrent model packages both the adapter and power supply together so you’re not left trying to figure out how to power your drives (and hoping you have an old PSU stashed along with all those old drives).
How to Get Data from an Old Hard Drive, install hard drive, how to use old hard drive, how to mount old hard drive, how to get data off old hard drive, retrieve data from old hard drive,
Acquiring the hardware is the trickiest part. Once you have the hardware, all you need to do is use the appropriate side of the adapter (it has a side for 3.5 IDE, 2.5 IDE, and SATA), make sure the drive jumpers are set to Master (if the drive is old enough to use a jumper system, modern SATA drives rarely use jumpers), plug the adapter into a USB port on your computer, plug in the power via the molex adapter unit, and then turn the switch on the power cable on to provide power to the drive. Here’s what a drive looks like hooked up correctly to an IDE drive:

Once the power is on and the drive spins up, it should appear in Windows as a removable drive the same way a brand new off-the-shelf external hard drive would, no software or drivers needed. Here’s the drive detected right along side an actual external drive:

Here’s a peek inside the drive, and old Windows desktop drive, where you can see all the old folders and such are easily accessible:

When opening folders, especially folders on old hard drives with Windows previously installed, you may run into a message like this:

You’ll see this error/prompt when you attempt to open a file/folder that had file permissions assigned to it by the previous operating system, but for which no currently valid permissions exist. You should only need to click this once for most situations (such as opening a user directory of an old Windows account). If the simple permissions prompt seen above doesn’t work (or you don’t even get the prompt to apply the permission, but an access error instead), check out our primer on Windows file permissions to learn how to manually edit the permissions and get to your files.
How to Get Data from an Old Hard Drive, install hard drive, how to use old hard drive, how to mount old hard drive, how to get data off old hard drive, retrieve data from old hard drive,
If your drive does not appear, and you’ve properly connected both the power and data cables, there’s usually only three culprits: 1) it’s an older drive and you need to set the jumpers properly, 2) the drive’s file system is unreadable by your OS, or 3) the drive is damaged.
How to Get Data from an Old Hard Drive, install hard drive, how to use old hard drive, how to mount old hard drive, how to get data off old hard drive, retrieve data from old hard drive,
Remember, what you’re doing to the drive with the data/power adapter cable is essentially mounting it as you would with an internal drive (but without the hassle of cracking open the case). If your computer can’t read the drive under those circumstances (because the drive has an incompatible file system or is physically degraded/damaged), then it won’t be able to read it over the USB setup either.
How to Get Data from an Old Hard Drive, install hard drive, how to use old hard drive, how to mount old hard drive, how to get data off old hard drive, retrieve data from old hard drive,
How to Get Data from an Old Hard Drive, install hard drive, how to use old hard drive, how to mount old hard drive, how to get data off old hard drive, retrieve data from old hard drive,
Remember, what you’re doing to the drive with the data/power adapter cable is essentially mounting it as you would with an internal drive (but without the hassle of cracking open the case). If your computer can’t read the drive under those circumstances (because the drive has an incompatible file system or is physically degraded/damaged), then it won’t be able to read it over the USB setup either.
How to Get Data from an Old Hard Drive, install hard drive, how to use old hard drive, how to mount old hard drive, how to get data off old hard drive, retrieve data from old hard drive,
Barring that, though, it’s as simple as plug and play. For $20 you have a hassle free way to check your drives, retrieve old data, compare it to your backups, wipe the data, and otherwise interact with the drives as if they’re mounted right in the computer case.
Go to link Download
Thursday, March 23, 2017
How to Convert FLAC to WAV without Quality Loss
How to Convert FLAC to WAV without Quality Loss
Q: “I want to convert som flac files to wav, then burn them so that I can play them in my car. I have Windows Vista. Any advice? Thanks.”
If you also have the same issues and trying to convert FLAC to WAV without any quality loss for playback on iTunes, Windows Media Player, QuickTime? Here, we will show you four parts and just pick up the best solution.
Why Convert FLAC to WAV?
Now that FLAC and WAV are both lossless audio formats, why still many people want to convert FLAC to WAV? Here lists the two main reasons:
Reason one: FLAC has a lot of advantages; however, it is not supported by Windows Media Player, iTunes, QuickTime and other popular players and devices. Its a pity for both Mac and Windows users. Conversely, WAV has greater compatibility than FLAC, which is not only compatible with Windows portable devices but also with iTunes and QuickTime.
Reason two: Meanwhile, people dont want to loss audio quality in the process of transformation so that they choose to convert FLAC to WAV.
WAV format is an excellent format for storing files and playing on the go when you do not have space restrictions. Therefore, converting FlAC to WAV will be a better solution if you want to play your FLAC files on Windows Media Player, iTunes, QuickTime and much more portable devices and store them without any quality lossless.
Part 1: Steps to Convert FLAC to MP3 Using Professional FLAC to WAV Converter
Pavtube Video Converter Ultimate - (Windows)

Pavtube Video Converter Ultimate is a DVD ripper and video converter in one program. It will help you to convert FLAC to WAV with ease. Besides, this powerful FLAC to WAV Converter supports converting FLAC files in batch to save your time greatly. Except the feature of converting FLAC to WAC, Pavtube FLAC to WAV Converter also can convert FLAC to almost all audio formats like FLAC to MP3, FLAC to AAC, FLAC to AC3, etc. Furthermore, this best FLAC to WAV Converter can extract audio from any video files like MP4, MOV, WMV, MKV, AVI, OGV, 3GP, MXF, FLV, ASF, and WebM, etc. Read the review.

Key Features
Note: It is necessary to change FLAC to WAV since it can solve the problem of FLAC wont play on iTunes, QuickTime, Windows Media player and much portable devise as well as maintain the audio quality. Whether you are using a Windows (Windows 10 included) computer or a Mac (El Capitan included). For Mac users, Pavtube iMedia Converter for Mac is a helpful app to encode videos for further usage.
Part 2: Steps to Convert FLAC Files to WAV Using WAV MP3 Converter
Step 1 – Download and install the WAV MP3 Conversion application.
Step 2 – After installation is complete, launch the application by double clicking the WAV MP3 Conversion program icon located on the computer’s desktop or located under the “Program Files” sub-menu of the “Start” menu.
Step 3 – Select the “FLAC Files” menu button and then choose the files to convert to .WAV format using the program’s file chooser.
Step 4 – Select the “Target File Format” menu option. Change the output file type to “.WAV”
Step 5 – Select the “Convert” menu button to initiate the file conversion of the FLAC files.
Step 6 – Play back the converted file by right clicking the file icon and choosing the “Play Destination” menu option. Alternatively, view all of the converted files by selecting the “Destination Folder” menu button.
Part 3:Steps to Convert FLAC to WAV with WinAmp
The WinAMP program is another widely deployed tool that can be used to convert FLAC files to WAV format. When downloading WinAMP the FLAC library support plugin must also be installed to support the file conversion from FLAC to WAV format. Both installations are available for free from the WinAMP website.
Step 1 – Install the WinAMP program along with the FLAC Library support plug-in on the target computer.
Step 2 – Open the WinAMP program and choose the “Plug-ins” menu choice. Then, select the “Output” menu option.
Step 3 – Select the “Null Soft Disk Writer” menu option and select the “Confirm” button.
Step 4 – Select a folder to save the new “WAV” files and then move the FLAC files to be converted to this location on your computer.
Step 5 – Choose all files in the folder and then right click the group. Pick the “Play With” menu choice and then select the “WinAMP” program.
Step 6 – Choose the “Play” button on the WInAMP player and the application will convert all files to WAV format.
Source: http://www.tech-faq.com/how-to-convert-flac-files-to-wav.html
Part 4: How to Convert FLAC to WAV for VLC | eHow
VLC, or VideoLAN Client, is a widely used open-source media player application. In addition to media playing, VLC supports streaming and converting files. Convert FLAC files to WAV files with VLC by using its "Convert" dialog box.
Step 1–Download and install VLC if you dont already have it installed. Go to the VLC Web site and click the "Download" button (see Resources).
Step 2–Open VLC by clicking "Start," "All Programs," "VideoLAN" and "VLC Media Player."
Step 3–Click the "Media" menu at the top of the "VLC Media Player" window and click "Convert / Save."
Step 4–Click the "Add" button under "File Selection" in the "Open Media" window that appears.
Step 5–Select a FLAC file by browsing to it with the file chooser dialog and double-clicking it.
Step 6–Click the "Convert / Save" button at the bottom of the "Open Media" window.
Name your WAV file by clicking "Browse" under "Destination" in the "Convert" window. Type a name for the file and press "Enter."
Step 7–Select "WAV" as the output format. Click the "Profile" box under "Settings" in the "Convert" window and click "Audio - CD" in the list.
Step 8–Click the "Convert" button at the bottom of the "Convert" window.
Source: http://www.ehow.com/how_6659347_convert-flac-wav-vlc.html
Pavtube Software makes it extremely easy to convert videos and audios. Hopefully it can help you out whenever you have an audio or video conversion need.
Note: Much wonderful software bundled with Video Converter Ultimate will provide you more amazing experience in converting videos. Go to Money Saving Software Bundles to get special offer for more software, such asByteCopy + Video Converter Ultimate = Only $79.9, Save $27.1, Video Converter Ultimate($65) + ChewTune($29) = Only $74.9, Save $19.1 and so on.
Read More:
If you also have the same issues and trying to convert FLAC to WAV without any quality loss for playback on iTunes, Windows Media Player, QuickTime? Here, we will show you four parts and just pick up the best solution.
Why Convert FLAC to WAV?
Now that FLAC and WAV are both lossless audio formats, why still many people want to convert FLAC to WAV? Here lists the two main reasons:
Reason one: FLAC has a lot of advantages; however, it is not supported by Windows Media Player, iTunes, QuickTime and other popular players and devices. Its a pity for both Mac and Windows users. Conversely, WAV has greater compatibility than FLAC, which is not only compatible with Windows portable devices but also with iTunes and QuickTime.
Reason two: Meanwhile, people dont want to loss audio quality in the process of transformation so that they choose to convert FLAC to WAV.
WAV format is an excellent format for storing files and playing on the go when you do not have space restrictions. Therefore, converting FlAC to WAV will be a better solution if you want to play your FLAC files on Windows Media Player, iTunes, QuickTime and much more portable devices and store them without any quality lossless.
Part 1: Steps to Convert FLAC to MP3 Using Professional FLAC to WAV Converter
Pavtube Video Converter Ultimate - (Windows)
Pavtube Video Converter Ultimate is a DVD ripper and video converter in one program. It will help you to convert FLAC to WAV with ease. Besides, this powerful FLAC to WAV Converter supports converting FLAC files in batch to save your time greatly. Except the feature of converting FLAC to WAC, Pavtube FLAC to WAV Converter also can convert FLAC to almost all audio formats like FLAC to MP3, FLAC to AAC, FLAC to AC3, etc. Furthermore, this best FLAC to WAV Converter can extract audio from any video files like MP4, MOV, WMV, MKV, AVI, OGV, 3GP, MXF, FLV, ASF, and WebM, etc. Read the review.
Key Features
- Convert any video (including Tivo) and DVD to MOV, MKV, MPG, AVI, etc.
- Support adding SRT,ASS,SSA sbutitles
- You can do some simple editor: Trim, Corp, Add Watemark, (3D) Effect, Deinterlacing, Audio Editor.
Note: It is necessary to change FLAC to WAV since it can solve the problem of FLAC wont play on iTunes, QuickTime, Windows Media player and much portable devise as well as maintain the audio quality. Whether you are using a Windows (Windows 10 included) computer or a Mac (El Capitan included). For Mac users, Pavtube iMedia Converter for Mac is a helpful app to encode videos for further usage.
Part 2: Steps to Convert FLAC Files to WAV Using WAV MP3 Converter
Step 1 – Download and install the WAV MP3 Conversion application.
Step 2 – After installation is complete, launch the application by double clicking the WAV MP3 Conversion program icon located on the computer’s desktop or located under the “Program Files” sub-menu of the “Start” menu.
Step 3 – Select the “FLAC Files” menu button and then choose the files to convert to .WAV format using the program’s file chooser.
Step 4 – Select the “Target File Format” menu option. Change the output file type to “.WAV”
Step 5 – Select the “Convert” menu button to initiate the file conversion of the FLAC files.
Step 6 – Play back the converted file by right clicking the file icon and choosing the “Play Destination” menu option. Alternatively, view all of the converted files by selecting the “Destination Folder” menu button.
Part 3:Steps to Convert FLAC to WAV with WinAmp
The WinAMP program is another widely deployed tool that can be used to convert FLAC files to WAV format. When downloading WinAMP the FLAC library support plugin must also be installed to support the file conversion from FLAC to WAV format. Both installations are available for free from the WinAMP website.
Step 1 – Install the WinAMP program along with the FLAC Library support plug-in on the target computer.
Step 2 – Open the WinAMP program and choose the “Plug-ins” menu choice. Then, select the “Output” menu option.
Step 3 – Select the “Null Soft Disk Writer” menu option and select the “Confirm” button.
Step 4 – Select a folder to save the new “WAV” files and then move the FLAC files to be converted to this location on your computer.
Step 5 – Choose all files in the folder and then right click the group. Pick the “Play With” menu choice and then select the “WinAMP” program.
Step 6 – Choose the “Play” button on the WInAMP player and the application will convert all files to WAV format.
Source: http://www.tech-faq.com/how-to-convert-flac-files-to-wav.html
Part 4: How to Convert FLAC to WAV for VLC | eHow
VLC, or VideoLAN Client, is a widely used open-source media player application. In addition to media playing, VLC supports streaming and converting files. Convert FLAC files to WAV files with VLC by using its "Convert" dialog box.
Step 1–Download and install VLC if you dont already have it installed. Go to the VLC Web site and click the "Download" button (see Resources).
Step 2–Open VLC by clicking "Start," "All Programs," "VideoLAN" and "VLC Media Player."
Step 3–Click the "Media" menu at the top of the "VLC Media Player" window and click "Convert / Save."
Step 4–Click the "Add" button under "File Selection" in the "Open Media" window that appears.
Step 5–Select a FLAC file by browsing to it with the file chooser dialog and double-clicking it.
Step 6–Click the "Convert / Save" button at the bottom of the "Open Media" window.
Name your WAV file by clicking "Browse" under "Destination" in the "Convert" window. Type a name for the file and press "Enter."
Step 7–Select "WAV" as the output format. Click the "Profile" box under "Settings" in the "Convert" window and click "Audio - CD" in the list.
Step 8–Click the "Convert" button at the bottom of the "Convert" window.
Source: http://www.ehow.com/how_6659347_convert-flac-wav-vlc.html
Pavtube Software makes it extremely easy to convert videos and audios. Hopefully it can help you out whenever you have an audio or video conversion need.
Note: Much wonderful software bundled with Video Converter Ultimate will provide you more amazing experience in converting videos. Go to Money Saving Software Bundles to get special offer for more software, such asByteCopy + Video Converter Ultimate = Only $79.9, Save $27.1, Video Converter Ultimate($65) + ChewTune($29) = Only $74.9, Save $19.1 and so on.
Read More:
- Play Blu-ray 3D ISO with Full Dolby True HD/DTS Master Audio on HTPC
- Torrent AVI Movies Has Only Audio in Windows Movie Maker
- Extract MP3 Audio from Vimeo Video for Listening on MP3 Players
- Ultimate Gudie for Movie Entertainment (Blu-ray, DVD, ISO, iTunes, Video) on TV
- MKV Movies Not Playing /No Sound on Kodi 15 After Update
Go to link Download
Friday, February 17, 2017
How to Recover Photos from iPhone 6S Without Backups on Mac
How to Recover Photos from iPhone 6S Without Backups on Mac
The youth, especially the girls, are fond of record their life with photos on their iPhone 6S. But situations may occur due to different reasons, such as iOS upgrade, device damaged, failure jailbreak, etc. If you do have some important photos in your iPhone 6S, you perhaps need to recover it. So how to do it?
This article aims to show you the easiest way to retrieve the lost photo of your iPhone 6S on Mac when you don’t have iTunes/iCloud backups. Since you can directly recover the photo from backups easily so I think it doesn’t need to state the way again. Before the beginning, you have to prepare a Mac iPhone/iPad Data Recovery program. If you don’t have any idea about it, I recommend you Wondershare Dr.Fone for iOS for Mac. It has more powerful function that deserves you to try:
1. Wide Supported Data Types to Recover: Recover iOS data including photos, videos, messages, contacts, notes, reminders, calendar events, call history, etc. No matter what kind of photos you want to recover from iPhone 6S, Camera Roll photos, Photo Stream photos or Photo Library photos, Wondershare helps you make it.
2. Recovery Modes: Offers you 3 ways to recover deleted or lost photos from iPhone: from iDevice directly (without using any backup), from iTunes backup, and from iCloud backup. No matter whether you have made an iTunes or iCloud backup, you can get a way to retrieve them.
3. Selectively Recover Photo: Instead of performing a complete iTunes restore, Wondershare lets you preview the deleted photos in thumbnails and recover what you need instead of all the data.
4. Easy-to-use: Intuitive interface makes basic and advanced users can use it with ease.
5. Supports all models of iPhone: Supports iPhone 6S (Plus)/6 (Plus)/5S/5C/4S/4/3GS and iPad, iPod Touch. Compatible with iTunes 12.1. iOS 9 and Mac OS X El Capitan. (Read its review)
Free Download and Install Mac iPhone Data Recovery


How to recover photo from iPhone 6S directly without backups?
Step 1: Open Wondershare on your computer > Connect your iPhone 6S to the computer with USB cable > Choose Recover from an iOS Device. Then click on “Start Scan”.

Step 2: Preview and recover the photo
Once the scan ends, you can preview all the contents of your iPhone 6S, including messages, iMessages, contacts, etc on the left. Check photo option on the left list. Then click “Recover” to save all your photo to your computer. You can see the search box on the top right interface, so you can search for the exact contact you want to recover.
That’s all. Is it easy? Just try.
Related Software:
Wondershare Dr.Fone for Android for Mac - First aid to recover deleted or lost contacts, text messages, photos, videos, audio files, documents, whatsapp history, call history, etc from Android phones and tablets.
Wondershare MobileTrans for Mac - One click and risk-free solution to move contacts, text messages, call logs, calendar, photos, music, video and apps between iPhone, Android, Blackberry and Nokia(Symbian) phones.
Wondershare TunesGo for Mac - Transfer and copy music, videos, playlists and other media files from iPhone, iPad and iPod touch to iTunes and PC with no difficulty.
Pavtube iMedia Converter for Mac - Convert any 4K/SD/HD and Blu-ray/DVD to iPhone, iPad, iPod Touch with suitable format.
Related Articles:
This article aims to show you the easiest way to retrieve the lost photo of your iPhone 6S on Mac when you don’t have iTunes/iCloud backups. Since you can directly recover the photo from backups easily so I think it doesn’t need to state the way again. Before the beginning, you have to prepare a Mac iPhone/iPad Data Recovery program. If you don’t have any idea about it, I recommend you Wondershare Dr.Fone for iOS for Mac. It has more powerful function that deserves you to try:
1. Wide Supported Data Types to Recover: Recover iOS data including photos, videos, messages, contacts, notes, reminders, calendar events, call history, etc. No matter what kind of photos you want to recover from iPhone 6S, Camera Roll photos, Photo Stream photos or Photo Library photos, Wondershare helps you make it.
2. Recovery Modes: Offers you 3 ways to recover deleted or lost photos from iPhone: from iDevice directly (without using any backup), from iTunes backup, and from iCloud backup. No matter whether you have made an iTunes or iCloud backup, you can get a way to retrieve them.
3. Selectively Recover Photo: Instead of performing a complete iTunes restore, Wondershare lets you preview the deleted photos in thumbnails and recover what you need instead of all the data.
4. Easy-to-use: Intuitive interface makes basic and advanced users can use it with ease.
5. Supports all models of iPhone: Supports iPhone 6S (Plus)/6 (Plus)/5S/5C/4S/4/3GS and iPad, iPod Touch. Compatible with iTunes 12.1. iOS 9 and Mac OS X El Capitan. (Read its review)
Free Download and Install Mac iPhone Data Recovery
How to recover photo from iPhone 6S directly without backups?
Step 1: Open Wondershare on your computer > Connect your iPhone 6S to the computer with USB cable > Choose Recover from an iOS Device. Then click on “Start Scan”.
Step 2: Preview and recover the photo
Once the scan ends, you can preview all the contents of your iPhone 6S, including messages, iMessages, contacts, etc on the left. Check photo option on the left list. Then click “Recover” to save all your photo to your computer. You can see the search box on the top right interface, so you can search for the exact contact you want to recover.
That’s all. Is it easy? Just try.
Related Software:
Wondershare Dr.Fone for Android for Mac - First aid to recover deleted or lost contacts, text messages, photos, videos, audio files, documents, whatsapp history, call history, etc from Android phones and tablets.
Wondershare MobileTrans for Mac - One click and risk-free solution to move contacts, text messages, call logs, calendar, photos, music, video and apps between iPhone, Android, Blackberry and Nokia(Symbian) phones.
Wondershare TunesGo for Mac - Transfer and copy music, videos, playlists and other media files from iPhone, iPad and iPod touch to iTunes and PC with no difficulty.
Pavtube iMedia Converter for Mac - Convert any 4K/SD/HD and Blu-ray/DVD to iPhone, iPad, iPod Touch with suitable format.
Related Articles:
- How to Recover Deleted Voicemail on iPhone 6S on Mac
- How to Fix iPhone White Screen of Death on Mac El Capitan?
- Is it Possible to Recover Contacts From an Erased iPhone 6S?
- How to Recover Deleted Texts Message on iPhone 6S
- How to Recover Deleted WeChat Data from iPhone 6s Plus/6s/6/5s/4s/4?
Go to link Download
Thursday, February 2, 2017
How To Install Siri on Iphone 4 Without Proxy
How To Install Siri on Iphone 4 Without Proxy
how to install siri on iphone 4 without proxy - Finally there is Siri that can iDevice except the iPhone 4S, if using Spire Siri Proxy to play
Then another with Sara, Sara is no proxy, so you do not need to look for to and fro to seek a free proxy that works without ERROR .
You want to try Sara, Open Cydia and Add Repo http://isoftjsc.com, and Sara Install
After that you have to Respring iDevice.
It turns out that Sara had such Dictation on the iPhone 4S, Wow amazing once!
A video that discusses Sara
Then another with Sara, Sara is no proxy, so you do not need to look for to and fro to seek a free proxy that works without ERROR .
You want to try Sara, Open Cydia and Add Repo http://isoftjsc.com, and Sara Install
After that you have to Respring iDevice.
It turns out that Sara had such Dictation on the iPhone 4S, Wow amazing once!
A video that discusses Sara
Go to link Download
Monday, January 30, 2017
How to boost internet speed by 20 without any software
How to boost internet speed by 20 without any software
BEST GREENHOUSES FOR GROOVING VEGETABLES
? ? 1(360)241-1624 ?

? ? 360organic.us ?
DURABLE! AFFORDABLE! ALUMINUM + UV POLYCARBONATE
Old trick but it work very well!
***
Microsoft reserves 20% of your available bandwidth for their own purposes like Windows Updates and interrogating your PC etc. By using reserved bandwidth, you can make your internet connection faster by 20%. Below steps will guide you to increase speed of your Internet.
important:
Speed up your PC Disable System Restore on SSD
***
Limit Reservable Bandwidth Setting in Windows XP,Windows 7, Windows 8
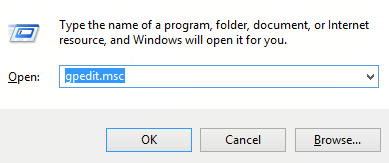
1. Press Windows Key + R combination, type put gpedit.msc in Run dialog box and hit Enter to open the Local Group Policy Editor.
%2B-%2BCopy.png)
2. Navigate here:
Computer Configuration -> Administrative -> Network -> Qos Packet Scheduler
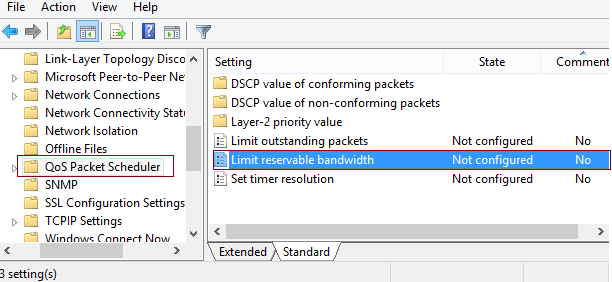
3. In the right pane of this window, look for the settings named Limit reservable bandwidth, it must be showing a Not Configured status by default. Double click on the same setting to modify it:
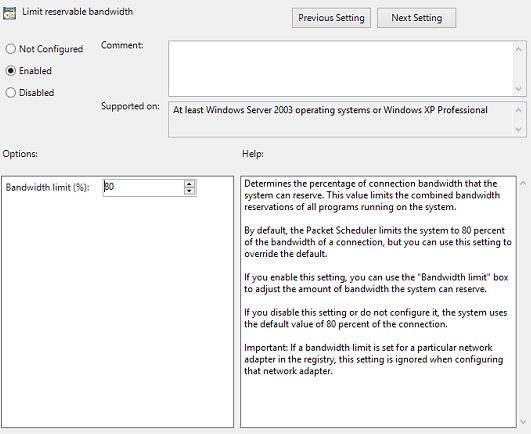
This policy setting determines the percentage of connection bandwidth that the system can reserve. This value limits the combined bandwidth reservations of all programs running on the system. By default, the Packet Scheduler limits the system to 80 percent of the bandwidth of a connection, but you can use this setting to override the default. If you enable this setting, you can use the “Bandwidth limit” box to adjust the amount of bandwidth the system can reserve. If you disable this setting or do not configure it, the system uses the default value of 80 percent of the connection. If a bandwidth limit is set for a particular network adapter in the registry, this setting is ignored when configuring that network adapter.
4. Now, in the above shown window, select Enabled and in the Options section; you could input the percentage for limiting the bandwidth. If you input 0 percent here, you can gain the reserved bandwidth reserved by the system.
Click Apply followed by OK then. You may now close the Local Group Policy Editor and reboot the system with gained bandwidth.
For these who dont have gpedit in there systems:
For these who dont have gpedit in there systems:
Thanks to "jwils876" @ DA has shared a small setup file to enable Group Policy Editor in Windows 7 Starter, Home Basic and Home Premium editions.
The installer has been originally created by "davehc" @ Windows7forums, so thanks goes to him as well.
For Windows 7 64-bit (x64) users! Youll also need to go to "SysWOW64" folder present in "C:Windows" folder and copy "GroupPolicy", "GroupPolicyUsers" folders and gpedit.msc file from there and paste them in "C:WindowsSystem32" folder.
If you are getting "MMC could not create the snap-in" error message while running gpedit.msc, check out following steps to fix the problem. Basically it happens when your username in Windows contains more than one word.
Run the installer and leave it at the last step (do not click on the "Finish" button).
Now go to C:WindowsTempgpedit folder.
If you are running 32-bit (x86) edition of Windows 7, right-click on x86.bat file and choose Open With Notepad option. If you are running 64-bit (x64) edition of Windows 7, right-click on x64.bat file and choose "Open With -> Notepad" option.
Youll find a total of 6 lines containing the following string in the file:
%username%:f
Edit those lines and replace %username% with "%username%"
For example:
Original: %WinDir%SysWOW64gpedit.dll /grant:r %username%
New: %WinDir%SysWOW64gpedit.dll /grant:r "%username%"
Save and run the file (right-click -> Run as Administrator.
Thats it. Youll have working gpedit.msc.
Additional information
What is the difference between BIOS and CMOS?
What are the F1 through F12 keys?
How to use system recovery options in Windows?
Random black screen while playing games
How to Delete and Clear Recent Items in Windows 7 Jump Lists
How to enter the BIOS or CMOS setup
What is the difference between BIOS and CMOS?
What are the F1 through F12 keys?
MISSCELLENIOUS ITEMS

MISSCELLENIOUS ITEMS
Durable Greenhouses made from Polycarbonate UV Protected material and Aluminum
ALSO PLEASE VISIT THIS VIDEOS AND SEE IF YOU FIND SOMETHING NEED:
Windows Registry Tools can be downloaded here:
How to kip your PC Private by deleting DATA Permanently
http://askpctech.blogspot.com/2016/03/kip-your-pc-privat.html
This tutorial is made up on request several users, is well is fallowing video:
1)How to Delete Paint Recent Pictures from List in Windows 7
2)Win 7– Fix for “Safely Remove Hardware and Eject Media” not working How To
3)Windows 10 How to Fix Black Screen After Booting
4)How To Remove Windows 10 Upgrade Notification On Windows 7 And Windows 8
5)How to Delete Face book Page Permanently - 2015
6)How to Uninstall Windows 10 and Downgrade to Windows 7 or 8.1
7)detected: not-a-virus:remoteadmin.win32
8)How to change pictures into icons for folders
9)Speed up your PC Disable System Restore on SSD
10)Speed up your PC Disable Scheduled De-fragmentation SSD
11)2015 Black screen of DEATH Windows 7 & 8 - with cursor at start-up SOLVED
12)Upon start up only wallpaper shows FIX
13)Here is video on Windows 7 & 8 - Black screen with cursor at start-up FIX
You can also open Task Manager by pressing Ctrl+Shift+Esc.
14) I bought a windows 7 PC but it Look alike old PC FIX:
15) Windows 7 & 8 - Black screen with cursor at start-up FIX:
16) How To Fix Minecraft OpenGL Error Windows 7 xp vista 720p :
17) removing bars using regscanner regedit & file shredder 720p:
18) How to Recover windows Explorer from error 2014 720p
19) HOW TO Save on battery online
20) Windows 7 & 8 - Black screen with cursor at start-up FIX
Upon start up only wallpaper shows no icons
CTL+ALT+DEL then click file and new task. then type explorer.exe and press ok
Best Greenhouse system 2015
Go to link Download
Wednesday, January 25, 2017
How To Backup Android Apps Without Root
How To Backup Android Apps Without Root
How To Backup Android Apps Without Root - How to easily create a backup file in android APK file especially, as we often hear for backup apk can be done using Titanium Backup where a device is diroot since not all android users it is categorized as an advanced user, but still many who remain loyal as a normal user in the sense of using all existing features without maximizing the advantages in functionality or device as desired punyai or more personal in short as a normal user.
Back again about how to backup android files on the SD card where the condition is not at the root, which probably can be said is important so that all the APK files that have been installed from the Play store can re-install without having to re-download, in addition to the backup file can result in share to friends or stored on storage media such as flash drive, hard drive or other storage media her, try an application called My Backup.

This application is quite good and can count on to matters such as APK file backup, SMS, Contacts, System Setup and Online Data yours, which can be saved in SD Card up to this application can run android devices that have root access or not, will be very help for users who are not at the root of Android device backup backup affair was so easy, all the results of the backup will be stored in a folder with the name Reware that can be installed, on the share at any time in need, the process was pretty easy to just select which applications will be in backup without a long process.
Go to link Download
Tuesday, January 24, 2017
Hacker How to disable history in Chrome without using hidden browsing mode
Hacker How to disable history in Chrome without using hidden browsing mode
I was searching about settings in google chrome to disable history saving.
I was surprised that is not implemented. (only manual deletion)
So, i searched on internet and I found that, to avoid hidden browsing mode but having cookies saved the only solution is to search for history file here:
C:UsersusernameAppDataLocalGoogleChromeUser DataDefaulthistory putting it in read only mode
http://www.geekissimo.com/2011/02/06/chrome-come-disabilitare-salvataggio-siti-cronologia-senza-modalita-incognito/
Go to link Download
Wednesday, January 11, 2017
How to Create an Apple ID without Credit Card
How to Create an Apple ID without Credit Card
Millions of people have this question as how to create an Apple ID without entering their Credit Cards detail in Apples System?.Its because they are scared of being hacked by some unethical person as several instances have occurred in the past few years where big companies like apple were reported to be hacked with passwords and credit card number shown in the systems.
A few years ago, linking a credit card to an Apple account was mandatory. But Apple has changed its stance and has been letting users create an Apple ID without a credit card for a while now.Having an Apple ID is a prerequisite to do just about anything related to Apple services. If you want to buy music on iTunes, download apps in the App Store,Reinstall OS X or use iCloud, you must have an Apple ID
Whatever your reason might be to do so, I am going to show you how to create an Apple ID without a credit card.
Note that if you don’t link a credit card or other payment method to your Apple ID, you will obviously not be able to complete purchases, but you will however be able to download free content, such as free apps, free music or free books.
The main reason of writing this post is, while creating Apple ID it asks to set up a payment method where you have the option to provide Credit/Debit card details or use Paypal, Redeem a gift certificate or select None as a payment method for the free Apple ID,sometimes this option of selecting None is not available or not shown or the option none is there, but after you select next, it loops you to the top of the screen and nothing happens. It also says "For assistance, contact iTunes Support" or "Please contact iTunes support to complete this transaction"
Solutions: This issue of not showing None option as a payment method or looping you to the same payment method screen is always resulted when you are using an existing or old Apple ID that you have already created before either on a windows PC or otherwise and did not set up payment method.As per the Apple there could be following major reasons of not showing None when editing your Apple ID payment information.
Why can’t I select None when I edit my Apple ID payment information?
You might not be able to see or select the None payment option for one of these reasons. If you dont want to use a credit card, you can use another form of payment, such as a gift card.
1. If you have an unpaid balance or payment due
You cant select None as your payment type until you pay your balance. To see which order you need to pay for, view your purchase history on a Mac or PC. When you sign in to the store, you might see a message that there was a billing issue with your last order. Click the Billing Info button to see the order.
After you pay for the order, you can change your payment information to None.
2. If youre using the iTunes Store or App Store for the first time
If youre using the store for the first time with an existing Apple ID, you must provide a payment method. After you create the account, you can change your payment information to None.
If youre creating a new Apple ID, you might be able to create an account without entering your credit card details.
3. If you changed your country or region
When you change the country or region of an existing Apple ID, you must provide a payment method and update your billing options. If you want to remove your payment method after you change the country or region, you can change your payment information to None.
4. If youre a part of Family Sharing
When you set up Family Sharing, the family organizer must provide a payment method. If your family includes a child account, the family organizer must use a credit card as the payment method. This payment method will be used for all purchases initiated by family members and can only be changed by the family organizer.
If you already have an Apple ID
If youve already created your Apple ID, youll need to add a payment method when you first use it to sign in to the iTunes Store, App Store, or iBooks Store. But you can optionally remove the payment method after you sign in to the store. You wont be asked for a payment method again until you make your first purchase.
If you dont have an Apple ID
If you havent created your Apple ID, follow the steps below to create one and a store account at the same time, without adding a payment method.
On an iPhone, iPad, or iPod touch
If you use Family Sharing, and you’re the family organizer, you can’t set your payment information to None. Youll need to use a credit card or debit card.
On a Mac or PC
1. Open iTunes, then go to the iTunes Store by clicking the iTunes Store button at the top of the window.
2. Scroll down and find the country flag in the lower-right corner of the window. If its not the flag of the country where you live, click it and choose your country or region.
3. Go to the App Store, Music, TV Shows, or Books section of the store by clicking on one of the icons in the upper-left corner.
4. Download a free app, song, video, or book. To find free items, look in the right column of the window and click any link that includes the word "Free," such as "Free on iTunes" or "Top Free." When you find a free item, click Get beneath its icon.
5. When youre asked to sign in with an Apple ID, click Create Apple ID.
6. Follow the onscreen instructions. When youre asked for payment information, choose None as the payment type. See what to do if None isnt showing or you cant select it.
7. After you enter all of the information required, youll be asked to verify your Apple ID by email. You must verify your Apple ID before you can begin using it. D
In worst scenario where the None option is still not available try following options.
1. Leave the payment method to default VISA and enter a gift card code and your address then click next it will fail but the NONE option will appear the next time , Select none and click next and you are DONE. It worked for some people as claimed on apple support forum.
"it says you can use a itunes voucher in the end I bought a £15.00 itunes voucher and inputted the code and it let me complete my account set up and start to download apps and music. When I then went back into my account details (after completeing the set up) the "none" option had appeared, thats something apple needs to look at, why isnt the "none" option available from the start?"
2. Provide your Credit/Debit Card details, download a free app and then login to https://appleid.apple.com/us/ go to modify the payment information. At this point the none option will be available and you would be able to select this and clear the visa card information.
3. Clear your browsers Caches and Cookies delete history and then try to create a new Apple ID with the Email ID you never ever have tried registering/using your preferred apple id/e-mail address.
Incoming search terms
Apple ID, Creating apple id without credit card, select payment option none,payment option none not available in apple id creation,how to create apple id witout credit/debit card,Create apple with paypal,create apple ID without payment information
Source of information: http://www.apple.com
A few years ago, linking a credit card to an Apple account was mandatory. But Apple has changed its stance and has been letting users create an Apple ID without a credit card for a while now.Having an Apple ID is a prerequisite to do just about anything related to Apple services. If you want to buy music on iTunes, download apps in the App Store,Reinstall OS X or use iCloud, you must have an Apple ID
Whatever your reason might be to do so, I am going to show you how to create an Apple ID without a credit card.
Note that if you don’t link a credit card or other payment method to your Apple ID, you will obviously not be able to complete purchases, but you will however be able to download free content, such as free apps, free music or free books.
The main reason of writing this post is, while creating Apple ID it asks to set up a payment method where you have the option to provide Credit/Debit card details or use Paypal, Redeem a gift certificate or select None as a payment method for the free Apple ID,sometimes this option of selecting None is not available or not shown or the option none is there, but after you select next, it loops you to the top of the screen and nothing happens. It also says "For assistance, contact iTunes Support" or "Please contact iTunes support to complete this transaction"
 |
| How to Create an Apple ID without Credit Card? |
 |
| How to Create an Apple ID without Credit Card? |
Solutions: This issue of not showing None option as a payment method or looping you to the same payment method screen is always resulted when you are using an existing or old Apple ID that you have already created before either on a windows PC or otherwise and did not set up payment method.As per the Apple there could be following major reasons of not showing None when editing your Apple ID payment information.
Why can’t I select None when I edit my Apple ID payment information?
You might not be able to see or select the None payment option for one of these reasons. If you dont want to use a credit card, you can use another form of payment, such as a gift card.
1. If you have an unpaid balance or payment due
You cant select None as your payment type until you pay your balance. To see which order you need to pay for, view your purchase history on a Mac or PC. When you sign in to the store, you might see a message that there was a billing issue with your last order. Click the Billing Info button to see the order.
After you pay for the order, you can change your payment information to None.
2. If youre using the iTunes Store or App Store for the first time
If youre using the store for the first time with an existing Apple ID, you must provide a payment method. After you create the account, you can change your payment information to None.
If youre creating a new Apple ID, you might be able to create an account without entering your credit card details.
3. If you changed your country or region
When you change the country or region of an existing Apple ID, you must provide a payment method and update your billing options. If you want to remove your payment method after you change the country or region, you can change your payment information to None.
4. If youre a part of Family Sharing
When you set up Family Sharing, the family organizer must provide a payment method. If your family includes a child account, the family organizer must use a credit card as the payment method. This payment method will be used for all purchases initiated by family members and can only be changed by the family organizer.
Create an Apple ID for iTunes Store, App Store, or iBooks Store account without a credit card or other payment method
If you already have an Apple ID
If youve already created your Apple ID, youll need to add a payment method when you first use it to sign in to the iTunes Store, App Store, or iBooks Store. But you can optionally remove the payment method after you sign in to the store. You wont be asked for a payment method again until you make your first purchase.
If you dont have an Apple ID
If you havent created your Apple ID, follow the steps below to create one and a store account at the same time, without adding a payment method.
On an iPhone, iPad, or iPod touch
- Open the App Store, iTunes Store, or iBooks Store.

How to Create an Apple ID without Credit Card? - Choose any free app, song, video, or book.

How to Create an Apple ID without Credit Card? - Tap Get next to the item, then tap again to get it.

How to Create an Apple ID without Credit Card? - When youre asked to sign in with an Apple ID, tap Create New Apple ID.

How to Create an Apple ID without Credit Card? - Follow the onscreen instructions. When youre asked for payment information, choose None. See what to do if None isnt showing or you cant select it.

How to Create an Apple ID without Credit Card? - Even though you are creating the account without choosing a credit card, Apple still requires you to enter your name, address and phone number. You can always enter the address and phone number of your school. Scroll down and enter your name, address and phone number, then tap "Next".

How to Create an Apple ID without Credit Card? - After you enter all of the information required, youll be asked to verify your Apple ID by email. Apple will send you a confirmation email to the email address you provided. Check your emails and click the “Verify” link in the email Apple sent you, then log in using your newly created username (your email address) and password.
- Finally, go back to the App Store application, and sign in your new account.
If you use Family Sharing, and you’re the family organizer, you can’t set your payment information to None. Youll need to use a credit card or debit card.
On a Mac or PC
1. Open iTunes, then go to the iTunes Store by clicking the iTunes Store button at the top of the window.
 |
| How to Create an Apple ID without Credit Card? |
2. Scroll down and find the country flag in the lower-right corner of the window. If its not the flag of the country where you live, click it and choose your country or region.
 |
| Select Language |
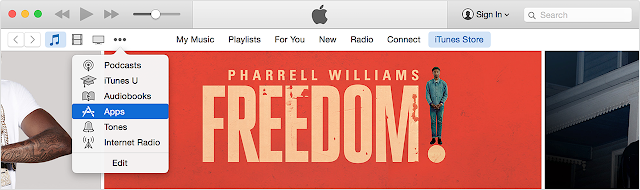
3. Go to the App Store, Music, TV Shows, or Books section of the store by clicking on one of the icons in the upper-left corner.
 |
| How to Create an Apple ID without Credit Card? |
4. Download a free app, song, video, or book. To find free items, look in the right column of the window and click any link that includes the word "Free," such as "Free on iTunes" or "Top Free." When you find a free item, click Get beneath its icon.
 |
| How to Create an Apple ID without Credit Card? |
5. When youre asked to sign in with an Apple ID, click Create Apple ID.
 |
| How to Create an Apple ID without Credit Card? |
6. Follow the onscreen instructions. When youre asked for payment information, choose None as the payment type. See what to do if None isnt showing or you cant select it.
 |
| How to Create an Apple ID without Credit Card? |
7. After you enter all of the information required, youll be asked to verify your Apple ID by email. You must verify your Apple ID before you can begin using it. D
In worst scenario where the None option is still not available try following options.
1. Leave the payment method to default VISA and enter a gift card code and your address then click next it will fail but the NONE option will appear the next time , Select none and click next and you are DONE. It worked for some people as claimed on apple support forum.
"it says you can use a itunes voucher in the end I bought a £15.00 itunes voucher and inputted the code and it let me complete my account set up and start to download apps and music. When I then went back into my account details (after completeing the set up) the "none" option had appeared, thats something apple needs to look at, why isnt the "none" option available from the start?"
2. Provide your Credit/Debit Card details, download a free app and then login to https://appleid.apple.com/us/ go to modify the payment information. At this point the none option will be available and you would be able to select this and clear the visa card information.
3. Clear your browsers Caches and Cookies delete history and then try to create a new Apple ID with the Email ID you never ever have tried registering/using your preferred apple id/e-mail address.
**************End of Article*************
Incoming search terms
Apple ID, Creating apple id without credit card, select payment option none,payment option none not available in apple id creation,how to create apple id witout credit/debit card,Create apple with paypal,create apple ID without payment information
Source of information: http://www.apple.com
Go to link Download
Subscribe to:
Posts (Atom)