Showing posts with label apple. Show all posts
Showing posts with label apple. Show all posts
Friday, February 10, 2017
Games di Apple TV harus dimaikan Menggunakan Remot
Games di Apple TV harus dimaikan Menggunakan Remot

TV yang telah apple rilis merupkan salah satu TVterbaik dimana salah satu fitur yang terdapat pada tv buatan apple ini dapat memainkan games dengan kualitas yang sangat baik, Dengan adanya controller yang dirancang dengan dilengkapi touchpad sehingga games yang terdapat pada apple tv lebih menarik untuk dimainkan.
Ini bisa menjadi kabar baik bagi para pengembang games untuk mempopulerkan games yang telah mereka buat, Tetapi agar game dapat dimainkan pada apple TV harus support dengan remote apple tv ini berarti Developer harus mengembangkan penggunaan remote pada game yang akan dimainkan pada apple tv.
Fitur yang terdapat pada apple tv ini mungkin bisa sedikit terbatas karna jika pengembang ingin membuat games yang lebih kompleks terkendala dengan size game yang bisa dimainkan pada apple tv ini hanya 200MB saja,
Go to link Download
Wednesday, January 11, 2017
How to Create an Apple ID without Credit Card
How to Create an Apple ID without Credit Card
Millions of people have this question as how to create an Apple ID without entering their Credit Cards detail in Apples System?.Its because they are scared of being hacked by some unethical person as several instances have occurred in the past few years where big companies like apple were reported to be hacked with passwords and credit card number shown in the systems.
A few years ago, linking a credit card to an Apple account was mandatory. But Apple has changed its stance and has been letting users create an Apple ID without a credit card for a while now.Having an Apple ID is a prerequisite to do just about anything related to Apple services. If you want to buy music on iTunes, download apps in the App Store,Reinstall OS X or use iCloud, you must have an Apple ID
Whatever your reason might be to do so, I am going to show you how to create an Apple ID without a credit card.
Note that if you don’t link a credit card or other payment method to your Apple ID, you will obviously not be able to complete purchases, but you will however be able to download free content, such as free apps, free music or free books.
The main reason of writing this post is, while creating Apple ID it asks to set up a payment method where you have the option to provide Credit/Debit card details or use Paypal, Redeem a gift certificate or select None as a payment method for the free Apple ID,sometimes this option of selecting None is not available or not shown or the option none is there, but after you select next, it loops you to the top of the screen and nothing happens. It also says "For assistance, contact iTunes Support" or "Please contact iTunes support to complete this transaction"
Solutions: This issue of not showing None option as a payment method or looping you to the same payment method screen is always resulted when you are using an existing or old Apple ID that you have already created before either on a windows PC or otherwise and did not set up payment method.As per the Apple there could be following major reasons of not showing None when editing your Apple ID payment information.
Why can’t I select None when I edit my Apple ID payment information?
You might not be able to see or select the None payment option for one of these reasons. If you dont want to use a credit card, you can use another form of payment, such as a gift card.
1. If you have an unpaid balance or payment due
You cant select None as your payment type until you pay your balance. To see which order you need to pay for, view your purchase history on a Mac or PC. When you sign in to the store, you might see a message that there was a billing issue with your last order. Click the Billing Info button to see the order.
After you pay for the order, you can change your payment information to None.
2. If youre using the iTunes Store or App Store for the first time
If youre using the store for the first time with an existing Apple ID, you must provide a payment method. After you create the account, you can change your payment information to None.
If youre creating a new Apple ID, you might be able to create an account without entering your credit card details.
3. If you changed your country or region
When you change the country or region of an existing Apple ID, you must provide a payment method and update your billing options. If you want to remove your payment method after you change the country or region, you can change your payment information to None.
4. If youre a part of Family Sharing
When you set up Family Sharing, the family organizer must provide a payment method. If your family includes a child account, the family organizer must use a credit card as the payment method. This payment method will be used for all purchases initiated by family members and can only be changed by the family organizer.
If you already have an Apple ID
If youve already created your Apple ID, youll need to add a payment method when you first use it to sign in to the iTunes Store, App Store, or iBooks Store. But you can optionally remove the payment method after you sign in to the store. You wont be asked for a payment method again until you make your first purchase.
If you dont have an Apple ID
If you havent created your Apple ID, follow the steps below to create one and a store account at the same time, without adding a payment method.
On an iPhone, iPad, or iPod touch
If you use Family Sharing, and you’re the family organizer, you can’t set your payment information to None. Youll need to use a credit card or debit card.
On a Mac or PC
1. Open iTunes, then go to the iTunes Store by clicking the iTunes Store button at the top of the window.
2. Scroll down and find the country flag in the lower-right corner of the window. If its not the flag of the country where you live, click it and choose your country or region.
3. Go to the App Store, Music, TV Shows, or Books section of the store by clicking on one of the icons in the upper-left corner.
4. Download a free app, song, video, or book. To find free items, look in the right column of the window and click any link that includes the word "Free," such as "Free on iTunes" or "Top Free." When you find a free item, click Get beneath its icon.
5. When youre asked to sign in with an Apple ID, click Create Apple ID.
6. Follow the onscreen instructions. When youre asked for payment information, choose None as the payment type. See what to do if None isnt showing or you cant select it.
7. After you enter all of the information required, youll be asked to verify your Apple ID by email. You must verify your Apple ID before you can begin using it. D
In worst scenario where the None option is still not available try following options.
1. Leave the payment method to default VISA and enter a gift card code and your address then click next it will fail but the NONE option will appear the next time , Select none and click next and you are DONE. It worked for some people as claimed on apple support forum.
"it says you can use a itunes voucher in the end I bought a £15.00 itunes voucher and inputted the code and it let me complete my account set up and start to download apps and music. When I then went back into my account details (after completeing the set up) the "none" option had appeared, thats something apple needs to look at, why isnt the "none" option available from the start?"
2. Provide your Credit/Debit Card details, download a free app and then login to https://appleid.apple.com/us/ go to modify the payment information. At this point the none option will be available and you would be able to select this and clear the visa card information.
3. Clear your browsers Caches and Cookies delete history and then try to create a new Apple ID with the Email ID you never ever have tried registering/using your preferred apple id/e-mail address.
Incoming search terms
Apple ID, Creating apple id without credit card, select payment option none,payment option none not available in apple id creation,how to create apple id witout credit/debit card,Create apple with paypal,create apple ID without payment information
Source of information: http://www.apple.com
A few years ago, linking a credit card to an Apple account was mandatory. But Apple has changed its stance and has been letting users create an Apple ID without a credit card for a while now.Having an Apple ID is a prerequisite to do just about anything related to Apple services. If you want to buy music on iTunes, download apps in the App Store,Reinstall OS X or use iCloud, you must have an Apple ID
Whatever your reason might be to do so, I am going to show you how to create an Apple ID without a credit card.
Note that if you don’t link a credit card or other payment method to your Apple ID, you will obviously not be able to complete purchases, but you will however be able to download free content, such as free apps, free music or free books.
The main reason of writing this post is, while creating Apple ID it asks to set up a payment method where you have the option to provide Credit/Debit card details or use Paypal, Redeem a gift certificate or select None as a payment method for the free Apple ID,sometimes this option of selecting None is not available or not shown or the option none is there, but after you select next, it loops you to the top of the screen and nothing happens. It also says "For assistance, contact iTunes Support" or "Please contact iTunes support to complete this transaction"
 |
| How to Create an Apple ID without Credit Card? |
 |
| How to Create an Apple ID without Credit Card? |
Solutions: This issue of not showing None option as a payment method or looping you to the same payment method screen is always resulted when you are using an existing or old Apple ID that you have already created before either on a windows PC or otherwise and did not set up payment method.As per the Apple there could be following major reasons of not showing None when editing your Apple ID payment information.
Why can’t I select None when I edit my Apple ID payment information?
You might not be able to see or select the None payment option for one of these reasons. If you dont want to use a credit card, you can use another form of payment, such as a gift card.
1. If you have an unpaid balance or payment due
You cant select None as your payment type until you pay your balance. To see which order you need to pay for, view your purchase history on a Mac or PC. When you sign in to the store, you might see a message that there was a billing issue with your last order. Click the Billing Info button to see the order.
After you pay for the order, you can change your payment information to None.
2. If youre using the iTunes Store or App Store for the first time
If youre using the store for the first time with an existing Apple ID, you must provide a payment method. After you create the account, you can change your payment information to None.
If youre creating a new Apple ID, you might be able to create an account without entering your credit card details.
3. If you changed your country or region
When you change the country or region of an existing Apple ID, you must provide a payment method and update your billing options. If you want to remove your payment method after you change the country or region, you can change your payment information to None.
4. If youre a part of Family Sharing
When you set up Family Sharing, the family organizer must provide a payment method. If your family includes a child account, the family organizer must use a credit card as the payment method. This payment method will be used for all purchases initiated by family members and can only be changed by the family organizer.
Create an Apple ID for iTunes Store, App Store, or iBooks Store account without a credit card or other payment method
If you already have an Apple ID
If youve already created your Apple ID, youll need to add a payment method when you first use it to sign in to the iTunes Store, App Store, or iBooks Store. But you can optionally remove the payment method after you sign in to the store. You wont be asked for a payment method again until you make your first purchase.
If you dont have an Apple ID
If you havent created your Apple ID, follow the steps below to create one and a store account at the same time, without adding a payment method.
On an iPhone, iPad, or iPod touch
- Open the App Store, iTunes Store, or iBooks Store.

How to Create an Apple ID without Credit Card? - Choose any free app, song, video, or book.

How to Create an Apple ID without Credit Card? - Tap Get next to the item, then tap again to get it.

How to Create an Apple ID without Credit Card? - When youre asked to sign in with an Apple ID, tap Create New Apple ID.

How to Create an Apple ID without Credit Card? - Follow the onscreen instructions. When youre asked for payment information, choose None. See what to do if None isnt showing or you cant select it.

How to Create an Apple ID without Credit Card? - Even though you are creating the account without choosing a credit card, Apple still requires you to enter your name, address and phone number. You can always enter the address and phone number of your school. Scroll down and enter your name, address and phone number, then tap "Next".

How to Create an Apple ID without Credit Card? - After you enter all of the information required, youll be asked to verify your Apple ID by email. Apple will send you a confirmation email to the email address you provided. Check your emails and click the “Verify” link in the email Apple sent you, then log in using your newly created username (your email address) and password.
- Finally, go back to the App Store application, and sign in your new account.
If you use Family Sharing, and you’re the family organizer, you can’t set your payment information to None. Youll need to use a credit card or debit card.
On a Mac or PC
1. Open iTunes, then go to the iTunes Store by clicking the iTunes Store button at the top of the window.
| How to Create an Apple ID without Credit Card? |
2. Scroll down and find the country flag in the lower-right corner of the window. If its not the flag of the country where you live, click it and choose your country or region.
 |
| Select Language |
3. Go to the App Store, Music, TV Shows, or Books section of the store by clicking on one of the icons in the upper-left corner.
 |
| How to Create an Apple ID without Credit Card? |
4. Download a free app, song, video, or book. To find free items, look in the right column of the window and click any link that includes the word "Free," such as "Free on iTunes" or "Top Free." When you find a free item, click Get beneath its icon.
 |
| How to Create an Apple ID without Credit Card? |
5. When youre asked to sign in with an Apple ID, click Create Apple ID.
 |
| How to Create an Apple ID without Credit Card? |
6. Follow the onscreen instructions. When youre asked for payment information, choose None as the payment type. See what to do if None isnt showing or you cant select it.
 |
| How to Create an Apple ID without Credit Card? |
7. After you enter all of the information required, youll be asked to verify your Apple ID by email. You must verify your Apple ID before you can begin using it. D
In worst scenario where the None option is still not available try following options.
1. Leave the payment method to default VISA and enter a gift card code and your address then click next it will fail but the NONE option will appear the next time , Select none and click next and you are DONE. It worked for some people as claimed on apple support forum.
"it says you can use a itunes voucher in the end I bought a £15.00 itunes voucher and inputted the code and it let me complete my account set up and start to download apps and music. When I then went back into my account details (after completeing the set up) the "none" option had appeared, thats something apple needs to look at, why isnt the "none" option available from the start?"
2. Provide your Credit/Debit Card details, download a free app and then login to https://appleid.apple.com/us/ go to modify the payment information. At this point the none option will be available and you would be able to select this and clear the visa card information.
3. Clear your browsers Caches and Cookies delete history and then try to create a new Apple ID with the Email ID you never ever have tried registering/using your preferred apple id/e-mail address.
**************End of Article*************
Incoming search terms
Apple ID, Creating apple id without credit card, select payment option none,payment option none not available in apple id creation,how to create apple id witout credit/debit card,Create apple with paypal,create apple ID without payment information
Source of information: http://www.apple.com
Go to link Download
Thursday, November 17, 2016
How to Play Movies from iTunes to a TV without an Apple TV
How to Play Movies from iTunes to a TV without an Apple TV
Question from Quora: How can I play movies from iTunes to a TV without an Apple TV?
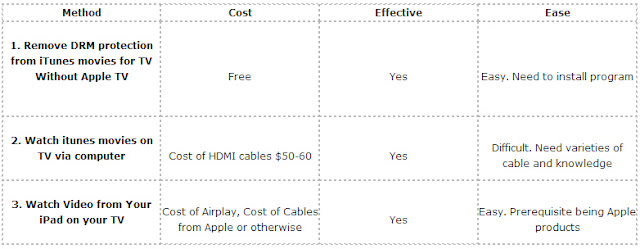
A 1: There are many ways to do so. You can move the iTunes movies to external hard drive or a USB, then play it on your TV via usb port. Or you can stream the iTunes videos to TV via plex or Chromecast. But, to finish this, you should first remove DRM from iTunes videos.
A 2: You can stream iTunes movies to a TV via Nexus Player. Nexus Player is Google Cast-ready, meaning it can receive a stream from a Chromebook, Android or iOS phones or tablets, and display it on a TV.
In this guide, we will offer you the top way of get iTunes movie purchases or rentals to watch on your HDTV.
Hot Search: TOP 10 4K Ultra HD TVs | Best Smart TV Brand Reviews | iTunes to Android | iTunes videos to Surface RT |iTunes to Roku 3…
So how to remove DRM protection from iTunes movies? That is a easy job as long as you have a DRM Removal.Pavtube ChewTune (Review) is a exact user-friendly, professional and popular DRM Removal on the market. This software can remove DRM protection from iTunes movies and turn them to other video format with high quality to adapt to your HD TV. Except for transferring iTunes movies to HD TV via USB, it also can deal with BBC iPlayer video, Amazon movies, Zune Marketplace videos, etc so that you can watch them on TV, tablet, game console and other players.
With it you can remove DRM protection and convert iTunes movies and Episodes losslessly to USB drive supported normal MP4 format in 6X fast speed. For Mac users, you can turn to Pavtube ChewTune for Mac.
Now you can download the right version of Pavtube iTunes DRM Video Converter and begin to transfer iTunes videos to HD TV via USB by following the instructions below.
Free download and install:
Step 1. Download and install Pavtube ChewTune. There would be a command window pop up during the installation, please do not shut down it and let it running until the installation completed.

Step 2. Add iTunes Movies and choose target format. Drag and drop your videos to it directly, or you can click icon to import them as below.

Let’s click the drop-down-list besides “Format” and choose “Same as the source video”for Samsung 4K UHD TV.

Step 3. Customize target video specs. (Optional)
Click “Settings” as above to enter Profile Settings window, you can find settings for video size, codec, bitrate and frame rate. Change them at your own needs.
Step 4. Start (batch) conversion.
Now click the big red “Convert” icon to start converting DRM videos; this converter will activate your media player automatically and start to play this video (let’s keep it running). The player windows cannot be removed or closed. After conversion, click “Open output folder” to quick locate the converted video. Now, you can move the converted videos files to your USB drive.
Follow these steps to transfer the iTunes library to a USB Flash Drive for HD TV:
a. Plug your USB flash drive into your computer’s port. Launch iTunes on your computer
b. Go to the “Edit” menu within iTunes and click on “Preferences.”
c. Click on the “Advanced” tab to see where exactly your iTunes library is stored. It will be an XML file.
d. Open your library by going to the “Start” menu, selecting “computer,” clicking on the appropriate drive and browsing to the location of the file.
e. Open a second window in “computer” and click on the icon for your flash drive. Drag and drop your library to the drive. This could take a long
time, depending on the size of your library.
Now, you can transfer the converted videos to your USB flash drive and you are free to move all the movies to USB flash drive.
Other Two Methods for Watching iTunes Movies on TV
A: Watch itunes movies on TV via computer
Step 1- If you already have the iTunes on your computer then another way you can salvage those rented movies from going waste is to play the videos on iTunes via the computer. By connecting the computer to the TV you can make sure that you can watch the same through iTunes that is connected in the computer.
Step 2- If you can acquire an HDMI cable then most of your problems are over. By directly connecting what is visible on your computer onto the TV you will have perfect transmission that also does not affect the image quality and definition.
Step 3- You can use the TV remote control to go to the setting. The settings will specify the switch for the TVs input to the correct port. You can even connect and set the graphics adapter and continue to choose and use the TV screen as the monitor where you will be primarily watching the movies. By using this simple step you can play any iTunes on your preferred screen of watching. Do keep that popcorn by your side.
Step 4- You can also join your computer with your TV via other kinds of audio and video cables. To connect audio cables you will need to get a Miniplug-to-RCA stereo cable and by connecting this to your headphone jack on your computer and the audio port on your TV. For a video input you will need two methods. If you have an S-video connection on the PC then you can use an S-video cable to connect to the RCA ports that are available on your TV. A VGA or DVI connection can help with directly connecting your TV and your computer, making the display work like a monitor.
B: Watch Video from Your iPad on your TV
There are two methods under this that can help you watch videos on a TV. The first ia the option of Airplay and the other is the option of connecting the iPad to the TV directly. Whichever suits your pocket and fancy can be used to combat the boredom that you are feeling.
AirPlay
Step 1- The AirPlay feature has been started specifically for those who want to watch movies online on their TV. You can use the wireless system to watch Commercial flicks as well as the videos you shot and the other rented movies from iPad to an Apple TV box. There is need that you have an HDTV for the same.
Step 2- Once you start watching any movie on the iPad, you can tap the AirPlay button which you will be able to find in the setting sections of the video controls. Though you will be able to watch only one screen at one go, you will still be able to stream in any of the movies that you have been watching to the Apple TV box and then you have to refer to the steps that concern the Apple TV section.
Step 3- The best part about this method is that while your movie is streaming on the TV you can multitask on you tablet and continue working if your times is not totally free. Your kids can continue watching a movie and entertaining themselves while you finish your pending work. It must be said that rented movies show trouble when being fixed up to a TV.
AV Adapter cables
You can buy an adapter cable and join them to the TV do get brilliant picture quality. These cables are often supplied by Apple itself but you might not want to go in for expensive cables and by them off locally in the market. This will also save you a pretty penny when considering the overall cost for watching movies on a TV.
Now, just choose the way you like for enjoy iTunes Movies on TV. Have fun!
Read More:
A 1: There are many ways to do so. You can move the iTunes movies to external hard drive or a USB, then play it on your TV via usb port. Or you can stream the iTunes videos to TV via plex or Chromecast. But, to finish this, you should first remove DRM from iTunes videos.
A 2: You can stream iTunes movies to a TV via Nexus Player. Nexus Player is Google Cast-ready, meaning it can receive a stream from a Chromebook, Android or iOS phones or tablets, and display it on a TV.
In this guide, we will offer you the top way of get iTunes movie purchases or rentals to watch on your HDTV.
Hot Search: TOP 10 4K Ultra HD TVs | Best Smart TV Brand Reviews | iTunes to Android | iTunes videos to Surface RT |iTunes to Roku 3…
So how to remove DRM protection from iTunes movies? That is a easy job as long as you have a DRM Removal.Pavtube ChewTune (Review) is a exact user-friendly, professional and popular DRM Removal on the market. This software can remove DRM protection from iTunes movies and turn them to other video format with high quality to adapt to your HD TV. Except for transferring iTunes movies to HD TV via USB, it also can deal with BBC iPlayer video, Amazon movies, Zune Marketplace videos, etc so that you can watch them on TV, tablet, game console and other players.
With it you can remove DRM protection and convert iTunes movies and Episodes losslessly to USB drive supported normal MP4 format in 6X fast speed. For Mac users, you can turn to Pavtube ChewTune for Mac.
Now you can download the right version of Pavtube iTunes DRM Video Converter and begin to transfer iTunes videos to HD TV via USB by following the instructions below.
Free download and install:
Step 1. Download and install Pavtube ChewTune. There would be a command window pop up during the installation, please do not shut down it and let it running until the installation completed.
Step 2. Add iTunes Movies and choose target format. Drag and drop your videos to it directly, or you can click icon to import them as below.
Let’s click the drop-down-list besides “Format” and choose “Same as the source video”for Samsung 4K UHD TV.
Step 3. Customize target video specs. (Optional)
Click “Settings” as above to enter Profile Settings window, you can find settings for video size, codec, bitrate and frame rate. Change them at your own needs.
Step 4. Start (batch) conversion.
Now click the big red “Convert” icon to start converting DRM videos; this converter will activate your media player automatically and start to play this video (let’s keep it running). The player windows cannot be removed or closed. After conversion, click “Open output folder” to quick locate the converted video. Now, you can move the converted videos files to your USB drive.
Follow these steps to transfer the iTunes library to a USB Flash Drive for HD TV:
a. Plug your USB flash drive into your computer’s port. Launch iTunes on your computer
b. Go to the “Edit” menu within iTunes and click on “Preferences.”
c. Click on the “Advanced” tab to see where exactly your iTunes library is stored. It will be an XML file.
d. Open your library by going to the “Start” menu, selecting “computer,” clicking on the appropriate drive and browsing to the location of the file.
e. Open a second window in “computer” and click on the icon for your flash drive. Drag and drop your library to the drive. This could take a long
time, depending on the size of your library.
Now, you can transfer the converted videos to your USB flash drive and you are free to move all the movies to USB flash drive.
Other Two Methods for Watching iTunes Movies on TV
A: Watch itunes movies on TV via computer
Step 1- If you already have the iTunes on your computer then another way you can salvage those rented movies from going waste is to play the videos on iTunes via the computer. By connecting the computer to the TV you can make sure that you can watch the same through iTunes that is connected in the computer.
Step 2- If you can acquire an HDMI cable then most of your problems are over. By directly connecting what is visible on your computer onto the TV you will have perfect transmission that also does not affect the image quality and definition.
Step 3- You can use the TV remote control to go to the setting. The settings will specify the switch for the TVs input to the correct port. You can even connect and set the graphics adapter and continue to choose and use the TV screen as the monitor where you will be primarily watching the movies. By using this simple step you can play any iTunes on your preferred screen of watching. Do keep that popcorn by your side.
Step 4- You can also join your computer with your TV via other kinds of audio and video cables. To connect audio cables you will need to get a Miniplug-to-RCA stereo cable and by connecting this to your headphone jack on your computer and the audio port on your TV. For a video input you will need two methods. If you have an S-video connection on the PC then you can use an S-video cable to connect to the RCA ports that are available on your TV. A VGA or DVI connection can help with directly connecting your TV and your computer, making the display work like a monitor.
B: Watch Video from Your iPad on your TV
There are two methods under this that can help you watch videos on a TV. The first ia the option of Airplay and the other is the option of connecting the iPad to the TV directly. Whichever suits your pocket and fancy can be used to combat the boredom that you are feeling.
AirPlay
Step 1- The AirPlay feature has been started specifically for those who want to watch movies online on their TV. You can use the wireless system to watch Commercial flicks as well as the videos you shot and the other rented movies from iPad to an Apple TV box. There is need that you have an HDTV for the same.
Step 2- Once you start watching any movie on the iPad, you can tap the AirPlay button which you will be able to find in the setting sections of the video controls. Though you will be able to watch only one screen at one go, you will still be able to stream in any of the movies that you have been watching to the Apple TV box and then you have to refer to the steps that concern the Apple TV section.
Step 3- The best part about this method is that while your movie is streaming on the TV you can multitask on you tablet and continue working if your times is not totally free. Your kids can continue watching a movie and entertaining themselves while you finish your pending work. It must be said that rented movies show trouble when being fixed up to a TV.
AV Adapter cables
You can buy an adapter cable and join them to the TV do get brilliant picture quality. These cables are often supplied by Apple itself but you might not want to go in for expensive cables and by them off locally in the market. This will also save you a pretty penny when considering the overall cost for watching movies on a TV.
Comparison Chart
Now, just choose the way you like for enjoy iTunes Movies on TV. Have fun!
Read More:
- Encode H.265 video for iPhone/iPad/Apple TV on Mac
- Backup Furious 7 Blu-ray on Apple TV 3, 2, 1
- Playable 3D MKV files on 3D TV with 3D Experience
- Convert H.265/HEVC to PS4 for Samsung TV via Mac El Capitan
- 3D Blu-ray to ATV 4 - Stream 3D Blu-ray to Apple TV 4
Go to link Download
Saturday, November 12, 2016
How to Delete Search History on Apple Maps
How to Delete Search History on Apple Maps
How to Delete Search History on Apple Maps - Do not be too surprised if some of you do not know how to delete search history in Apple Maps. Yes, some of us really have so long been using an iPhone or iPad, but there is just a chance we do not know how to do this or that in the Apple maps app.
In Apple Maps, search for a location that you do it will show up when you tap on the search bar. The column will appear in various locations youve previously entered. But when you tap one of the locations for the re-visit it, you will not be able to swipe on each item to delete them one by one. Worse yet, there is no button to delete them simultaneously. Unlike the Apple Maps on the iPad with a Clear button in the search windows, the key is not given in the Apple Maps for iPhone.


You also can set bookmarks using the Bookmarks tab. There is an Edit button that lets you delete individual Bookmark and even rename or set the order of the bookmarks.
Well, now you can begin to explore again with Apple Maps on your iPhone. May be useful;)
Go to link Download
Saturday, November 5, 2016
iFlicks for Windows 10 8 1 8 7 iTunes iPad Apple TV iPod iPhone
iFlicks for Windows 10 8 1 8 7 iTunes iPad Apple TV iPod iPhone
iFlicks offers an ultimate way to handle your movies, TV shows and iTunes, you can add metadata for better organize iTunes. Most of the softwares similar to iFlicks are based on Mac OS. Maybe you have spent months of Sundays to find an iFlicks alternative for Windows. And till now, there is in fact no iFlicks equivalent that is as powerful as iFlicks to handle videos and iTunes. However, there are some alternatives to iFlicks that can help you convert videos to iTunes so that you can better organize your media. This article will show you an ideal Windows iFlicks Alternative - Pavtube Video Converter Ultimate.
At first you need to know: iFlicks supports these formats:
* File formats: avi, divx, flv, m4v, mkv, mov, mp4
* Video types: MS-MPEG4 v1 & v2, DivX, 3ivx, H.264, VP6, H263i, VP3, MPEG1 & MPEG2 Video
Maybe you have spent months of Sundays to find an iFlicks alternative for Windows. Now you are right here. Luckily, The recommended iFlicks for Windows (Including Windows 10) is Pavtube Video Converter Ultimate, an Ultimate tool to meet your multimedia needs. Also it can be acted as a metadata editor for iTunes, making you easily personalize metadata manually. Here is review. With it, you can effortlessly:
1. Convert all regular formats like AVI, MP4, WMV, FLV, MKV, MPG, MPEG, 3GP, VOB, etc. to iTunes.
2. Rip DVD movies to iTunes friendly video format.
3. Burn iTunes movies to DVD for playing on DVD player or TV.
4. Download videos from YouTube, Facebook, Vimeo, Hulu, etc.
5. Remove DRM protection from iTunes movies.
6. Convert 2D videos to 3D videos.
Now, Just Free Download iFlicks Alternative for Windows or Mac:


Other Download:
- Pavtube old official address: http://www.pavtube.cn/blu-ray-video-converter-ultimate/
- Cnet Download: http://download.cnet.com/Pavtube-Video-Converter-Ultimate/3000-2194_4-75938564.html
How to Use This iFlicks Alternative for Windows 2003/XP/Vista/7/8/8.1/10
Below is a step by step guide to use this iFlicks Alternative for Windows. Pavtube Video Converter Ultimate has a well optimized interface. Even to a beginner, you will quickly know how to master this application. Please read the 4 steps below. If you are looking for a iFlick alternative for Mac, please click Pavtube iMedia Converter for Mac or you need to know: How to move files from a Windows PC to a Mac in stead of download the mac version.
Step 1: Add files into the iFlicks Alternative for Windows
Run the iFlicks Alternative for Windows. Launch it; click “Add Video” and load your Video files. Or directly drag and drip your video source to the program. It supports batch conversion so you can import multiple files at a time.

Step 2: Set Apple Device as Output Format
Click the down arrow button under “Output Format” to pop up the Output Format window, lick “Apple” to choose your Apple device, like iPhone, iPad, or Apple TV. Also you can click the “Format” icon to set MP4 as the output format.

Learn >> Apple TV Best Format | iPhone 6 Best Format | iPad Air 2 & Mini 3 Best Format…
Step 3: Convert Media to iTunes format
Click the “Convert” button to start converting the media video or audio files to iTunes supported format. It will be finished with fast conversion speed and great output quality. Then, you can click “Open” button to drag the converted media files to iTunes for easy playback or for sync to Apple TV, iPads oriPhone.
Much wonderful software bundled with Video Converter Ultimate will provide you more amazing experience in converting videos. Go to Money Saving Software Bundles to get special offer for more software, such as ByteCopy + Video Converter Ultimate = Only $79.9, Save $27.1, Video Converter Ultimate($65) + ChewTune($29) = Only $74.9, Save $19.1 and so on.
Read More:
At first you need to know: iFlicks supports these formats:
* File formats: avi, divx, flv, m4v, mkv, mov, mp4
* Video types: MS-MPEG4 v1 & v2, DivX, 3ivx, H.264, VP6, H263i, VP3, MPEG1 & MPEG2 Video
Maybe you have spent months of Sundays to find an iFlicks alternative for Windows. Now you are right here. Luckily, The recommended iFlicks for Windows (Including Windows 10) is Pavtube Video Converter Ultimate, an Ultimate tool to meet your multimedia needs. Also it can be acted as a metadata editor for iTunes, making you easily personalize metadata manually. Here is review. With it, you can effortlessly:
1. Convert all regular formats like AVI, MP4, WMV, FLV, MKV, MPG, MPEG, 3GP, VOB, etc. to iTunes.
2. Rip DVD movies to iTunes friendly video format.
3. Burn iTunes movies to DVD for playing on DVD player or TV.
4. Download videos from YouTube, Facebook, Vimeo, Hulu, etc.
5. Remove DRM protection from iTunes movies.
6. Convert 2D videos to 3D videos.
Now, Just Free Download iFlicks Alternative for Windows or Mac:
Other Download:
- Pavtube old official address: http://www.pavtube.cn/blu-ray-video-converter-ultimate/
- Cnet Download: http://download.cnet.com/Pavtube-Video-Converter-Ultimate/3000-2194_4-75938564.html
How to Use This iFlicks Alternative for Windows 2003/XP/Vista/7/8/8.1/10
Below is a step by step guide to use this iFlicks Alternative for Windows. Pavtube Video Converter Ultimate has a well optimized interface. Even to a beginner, you will quickly know how to master this application. Please read the 4 steps below. If you are looking for a iFlick alternative for Mac, please click Pavtube iMedia Converter for Mac or you need to know: How to move files from a Windows PC to a Mac in stead of download the mac version.
Step 1: Add files into the iFlicks Alternative for Windows
Run the iFlicks Alternative for Windows. Launch it; click “Add Video” and load your Video files. Or directly drag and drip your video source to the program. It supports batch conversion so you can import multiple files at a time.
Step 2: Set Apple Device as Output Format
Click the down arrow button under “Output Format” to pop up the Output Format window, lick “Apple” to choose your Apple device, like iPhone, iPad, or Apple TV. Also you can click the “Format” icon to set MP4 as the output format.
Learn >> Apple TV Best Format | iPhone 6 Best Format | iPad Air 2 & Mini 3 Best Format…
Step 3: Convert Media to iTunes format
Click the “Convert” button to start converting the media video or audio files to iTunes supported format. It will be finished with fast conversion speed and great output quality. Then, you can click “Open” button to drag the converted media files to iTunes for easy playback or for sync to Apple TV, iPads oriPhone.
Much wonderful software bundled with Video Converter Ultimate will provide you more amazing experience in converting videos. Go to Money Saving Software Bundles to get special offer for more software, such as ByteCopy + Video Converter Ultimate = Only $79.9, Save $27.1, Video Converter Ultimate($65) + ChewTune($29) = Only $74.9, Save $19.1 and so on.
Read More:
- Rip The Hunger Games collection for Playing on ATV 4
- Store Blu-rays to Raid-5 NAS for TV-Set/iPad/iPhone
- Best Kindle Comparison Review on 2016 and Best Software Recomended
- Best MP4 Joiner - How to Split or Join MP4 Files
- MakeMKV vs ByteCopy vs DVDfab - Top Blu-ray Ripper/Backup Review
Go to link Download
Subscribe to:
Posts (Atom)