Showing posts with label any. Show all posts
Showing posts with label any. Show all posts
Sunday, March 26, 2017
How to enable DEVELOPER OPTIONS and put any Android Device in USB DEBUGGING mode
How to enable DEVELOPER OPTIONS and put any Android Device in USB DEBUGGING mode
STEP: 1 Enabling Developer Options
To enable the Developers Options you need to find the Build Number option in settings menu on your device and tap on it for 7 times.
For example on Moto E go to : Settings > About phone > Build number
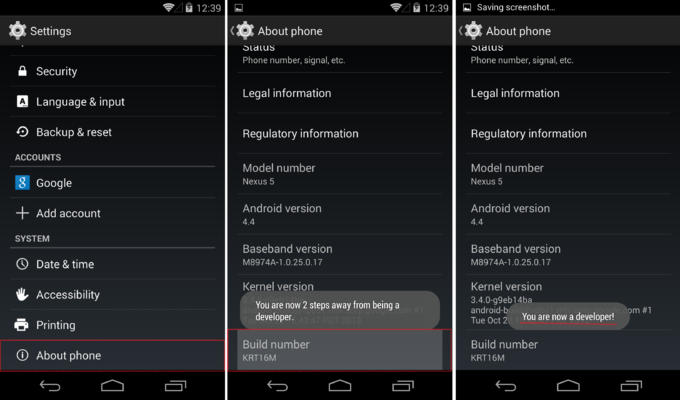
STEP: 2 Turning On Usb Debugging Mode
Now that you have enabled Developer Options, it will appear in your device settings. Tap on it and turn it on. And search for Usb Debugging in the list below, some warning will pop up, its no issue just tap on Okay.

Its done!
Go to link Download
Saturday, February 11, 2017
How to Use Any Trial Software Forever Free Using Time Stopper Guide
How to Use Any Trial Software Forever Free Using Time Stopper Guide

You always wanted to use any trial software for free, but for that you had to find a Crack for it on internet, but if you failed then you weren’t able to use the trial software any more. But now, it’s possible !!
Time Stopper let you run Trial Softwares forever without expiration.If you don’t have enough trial period of any trial version software you can extend the trial period using Time Stopper.
How it Works ?
Function of the time stopper is to change the date and time by entering into the software. For this reason time stopper will extend the trial period of the program for an unlimited amount of time.
Time Stopper will not modify the time and date of the operating system.
RUN AS DATE will not convert your trial version software to full version but it will let you use your trial version software lifetime.
BUT We recommend you to buy the software which you like.
Time Stopper at a glance
- Time Stopper is a free software.
- It is easily installable.
- Time Stopper are not damaging any file.
- It will not modify the time and date of the operating system.
- Run trial software without expiration.
- Anti virus can’t detect or blocked Time Stopper 4.0 as a virus.
How to Use ?
- User left click on “Browse… (push button)” in “Time Stopper”. Browse your installed trial version software in –> windows drive >> Program Files >> then find out your installed trial version software and choose that .exe file which will run your program.
- Now choose a date.This new date should include within trial period of the trial version software. We recommend to select tomorrow as the date.
- Now you will able to create a desktop shortcut for future use. To create a desktop shortcut type the shortcut name and click on create desktop shortcut and use these shortcut to open the trial version software.

Note: After patching the trial version software by using Time Stopper, you must always use the desktop shortcut which created by Time Stopper to open that software otherwise the trial will end instantly.

Download Links:
Time Stopper 4.02 (0.3 MB) | Mirror 1
Go to link Download
Monday, January 30, 2017
How to boost internet speed by 20 without any software
How to boost internet speed by 20 without any software
BEST GREENHOUSES FOR GROOVING VEGETABLES
? ? 1(360)241-1624 ?

? ? 360organic.us ?
DURABLE! AFFORDABLE! ALUMINUM + UV POLYCARBONATE
Old trick but it work very well!
***
Microsoft reserves 20% of your available bandwidth for their own purposes like Windows Updates and interrogating your PC etc. By using reserved bandwidth, you can make your internet connection faster by 20%. Below steps will guide you to increase speed of your Internet.
important:
Speed up your PC Disable System Restore on SSD
***
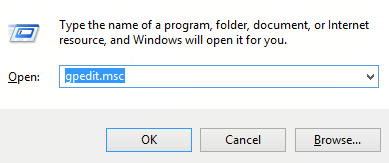
Limit Reservable Bandwidth Setting in Windows XP,Windows 7, Windows 8
1. Press Windows Key + R combination, type put gpedit.msc in Run dialog box and hit Enter to open the Local Group Policy Editor.
%2B-%2BCopy.png)
2. Navigate here:
Computer Configuration -> Administrative -> Network -> Qos Packet Scheduler
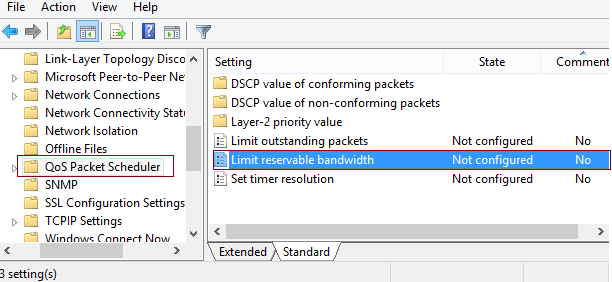
3. In the right pane of this window, look for the settings named Limit reservable bandwidth, it must be showing a Not Configured status by default. Double click on the same setting to modify it:
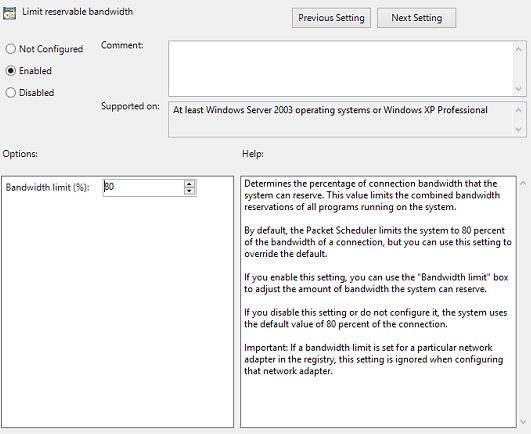
This policy setting determines the percentage of connection bandwidth that the system can reserve. This value limits the combined bandwidth reservations of all programs running on the system. By default, the Packet Scheduler limits the system to 80 percent of the bandwidth of a connection, but you can use this setting to override the default. If you enable this setting, you can use the “Bandwidth limit” box to adjust the amount of bandwidth the system can reserve. If you disable this setting or do not configure it, the system uses the default value of 80 percent of the connection. If a bandwidth limit is set for a particular network adapter in the registry, this setting is ignored when configuring that network adapter.
4. Now, in the above shown window, select Enabled and in the Options section; you could input the percentage for limiting the bandwidth. If you input 0 percent here, you can gain the reserved bandwidth reserved by the system.
Click Apply followed by OK then. You may now close the Local Group Policy Editor and reboot the system with gained bandwidth.
For these who dont have gpedit in there systems:
For these who dont have gpedit in there systems:
Thanks to "jwils876" @ DA has shared a small setup file to enable Group Policy Editor in Windows 7 Starter, Home Basic and Home Premium editions.
The installer has been originally created by "davehc" @ Windows7forums, so thanks goes to him as well.
For Windows 7 64-bit (x64) users! Youll also need to go to "SysWOW64" folder present in "C:Windows" folder and copy "GroupPolicy", "GroupPolicyUsers" folders and gpedit.msc file from there and paste them in "C:WindowsSystem32" folder.
If you are getting "MMC could not create the snap-in" error message while running gpedit.msc, check out following steps to fix the problem. Basically it happens when your username in Windows contains more than one word.
Run the installer and leave it at the last step (do not click on the "Finish" button).
Now go to C:WindowsTempgpedit folder.
If you are running 32-bit (x86) edition of Windows 7, right-click on x86.bat file and choose Open With Notepad option. If you are running 64-bit (x64) edition of Windows 7, right-click on x64.bat file and choose "Open With -> Notepad" option.
Youll find a total of 6 lines containing the following string in the file:
%username%:f
Edit those lines and replace %username% with "%username%"
For example:
Original: %WinDir%SysWOW64gpedit.dll /grant:r %username%
New: %WinDir%SysWOW64gpedit.dll /grant:r "%username%"
Save and run the file (right-click -> Run as Administrator.
Thats it. Youll have working gpedit.msc.
Additional information
What is the difference between BIOS and CMOS?
What are the F1 through F12 keys?
How to use system recovery options in Windows?
Random black screen while playing games
How to Delete and Clear Recent Items in Windows 7 Jump Lists
How to enter the BIOS or CMOS setup
What is the difference between BIOS and CMOS?
What are the F1 through F12 keys?
MISSCELLENIOUS ITEMS

MISSCELLENIOUS ITEMS
Durable Greenhouses made from Polycarbonate UV Protected material and Aluminum
ALSO PLEASE VISIT THIS VIDEOS AND SEE IF YOU FIND SOMETHING NEED:
Windows Registry Tools can be downloaded here:
How to kip your PC Private by deleting DATA Permanently
http://askpctech.blogspot.com/2016/03/kip-your-pc-privat.html
This tutorial is made up on request several users, is well is fallowing video:
1)How to Delete Paint Recent Pictures from List in Windows 7
2)Win 7– Fix for “Safely Remove Hardware and Eject Media” not working How To
3)Windows 10 How to Fix Black Screen After Booting
4)How To Remove Windows 10 Upgrade Notification On Windows 7 And Windows 8
5)How to Delete Face book Page Permanently - 2015
6)How to Uninstall Windows 10 and Downgrade to Windows 7 or 8.1
7)detected: not-a-virus:remoteadmin.win32
8)How to change pictures into icons for folders
9)Speed up your PC Disable System Restore on SSD
10)Speed up your PC Disable Scheduled De-fragmentation SSD
11)2015 Black screen of DEATH Windows 7 & 8 - with cursor at start-up SOLVED
12)Upon start up only wallpaper shows FIX
13)Here is video on Windows 7 & 8 - Black screen with cursor at start-up FIX
You can also open Task Manager by pressing Ctrl+Shift+Esc.
14) I bought a windows 7 PC but it Look alike old PC FIX:
15) Windows 7 & 8 - Black screen with cursor at start-up FIX:
16) How To Fix Minecraft OpenGL Error Windows 7 xp vista 720p :
17) removing bars using regscanner regedit & file shredder 720p:
18) How to Recover windows Explorer from error 2014 720p
19) HOW TO Save on battery online
20) Windows 7 & 8 - Black screen with cursor at start-up FIX
Upon start up only wallpaper shows no icons
CTL+ALT+DEL then click file and new task. then type explorer.exe and press ok
Best Greenhouse system 2015
Go to link Download
Wednesday, January 11, 2017
How To Full Remove uninstall any Program From Your PC
How To Full Remove uninstall any Program From Your PC
Clean Uninstall any program from Your PC..

Download Uninstall Tool Full Version

Download Method

Go to link Download
Tuesday, December 27, 2016
How To Install Windows From A Partition Without Any External Media
How To Install Windows From A Partition Without Any External Media
Install Windows From A Partition Without Any External Media
Hey guys this post is really very useful for not only installing windows but many more system management. As you know to format or installing windows you need an external media like Disc Drive or USB Flash Drive. But now can do it with some simple step without any Disc or Flash Drive.
Requirement :
- A Windows CD for first time only(with which you want to format or install your OS)
- EasyBCD Software(You can download free beta version of it from anywhere)
- Free Hard Disk space depending upon the size of your installation disc(for example here we gonna show you this process with Windows 7 and 8. Generally the size of a Windows 7-8 installation Disc is about 4 GB. So here we need 5 GB of free space. Thats means 1 GB more space than the installation disc)
Method :
- Create a partition of about 5 GB. [As you can see in picture (Drive H:)]

Blank Drive - Now open and copy your Windows 8 installation disc into this drive.

Copy OS - Now run EasyBCD and click on Add New Entry from the left side of the application.

Add New Entry - Now click on WinPE

WinPE - Now you have to path boot.wim file from the drive where youve copied your Installation Disc (Here Drive H:). To do this click on path(as you can see in pic) now open Drive H:, go to folder "sources and select the boot.wim file.

Select Path 
boot.wim - Now change the Entry name as Windows Installation or whatever you want.

Entry Name - Now click on Add Entry

Add Entry - Finish :).. Now restart your PC.. And After booting youll be asked for select Windows. Here click on Windows Installation(the Entry you have just created) to go to Windows Setup. And you can continue Windows Installation.
Note: You can view the Entry setting or change Start Up setting or time to select the default operating system. To do this follow the steps given below.
Steps:
1. Click on My Computer properties and open.
 | |||
| My Computer Properties |
 |
| Advance System Setting |
 |
| Start up and Recovery Setting |
 |
| Start up and Recovery Setting |
Go to link Download
Friday, December 16, 2016
How to Install any Motorola Device MTP USB Drivers in Windows xp 7 8 8 1 and Mac OS
How to Install any Motorola Device MTP USB Drivers in Windows xp 7 8 8 1 and Mac OS
It’s a really easy process to install USB Drivers for Motorola devices; we are going to do it with the help of Motorola Device Manager. Motorola Device Manager contains USB drivers and software to connect your Motorola devices to your computer using a USB cable.
- Download Motorola Device Manager from HERE.
- Go through the process of installing the software.
- Once installed you don’t need to open the software.
- Just connect your device with USB, and it installs the drivers automatically. Voilà!
Go to link Download
Thursday, December 1, 2016
How To Make Your PC Virus Free Without Buying Any Antivirus
How To Make Your PC Virus Free Without Buying Any Antivirus
How To Make Your PC Virus, Spyware and Maleware Free Without Buying Any Antivirus In Windows 7/8:
Process 1: The antivirus like Kaspersky, Quick Heal, K7 and the other top most antivirus are very good no doubt and also expensive software. You dont need to buy any kind of anti-virus if you have Windows 7 or Windows 8 installed on your system. Because Microsoft provide a free antivirus and anti-malware (Windows Defender) with Windows 7 and Windows 8. To active this make sure you dont have any other antivirus installed on your system. If already installed, you have to uninstall this from your system.
To run Windows Defender on windows 7 go to start and Type on the search bar “Windows Defender”. When found click on it and run. If you have an internet connection then update it first.
If u r using widows 8 just directly go to search option and type “windows defender”
To run Windows Defender on windows 7 go to start and Type on the search bar “Windows Defender”. When found click on it and run. If you have an internet connection then update it first.
If u r using widows 8 just directly go to search option and type “windows defender”
Process 2: If your computer dose not open or run normally for badly virus infection just download antivirus like quick hell, Kaspersky from your friends computer and active trial version .After opening this application youll find an option “make emergency disk”. Just click on it and follow the instruction and make a bootable disk using a blank cd or pen drive (The process of making your pendrive bootable is given below)). After Creating a boot disk now go to your PC and run the disk while booting. But before that make sure that CD/DVD drive is enable as 1st boot device. If not so then go to boot menu option while starting your system by pressing "DEL" and select first boot priority as a cd drive or pen drive which u have. And boot your computer it will take some time and it remove all virus and also repair your infected files and folders. After finish these process please active “windows defender” for further security of your computer which I mention above.
Process 3: If window defender does not work perfectly on your computer just download any popular antivirus from internet and active trail version and scan your full computer to remove virus from your computer.
 |
| Windows Defender Windows Defender, its a free application which helps you stay protected your computer against pop ups, slow performance and any security threats which caused by spyware and potentially unwanted software and maleware. System Requirement: Windows Server 2003 Service Pack 2 x64 Edition, Windows XP Service Pack 2, Windows Server 2003 Service Pack 1, Windows XP Professional x64 Edition, Windows Service Pack 7 and Windows Service Pack 8. |
- How to Make Your Pen Drive Bootable with WinUSB:
WinUSB is a tool that dynamically make your External Disc Device / External HDD bootable.
WinUSB is a tool that dynamically make your External Disc Device / External HDD bootable.
* DOS Bootable disk always formatted with FAT32 File system
* Drive recover would always format in NTFS system, without removing all partitions
Process:
 |
| WinUSB |
Run WinUSB. Then Click on Browse Set up Folder. Now select the folder that contains the Files that you want to make bootable(also may be an ISO or Image file). Now Click on OK. And click Make It Bootable. Now all done. Just wait.
Go to link Download
Friday, November 25, 2016
How To Use VM VirtualBox To Run Any OS in Windows Easy Guide
How To Use VM VirtualBox To Run Any OS in Windows Easy Guide

VirtualBox is a cross-platform virtualization application. What does that mean? For one thing, it installs on your existing Intel or AMD-based computers, whether they are running Windows, Mac, Linux or Solaris operating systems. Secondly, it extends the capabilities of your existing computer so that it can run multiple operating systems (inside multiple virtual machines) at the same time. So, for example, you can run Windows and Linux on your Mac, run Windows Server 2008 on your Linux server, run Linux on your Windows PC, and so on, all alongside your existing applications. You can install and run as many virtual machines as you like -- the only practical limits are disk space and memory.
VirtualBox is deceptively simple yet also very powerful. It can run everywhere from small embedded systems or desktop class machines all the way up to datacenter deployments and even Cloud environments.
In this User Manual, well begin simply with a quick introduction to virtualization and how to get your first virtual machine running with the easy-to-use VirtualBox graphical user interface.
You Can Run Your Desired OS using Oracle VM VirtualBox But We will show You how to Use Windows XP Within VirtualBox.
Setting up a virtual machine isn’t very complicated, but it does involve a number of steps. Don’t worry—we’ll walk you through them, one at a time.
Before we can begin, you’ll need to make sure you have the following two things:
VirtualBox: Other virtual machine programs are out there, but this one has a lot going for it—it’s got all the features you need, it’s easy to set up and use, and (best of all) it’s totally free for personal use. You can Download it with extension pack at Here.

Windows XP Installation File/Data (.iso or CD/DVD): In order to install windows on your new virtual machine, you’ll need your Windows XP installation disc (You can choose you desired one), or a downloaded Windows XP Lite.ISO file with the data that comes on that disc from Here.
1# If you’ve got all of the above, start by installing VirtualBox. There’s a few choices you can make during the installation, but you can just leave the default options selected for everything and click through. When the installer is done, VirtualBox will start up, and you’ll see a message informing you that you don’t have any virtual machine created yet. To remedy that, click on the New (blue) button in the top left corner.
You’ll now go through several pages of setup for your new virtual machine. On the first page, choose a descriptive name (such as “Windows XP Virtual Machine”) and select what make and model of operating system you’re going to install. Conveniently, Windows XP is the default choice, so unless your drop-down menu looks different, stick with that (here you have to choose your Operating System which you are going to install in this guide we choose windows xp 32bit lite.iso).

2# The second setup page asks you how much of your system memory you want to devote to the virtual machine while it’s running. Windows XP’s memory requirements are very low, but for better performance you’ll want to increase this higher than the recommended 192 MB. Depending on how much memory you have to spare, you can allocate from 512MB to 2GB. (You can use different value for different operating systems e.g. for windows 7 use 2GB-4GB) Click Next.

3# On the next page, leave “Create a virtual hard drive now” selected and click Create. A new setup window will open, with choices about virtual hard drive files. Leave the default “VDI” option selected, and click Next. On the following page, choose Dynamically allocated, which means that you can allocate, Because if you use 25GB of hard drive space for the virtual machine, but that space won’t actually be used up on your physical hard disk unless you actually use it for something in the virtual machine. Click Next again.

4# You’ll now be asked to pick the size of the drive. 10GB is enough to install the operating system with room to spare, but you should increase it a bit if you plan to install anything more than basic software. We are using 15GB for our Windows XP 32bit Lite (You can use different value for you different OS). Remember that you won’t be immediately forfeiting all this space on your main drive—it’ll only be claimed if you actually use it for something in your virtual Windows XP PC. Click Create.

5# Now, your virtual machine is ready to go. But just as if you’d built a brand new physical PC, you have to install an operating system on it. If you attempt to run the PC by double clicking on its tile on the left part of the screen, VirtualBox will automatically start the new machine wizard, and it will ask you to select a startup disc. You can click the little file icon next to the file field to browse your system for the Windows install data. If you have a physical disc, put it in your CD or DVD drive and select that drive. If you have an ISO, simply select that file. (We are using Window XP 32bit ISO image)

6# Your virtual machine will start up, and you will see the familiar Windows installation process (Or With Respect to Your OS). Even if you’ve never installed Windows XP before, the installation process is very straightforward—just click through each screen, filling in any of the basic info it asks you for. It will restart at one point in the process, and then after several minutes of installing you’ll find yourself looking at a small version of the Windows XP desktop, in a window. (May Different for Different OS)

7# Before you can start using your virtual Windows XP machine (Or any other OS), there’s one more step to complete. VirtualBox includes a set of software utilities to install on the virtual PC, which make it a lot easier to work with and control the virtual PC. To install these, click on the VirtualBox menu bar (On the Top) item labelled Devices, then select Insert Guest Additions CD Image.

A new wizard will pop up, this time inside the Windows XP virtual machine. There aren’t any complicated decisions to make here, just click next a couple times, and allow the computer to restart when it asks.

8# With Guest Additions installed you will have a number of new options available to you in the “Devices” menu of VirtualBox. Most useful is the option to add a shared folder, which will allow you to easily transfer files from your host computer to your virtual computer. To do this, click Devices, then Shared Folders Settings, which will open the virtual machine settings.
On the right side of the window there’s a small icon of a folder with a green plus. Click this, then select a file location to use as a folder. Make sure to click the boxes marked “Auto-mount” and “Make Permanent.” If you only plan to transfer files to the virtual machine and not from it, click “Read-only” as well. VirtualBox can be a little finicky with what it accepts as a valid file name here—we found the easiest way to make sure the folder path works is to manually create a folder with no spaces or special characters on the host machine, then copy and paste the address into the folder field.

9# Now, restart your virtual machine, and when it starts again you’ll see your shared folder as a drive on the virtual machine. You can use this to transfer software to the virtual machine, and then install it inside Windows XP. (Or your Desired OS)
Download Oracle VM VirtualBox With Extension Pack Installer from Here.
Note:-
This is a Basic Guide for Installing Windows XP in VM VirtualBox but You Can use it to install any OS in VirtualBox. But if You Want to learn about installing more OS on VirtualBox You Can learn more by visiting the Virtual Box Official Website Here
Facing Any Issue:-
If You Facing any issue please let me know by click bottom right side LIVE CHAT BOX.
Go to link Download
Sunday, October 30, 2016
Install firefox without any browser using FTP command in terminal on a Mac
Install firefox without any browser using FTP command in terminal on a Mac
How to download Firefox without any Web Browser on your Mac
I recently came across an interesting situation on my friends Mac wherein one of my clients updated his Safari from Mac App Store software update and then he started getting the following error message whenever he opens the safari on his Macbook Pro.He was running Mac OS X 10.8.
"This version of safari is not souported on the current version of OS X.Please upgrade to OS X 10.10 or above."
Unfortunately he did not have any alternate browser installed on his Mac and he could not install any other browser now as it requires you to have a browser to go to the download link.So the only option left was download the installation file on another computer and save it to a flash drive and install the Firefox or Chrome as an alternate browser on the other one where Safari does not work.
I tried to fix it but did not find any way but to reinstall OS X or upgrade to 10.10.4.
So here is the way to install Firefox without any browser using FTP command in terminal on a Mac.
Note: - If you are running OS X 10.6 Snow Leopard then you could download Safari Version 5.0.5 to your home folder from terminal.app ( no browser) required, just copy and paste:
curl -o Safari.dmg -R http://appldnld.apple.com.edgesuite.net/content.info.apple.com/Safari5/041-0564.20110413.Fi9pb/Safari5.0.5SnowLeopard.dmg
Incoming Search terms
install Firefox without any browser
Mac terminal command to install firefox without any browser
install firefox using terminal command on a mac without any browser
firefox download -ftp command without any browser
ftp command to download firefox on a mac without any browser
Mozilla firefox installation without safari
download firefox without safari
get a browser without any browser
download and install firefox free without any other browser
install firefox on mac with terminal ftp command
Unfortunately he did not have any alternate browser installed on his Mac and he could not install any other browser now as it requires you to have a browser to go to the download link.So the only option left was download the installation file on another computer and save it to a flash drive and install the Firefox or Chrome as an alternate browser on the other one where Safari does not work.
I tried to fix it but did not find any way but to reinstall OS X or upgrade to 10.10.4.
So here is the way to install Firefox without any browser using FTP command in terminal on a Mac.
- Go to Spotlight and type Terminal. Click on Terminal app to open it.
- In Terminal type “ftp” and hit enter.
- type “open ftp.mozilla.org” and hit enter.
- It will ask for a username, type “anonymous” and hit enter.
- It will then ask for a password, type “anonymous” and hit enter.
- Open the folder with the latest Mac release of Firefox by typing in:
- “cd pub/mozilla.org/firefox/releases/latest/mac/en-US/” and then enter.
- View the contents of the current directory by typing in “ls” and then enter.
- Switch to binary file mode by typing in “type image” and then hit enter..
- When you typed in “ls” from step 7, it should have listed a .dmg file for you. As of writing the latest version is Firefox 39.0.dmg. In this case, we will type in: get “Firefox 39.0.dmg” (type in the quotes)
- Now go type Firefox in the spotlight you should see the Firefox 39.0.dmg file downloaded.Click on the file and install it.
- Type “bye” to exit the FTP mode, and then quit terminal.
 |
| Install firefox without any browser using FTP on Mac |
 |
| Install firefox without any browser using FTP on Mac |
 |
| Install firefox without any browser using FTP on Mac |
Note: - If you are running OS X 10.6 Snow Leopard then you could download Safari Version 5.0.5 to your home folder from terminal.app ( no browser) required, just copy and paste:
curl -o Safari.dmg -R http://appldnld.apple.com.edgesuite.net/content.info.apple.com/Safari5/041-0564.20110413.Fi9pb/Safari5.0.5SnowLeopard.dmg
install Firefox without any browser
Mac terminal command to install firefox without any browser
install firefox using terminal command on a mac without any browser
firefox download -ftp command without any browser
ftp command to download firefox on a mac without any browser
Mozilla firefox installation without safari
download firefox without safari
get a browser without any browser
download and install firefox free without any other browser
install firefox on mac with terminal ftp command
Go to link Download
Thursday, October 13, 2016
If not open any web side like yahoo Hotmail etc
If not open any web side like yahoo Hotmail etc
The solution for the above title:-........
Normally this problem was generated my ip problem
So Plz first check your ip if there was not any ip you need to be provide the ip to your system
after that this problem was solved.
Normally this problem was generated my ip problem
So Plz first check your ip if there was not any ip you need to be provide the ip to your system
after that this problem was solved.
Go to link Download
Sunday, October 9, 2016
how to change IP address without any software
how to change IP address without any software
Open all blocked websites without any software, no ads, no log in or email required, just follow these simple steps mentioned in Video
- Free PPTP VPN Account (Easy to setup, no need to download any software, works with all Windows, Mobile and PS3 Devices)
- Server #1: euro195.vpnbook.com
- Server #2: euro213.vpnbook.com
- Server #3: uk180.vpnbook.com (UK VPN - optimized for fast web surfing; no p2p downloading)
- Server #4: us1.vpnbook.com (US VPN - optimized for fast web surfing; no p2p downloading)
- Username: vpnbook
- Password: 8ruFatha
- More servers coming...
Go to link Download
Subscribe to:
Comments (Atom)