Showing posts with label device. Show all posts
Showing posts with label device. Show all posts
Sunday, March 26, 2017
How to enable DEVELOPER OPTIONS and put any Android Device in USB DEBUGGING mode
How to enable DEVELOPER OPTIONS and put any Android Device in USB DEBUGGING mode
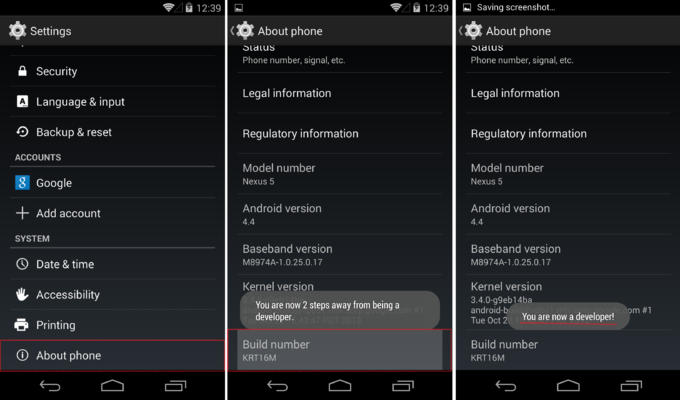
STEP: 1 Enabling Developer Options
To enable the Developers Options you need to find the Build Number option in settings menu on your device and tap on it for 7 times.
For example on Moto E go to : Settings > About phone > Build number
STEP: 2 Turning On Usb Debugging Mode
Now that you have enabled Developer Options, it will appear in your device settings. Tap on it and turn it on. And search for Usb Debugging in the list below, some warning will pop up, its no issue just tap on Okay.

Its done!
Go to link Download
Thursday, March 16, 2017
Intel Chipset Device Software 10 0 24 Free Download
Intel Chipset Device Software 10 0 24 Free Download

Intel Chipset Device Software 10.0.24 Free Download
Intel Chipset Device Software, provides information to the operating system of the proper setup chipset for use of certain features, such as AGP, USB, basic support for PCI and ISA PnP. Installing the drivers related to the chipset (such as the graphics driver, the IDE bus, etc.) is possible only if the operating system is fully recognize this chipset. This Software Also Offers A set of command line flags, Which Provide Additional Installation choices
The Intel(R) Chipset Device Software installs Windows* INF files to the target system. These files outline to the operating system how to configure the Intel(R) chipset components in order to ensure that the following features function properly:
- Core PCI and ISAPNP Services
- PCIe Support
- IDE/ATA33/ATA66/ATA100 Storage Support
- SATA Storage Support
- USB Support
- Identification of Intel(R) Chipset Components in
the Device Manager
Support processor:
- Intel® Atom™/Celeron®/Pentium® Processor
- Intel® Core™ M processor family
- 5th Generation Intel® Core™ processor family
- 4th Generation Intel® Core™ processor family
- 3rd Generation Intel® Core™ processor family
- 2nd Generation Intel® Core™ processor family
- Intel® 9 series chipset -Wellsburg -Patsburg
SYSTEM REQUIREMENTS
Microsoft Windows 7
Microsoft Windows 7 x64
Microsoft Windows Server 2008 R2
Microsoft Windows Server 2008 R2 x64
Microsoft Windows 8
Microsoft Windows 8 x64
Microsoft Windows Server 2012
Microsoft Windows Server 2012 x64
Microsoft Windows 8.1
Microsoft Windows 8.1 x64
Microsoft Windows Server 2012 R2
Microsoft Windows Server 2012 R2 x64
Microsoft Windows 10 x64
Download from Here
Go to link Download
Friday, December 16, 2016
How to Install any Motorola Device MTP USB Drivers in Windows xp 7 8 8 1 and Mac OS
How to Install any Motorola Device MTP USB Drivers in Windows xp 7 8 8 1 and Mac OS
It’s a really easy process to install USB Drivers for Motorola devices; we are going to do it with the help of Motorola Device Manager. Motorola Device Manager contains USB drivers and software to connect your Motorola devices to your computer using a USB cable.
- Download Motorola Device Manager from HERE.
- Go through the process of installing the software.
- Once installed you don’t need to open the software.
- Just connect your device with USB, and it installs the drivers automatically. Voilà!
Go to link Download
Tuesday, October 18, 2016
How to install ADB DRIVERS for your ANDROID DEVICE in WINDOWS XP 7 8 8 1
How to install ADB DRIVERS for your ANDROID DEVICE in WINDOWS XP 7 8 8 1
So basically there are two methods for installing adb driver, first one is very simple which automatically works but if somehow it’s not working then you will have to use second method in which you will install it manually.
METHOD 1 (Simple, Automatic): Make sure your computer have internet connection.
STEPS:
1) Connect your device to computer with USB cable.
2) Now in your phone turn on Developer Options (Setting -> Developer Options).
3) In Developer Options list, mark the check box “USB Debugging”.
4) Windows will automatically start to download and install the drivers.
METHOD 2 (Little Complex, Manual):
STEPS:
1) Download the attached .ZIP file and extract it somewhere you can find it (i.e. C: latest_usb_driver_windows).
2) Connect your device to computer with USB cable.
3) Now in your phone turn on Developer Options (Setting -> Developer Options).
4) In Developer Options list, mark the check box “USB Debugging”.
5) Open Device Manager, In Windows 8.1/8/7 press windows button then in search programs and files type “Device Manager”. Click on first option. In Windows XP go to Control Panel-> Performance and Maintenance-> Administrative Tools-> Computer Management. When the Computer Management utility opens, click on Device Manager on the left side of the window, located toward the bottom of the list under the System Tools heading.
6) Under Other Devices you should now see Motorola ADB Interface.
7) Right-click and select Update Driver Software.
8) Click on Browse my computer for driver software.
9) Click on Let me pick from a list of device drivers on my computer.
10) Click on Show All Devices then Next. DO NOT CLICK ON ADB INTERFACE FROM THE LIST!
11) Click on Have Disk button.
12) Click Browse button.
13) Go to “C: latest_usb_driver_windowsusb_driver “ then select android_winusb.inf and click the Open button.
14) Click OK.
15) Select Android Composite ADB Interface and click the Next button.
16) Click Yes on the Update Driver Warning window.
It will take few seconds to install the driver. Youll get a window saying that your driver was successfully updated (click the Close button), and your phone should now show up at the top of the device list under Android Phone.
LINK FOR DOWNLOAD: https://www.dropbox.com/s/1754z4m5d1d9zkj/latest_usb_driver_windows.zip?dl=0
Go to link Download
Subscribe to:
Posts (Atom)