Showing posts with label mac. Show all posts
Showing posts with label mac. Show all posts
Saturday, May 20, 2017
How to Fix iPhone White Screen of Death on Mac El Capitan
How to Fix iPhone White Screen of Death on Mac El Capitan
White screen of death is a phenomenon that many iPhone users including iPhone 6S (Plus) have to face every now and then. White screen of death shows as a black screen with an Apple logo or just completely blank scree. It occurs for several reasons but the main reasons are as below:

The Reason for iPhone White Screen of Death:
1.Multi-tasking maybe the reason:
If your iOS is lower than iOS 7.0.2, you maybe encounter the issue that you were multi-tasking between several apps.
2. Stressed out Hardware components:
If you have been using your iPhone for prolonged periods of time without giving it some time off, the hardware components of the iPhone may get stressed out and result in the appearance of a black screen of death.
3. Software Malfunction:
White screen of death may also be a result of a glitch in the software or iOS of your iPhone.
4. Application Incompatibility:
Trying to run apps that may be taking too much toll on your iPhone’s software and hardware may result in the appearance of white screen of death.
Generally, there are several ways to fix the white screen of death situation. You can try to handle this by yourself as the following steps:
1.Turn off your iPhone with the "Sleep/Wake" button. Now it is completely powered off. Then you can turn on it again.
2.Press both the Home button and Sleep/Wake button, holding them for at least for 10 seconds. Then the battery symbol or the Apple logo will appear on your screen when iPhone is reset. If you see the battery symbol, please charge your iPhone until it is totally charged.
3.If the white screen is still there, go to connect your iPhone to the computer with the data cable.
4.Get in to iTunes and select your device from the Devices list.
5.Tap "Summary" and then tap "Restore". Click "Back Up" if prompted.
6. Tap "Restore" to restore your iPhone.
All the things have been done now, and if there still is a white screen on your iPhone you had better to ask for professional help. You can go to visit an Apple store to get the device checked and repaired but you must afford to pay $199 and more upfront. Local repair shops can also repair a hardware caused white screen of death but when it comes to software, the user does not has many options to look forward to.
If you didn’t handle white screen of death issue as above steps and you don’t want to afford extra $199 to repair it, maybe you can try Wondershare Dr.Fone for iOS for Mac. Although it also is a paid one, it is cheaper and it not only can fix white screen of death but handle stuck in recovery mode issue and recover you lost iOS data, like message,contacts, notes, call history on your iPhone, iPad and iPod Touch. It supports iTunes 12.1 and Mac OS X 10.11 El Capitan. (Read its review)
For Windows users, pls turn to Wondershare Dr.Fone for iOS Windows.
Free Download and Install Mac iPhone Data Recovery


How to Fix White Screen of Death with Wondershare Dr.Fone for iOS?
Step 1: Download and install Wondershare Dr.Fone for Mac and launch it. Connect your iPhone or iPad with USB cable to computer. From the main window, select "Fix iOS to Normal" located at the bottom left of the screen. Wait for Wondershare Dr.Fone for Mac to detect your iOS device. Click "Start" once the device has been detected.

Step 2: To fix white screen of death on your iOS, Dr.Fone will download the latest version of your firmware after detecting your current iOS version. Hit "Download" and wait for the download to complete.

Step 3: After downloading and selecting the official firmware for your iPhone (iOS 9 supported), you should click the button "Start Fix" to let the program to fix the white screen of death issue for you without damaging your data. In less than 10 minutes, you will get a message saying that your device is restarting to normal mode.
Now, you should handled your white screen of death issue on your iOS device if you have followed the steps aforementioned.
Tip: How to avoid white screen of death?
1.The most important but simple trick to prevent getting your iPhone (including iPhone 6s and iPhone 6s Plus) into the white screen of death is to take good care of it. Don’t drop it; if butterfingers run in the family, keep it inside your pocket as much as you can.
2.Buy a protective case with extended edges to prevent direct contact of the phone with the surface that it fell on. Minimal impact means minimal chances of hardware abnormality resulting from the drop.
3.Sometimes, extra stress on the battery and other hardware resources of the iOS device can be the cause of the white screen of death. Therefore, avoid using the device for abnormally prolonged periods of time. If you notice that the device is heating up or getting stuck every now and then, give it some rest.
4.Shut down your phone once a month and then turn it back on after 10 seconds. Your phone runs non-stop for you, fetches all your emails, keeps all your pictures safe, it probably deserves this little break. This simple activity will give your phone with the time out that it needs minimizing the chances of appearance of a white screen of death.
5. White screen of death is not always caused by faulty hardware. Sometimes, glitches in the software cause the screen to go blank and white without any apparent reason. Such glitches are more common in iOS version below the iOS version 7. Therefore, keep your iOS devices updated to the latest iOS 9 version.
Related Software:
Wondershare Dr.Fone for Android for Mac - First aid to recover deleted or lost contacts, text messages, photos, videos, audio files, documents, whatsapp history, call history, etc from Android phones and tablets.
Wondershare MobileTrans for Mac - One click and risk-free solution to move contacts, text messages, call logs, calendar, photos, music, video and apps between iPhone, Android, Blackberry and Nokia(Symbian) phones.
Wondershare TunesGo for Mac - Transfer and copy music, videos, playlists and other media files from iPhone, iPad and iPod touch to iTunes and PC with no difficulty.
Pavtube iMedia Converter for Mac - Convert any 4K/SD/HD and Blu-ray/DVD to iPhone, iPad, iPod Touch with suitable format.
Source site: http://iphone-ipad-recovery.over-blog.com/fix-white-screen-of-death
Related Articles:
The Reason for iPhone White Screen of Death:
1.Multi-tasking maybe the reason:
If your iOS is lower than iOS 7.0.2, you maybe encounter the issue that you were multi-tasking between several apps.
2. Stressed out Hardware components:
If you have been using your iPhone for prolonged periods of time without giving it some time off, the hardware components of the iPhone may get stressed out and result in the appearance of a black screen of death.
3. Software Malfunction:
White screen of death may also be a result of a glitch in the software or iOS of your iPhone.
4. Application Incompatibility:
Trying to run apps that may be taking too much toll on your iPhone’s software and hardware may result in the appearance of white screen of death.
Generally, there are several ways to fix the white screen of death situation. You can try to handle this by yourself as the following steps:
1.Turn off your iPhone with the "Sleep/Wake" button. Now it is completely powered off. Then you can turn on it again.
2.Press both the Home button and Sleep/Wake button, holding them for at least for 10 seconds. Then the battery symbol or the Apple logo will appear on your screen when iPhone is reset. If you see the battery symbol, please charge your iPhone until it is totally charged.
3.If the white screen is still there, go to connect your iPhone to the computer with the data cable.
4.Get in to iTunes and select your device from the Devices list.
5.Tap "Summary" and then tap "Restore". Click "Back Up" if prompted.
6. Tap "Restore" to restore your iPhone.
All the things have been done now, and if there still is a white screen on your iPhone you had better to ask for professional help. You can go to visit an Apple store to get the device checked and repaired but you must afford to pay $199 and more upfront. Local repair shops can also repair a hardware caused white screen of death but when it comes to software, the user does not has many options to look forward to.
If you didn’t handle white screen of death issue as above steps and you don’t want to afford extra $199 to repair it, maybe you can try Wondershare Dr.Fone for iOS for Mac. Although it also is a paid one, it is cheaper and it not only can fix white screen of death but handle stuck in recovery mode issue and recover you lost iOS data, like message,contacts, notes, call history on your iPhone, iPad and iPod Touch. It supports iTunes 12.1 and Mac OS X 10.11 El Capitan. (Read its review)
For Windows users, pls turn to Wondershare Dr.Fone for iOS Windows.
Free Download and Install Mac iPhone Data Recovery
How to Fix White Screen of Death with Wondershare Dr.Fone for iOS?
Step 1: Download and install Wondershare Dr.Fone for Mac and launch it. Connect your iPhone or iPad with USB cable to computer. From the main window, select "Fix iOS to Normal" located at the bottom left of the screen. Wait for Wondershare Dr.Fone for Mac to detect your iOS device. Click "Start" once the device has been detected.
Step 2: To fix white screen of death on your iOS, Dr.Fone will download the latest version of your firmware after detecting your current iOS version. Hit "Download" and wait for the download to complete.
Step 3: After downloading and selecting the official firmware for your iPhone (iOS 9 supported), you should click the button "Start Fix" to let the program to fix the white screen of death issue for you without damaging your data. In less than 10 minutes, you will get a message saying that your device is restarting to normal mode.
Now, you should handled your white screen of death issue on your iOS device if you have followed the steps aforementioned.
Tip: How to avoid white screen of death?
1.The most important but simple trick to prevent getting your iPhone (including iPhone 6s and iPhone 6s Plus) into the white screen of death is to take good care of it. Don’t drop it; if butterfingers run in the family, keep it inside your pocket as much as you can.
2.Buy a protective case with extended edges to prevent direct contact of the phone with the surface that it fell on. Minimal impact means minimal chances of hardware abnormality resulting from the drop.
3.Sometimes, extra stress on the battery and other hardware resources of the iOS device can be the cause of the white screen of death. Therefore, avoid using the device for abnormally prolonged periods of time. If you notice that the device is heating up or getting stuck every now and then, give it some rest.
4.Shut down your phone once a month and then turn it back on after 10 seconds. Your phone runs non-stop for you, fetches all your emails, keeps all your pictures safe, it probably deserves this little break. This simple activity will give your phone with the time out that it needs minimizing the chances of appearance of a white screen of death.
5. White screen of death is not always caused by faulty hardware. Sometimes, glitches in the software cause the screen to go blank and white without any apparent reason. Such glitches are more common in iOS version below the iOS version 7. Therefore, keep your iOS devices updated to the latest iOS 9 version.
Related Software:
Wondershare Dr.Fone for Android for Mac - First aid to recover deleted or lost contacts, text messages, photos, videos, audio files, documents, whatsapp history, call history, etc from Android phones and tablets.
Wondershare MobileTrans for Mac - One click and risk-free solution to move contacts, text messages, call logs, calendar, photos, music, video and apps between iPhone, Android, Blackberry and Nokia(Symbian) phones.
Wondershare TunesGo for Mac - Transfer and copy music, videos, playlists and other media files from iPhone, iPad and iPod touch to iTunes and PC with no difficulty.
Pavtube iMedia Converter for Mac - Convert any 4K/SD/HD and Blu-ray/DVD to iPhone, iPad, iPod Touch with suitable format.
Source site: http://iphone-ipad-recovery.over-blog.com/fix-white-screen-of-death
Related Articles:
- How to Recover Deleted Voicemail on iPhone 6S on Mac
- How to Recover Deleted WeChat Data from iPhone 6s Plus/6s/6/5s/4s/4?
- How to Recover Deleted Texts Message on iPhone 6S
- Recover Lost calendars After iPhone 6s Stolen
- Top iPhone Data Recovery Software
Go to link Download

Wednesday, March 8, 2017
How to Make AVI files to Work in Quicktime on Mac El Capitan
How to Make AVI files to Work in Quicktime on Mac El Capitan
This article shows you how to convert AVI video files to QuickTime MOV, so that you can play, share, or upload all kinds of AVI files to QuickTime on Mac El Capitan without limitations.
Why We often Encounter Problem in Importing AVI to QuickTime?
As we all know, AVI (Audio Video Interleaved) is common video file format which might be one of the most used file formats for saving video files online and offline. AVI format has better compatibility with Windows OS X. It can be easily playable on Windows Media Player or Movie Maker. However, to Mac user, AVI file format is their nightmare, only audio exists or even worse, QT just crashes. It is because of their variant codecs.
So if your source AVI files cant be accepted by QuickTime Player, it is necessary to convert AVI to QuickTime supported mov format. This article is specially written down to assist you to do the AVI to QuickTime MOV conversion on Mac OS X El Capitan step by step.
I know a program that named iMedia converter for Mac, is just the ideal AVI to mov conversion software. It can easily transcode any kind of AVI video to mov for adding AVI to QuickTime for playing. Here is how it works. Here is the review.
Preparation: Run Pavtube AVI to QuickTime Converter for Mac El Capitan
Free Download and trail:


Other Download:
- Pavtube old official address: http://www.pavtube.cn/imedia-converter-mac/
- Cnet Download: http://download.cnet.com/Pavtube-iMedia-Converter/3000-2194_4-76177788.html
Good News! To thanks for your continuous support, Pavtube Official Website and Pavtube Facebook are now holding the biggest sale for this Thanksgiving Day, Black Friday Holiday Cyber Monday Crazy Promotion with fantastic 50% off discounts and giveaway. Pay less to get powerful Blu-ray/DVD/Video Converter to build your own home media center on your becoming Christmas!
Step 1. Run the program and load your AVI video files into it.

Step 2. Choose MOV- QuickTime(*.mov) as output. You can easily find it in "Common Video" category.

Step 3. Start transcoding AVI to QuickTime mov by clicking on "Convert" button.
Of course, the process will take some time, please wait patiently. When its finished, you can easily import the converted media file into QuickTime for playing.
Except help you handling AVI video files, this iMedia converter for Mac can convert Blu-ray, DVD and a wide range of video formats for your tablets or smartphones with optimized presets. Overall, its really a good helper that worth having.
Read More:
Why We often Encounter Problem in Importing AVI to QuickTime?
As we all know, AVI (Audio Video Interleaved) is common video file format which might be one of the most used file formats for saving video files online and offline. AVI format has better compatibility with Windows OS X. It can be easily playable on Windows Media Player or Movie Maker. However, to Mac user, AVI file format is their nightmare, only audio exists or even worse, QT just crashes. It is because of their variant codecs.
So if your source AVI files cant be accepted by QuickTime Player, it is necessary to convert AVI to QuickTime supported mov format. This article is specially written down to assist you to do the AVI to QuickTime MOV conversion on Mac OS X El Capitan step by step.
I know a program that named iMedia converter for Mac, is just the ideal AVI to mov conversion software. It can easily transcode any kind of AVI video to mov for adding AVI to QuickTime for playing. Here is how it works. Here is the review.
Preparation: Run Pavtube AVI to QuickTime Converter for Mac El Capitan
Free Download and trail:
Other Download:
- Pavtube old official address: http://www.pavtube.cn/imedia-converter-mac/
- Cnet Download: http://download.cnet.com/Pavtube-iMedia-Converter/3000-2194_4-76177788.html
Good News! To thanks for your continuous support, Pavtube Official Website and Pavtube Facebook are now holding the biggest sale for this Thanksgiving Day, Black Friday Holiday Cyber Monday Crazy Promotion with fantastic 50% off discounts and giveaway. Pay less to get powerful Blu-ray/DVD/Video Converter to build your own home media center on your becoming Christmas!
Step 1. Run the program and load your AVI video files into it.
Step 2. Choose MOV- QuickTime(*.mov) as output. You can easily find it in "Common Video" category.
Step 3. Start transcoding AVI to QuickTime mov by clicking on "Convert" button.
Of course, the process will take some time, please wait patiently. When its finished, you can easily import the converted media file into QuickTime for playing.
Except help you handling AVI video files, this iMedia converter for Mac can convert Blu-ray, DVD and a wide range of video formats for your tablets or smartphones with optimized presets. Overall, its really a good helper that worth having.
Read More:
- Convert H.265/HEVC to PS4 for Samsung TV via Mac El Capitan
- Convert DVD to HD MKV via Mede8er Multi-Media player at home on Mac
- MP4 vs MPEG: Best MPEG to MP4 Converter for Mac El Capitan
- Playing YouTube (FLV) files on a Keynote on Mac OS X El Capitan
- Play M2TS with Plex media server via Mac OS X El Capitan
Go to link Download
Friday, February 17, 2017
How to Recover Photos from iPhone 6S Without Backups on Mac
How to Recover Photos from iPhone 6S Without Backups on Mac
The youth, especially the girls, are fond of record their life with photos on their iPhone 6S. But situations may occur due to different reasons, such as iOS upgrade, device damaged, failure jailbreak, etc. If you do have some important photos in your iPhone 6S, you perhaps need to recover it. So how to do it?
This article aims to show you the easiest way to retrieve the lost photo of your iPhone 6S on Mac when you don’t have iTunes/iCloud backups. Since you can directly recover the photo from backups easily so I think it doesn’t need to state the way again. Before the beginning, you have to prepare a Mac iPhone/iPad Data Recovery program. If you don’t have any idea about it, I recommend you Wondershare Dr.Fone for iOS for Mac. It has more powerful function that deserves you to try:
1. Wide Supported Data Types to Recover: Recover iOS data including photos, videos, messages, contacts, notes, reminders, calendar events, call history, etc. No matter what kind of photos you want to recover from iPhone 6S, Camera Roll photos, Photo Stream photos or Photo Library photos, Wondershare helps you make it.
2. Recovery Modes: Offers you 3 ways to recover deleted or lost photos from iPhone: from iDevice directly (without using any backup), from iTunes backup, and from iCloud backup. No matter whether you have made an iTunes or iCloud backup, you can get a way to retrieve them.
3. Selectively Recover Photo: Instead of performing a complete iTunes restore, Wondershare lets you preview the deleted photos in thumbnails and recover what you need instead of all the data.
4. Easy-to-use: Intuitive interface makes basic and advanced users can use it with ease.
5. Supports all models of iPhone: Supports iPhone 6S (Plus)/6 (Plus)/5S/5C/4S/4/3GS and iPad, iPod Touch. Compatible with iTunes 12.1. iOS 9 and Mac OS X El Capitan. (Read its review)
Free Download and Install Mac iPhone Data Recovery
How to recover photo from iPhone 6S directly without backups?
Step 1: Open Wondershare on your computer > Connect your iPhone 6S to the computer with USB cable > Choose Recover from an iOS Device. Then click on “Start Scan”.

Step 2: Preview and recover the photo
Once the scan ends, you can preview all the contents of your iPhone 6S, including messages, iMessages, contacts, etc on the left. Check photo option on the left list. Then click “Recover” to save all your photo to your computer. You can see the search box on the top right interface, so you can search for the exact contact you want to recover.
That’s all. Is it easy? Just try.
Related Software:
Wondershare Dr.Fone for Android for Mac - First aid to recover deleted or lost contacts, text messages, photos, videos, audio files, documents, whatsapp history, call history, etc from Android phones and tablets.
Wondershare MobileTrans for Mac - One click and risk-free solution to move contacts, text messages, call logs, calendar, photos, music, video and apps between iPhone, Android, Blackberry and Nokia(Symbian) phones.
Wondershare TunesGo for Mac - Transfer and copy music, videos, playlists and other media files from iPhone, iPad and iPod touch to iTunes and PC with no difficulty.
Pavtube iMedia Converter for Mac - Convert any 4K/SD/HD and Blu-ray/DVD to iPhone, iPad, iPod Touch with suitable format.
Related Articles:
This article aims to show you the easiest way to retrieve the lost photo of your iPhone 6S on Mac when you don’t have iTunes/iCloud backups. Since you can directly recover the photo from backups easily so I think it doesn’t need to state the way again. Before the beginning, you have to prepare a Mac iPhone/iPad Data Recovery program. If you don’t have any idea about it, I recommend you Wondershare Dr.Fone for iOS for Mac. It has more powerful function that deserves you to try:
1. Wide Supported Data Types to Recover: Recover iOS data including photos, videos, messages, contacts, notes, reminders, calendar events, call history, etc. No matter what kind of photos you want to recover from iPhone 6S, Camera Roll photos, Photo Stream photos or Photo Library photos, Wondershare helps you make it.
2. Recovery Modes: Offers you 3 ways to recover deleted or lost photos from iPhone: from iDevice directly (without using any backup), from iTunes backup, and from iCloud backup. No matter whether you have made an iTunes or iCloud backup, you can get a way to retrieve them.
3. Selectively Recover Photo: Instead of performing a complete iTunes restore, Wondershare lets you preview the deleted photos in thumbnails and recover what you need instead of all the data.
4. Easy-to-use: Intuitive interface makes basic and advanced users can use it with ease.
5. Supports all models of iPhone: Supports iPhone 6S (Plus)/6 (Plus)/5S/5C/4S/4/3GS and iPad, iPod Touch. Compatible with iTunes 12.1. iOS 9 and Mac OS X El Capitan. (Read its review)
Free Download and Install Mac iPhone Data Recovery
How to recover photo from iPhone 6S directly without backups?
Step 1: Open Wondershare on your computer > Connect your iPhone 6S to the computer with USB cable > Choose Recover from an iOS Device. Then click on “Start Scan”.
Step 2: Preview and recover the photo
Once the scan ends, you can preview all the contents of your iPhone 6S, including messages, iMessages, contacts, etc on the left. Check photo option on the left list. Then click “Recover” to save all your photo to your computer. You can see the search box on the top right interface, so you can search for the exact contact you want to recover.
That’s all. Is it easy? Just try.
Related Software:
Wondershare Dr.Fone for Android for Mac - First aid to recover deleted or lost contacts, text messages, photos, videos, audio files, documents, whatsapp history, call history, etc from Android phones and tablets.
Wondershare MobileTrans for Mac - One click and risk-free solution to move contacts, text messages, call logs, calendar, photos, music, video and apps between iPhone, Android, Blackberry and Nokia(Symbian) phones.
Wondershare TunesGo for Mac - Transfer and copy music, videos, playlists and other media files from iPhone, iPad and iPod touch to iTunes and PC with no difficulty.
Pavtube iMedia Converter for Mac - Convert any 4K/SD/HD and Blu-ray/DVD to iPhone, iPad, iPod Touch with suitable format.
Related Articles:
- How to Recover Deleted Voicemail on iPhone 6S on Mac
- How to Fix iPhone White Screen of Death on Mac El Capitan?
- Is it Possible to Recover Contacts From an Erased iPhone 6S?
- How to Recover Deleted Texts Message on iPhone 6S
- How to Recover Deleted WeChat Data from iPhone 6s Plus/6s/6/5s/4s/4?
Go to link Download
Tuesday, January 24, 2017
Install Mac OS X Snow Leopard on a PC using VMware
Install Mac OS X Snow Leopard on a PC using VMware
Many computer shoppers choose to buy a Mac not only to use OS X, but Windows as well. That is one strong advantage that Macs have in the Mac vs PC war. Apple computers are capable of running Windows, either through Bootcamp or virtual machines.
So, why aren’t Windows PC’s capable of running OS X? Well, Windows PC’s are capable of running OS X. But, it is against Apple’s licensing agreement to do so. Thus, this article is intended for educational and demonstration purposes only. If you want to run OS X the best way possible, get a Mac.

*In order for this to work, your computer must have a processor that supports virtualization. If it does not, you may receive errors. For the most part, any newer processor lines: Core 2 Duo, Quad Core, and Core i7 should all work fine.
But, don’t expect to not get errors if you are using an older Pentium 4 machine. The processor must be Intel and not AMD*
Because we will be installing OS X on top of Windows through a virtual machine, the first step is to get some virtual machine software. For this demo, we will be using VMware’s Workstation 7.
If you do not feel like purchasing Workstation 7 at this time, you can get a limited trial here. The download may take a good half an hour to complete. Workstation is a 512MB file.
Upon download, go ahead and install Workstation 7 onto your computer. The installation process is very simple just launch the installer, and the VMware installer will guide you through the rest.
One thing to note, when it asks your if you want to do a custom install or a typical install, choose typical install. After the installer finishes, restart your computer.

Now that you have Workstation 7 installed, you need a pre-configured VMware virtual machine file to install Snow Leopard on top of. Download this torrent and save it to your desktop.
After you have the pre-configured virtual machine file downloaded, you will need to extract the files using WinRAR or another archive utility. If you do not have an archive utility, you can get WinRAR here.
Note: This file is just a disk image framework, no viruses or anything like that. VMware Workstation uses the disk image format to save and contain virtual machines.

Time to start installing Snow Leopard. Launch VMware Workstation by using the path Start > All Programs > VMware > VMware Workstation. Open up the VMware disk image framework that you just downloaded and extracted.
Select File > Open. Navigate to your Snowy_VM folder, open it, open up the next folder that says “Mac OS X 10.6 Server (experimental).vmwarevm, and choose the 2KB file that is named Mac OS X Server 10.6 (experimental). Click the open button to load the virtual machine.

From the Mac OS X Server tab in the VMware Workstation window, click the edit virtual machine settings icon. You may adjust the hard drive size, memory, etc, to your liking.
Select CD/DVD (IDE) and under the Connection settings, select Use ISO Image File. Click the Browsebutton and navigate to the Darwin_Snow.iso which is located in your Snowy_VM folder. Click the Openbutton to select the virtual machine.


Now it’s time to power on the virtual machine. Click the Power on this virtual machine option. As soon as the process starts, hold down the F8 key on your keyboard. You should be prompted with a boot menu screen.


If you have not done so already, insert your OS X Snow Leopard Install DVD into your computer’s CD/DVD drive. So far, you have loaded a workable virtual machine and framework into VMware Workstation.
Now it’s time to actually install Snow Leopard onto that virtual machine disk image. You should see some settings icons located at the bottom right portion of the VMware window. Right-click the icon that looks like a CD and choose settings from the pop up menu.

Under the connections listing, change the options from use ISO image to use physical drive. After you have done that, click the Save and Exit button.

Go back into the boot screen and select the option C Boot from DVD. Press the F8 button on your keyboard for advanced options and type “-v” without the quotes and hit enter. Now, VMware Workstation should boot your Snow Leopard install disc. It may take a couple of minutes to load.
That’s all there is to it. You should now be at the normal Snow Leopard install screen. Click continue on the first screen that comes up. On the second screen, click the utilities option in the install window and select disk utility. Use disk utility to change the hard drive format type to OS X Extended (Journaled). Exit disk utility and let OS X install completely.
Upon install of Snow Leopard, your virtual machine will restart. After it restarts you will need to do a couple of things to get into Snow Leopard. Select CD/DVD options, like you did before, and use the Use ISO Image File option.

Browse to the Darwin_Snow.iso and select it. Now, upon powering on your virtual machine, it should boot directly into Snow Leopard. You may need to force a couple of restarts until Snow Leopard loads correctly for the first time. After it does, adjust your settings from within Snow Leopard, save, and you should be good to go.
Go to link Download
Sunday, January 1, 2017
How to Add Subtitles to MP4 Videos Movies on PC Mac
How to Add Subtitles to MP4 Videos Movies on PC Mac
Subtitles are always shown as the text word of the dialogue or commentary in movies, TV programs, video games, music videos, etc. Most subtitles consist purely of text characters since text is surely the simplest data to be stored and compressed. If you’re going to create a slideshow or greeting card video, you’ll probably want to include captions or titles that let you comment on what the viewer is seeing, in addition to images, videos, and music.
Here, a step-by-step guide on how to add subtitles to MP4, including two methods about get downloaded the right subtitles for your MP4 videos as well as how to add various external subtitles to MP4 like add SRT to MP4.
Part One: Adding Subtitles to MP4 Video from eHow
Those with MP4 files that are without subtitles may want to add them, and to do so requires following a specific process. Download MP4Box and Yamb, and extract them from their zip files onto your PC. For ease of use, make sure theyre in the same folder. The links for both programs are included below in the Resources section.
Run Yamb from its folder, and click on the Settings Icon. Double click on the "Advanced Settings for Yamb" entry.
Type in the file path to the MP4Box program in the Location box. For example, if it was saved directly on the C drive, it would be "C:/mp4box.exe." Then click on Next.
Click on the Creation icon from Yambs main menu. Double click on the entry "Click to create an MP4 file."
Click on the Add button and locate the MP4 file that you wish to subtitle. Add the file to the MP4 File Creation window.
Click on the Add button again, and locate the SRT subtitle file that will be added to the video.
Change the output files name to make a separate MP4 file, unless you wish to overwrite the original MP4 video.
Click on Next, and wait for Yamb to process the file. The time required will vary based on the videos length and file size.
When the file finishes, click "Finish" to close Yamb, or click "Back" if you have any other videos to add subtitles to.
Source:http://www.ehow.com/how_6867828_add-subtitles-mp4-files.html
Part Two: Easily Add Subtitles to MP4 Videos Movies with Best MP4 Subtitle Adder
After you have downloaded the subtitles, you may wonder how to embed and attach the downloaded subtitle to MP4 movies. Not to worry! Below will describe a detailed guide on how to add subtitles to MP4. Pavtube Video Converter Ultimate is the top choice for adding subtitles to MP4 files. Before merging your preferred external subtitles to MP4 videos, wed like to provide some basic knowledge of this powerful MP4 subtitles merger to help you learn what it can exactly do for you. Here is review.
Key Features of MP4 Subtitle Adder
* Add subtitles to MP4 like add SRT to MP4, add SSA to MP4, add SUB and IDX to MP4 and more;
* Add subtitles to MP4 as well as keep the original video format or change MP4 to MOV, AVI, WMV, MKV, FLV, ASF, WebM, 3GP, etc;
* Also can attach subtitles to almost all kinds of video clips like MOV, AVI, WMV, MKV, FLV, ASF, AVHCD, MOD, MTS, MXF, WebM, SWF and more;
* Besides embed subtitles to MP4, it also supports editing videos in many options: trim, crop, merge, split, add effect/watermark, adjust volume/bitrate/channel, etc;
* Add SRT to MP4 on Mac OS X v10.5 (Leopard), 10.6 (Snow Leopard),10.7 (Lion), 10.8 (Mountain Lion), 10.9 (Mavericks), 10.10 (Yosemite), 10.11 (El Capitan);
* Add SRT to MP4 on Windows 10, Windows 8.1, Windows 8, Windows 7, Windows Vista, Windows XP, and Windows 2000.
Free Download and trail:


Other Download:
- Pavtube old official address: http://www.pavtube.cn/blu-ray-video-converter-ultimate/
- Cnet Download: http://download.cnet.com/Pavtube-Video-Converter-Ultimate/3000-2194_4-75938564.html
Follow the step guide on >> Add SRT/ASS/SSA Subtitles to MP4 Video.
Add Subtitles to MP4 - Where to Find and Download Subtitles for the MP4 Videos/Movies
Before adding subtitles to MP4 videos movies, we will firstly provide you some information about where and how to download wanted movies subtitles.
Normally you have two methods to download desired subtitles: One is download movie subtitles from subtitle downloading sites which provide numerous subtitles in different languages, such as Moviesubtitles.org, OpenSubtitles.org, Subscene.com, etc; The other is to download subtitles for MP4 via a subtitle downloader app like Sublight.
>> More about how to free download subtitles for MP4 movies.
Read More:
Here, a step-by-step guide on how to add subtitles to MP4, including two methods about get downloaded the right subtitles for your MP4 videos as well as how to add various external subtitles to MP4 like add SRT to MP4.
Part One: Adding Subtitles to MP4 Video from eHow
Those with MP4 files that are without subtitles may want to add them, and to do so requires following a specific process. Download MP4Box and Yamb, and extract them from their zip files onto your PC. For ease of use, make sure theyre in the same folder. The links for both programs are included below in the Resources section.
Run Yamb from its folder, and click on the Settings Icon. Double click on the "Advanced Settings for Yamb" entry.
Type in the file path to the MP4Box program in the Location box. For example, if it was saved directly on the C drive, it would be "C:/mp4box.exe." Then click on Next.
Click on the Creation icon from Yambs main menu. Double click on the entry "Click to create an MP4 file."
Click on the Add button and locate the MP4 file that you wish to subtitle. Add the file to the MP4 File Creation window.
Click on the Add button again, and locate the SRT subtitle file that will be added to the video.
Change the output files name to make a separate MP4 file, unless you wish to overwrite the original MP4 video.
Click on Next, and wait for Yamb to process the file. The time required will vary based on the videos length and file size.
When the file finishes, click "Finish" to close Yamb, or click "Back" if you have any other videos to add subtitles to.
Source:http://www.ehow.com/how_6867828_add-subtitles-mp4-files.html
Part Two: Easily Add Subtitles to MP4 Videos Movies with Best MP4 Subtitle Adder
After you have downloaded the subtitles, you may wonder how to embed and attach the downloaded subtitle to MP4 movies. Not to worry! Below will describe a detailed guide on how to add subtitles to MP4. Pavtube Video Converter Ultimate is the top choice for adding subtitles to MP4 files. Before merging your preferred external subtitles to MP4 videos, wed like to provide some basic knowledge of this powerful MP4 subtitles merger to help you learn what it can exactly do for you. Here is review.
Key Features of MP4 Subtitle Adder
* Add subtitles to MP4 like add SRT to MP4, add SSA to MP4, add SUB and IDX to MP4 and more;
* Add subtitles to MP4 as well as keep the original video format or change MP4 to MOV, AVI, WMV, MKV, FLV, ASF, WebM, 3GP, etc;
* Also can attach subtitles to almost all kinds of video clips like MOV, AVI, WMV, MKV, FLV, ASF, AVHCD, MOD, MTS, MXF, WebM, SWF and more;
* Besides embed subtitles to MP4, it also supports editing videos in many options: trim, crop, merge, split, add effect/watermark, adjust volume/bitrate/channel, etc;
* Add SRT to MP4 on Mac OS X v10.5 (Leopard), 10.6 (Snow Leopard),10.7 (Lion), 10.8 (Mountain Lion), 10.9 (Mavericks), 10.10 (Yosemite), 10.11 (El Capitan);
* Add SRT to MP4 on Windows 10, Windows 8.1, Windows 8, Windows 7, Windows Vista, Windows XP, and Windows 2000.
Free Download and trail:
Other Download:
- Pavtube old official address: http://www.pavtube.cn/blu-ray-video-converter-ultimate/
- Cnet Download: http://download.cnet.com/Pavtube-Video-Converter-Ultimate/3000-2194_4-75938564.html
Follow the step guide on >> Add SRT/ASS/SSA Subtitles to MP4 Video.
Add Subtitles to MP4 - Where to Find and Download Subtitles for the MP4 Videos/Movies
Before adding subtitles to MP4 videos movies, we will firstly provide you some information about where and how to download wanted movies subtitles.
Normally you have two methods to download desired subtitles: One is download movie subtitles from subtitle downloading sites which provide numerous subtitles in different languages, such as Moviesubtitles.org, OpenSubtitles.org, Subscene.com, etc; The other is to download subtitles for MP4 via a subtitle downloader app like Sublight.
>> More about how to free download subtitles for MP4 movies.
Read More:
- Rip Blu-ray to MKV with subtitles for using in VLC
- Rip Blu-ray Audio to lossless FLAC for playback using VLC
- Enjoy Any AVI Videos on PS4 with inserted subtitle
- Full disc copy Blu-ray with keeping 7.1 audio
- Play M2TS with Plex media server via Mac OS X El Capitan
Go to link Download
Saturday, December 31, 2016
How to recover data in Mac if the disk image is corrupt
How to recover data in Mac if the disk image is corrupt
How to recover data in Mac if the disk image is corrupt
The disk image is a file containing the complete contents and structure of the storage device contains. Create a disk image is the most convenient way to keep your valuable data stored on the hard disk backup.
There are different formats of files on the hard disk image of Mac OS (eg Mac OS X) and.DMG is the most popular among them is used to create. A.DMG (short for disk image file) allows you to secure password protection and file compression. Therefore, both the distribution of files and security.
If you the.DMG file, it is mounted as a hard disk in the Finder. You can easily create.DMG file with the tools included in Mac OS, such as Disk Utility in Mac OS X 10.5, 10.4 and 10.3. You can also the.DMG file with the command line tool hdiutil.
When creating a disk image is the best option to prevent data loss, but sometimes when you copy the disk to install the data access, you may receive the following error message:
"The disk image you are opening may be damaged and could damage the system. Are you sure that you open this disk image?"
Mac OS X recognizes the image of the damaged drive to mount an image as damaged can lead to data loss. In these situations, you can not read data off the.DMG file and then you should go for Mac Data Recovery for the problem.
Mac Data Recovery is the process of scanning the hard drive for missing data, lost or inaccessible data. It offers potential help in most cases of data loss and save your important data and personal.
You can use Mac Data Recovery in a simple, safe, fast and automated using the most powerful Mac recovery software like Stellar Phoenix Macintosh data recovery using. This Mac recovery software is capable in most situations of Mac logical data loss problems. Phoenix Mac Data Recovery supports recovery from HFS, HFS +, HFSX, HFS Wrapper and FAT file system volumes. This Mac recovery software is compatible with Mac OS X 10.5, 10.4 and 10.3.9.
How to recover data in Mac if the disk image is corrupt
There are different formats of files on the hard disk image of Mac OS (eg Mac OS X) and.DMG is the most popular among them is used to create. A.DMG (short for disk image file) allows you to secure password protection and file compression. Therefore, both the distribution of files and security.
If you the.DMG file, it is mounted as a hard disk in the Finder. You can easily create.DMG file with the tools included in Mac OS, such as Disk Utility in Mac OS X 10.5, 10.4 and 10.3. You can also the.DMG file with the command line tool hdiutil.
When creating a disk image is the best option to prevent data loss, but sometimes when you copy the disk to install the data access, you may receive the following error message:
"The disk image you are opening may be damaged and could damage the system. Are you sure that you open this disk image?"
Mac OS X recognizes the image of the damaged drive to mount an image as damaged can lead to data loss. In these situations, you can not read data off the.DMG file and then you should go for Mac Data Recovery for the problem.
Mac Data Recovery is the process of scanning the hard drive for missing data, lost or inaccessible data. It offers potential help in most cases of data loss and save your important data and personal.
You can use Mac Data Recovery in a simple, safe, fast and automated using the most powerful Mac recovery software like Stellar Phoenix Macintosh data recovery using. This Mac recovery software is capable in most situations of Mac logical data loss problems. Phoenix Mac Data Recovery supports recovery from HFS, HFS +, HFSX, HFS Wrapper and FAT file system volumes. This Mac recovery software is compatible with Mac OS X 10.5, 10.4 and 10.3.9.
How to recover data in Mac if the disk image is corrupt
Go to link Download
Sunday, December 18, 2016
How to speed up your Mac The best article on Mac optimization
How to speed up your Mac The best article on Mac optimization
If your Mac is running slow or you think it should be optimized so here are few recommended steps you can follow to speed up your Mac.
Macs usually dont need much in the way of maintenance, but they can definitely use some cleanup from time to time, especially after heavy use.
But before you do any cleaning or maintenance task on your Mac it is always a good idea to back up your data. For Macs, its easy: grab an external drive and run Time Machine .
Steps to back up data with Time Machine in Mac
To back up your Mac the first thing you’ll need is an external USB or Fire Wire hard drive.
Turn on Time Machine.
When you connect the external hard drive to your Mac, Time Machine will ask if you’d like to use it for backups.
Click Use as Backup Disk A full system backup will begin immediately. And then System Preferences will open to display Time Machine preferences.
Now make sure the Time Machine is on and then Click on the option button in the Time Machine Preferences window as shown above.A sheet similar to below Pic-22(c) appears.
This sheet allows you to exclude files, folders, or entire volumes from being backed up. You might want to do this to avoid filling up your backup drive.
To add files and folders to the "Do not back up" list Click the + (plus sign) button. and select the items to add to the Do No Backup List.
From here, pick and choose the items you’d like to leave out, and click Exclude when youre finished. In the large Exclude list, you’ll see the folders or individual files that you selected. You can change your mind about these at any time by selecting a file and clicking the minus-sign (-) button to remove that file or folder from "Exclude or Do not Backup list" and those items will be included in the backup list.
When your first Time Machine backup starts, a new window appears on your desktop to let you know things are going. You can close System Preferences now; it wont affect the backup.
Your first full system backup will take a few hours or more, depending on the size of your Mac’s hard drive. But subsequent regular backups will take only a fraction of that time because the drive will limit itself to updating what’s already there and saving new files. If your drive stays connected to your Mac, the scheduled hourly backups will take just seconds to complete.
Time Machine displays a notification after the first backup is complete, or if any issues arise during the initial backup.
Time Machine menu
The Time Machine menu in the menu bar also lets you know when a backup is happening in the background. While a backup is in progress, the menu icon includes an additional arrow in Mavericks, or rotates counterclockwise in earlier versions of OS X.
You can check the status of your backup by clicking on the Time Machine icon in the menu bar. If you see a Time Machine icon in the menu bar that indicates a possible issue, click the icon to learn what is preventing Time Machine from backing up.
When you turn your Mac on it starts loading the boot file then other operating system files to start the Mac completely so that you can work on it.At the same time after loading all the boot and operating system files it also loads all the start up items like safari, Mozilla, iTunes, iTunes helper, dropbox, CleanMyDrive which are checked under login items. Unchecking them will reduce startup time and you can start those program later without any trouble when you wanna use them.
In order to remove unnecessary startup or login Items, click on the Apple menu in the top-left corner of the screen.
Then Go to System Preferences > and then open Users & Groups
and then click on the user name on the left and then click on the Login Items tab to see a list of the apps that open when you boot your Mac. Uncheck the apps you dont need at startup.
You can also click on the Software Update... button right underneath the Mac OS X version shown in the pic-22(M) above or just click on the software update option in Apple menu to update your Mac.
if there is any update available for your Mac you will get message windows like Pic-22(n) below.
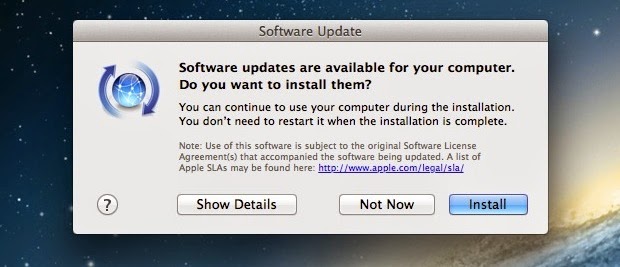
To update your software, first ensure your Mac is connected to both a power supply and the Internet.Then click Install update.
If your work involves software like Final Cut Pro, Photoshop, Premiere,Microsoft Word , CAD programs and a variety of games or other high-end memory-hungry applications they leave huge number of cache files in RAM even after you quit them so your Macs Memory might be filled with huge number of cache files in inactive memory that you could be using for other tasks.You could clean the inactive Cache using a Free Tool Memory Clean.You can Download it from Mac App Store.
Memory Clean- It is the ultimate app for optimizing your Macs memory.Memory Clean works by purging the Macs inactive memory and is best used when you close an intensive app that you do not plan to use again quickly within a few hours.it will clean up the caches the app left scattered in system memory.
It creates an icon in Macs menu bar and shows you memory statistics whenever you want them. If you find your RAM is filling up because OS X isnt doing a great job of cleaning it out and things are slowing it down as a result, you can clear out the contents yourself as shown in the Pic-22(q) below.
> purge
WARNING: Improper use of the sudo command could lead to data loss
or the deletion of important system files. Please double-check your
typing when using sudo. Type "man sudo" for more information.
To proceed, enter your password, or type Ctrl-C to abort.
Password:
Enter the Password for Admin Account.Give OS X a minute or two to complete the process
Note: You need to run this command with root privileges.some versions of OS X may require you to prefix the purge command with sudo, requiring authentication.
So you can delete the log files stored in /Library/Logs and ~/Library/Logs by going into the folder and selecting them all and then press Command-Delete.
You can also delete them using the rm Command.
You need to launch Terminal from the Applications folder or your Dock, whichever is easier for you. Then, type or paste the following command into the resulting window:
sudo rm -rf /private/var/log/*
This should clean out the system logs up to and including when you run the command, so you might want to do this on a regular basis if you find it frees up a ton of space.
Now, close that Terminal window and open another. Type or paste the following command into Terminal:
sudo rm -rf /private/var/folders/
This will get rid of the QuickLook cache files, which will then start to accumulate again. This might be another regular task if space is at a premium on your Mac, and if the speed hit to QuickLook doesn’t bother you.
Each of the commands above will require you to enter your administrator password.
Macs usually dont need much in the way of maintenance, but they can definitely use some cleanup from time to time, especially after heavy use.
But before you do any cleaning or maintenance task on your Mac it is always a good idea to back up your data. For Macs, its easy: grab an external drive and run Time Machine .
Steps to back up data with Time Machine in Mac
To back up your Mac the first thing you’ll need is an external USB or Fire Wire hard drive.
 |
| Pic-22(a) |
Turn on Time Machine.
When you connect the external hard drive to your Mac, Time Machine will ask if you’d like to use it for backups.
 |
| Pic-22(b) |
Click Use as Backup Disk A full system backup will begin immediately. And then System Preferences will open to display Time Machine preferences.
 |
| Pic-22(c) |
Now make sure the Time Machine is on and then Click on the option button in the Time Machine Preferences window as shown above.A sheet similar to below Pic-22(c) appears.
 |
| Pic-22(d) |
To add files and folders to the "Do not back up" list Click the + (plus sign) button. and select the items to add to the Do No Backup List.
 |
| Pic-22(e) |
When your first Time Machine backup starts, a new window appears on your desktop to let you know things are going. You can close System Preferences now; it wont affect the backup.
 |
| Pic-22(f) |
Your first full system backup will take a few hours or more, depending on the size of your Mac’s hard drive. But subsequent regular backups will take only a fraction of that time because the drive will limit itself to updating what’s already there and saving new files. If your drive stays connected to your Mac, the scheduled hourly backups will take just seconds to complete.
Time Machine displays a notification after the first backup is complete, or if any issues arise during the initial backup.
 |
| Pic-22(g) |
Time Machine menu
The Time Machine menu in the menu bar also lets you know when a backup is happening in the background. While a backup is in progress, the menu icon includes an additional arrow in Mavericks, or rotates counterclockwise in earlier versions of OS X.
 |
| Idle |
 |
| Progress |
 |
| Can Not Backup |
You can check the status of your backup by clicking on the Time Machine icon in the menu bar. If you see a Time Machine icon in the menu bar that indicates a possible issue, click the icon to learn what is preventing Time Machine from backing up.
 |
| Pic-22(h) |
 |
| Pic-22(i) |
Step 1. Stop unnecessary Start up items.
When you turn your Mac on it starts loading the boot file then other operating system files to start the Mac completely so that you can work on it.At the same time after loading all the boot and operating system files it also loads all the start up items like safari, Mozilla, iTunes, iTunes helper, dropbox, CleanMyDrive which are checked under login items. Unchecking them will reduce startup time and you can start those program later without any trouble when you wanna use them.
In order to remove unnecessary startup or login Items, click on the Apple menu in the top-left corner of the screen.
 |
| Pic-22(j) |
 |
| Pic-22(k) |
and then click on the user name on the left and then click on the Login Items tab to see a list of the apps that open when you boot your Mac. Uncheck the apps you dont need at startup.
 |
| Pic-22(l) |
On the hard drive, there are a few more folders you can check:
Macintosh HD –> Library –> LaunchAgents
Macintosh HD –> Library –> LaunchDaemons
Macintosh HD –> Library –> StartupItems
Macintosh HD –> Users –> Your Home Folder –> Library –> LaunchAgents
Macintosh HD –> Users –> Your Home Folder –> Library –> StartupItems
These folders contain .plist files which launch background processes (backups, VPNs, etc.). You can delete items you recognize as outdated or programs no longer needed; for example, as above you may see some items with Symantec in their filenames, or an old backup program you’re no longer using. An Administrator password will be required. Not all of these folders may exist on your system.
Note that in OS X 10.7 and above the User Library folder is invisible by default; to make it visible,Click on the Go in the Finder an hold down the Option key make the Library visible.
Step 2. Update Your OS
Regardless of which OS X version you are using, updating your software to the latest version is clearly worth doing.Apple keeps posting system software updates and even occasionally produces firmware updates for its computers. Some of these can have a positive effect on performance.You can check the latest version of your Mac by clicking here. And compare the OS X version on your Mac by clicking on the Apple icon on the top left corner and selecting About This Mac as shown in the Pic-22(M) below. |
| Pic-22(M) |
if there is any update available for your Mac you will get message windows like Pic-22(n) below.
 |
| Pic-22(n) |
Step 3. Clean up your Macs Memory( RAM )
If your Mac is running slow, the first place too look is Macs inbuilt tool Activity Monitor.The Activity Monitor is a built-in application that shows which of your open applications are using the most system resources.Activity Monitor provides information about the processes and resources in use on your Mac.Click Memory near the top of the Activity Monitor window to view system memory usage and to see how much memory is being used by active processes as shown in the Pic-22(p) below.Close any apps that are using a considerable more amount of memory and you should see performance improve.
Activity Monitor, located in the Macintosh HD > Applications > Utilities folder,You can Open it from Utilities folder or directly open it with the help of spotlight by typing activity monitor in the spotlight search option on the Top right corner as shown in the pic-22(o) below.
 |
| Pic-22(o) |
 |
| Pic-22(p) |
Mac OS X has fairly good memory management but it’s not perfect, and sometimes RAM can be held unnecessarily in the “inactive” state despite the contents no longer being needed.
Your Mac likes to cache things in your "free" RAM so if you need them later you can load them quickly. This might be nice sometimes, but if you are not using those thing for a long time it is worthless and will eat up some of your Memory which also results in slowing your Mac down.
Memory Clean- It is the ultimate app for optimizing your Macs memory.Memory Clean works by purging the Macs inactive memory and is best used when you close an intensive app that you do not plan to use again quickly within a few hours.it will clean up the caches the app left scattered in system memory.
It creates an icon in Macs menu bar and shows you memory statistics whenever you want them. If you find your RAM is filling up because OS X isnt doing a great job of cleaning it out and things are slowing it down as a result, you can clear out the contents yourself as shown in the Pic-22(q) below.
 |
| Pic-22(q) |
 |
| Pic-22(r) |
There are multiple memory optimization software available.A similar to them is Memory Diag which is also very famous among them.But you can also do it manually using the Purge Command.
To Clean up your Macs Memory manually using command
Launch Terminal, found in /Applications/Utilities/ and enter the following command
WARNING: Improper use of the sudo command could lead to data loss
or the deletion of important system files. Please double-check your
typing when using sudo. Type "man sudo" for more information.
To proceed, enter your password, or type Ctrl-C to abort.
Password:
Note: You need to run this command with root privileges.some versions of OS X may require you to prefix the purge command with sudo, requiring authentication.
Step 4. Clean up your Hard Drive
If you want the most of your Mac and want to increase its speed drastically , cleaning your hard drive is by far the best and easiest way to speed up your Mac. Go through your hard drive and clean out everything that’s slowing it down! What exactly is slowing it down? Caches, logs, apps, widgets, language packs, plugins, hidden trashes, and large files.
Get rid of these things to increase the speed of your Mac! The best part is that you can do this all manually! However, finding all of these things and removing them takes time, plus you have to know where to look. But you’ll get the biggest increase in speed.
1. Open Finder and click on the Go on top menu bar and select Go To Folder...
2. Type in ~/Library/Caches and hit Enter to proceed to this folder.
3. Highlight everything or select all by pressing Command-A and delete them all by pressing Command-Delete.These file will be moved to Trash so delete them from trash also.To empty trash press Command-Shift-Delete.
4. Do the same with folder /Library/Caches (note the lack of “~”, which acted as a shortcut to your home folder in step 2).
5. Restart your Mac so that your apps and system can generate fresh and new caches.
Get rid of these things to increase the speed of your Mac! The best part is that you can do this all manually! However, finding all of these things and removing them takes time, plus you have to know where to look. But you’ll get the biggest increase in speed.
Clear System cache
Your system and applications generate cache files to load and work faster. Once these files became outdated, they pile up on your Mac and decrease its performance. When you delete system and user caches from Mac OS X, your Mac generates fresh caches that help your apps operate faster and increase overall system performance.
How to clear caches on a Mac manually?
1. Open Finder and click on the Go on top menu bar and select Go To Folder...
 |
| Pic-22(s) |
2. Type in ~/Library/Caches and hit Enter to proceed to this folder.
3. Highlight everything or select all by pressing Command-A and delete them all by pressing Command-Delete.These file will be moved to Trash so delete them from trash also.To empty trash press Command-Shift-Delete.
4. Do the same with folder /Library/Caches (note the lack of “~”, which acted as a shortcut to your home folder in step 2).
5. Restart your Mac so that your apps and system can generate fresh and new caches.
Clear Logs
Your Mac generates lots of log files, with all sorts of information, sent by various system processes and applications. Most of it seems rather cryptic, meant for developers and others trying to diagnose problems, and many Mac users never have a reason to look at them. But they can be very useful to help diagnose a problem.But unless you look at these often via an app like Console, you’ll probably not need a ton of log files taking up space on your Mac, especially if you have one with a low-volume SSD.
Many of the log files are located in the /private/var/log folder, others in /Library/Logs, and others, mostly from user applications, are in each users <home folder>/Library/Logs folder).
To see these logs and their sizes Open Finder and click on the Go on top menu bar and select Go To Folder... type /var/log in the box.This will produce a window roughly like the one shown in Pic-22(t).
 |
| Pic-22(t) |
The asl folder should have a series of files named by date, plus a couple of others. There should be dated files for the last week or so; if there are many more, select the old ones and delete them (youll have to enter your Admin password).
Your system.log and/or system.log.0.bz2, etc. files (the ones with bz2 suffixes are compressed). You can safely delete any or all of them.
So you can delete the log files stored in /Library/Logs and ~/Library/Logs by going into the folder and selecting them all and then press Command-Delete.
You can also delete them using the rm Command.
You need to launch Terminal from the Applications folder or your Dock, whichever is easier for you. Then, type or paste the following command into the resulting window:
sudo rm -rf /private/var/log/*
This should clean out the system logs up to and including when you run the command, so you might want to do this on a regular basis if you find it frees up a ton of space.
Now, close that Terminal window and open another. Type or paste the following command into Terminal:
sudo rm -rf /private/var/folders/
This will get rid of the QuickLook cache files, which will then start to accumulate again. This might be another regular task if space is at a premium on your Mac, and if the speed hit to QuickLook doesn’t bother you.
Each of the commands above will require you to enter your administrator password.
Remove Unnecessary Languages
Apple ships each Mac with nearly 150 languages, which take up space. Unless you are a polyglot, youll never use these files.I dont know about you, but I use my computer in only one (human) language — English. And Im willing to bet that you do too,So why do you have a bunch of localization files for the operating system filling up your hard drive?You can use that space to keep your important usable files like Mp3 Songs or movies.
To remove unnecessary languages,Install Monolingual a free utility, to download Monolingual navigate to the main Monolingual homepage and click the blue download link in the upper-right corner of the page, beneath the Download section. Once installed. Just click the languages you want to remove and click the Remove button. The scan takes longer than youd expect; it ran for around 30 minutes on my machine, but ended up saving me 2.4GB of space.
It requires a 64-bit capable Intel-based Mac and at least Mac OS X 10.7 (Lion) and also works on OS X 10.8 (Mountain Lion) and OS X 10.9 (Mavericks).
To remove unnecessary languages,Install Monolingual a free utility, to download Monolingual navigate to the main Monolingual homepage and click the blue download link in the upper-right corner of the page, beneath the Download section. Once installed. Just click the languages you want to remove and click the Remove button. The scan takes longer than youd expect; it ran for around 30 minutes on my machine, but ended up saving me 2.4GB of space.
 |
| Pic-22(u) |
It requires a 64-bit capable Intel-based Mac and at least Mac OS X 10.7 (Lion) and also works on OS X 10.8 (Mountain Lion) and OS X 10.9 (Mavericks).
Delete Unnecessary Downloaded files
Sometimes you download webpages,songs,Pictures, softwares, PDFs, or any other files which you need for one time use and you no longer need it again, those files still sits in your Hard drive and eat up precious disk space.You should regularly keep deleting the unnecessary Downloaded files.
To delete unnecessary Downloaded files open finder from dock and go to Download folder or just look for the download folder through spotlight.Open the Downloads and Delete all those files which you no longer need.
 |
| Pic-22(v) |
Delete hidden .Trashes,.Spotlight-V100 folders/files,.fseventsd,._.Trashes and .DS_Store
Have you ever accidentally deleted a files or folder in Mac and then you want to restore it but you did not find it in trash and you had not already been running backups with Time Machine.That might have been your worst time.Here I am gonna tell you a secret of Mac that you can recover those files/Folder without any expensive file recovery software or without the help of Time Machine.
Well the secret is a hidden .trashes folder that Mac creates on each of your hard drives and/or partitions.Mac hides any files or folders by prefixing a ". " to their names.This .Trashes files and folders are created by Mac in each drive and partition.When you delete any fil
Read more »
Go to link Download
Subscribe to:
Posts (Atom)