Monday, May 8, 2017
How to Access Windows 7′s Real Administrator Account
How to Access Windows 7′s Real Administrator Account
How to Access Windows 7?s Real Administrator Account?
Caveat
Activating the account

With the Administrator account selected, click More Actions under Administrator in the Actions panel on the right and select Properties from the menu, as shown in Below.

When you see the Administrator Properties dialog box, just clear the Account Is Disabled check box, as shown inbelow, and click OK.

Keep in mind that now that the Administrator Account is activated you can also work with the account in the User Accounts tool in the Control Panel.
Setting the password

However, since the Administrator Account has never been used, you can click Proceed with impunity. When you do, you’ll see the Set Password for Administrator dialog box, shown in Below, and can type the new password in both text boxes. Then, click OK.

Logging in as the Administrator

When you do, you’ll never encounter a UAC prompt. Again, I must emphasize that you should use the real Administrator account sparingly and never make it your default mode of operation!
What’s your take?
Go to link Download

Monday, January 30, 2017
How do I get real player cloud icon off my computer
How do I get real player cloud icon off my computer
Today we got an issue where our Tier-1 support engineer spent almost four hours in trying to get rid of Real player cloud icon which is a system folder icon that shows in my computer under others list underneath the hard drive icons.It looks just like the icons listed under other in the following picture but you can not find an easy way to remove it.Real Player Cloud icon is such a stubborn icon that you can not get rid of easily.
 |
| RealPlayer Cloud icon, Pic-13(a) |
This issue actually occurred after one of our clients uninstalled the Real player Cloud from his computer.He did not know that he would not completely get rid of the real player.So after it was uninstalled he went to Computer and found the Real Player Cloud system folder there.He tried to remove it, he checked the add remove program ( Program and features ) and scrolled through the list but did not find Real Player there.He then checked the control panel if he could find the real player cloud icon so that he could uninstall it from there but did not find any icons for Real player.Checked the start up items by going to Run-> typing "Msconfig" and in the system configuration utility clicked on start up and unchecked everything he could find related to the Real Player Cloud.So after doing all this he Googled about this issue and reached a support forum for Real Player here is the link of that support forum https://realnetworks.zendesk.com/entries/26869617-Uninstall-Realplayer-Cloud he read it and tried all the steps to get Rid of that.So he re-installed and uninstalled it but the same issue persists.
After the uninstall he was instructed to do the following
Delete the RealPlayer folders.
To delete the folders for RealPlayer located at:
c:program files ealRealPlayer
c:program filescommon files eal
1. Go to My Computer.
2. Go to C: or Local Disk (C:).
3. Go to the Program Files folder.
4. Go to the Real folder.
5. Delete the RealPlayer folder: c:program files ealRealPlayer
6. Go back to the Program Files folder.
7. Go to the Common Files folder.
8. Delete the Real folder: c:program filescommon files eal
NOTE: If you have a 64-bit operating system, the RealPlayer folders will be in a different location:
c:program files x86 ealRealPlayer
c:program files x86common files eal
1. Go to My Computer.
2. Go to C: or Local Disk (C:).
3. Go to the Program Files folder.
4. Go to the Real folder.
5. Delete the RealPlayer folder: c:program files x 86 ealRealPlayer
6. Go back to the Program Files folder.
7. Go to the Common Files folder.
8. Delete the Real folder: c:program files x86common files eal
After doing all these troubleshooting he was told to delete RPcloudview.dll file he searched through the computer and could not find that.He also checked process named recordingmanager.exe*32 and rndlresolversvc.exe*32 , Ended the process and deleted the file associated with them but could not get rid of the icon.
When I got this case escalated to me I got confused for some time as what to do next.
When I searched the Google I found apart from the Main executable file of Real Player (C:Program Files eal ealplayer ealplay.exe) there are multiple other files which were installed and they are as following.
rdsf3260.dll - RealPlayer (32-bit) (Audio Filter Plugin)
convert.exe - RealConverter
dbghelp.dll (by Microsoft) - Debugging Tools for Windows(R) (Windows Image Helper)
dunzip32.dll (by Inner Media) - DynaZIP-32 Multi-Threading UnZIP DLL
fixrjb.exe - RealNetworks RealPlayer (RealNetworks Fix RJB Application)
hxaudiodevicehook.dll - HXAudioDeviceHook Module
ierjplug.dll - ierjplug Module
mediainfo.dll (by MediaArea.net) - MediaInfo (All about your audio and video files)
mmcdda32.dll - RealNetworks CD Extract Component
realcleaner.exe - RealCleaner
realconverter.exe
realjbox.exe
realshare.exe - RealShare (RealShare Launcher)
realtrimmer.exe - RealTrimmer
rjbres.dll - RealPlayer (Resources)
rjdlg.dll - My Media Component
rjprog.dll
rjwmapln.dll - Windows Media Audio import plugin
rndevicedbbuilder.exe - rndevicedblauncher (RN Device DB Builder)
rpau3260.dll - rpautostream Module
rphelperapp.exe - RealNetworks Helper Application
rpplugprot.dll - rpplugprot module
rpshell.dll - RealPlayer Shell Extensions
rpshellextension.dll (by RealPlayer) - RealPlayer shellextension
rpshellsearch.dll - RealPlayer Search Shell Extension
rpwa3260.dll - RealPlayer Plugin
tnetdtct.dll - RealNetworks Online Utility
tpasdk.dll - RealNetworks Playback System
tsasdk.dll - RealNetworks Utility Services
wmdmhelper.dll - RealNetworks Products (32-bit) (WMDM PD Helper Plugin)
cddbcontrol.dll (by Gracenote) - CDDBControl Core Module
cddblink.dll (by Gracenote) - CddbLink Module
cddbmusicid.dll (by Gracenote) - CddbMusicID M
So in order to remove the real player cloud icon from my computer folder I am supposed to delete these files and folder too but I did not deal with any of those files.
I went to the C:/ drive and open the "Documents and Settings" folder .Go to your Windows username folder and click the "Application Data" folder and then find the "Real" folder and delete it.For windows 7 you can go to c:/users/UserName/AppData and delete the folder named Real from there.
I started researching and found this nice article to delete Namespace key contents from registry.This key lists several cryptic folders which define the icons that are displayed in My Computer in Windows Explorer.So delete all the subkeys listed under NameSpace key.To delete them do the following steps.
Steps to delete NameSpace Key contents
1). Click on start, Go to Run and Type Regedit and click ok.
2). Then navigate to the following key "HKEY_LOCAL_MACHINESOFTWAREMicrosoftWindowsCurrentVersionExplorerMyComputerNameSpace"
 |
| Remove real player cloud icon from registry Pic-13(b) |
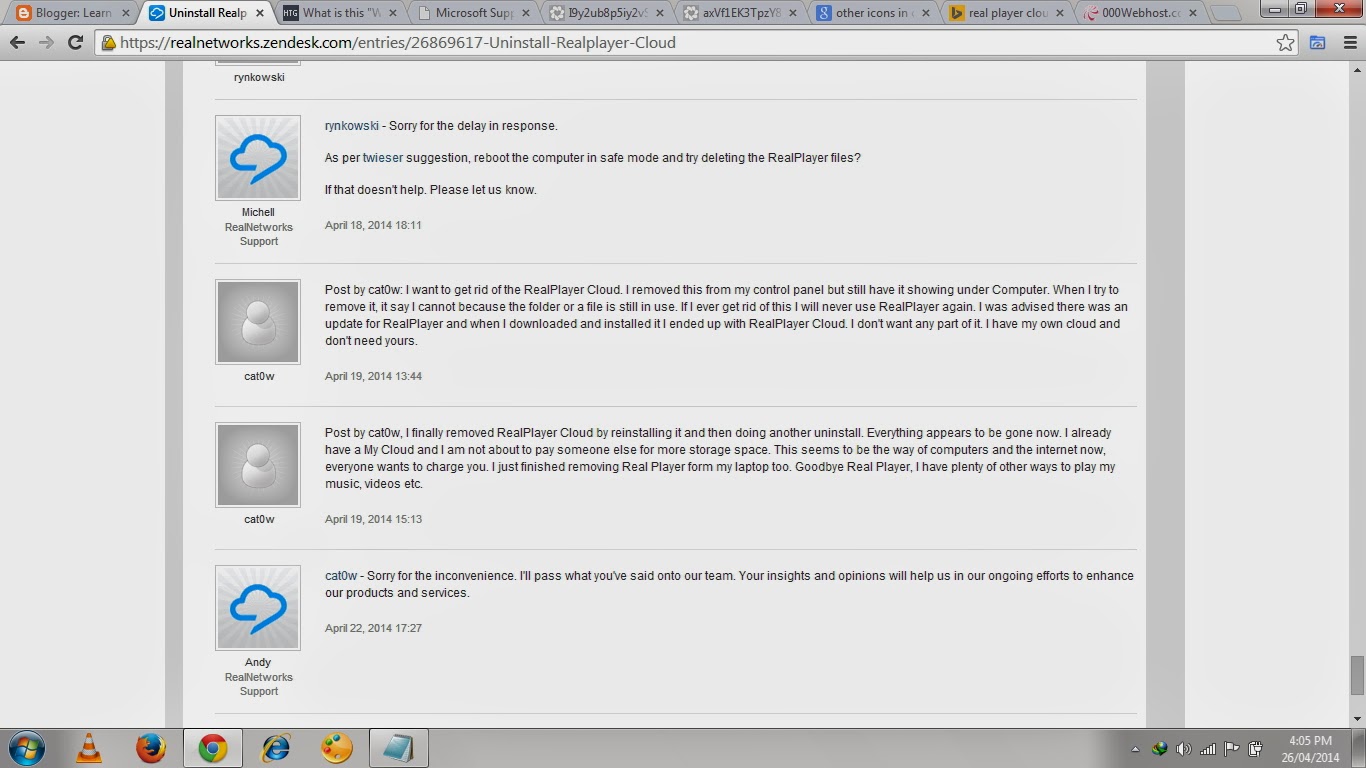
I searched the forum and found this apologies as shown in the picture- 13 (c) below from Real network support guys that they were sorry for the inconvenience and they apologize and are researching to fix this issue.
 |
| Pic-13(c) |
 |
| Pic-13(d) |
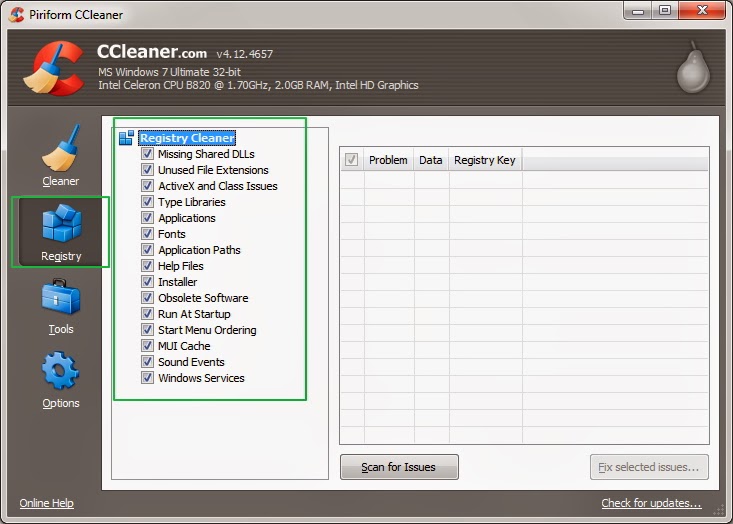
Then this Idea struck in my mind that why dont I clean the registry for left over file.So I Opened CCleaner and Clicked the Registry option at the left hand side and selected all the items to scan.So I scanned the registry with CCleaner as shown in the Pic-13(e) and It fixed all the issues related ton Registry and Bingo....!!!
That Real Player Cloud has gone away...I restarted the computer and It just worked fine.
 |
| Pic-13(e) |
Now I repent spending that much time in Removing Real Player Cloud icon while I wonder I could just take that off My Computer within 5 minutes after scanning the registry with CCleaner and fixing all the issues.
Conclusion: To remove real Player cloud icon from computer first delete the namespace and delegated folder entry from registry as shown in the above steps and then remove from other places in registry and clean the leftover registry items using the Ccleaners the regitry fix option.
Thanks for reading...
Happy Troubleshooting..!!!
Nasir
Go to link Download
Saturday, December 17, 2016
How To Enjoy Etisalat New Real 250 Bonus Tariff Plan On All Recharge Above N100
How To Enjoy Etisalat New Real 250 Bonus Tariff Plan On All Recharge Above N100

For those Etisalat subscriber in the house you are about to enjoy more value for your money because Etisalat has launched a special bonus offer called Super Recharge which guarantees real bonuses that can be used across all networks.With the Etisalat Super Recharge Offer both new and existing subscribers on any of the following plans: Easy Starter, Easy Cliq, Talkzone and Cliqlite plans will enjoy 250% instant bonus on all recharges above N100 and 150% on all recharges below N100 with a simple flat tariff of 40 kobo per second for all nationalcalls.Also, new subscribers on the network can get an additional 1GB data plan at just N500.The beauty behind the Etisalat Super Recharge Offer is that unlike other airtime bonuses offered in the telecom market, it has no hidden charges or restrictive terms and it comes with a competitive off-net tariff.Speaking about the offer, the Director, Consumer Segment, Etisalat Nigeria, Adeolu Dairo explained that the"Super Recharge Offer is tagged Real Bonus because it is a unique statement of transparency, integrity, simplicity, freedom and authenticity. It is a clear departure from the prevalent order in the market now. It is a huge statement of our loyal commitment to offering our customers best experiences on thenetwork."How To Opt-in/Active/Migrate To Etisalat Real Bonus==> To opt-in, Dial *611*1# and start enjoying or click the linketisalat.com.ng/voiceprepaid/real-bonus/==> To subscribe to etisalat 1GB for N500, dial*229*2*2#That's all and don't forget to share your experience on this tariff plan via comment.
Go to link Download
Sunday, November 13, 2016
Guest Post Websites Using a Back Door Technique to Find Visitors Real IP Locations
Guest Post Websites Using a Back Door Technique to Find Visitors Real IP Locations
Websites Using a "Back Door" Technique to Find Visitors Real IP Locations
 |
More VPN users are becoming aware that some websites are using a fairly new technology implemented in browsers like Google Chrome and Firefox, allowing websites to see the real IP and location of their users, regardless if the user is behind a VPN or proxy, essentially bypassing its protection.
This back door technique is called WebRTC and is supported in Chrome, Firefox, and Opera browsers. Only Firefox has an official method to disable WebRTC for users who wish to keep their real IP private behind their VPN, by visiting in the Firefox URL bar "about:config" then change the "media.peerconnection.enabled" setting to "False" will turn off WebRTC in Firefox. Chrome and Opera users are not so lucky, as there is no official method to disable WebRTC, they must rely on unofficial third party browser plugins which dont always work.
Some websites use the WebRTC back door to display content to their visitors only from specific geographic locations - different content for different locations. This may pose an inconvenience for users who travel often: visitors will have problems accessing content from their home location and instead only have access to content from the region they are currently traveling within, even when using a VPN to set their IP location or not.
How does this WebRTC back door really work? When a visitor opens a website with WebRTC code, it instructs the users web browser to make direct DNS calls to another server of the websites choosing. These DNS calls bypass typical VPN connections. Not just web browsers and websites can do this, any application running on your device can use the same technique to bypass your VPN or proxy.
The best solution to prevent your real IP leaking for both websites and apps is to change your device system DNS IP that works as a smart DNS proxy, such as Hide My IPs DNS Proxy service. Free DNS IPs such as Google DNS or OpenDNS do not offer protection for WebRTC back doors or other methods that "leak" users real IP addresses.
Perhaps one day Google Chrome will officially allow users turn off WebRTC, but this remains to be seen.


Hide your iP visit =======> https://www.hide-my-ip.com/
Go to link Download