Tuesday, May 23, 2017
How to Disable Windows 7 User Account
How to Disable Windows 7 User Account
How to Disable Windows 7 User Account
- Go to Control Panel -> System and Security -> Administrative Tools, and then open Computer Management.

- Alternatively, right click on Computer in Start menu, and select Manage.
- Expand Local Users and Groups branch.
- Click on Users section.
- Right click on the user to deactivate, and select Properties.


- Click OK and close Computer Management window.
- The user account is now disabled, and no longer can be used to log on.
net user "user name" /active:noGo to link Download

Monday, May 8, 2017
How to configure your business E mail account on Microsoft Outlook Outlook Express or on your Android Phone
How to configure your business E mail account on Microsoft Outlook Outlook Express or on your Android Phone
Welcome Back!, I am here again with a new topic on How to configure your Email client software like Microsoft Outlook and Outlook Express for your business or personal email(i.e Gmail).I still remember the days when I was working as a Technical support Officer with one of the reputed U.S based MNC.And I used to get calls related to Email issues which would be so much frustrating for the Clients because for some of them 50% of their whole business was dependent on their business or personal email.
So Lets start with How to configure the Email Client software to send and receive email on your desktop.Before we start I would like to tell you that there are numerous Email client Software available in the market, Some of the famous are Mozilla Thunderbird, Opera, Windows Live Mail, Pegasus Mail, IncrediMail, Mulberry , Foxmail, DreamMail, Alpine, MailBird, eM Client, Eudora,Mac Mail, Entourage, Outlook Express,Microsoft Outlook etc.
But Microsoft Outlook,Outlook express and Mac Mail are widely used. No Matter which Email client you are gonna configure, they all have almost the same way to configure like you need to go to the option and select Accounts or go to Tools menu and then Account settings.Once you have reached the account Settings page then you need to know a couple of information to connect the Email client with the Mail server.And those information are for sure User Name and Password for the Email account,then Incoming and Outgoing Mail server, Incoming or POP3 Port and Outgoing or SMTP Port number, and If they require SSL connection. And these information are easily available in the Cpanel of your hosting or Domain administration accounts or in the help Section of the Publicly used Web Mail (Gmail, yahoomail etc.).
Now first of all I am gonna show you how to find the Email account settings for the free hosting provider 000webhost.So login to members area and then go to C panel, then Navigate to Email section and click Manage Email Accounts as shown in the picture 4-(a).
 |
| 4-(a) |
Then its gonna show you a list of all the Email accounts as shown in the picture 4(b) below
 |
| 4-(b) |
here click the POP/IMAP configuration Link for the email account you want to set up with your Email client like Microsoft Outlook then its gonna show you the setting like Incoming Mail Server , Outgoing Mail Server, User Name and Password as shown in the picture 4(c).
 |
| 4-(c) |
As we see here the 000webhost does not provide you with an Outgoing Mail Server with free hosting Account.But you can use your ISP(Internet Service Provider) SMTP server.Call your ISP to know there SMTP Server.Now note Down all the information you have got here and open Microsoft Outlook from All program in start menu as shown in the picture 4(d).
 |
| 4(d) |
 |
| 4(e) |
So Click next and then select Yes then Click Next again as in Picture 4(f).Now you will get Auto Account Setup Screen as shown in the Picture 4(g), Which is normally used for well known famous Email account Like Yahoomail, Gmail, AOL, ATT.NET etc. Where you just Enter the Email ID and password and outlook will search for Incoming and Outgoing Mail Server with port number and Configure itself.But Right now We have to configure our business Email ID (Nasir@simulato.com/Alisha@simulato.com) So Click to check Manually Configure Server Settings or additional Server types and then Click next as in the Picture 4(g).
 |
| 4(f) |
 |
| 4-(g) |
 |
| 4(h) |
 |
| 4(i) |
 |
| 4(j) |
 |
| 4(k) |
 |
| 4(L) |
 |
| 4(m) |
 |
| 4(n) |
 |
| 4(O) |
Incoming Mail (POP3) Server - requires SSL: | pop.gmail.com Use SSL: Yes Port: 995 |
Outgoing Mail (SMTP) Server - requires TLS or SSL: | smtp.gmail.com Use Authentication: Yes Port for TLS/STARTTLS: 587 Port for SSL: 465 |
Server timeouts | Greater than 1 minute, we recommend 5 |
Full Name or Display Name: | [your name] |
Account Name or User Name: | your full email address (including @gmail.com or @your_domain.com) |
Email Address: | your email address (username@gmail.com or username@your_domain.com) |
Password: | your Gmail password |
Differences Between POP and IMAP
I am also showing you the differences in the table below to have a solid knowledge on IMAP and POP.I collected these information.htm and http://help.thunderbird.edu/content/what-difference-between-imap-and-pop-protocol.
IMAP | POP |
The IMAP protocol, by default, allows the user to keep all messages on the server. It constantly synchronizes the e-mail program with the server and displays what messages are currently present. All the actions performed on the messages (reading, moving, deleting...) will be done directly on the server. | The POP protocol, by default, is set to download all the messages from the e-mail server onto your computer. This means that all the actions performed on the messages (reading, moving, deleting...) will be performed on ones computer. Because everything is kept on the user’s computer, the user will not be able to reopen messages from any location other than the computer where the messages have been downloaded. |
Because everything is kept on the server the user will be able to access the e-mail in the inbox from any computer in the world connected to the Internet and can will always find the same settings in their e-mail account. | Once e-mail is downloaded it can be accessed only using the same computer. |
All messages as well as their attachments will be downloaded into desktop PC during the check new email process. | A whole message will be downloaded only when it is opened for display from its content. |
Mailboxes can only be created on desktop PC. There is only one mailbox (INBOX) exists on the server. | Multiple mailboxes can be created on the desktop PC as well as on the server. |
Filters can transfer incoming/outgoing messages only to local mailboxes. | Filters can transfer incoming/outgoing messages to other mailboxes no matter where the mailboxes locate (on the server or the PC). |
Outgoing email is stored only locally on the desktop PC. | Outgoing email can be filtered to a mailbox on server for accessibility from other machine. |
Messages are deleted on the desktop PC. Comparatively, it is inconvenient to clean up your mailbox on the server. | Messages can be deleted directly on the server to make it more convenient to clean up your mailbox on the server. |
Messages may be reloaded onto desktop PC several times due to the corruption of system files. | The occurrence of reloading messages from the server to PC is much less when compared to POP3. |
Go to link Download
How to Access Windows 7′s Real Administrator Account
How to Access Windows 7′s Real Administrator Account
How to Access Windows 7?s Real Administrator Account?
Caveat
Activating the account

With the Administrator account selected, click More Actions under Administrator in the Actions panel on the right and select Properties from the menu, as shown in Below.

When you see the Administrator Properties dialog box, just clear the Account Is Disabled check box, as shown inbelow, and click OK.

Keep in mind that now that the Administrator Account is activated you can also work with the account in the User Accounts tool in the Control Panel.
Setting the password

However, since the Administrator Account has never been used, you can click Proceed with impunity. When you do, you’ll see the Set Password for Administrator dialog box, shown in Below, and can type the new password in both text boxes. Then, click OK.

Logging in as the Administrator

When you do, you’ll never encounter a UAC prompt. Again, I must emphasize that you should use the real Administrator account sparingly and never make it your default mode of operation!
What’s your take?
Go to link Download
Friday, May 5, 2017
How to hack Facebook Account
How to hack Facebook Account


Here is How to Make Account in www.my3gb.com?


Now This Page Will Appear A Confirmation Mail is Sent!

Now Go To Your Mail Inbox and Check a Mail You Receive From www.My3gb.com There Will a Link Open It And Confirm Your Account


Go to link Download
Monday, March 13, 2017
How to Fix 403 error when setting up AT T account
How to Fix 403 error when setting up AT T account
403 error when setting up AT&T account
Original Title: "I am trying to setup an online account with AT&T to manage(bill pay ect.) After I,ve put in all required info,+registration code & hit continue, I get a (403)error code,that ,page cannot be displayed.Any input?"
Setting up account with AT&T.
After putting in all required info+ registration code & hit continue, I get a (403) error code,that page cannot be displayed.
Any input?
Keys to the Problem 403 error when setting up AT&T account
Download SmartPCFixer for Free Now
See this...
http://pcsupport.about.com/od/findbyerrormessage/a/403error.htm
More...
http://tinyurl.com/403ErrorCodeSearchResults
MS-MVP Windows Desktop Experience
"When all else fails try what the captain suggested before you started..."
To check for Windows updates. Open Windows Update by clicking the Start button , clicking All Programs, and then clicking Windows Update. In the left pane, click Check for updates, and then wait while Windows looks for the latest updates for your computer. If any updates are found, click Install updates.
Install the latest updates for Windows and for the program displaying the error. Note that the update for the program might be listed as an optional update on the Windows Update page.
Open Windows Update by clicking the Start button Picture of the Start button. In the search box, type Update, and then, in the list of results, click Windows Update.
Another Safe way to Repair the Problem: 403 error when setting up AT&T account:


How to Fix 403 error when setting up AT&T account with SmartPCFixer?
1. Download Error Fixer . Install it on your system. Click Scan, and it will perform a scan for your computer. The junk files will be shown in the list.

2. After the scan is done, you can see the errors and problems need to be fixed. Click Fix All.

3. The Repair part is finished, the speed of your computer will be much higher than before and the errors have been removed. You can also use other functions in this software. Like dll downloading, windows updating and print spooler error repair.

Related: How to Fix 3371 Errors in Windows XP,7,8&8.1?,Repair Corrupt Cab Files Error - How to Fix,Skchui.dll Error - How to Fix,Symantec Antivirus Slows Down Computer Error - How to Resolve,Error Windows Xp System Restore Incomplete Fix Solution,How to Fix - After updating from Internet Explorer 6 to Internet Explorer 9, my Favorites are lost?,How to Fix - Combination Stacked-Clustered Chart in Excel - Align data with horizontal tick marks?,Solution to Error: Macro to search and copy rows to different sheets based on cell value,Need solution to this problem in order to stop Vista from beeping.__"Your version of Microsoft Deprecated DLL Components isnt compatible with this version of Windows",Server Error in / Application.Site also runtime error [Solved]
Read More: How Can I Fix - 7 updates and then doesnt work properly?,[Anwsered] 4 minute delay in replying to, forwarding or compossing Hotmail or Outlook O.W.A., and browser freezes during this period.,64 bit processor [Anwsered],[Solved] 50% of the times I am in a MS word, or in an email, and I press enter to go to the next line to continue writing, Windows Mobility Center" screen shows up.,2 msn.com site,2007 Performance Issue / Very slow saves to network share,Can I use my HP D110A web service printer as a proxy server?,can i use a zoom 56k v.92/v.90 modem with 64b dileup? netzero said i might have the rong modem?,Can I downgrade to win 32-bit?
Go to link Download
Wednesday, February 22, 2017
How To Change Google Account In Google Play Play Store Android
How To Change Google Account In Google Play Play Store Android
For Android phone non-rooted
Home back to the first.
click Menu
Heading to Settings-> Application-> Manage Application.
Locate and click Google Apps
Click the "Clear Data", when appearing prompted, "All information youve saved in this, the application will be deleted permanently", click OK
Then press the "Back" and then to click "Synchronize Data" or through, Home> Menu> Settings> Data synchronization, it will display a wizard to insert a new Google account, this wizard also appears when we recently bought a new android handset or when weve just done a wipe through hardreset.
For Android phone is already rooted
Hp must be rooted first.
After in-root, use root explorer.
Insert into the data / system
Delete the file "accounts.db"
Once removed, please in-Restart / Reboot.
Go to link Download
Sunday, January 8, 2017
How To Remove Apps From Google Play Account
How To Remove Apps From Google Play Account
Heres How to Remove Applications on Google Play Store. Android users often spend a share of data services by downloading the application. Software does exist that have a very large size and mostly in the form of games. Download the application, especially the free ones often becomes a habit.

Sometimes you can see it on Google Play Store or in some online media and direct download. Later you realize that the longer the application or in fact not useful at all and immediately delete it.
But when you want to install one of the apps that have been removed and see there are many applications that once downloaded, you definitely hard to find. Now Google have updated their online store the application and the user can easily remove a variety of important applications.
The trick, open the Google Play Store on the device. Then tap the Google Play Store is in the upper right corner and you will be brought to the My Apps menu. After that you will see a variety of applications that are now being installed in the device. Slide the screen to the left and will appear All Apps page.
There you can see all the apps I have ever downloaded. For the record, you will realize that not all apps can be removed. Some of these applications will be inscribed Disabled. While that can be removed is that having a round icon with oblique streaks.
If you press any of the applications you want to remove, Google will ask for permission to do so. Then if you want to directly delete some applications, press any application you want removed, and you can choose the other. Good luck.
Go to link Download
Saturday, November 5, 2016
How To Create A Windows XP User Account Password
How To Create A Windows XP User Account Password
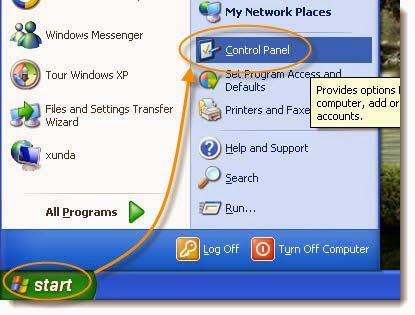
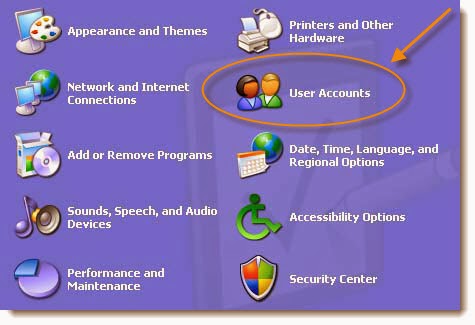
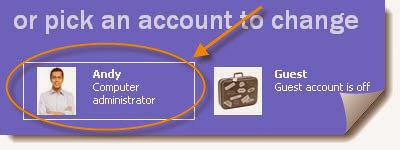
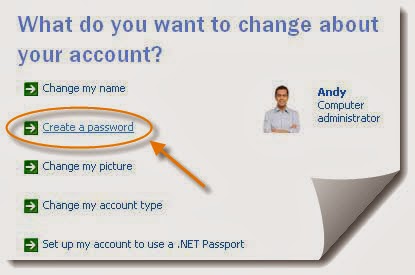
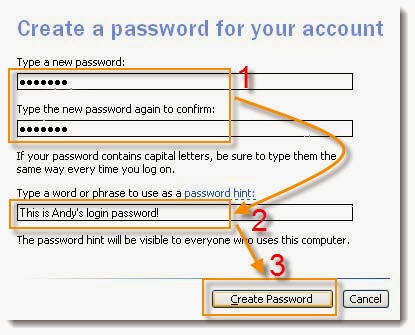
Note: This hint will remind you what your password is, but because it’s visible to everyone that goes on the computer (on the log in screen), don’t be too obvious if it’s a family computer.
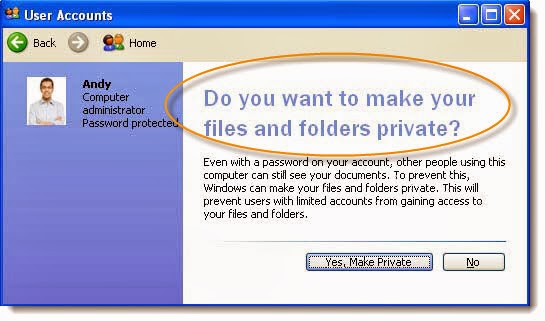
If you’re not concerned about this kind of security or this account is the only account on your PC, there’s no need to make your files private. In this case, click on the “No” button.
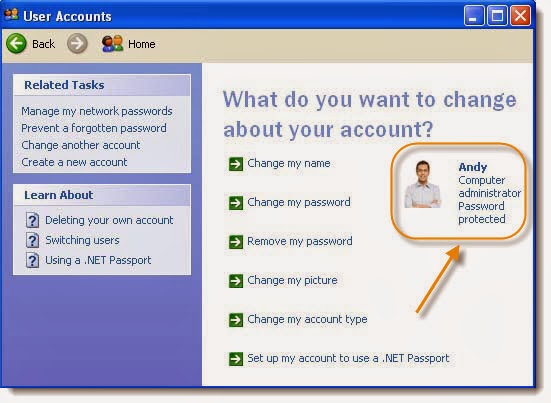
Tips:
Go to link Download
Sunday, October 2, 2016
Host your business Email with Google Use your Business Email account on Gmail and Login from Anywhere Anytime
Host your business Email with Google Use your Business Email account on Gmail and Login from Anywhere Anytime
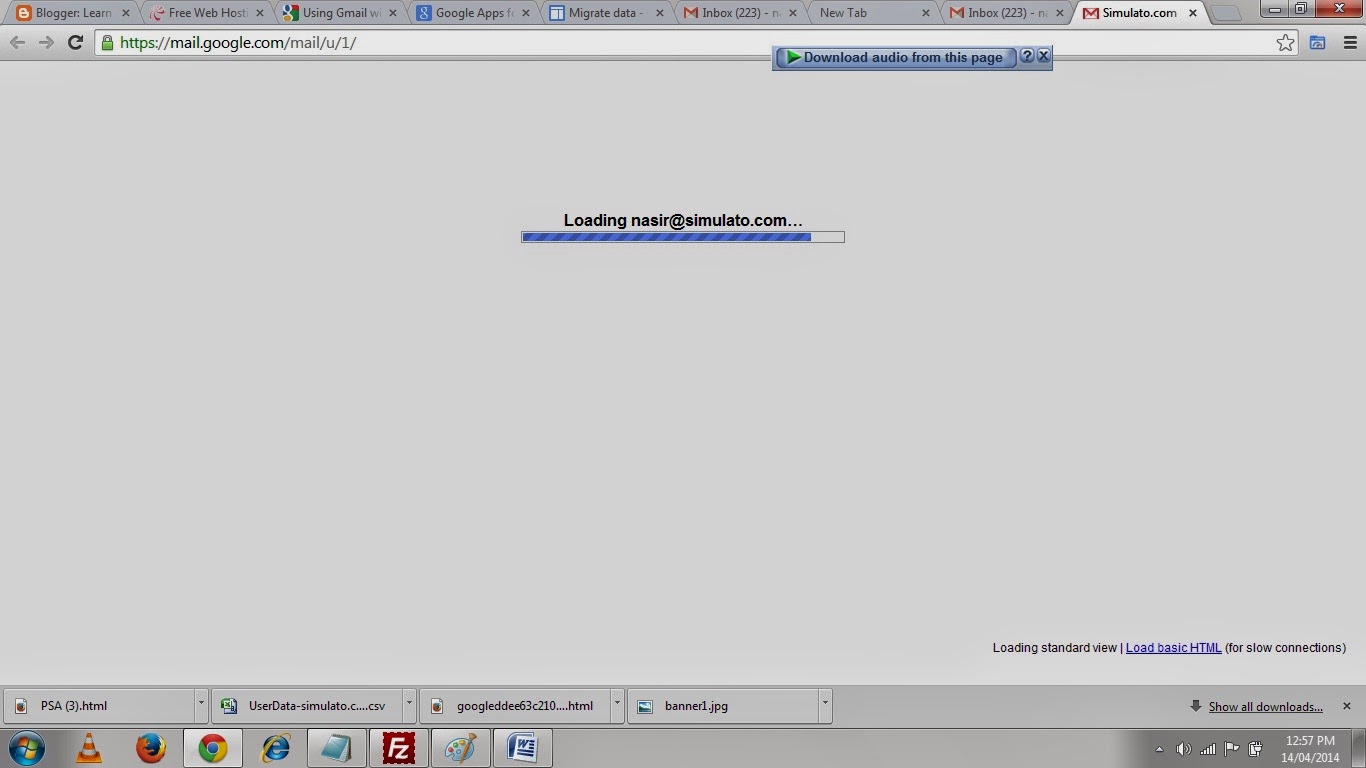
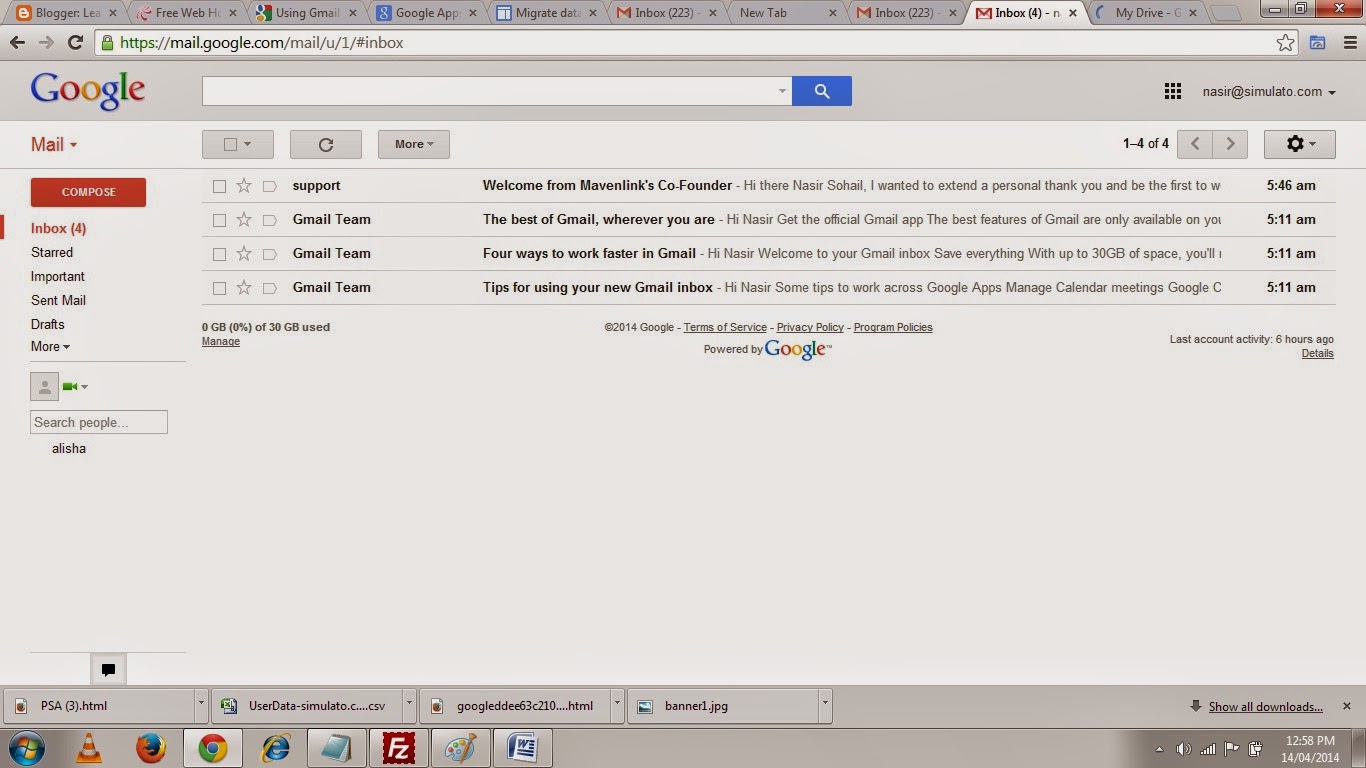
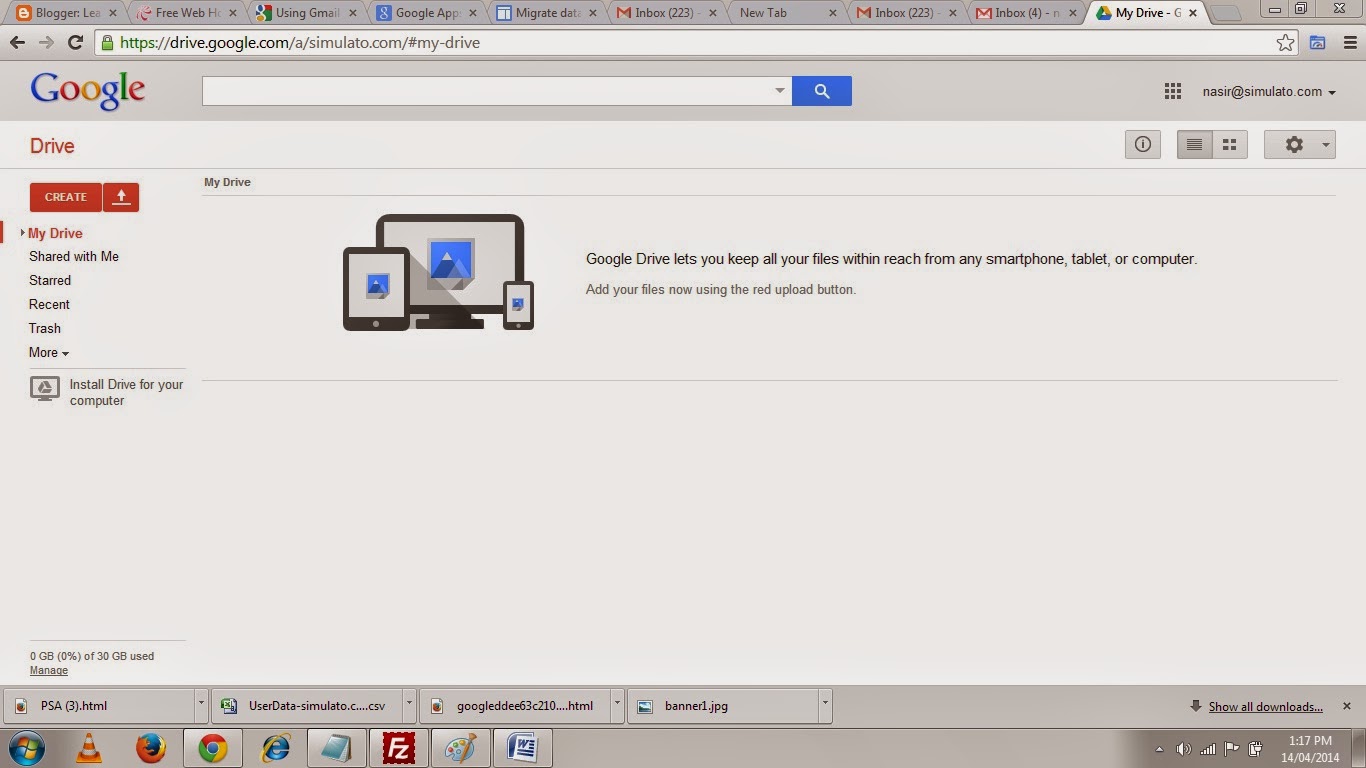
Today I am going to write a very interesting topic which would be very helpful for a small business people who uses their business email only in their office and has limitation.After reading this article they could change the way they manage their email and use it freely from anywhere with great features of Gmail, Google Talk, Hangouts, Contacts, Task, Lookup( Look all the addresses in your company), Google Docs and Google Drive.
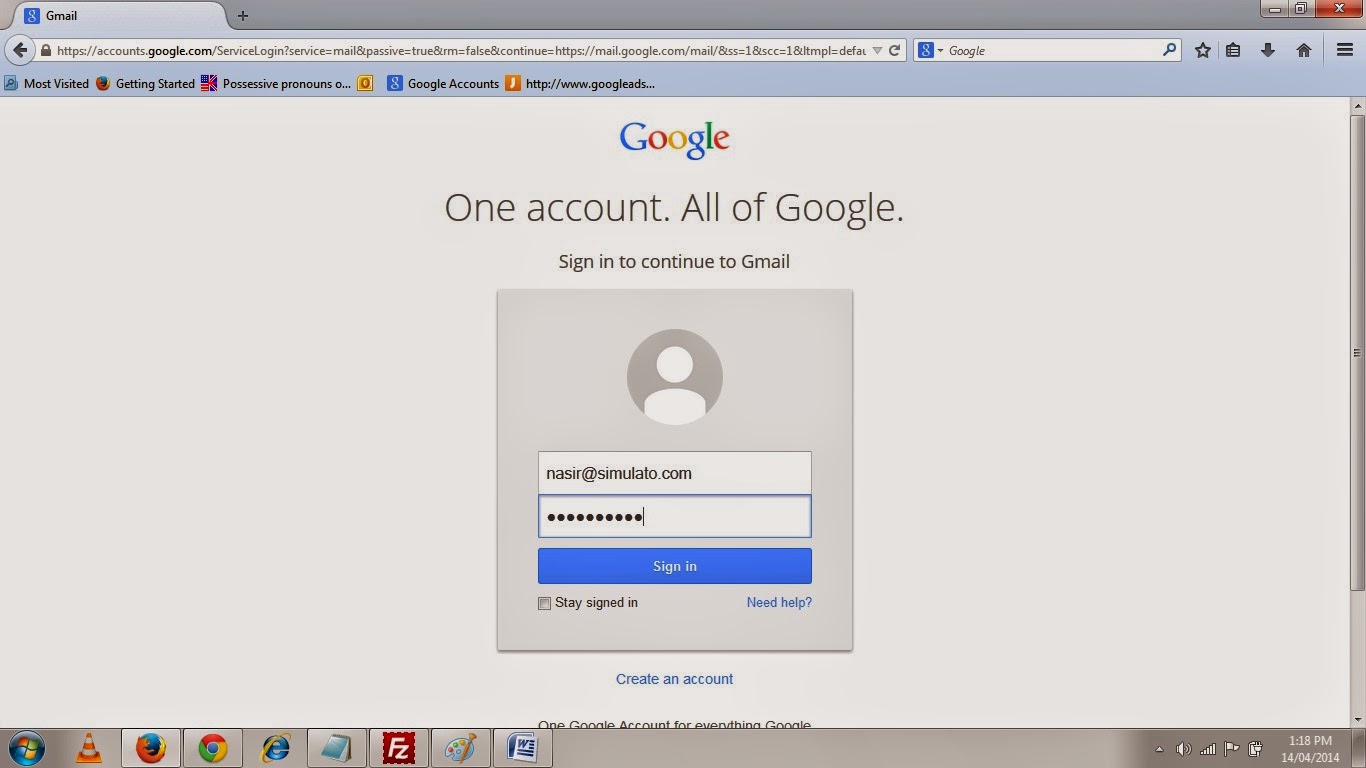
I have a domain name registered as Simulato.com where for my business Email I used to Login from a designated computer which has the Microsoft outlook configured or if I Have to login from a different place I had to login to My Web hosting provider and from there I could Login to my Web Mail and that did not have all the great features available as Gmail provides.So I took this decision to Host my Email Services to Google and now I login to my Email ( info@simulato.com ) from Gmail as a Google account and save my documents in Google Drive with all the Gmail Features like Google Talk and Hangouts.And I am always connected because I have also configured my business Email on my Android Phone.
 |
| Pic-9(a) |
 |
| Pic-9(b) |
 |
| Pic-9(c) |
 |
| Pic-9(d) |
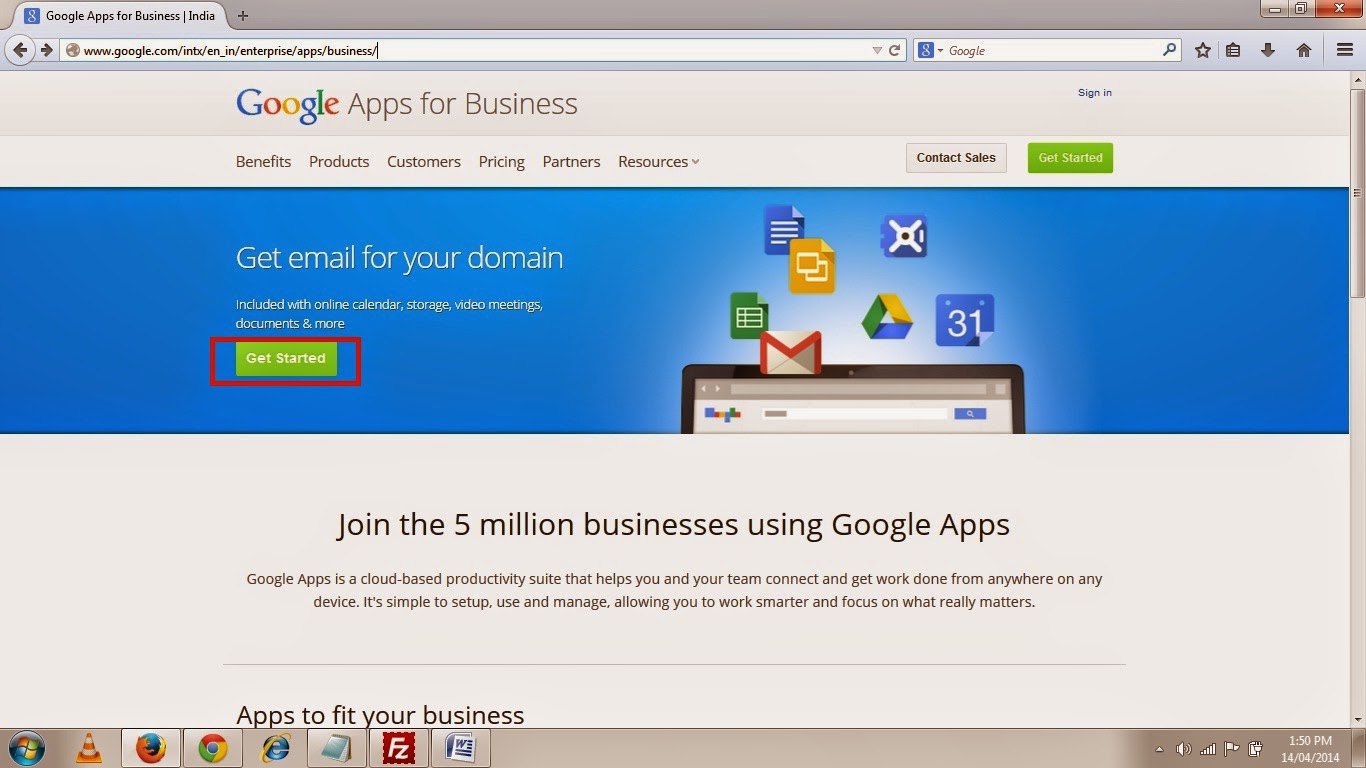
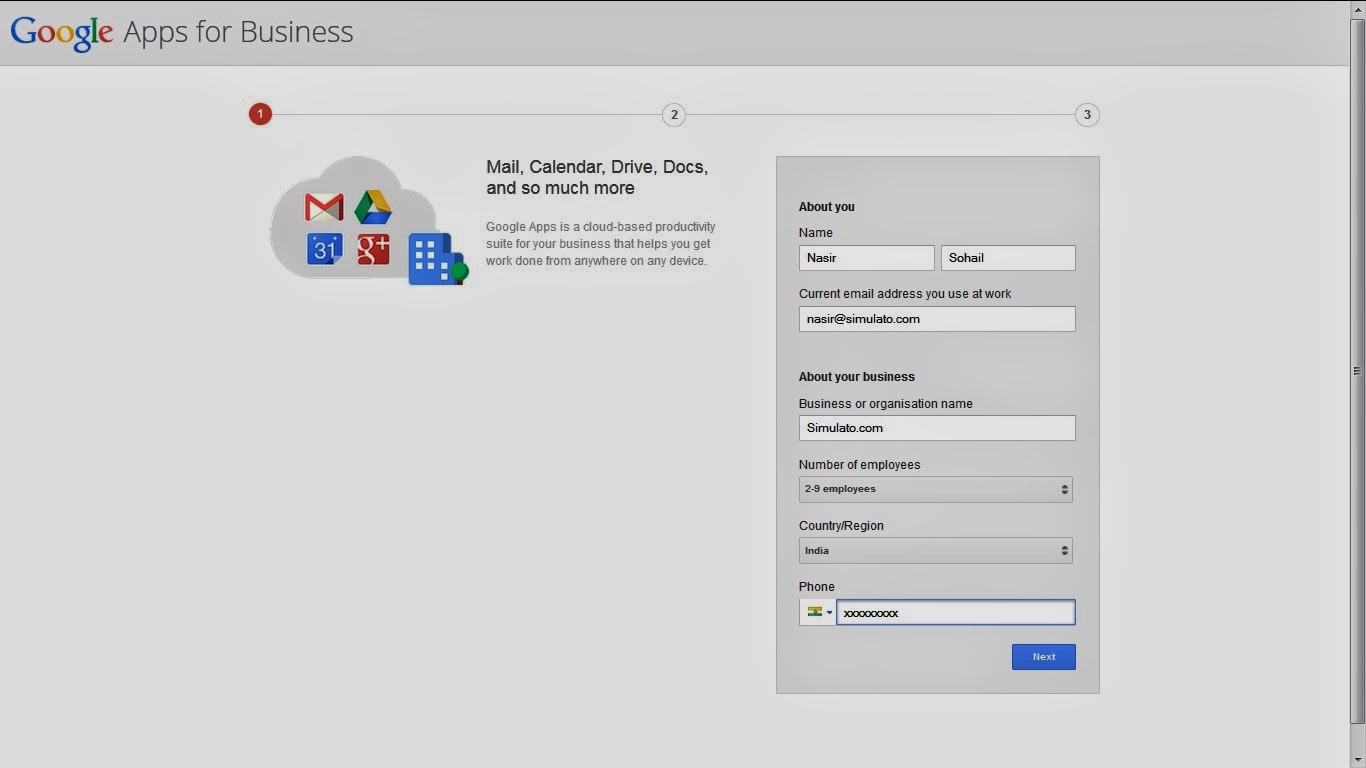
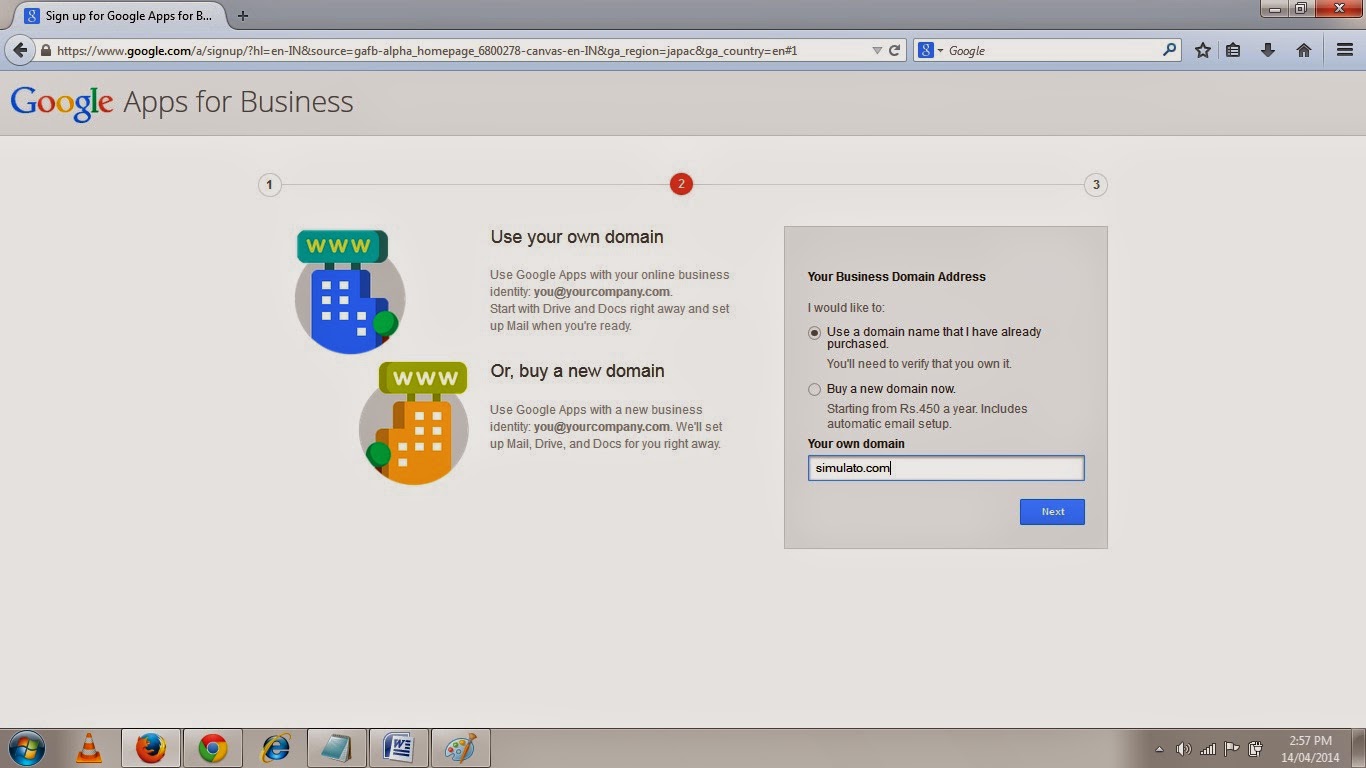
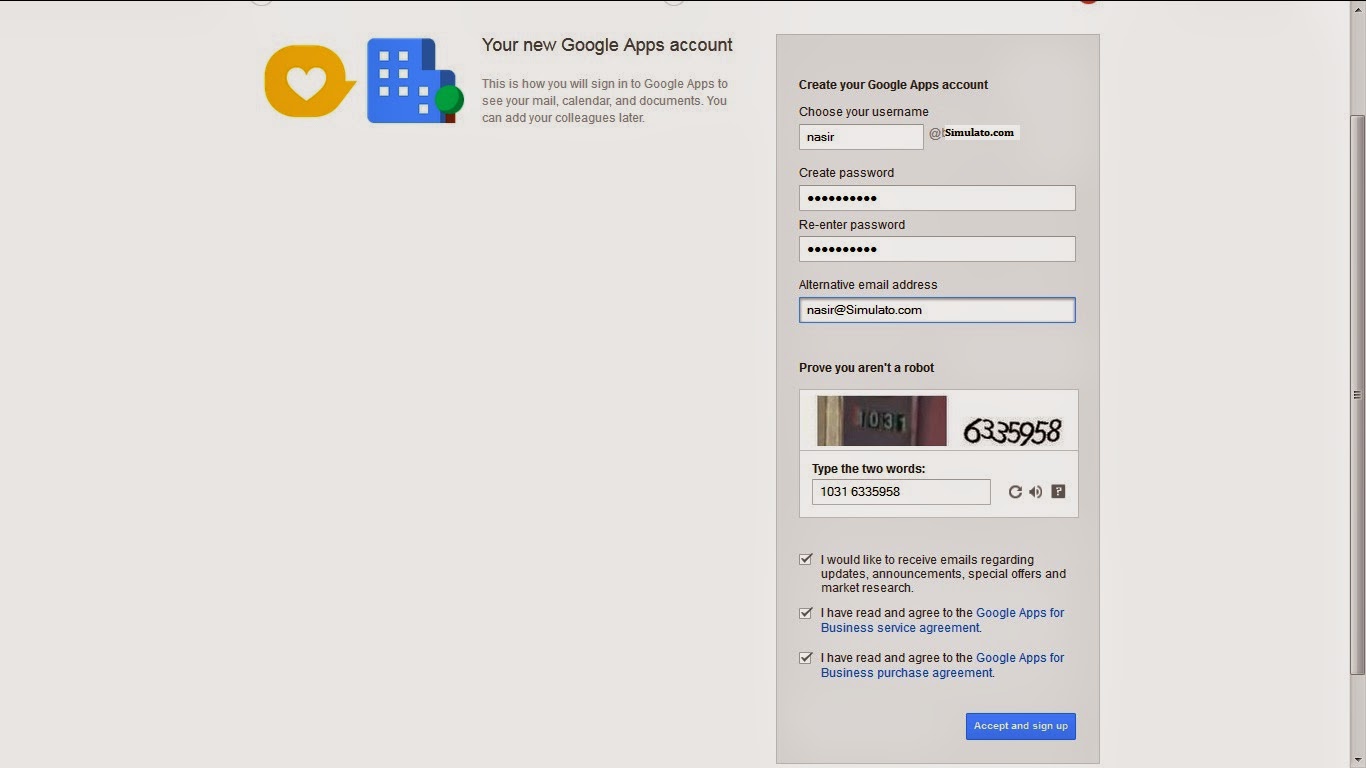
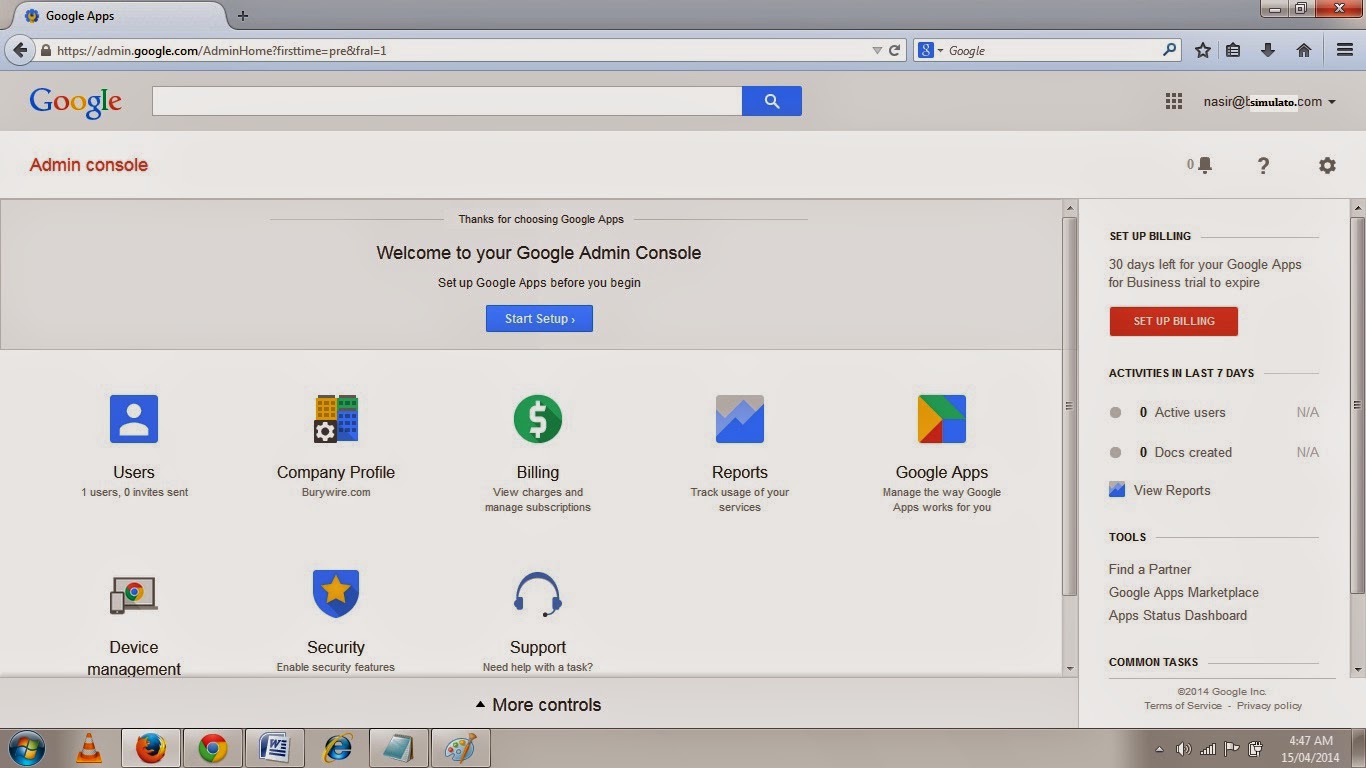
Steps to host your Email on Google.
1. Log on to Google Apps for Business by Clicking here.
 |
| Pic-9(e) |
 |
| Pic-9(f) |
 |
| Pic-9(g) |
 |
| Pic-9(h) |
 |
| Pic-9(i) |
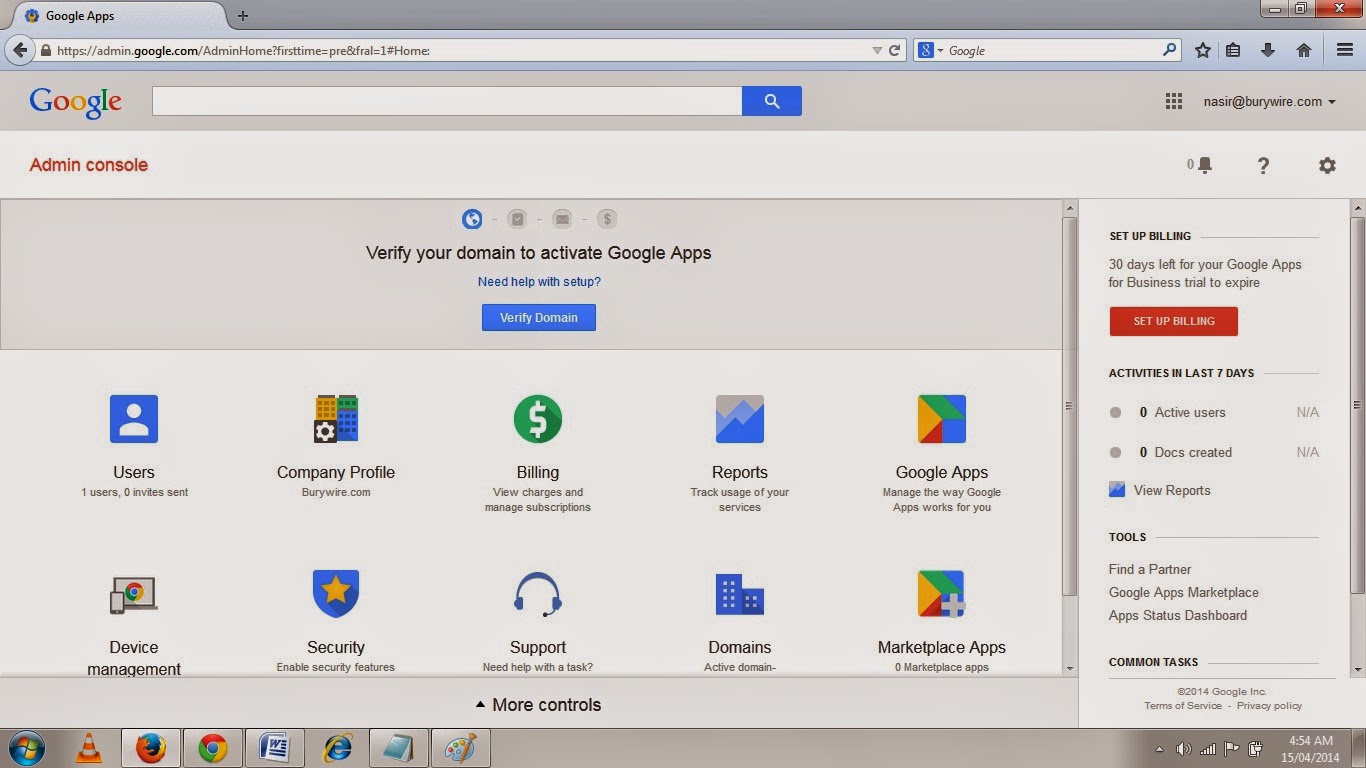 |
| Pic-9(j) |
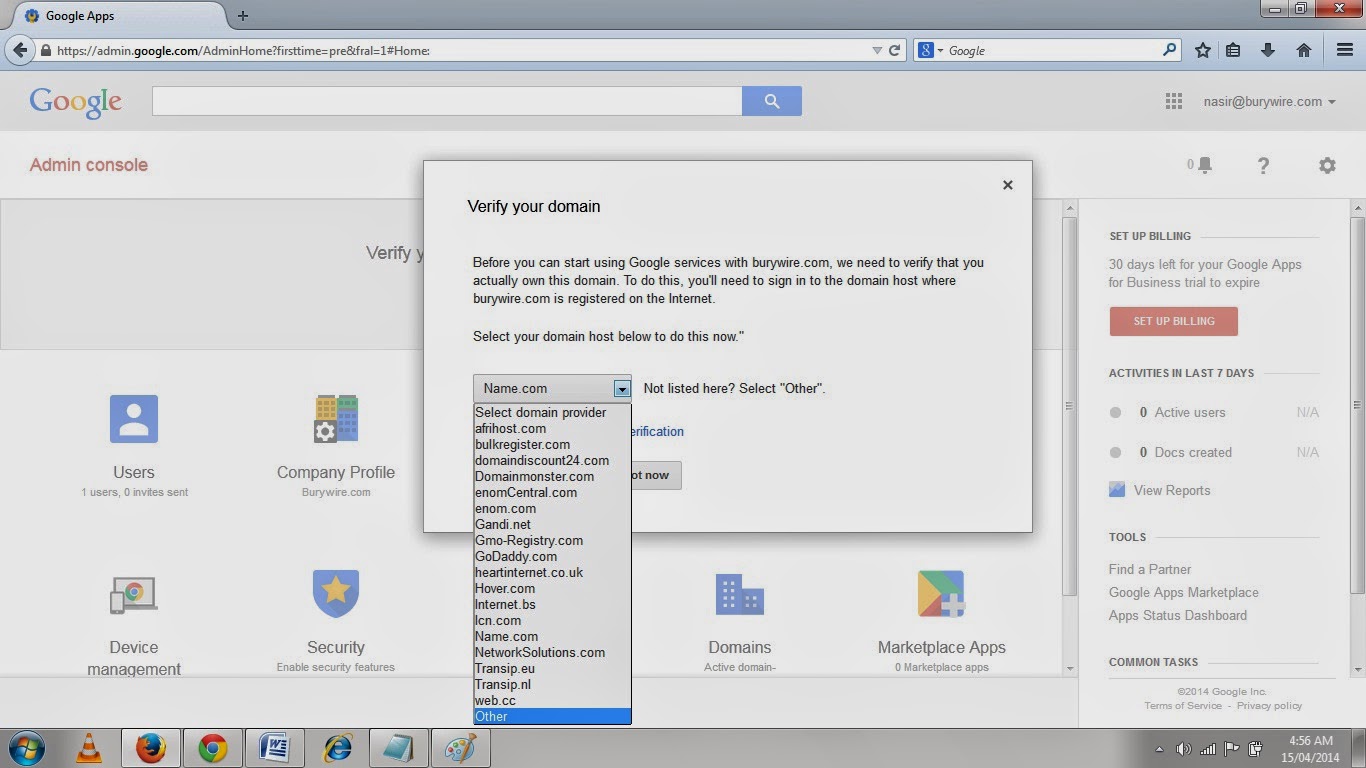 |
| Pic-9(k) |
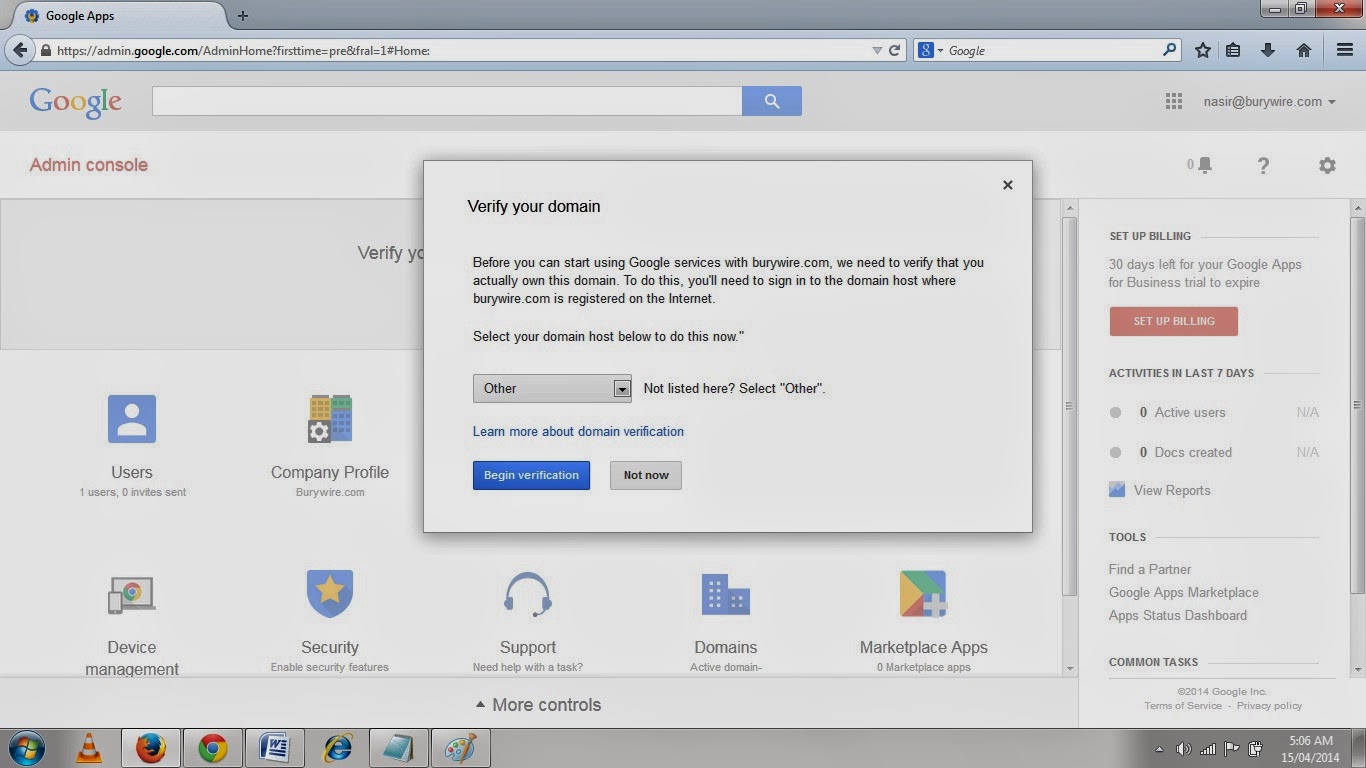 |
| Pic-9(L) |
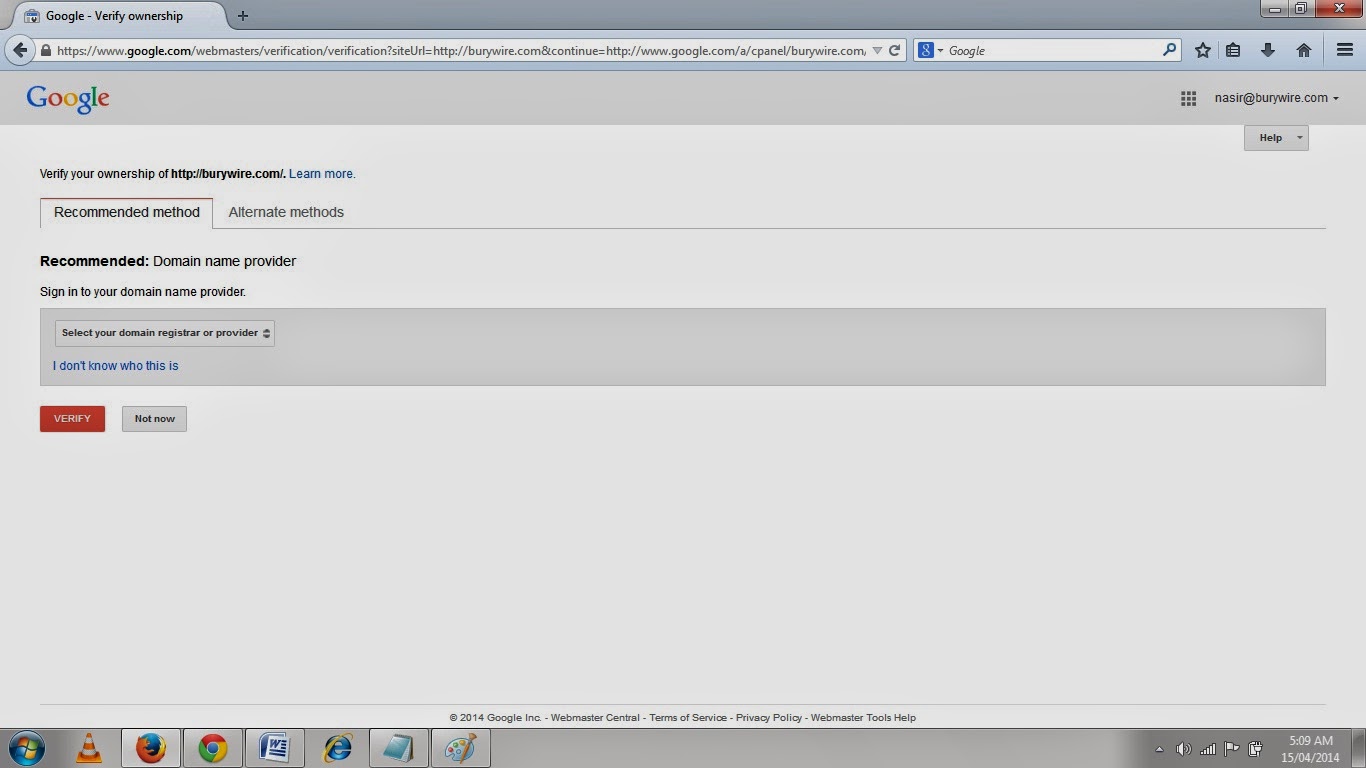 |
| Pic-9(m) |
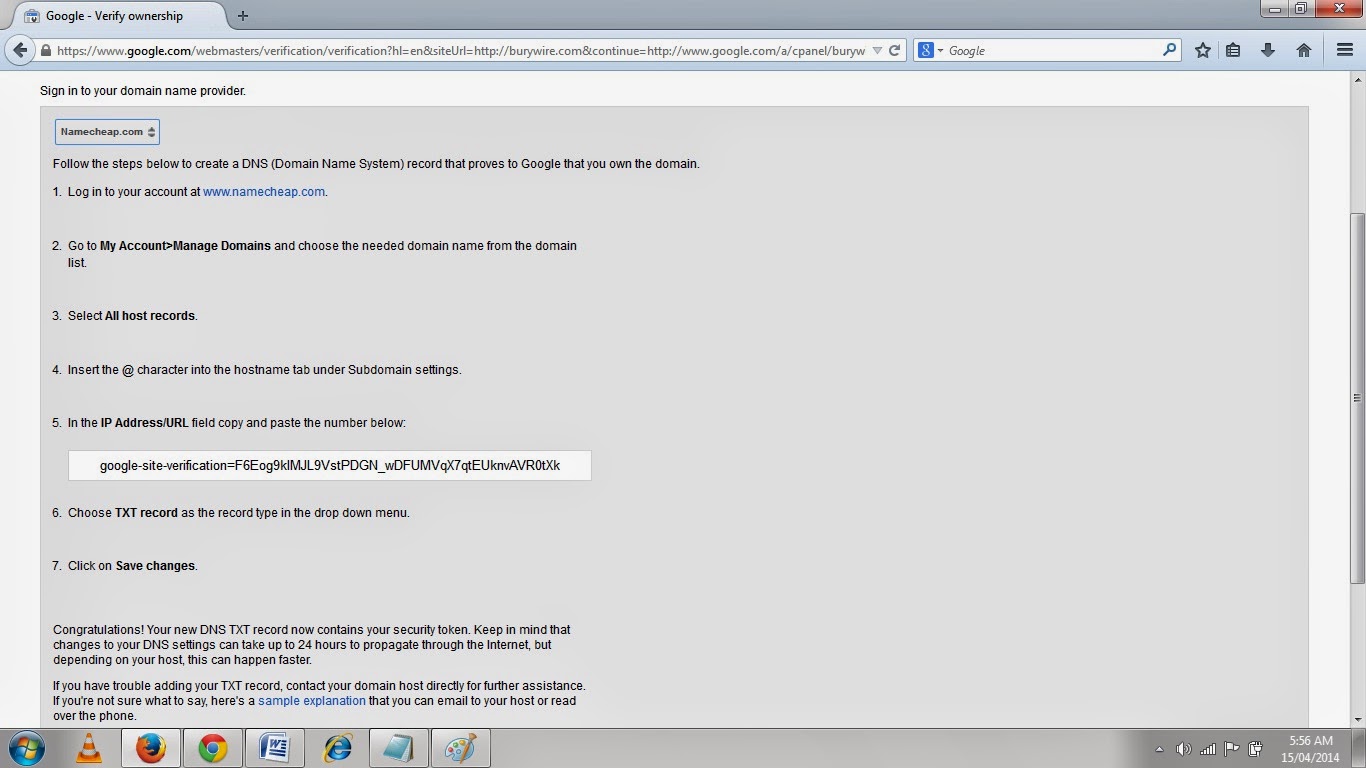
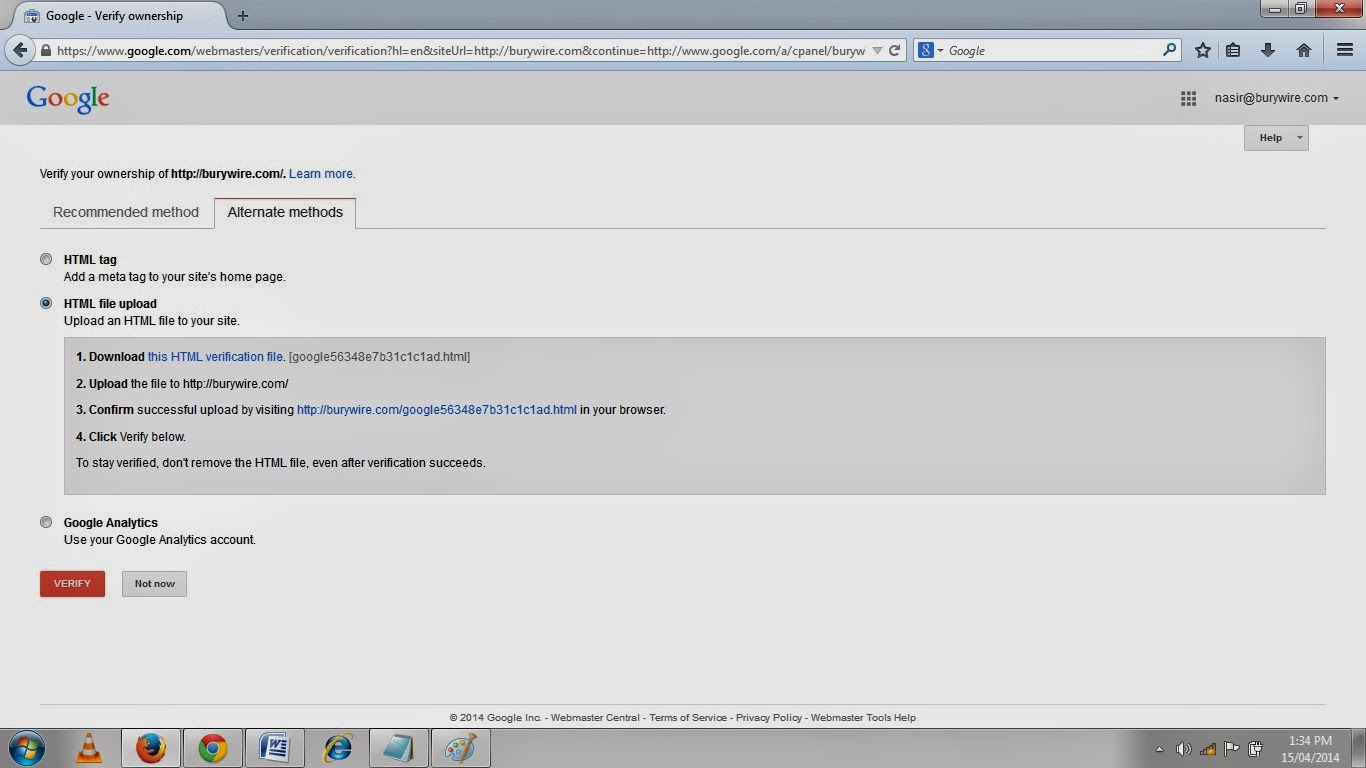
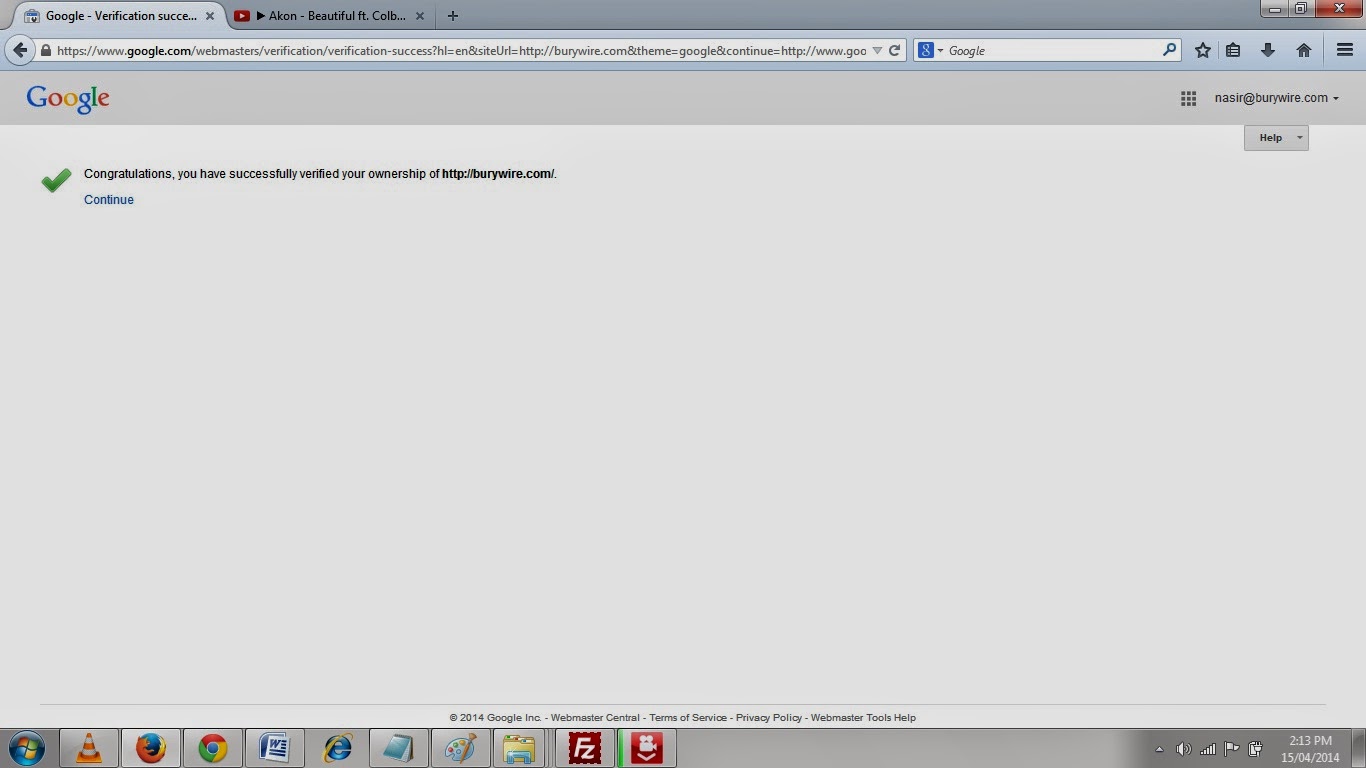
8. You can also select the Alternate Method by clicking on the alternate method tab to verify the ownership of this domain wherein you have to either put a Meta tag or just upload a file to your website as shown below in the picture- 9(o) and access that file and your are done.
 |
| Pic-9(n) |
 |
| Pic-9(o) |
 |
| Pic-9(p) |
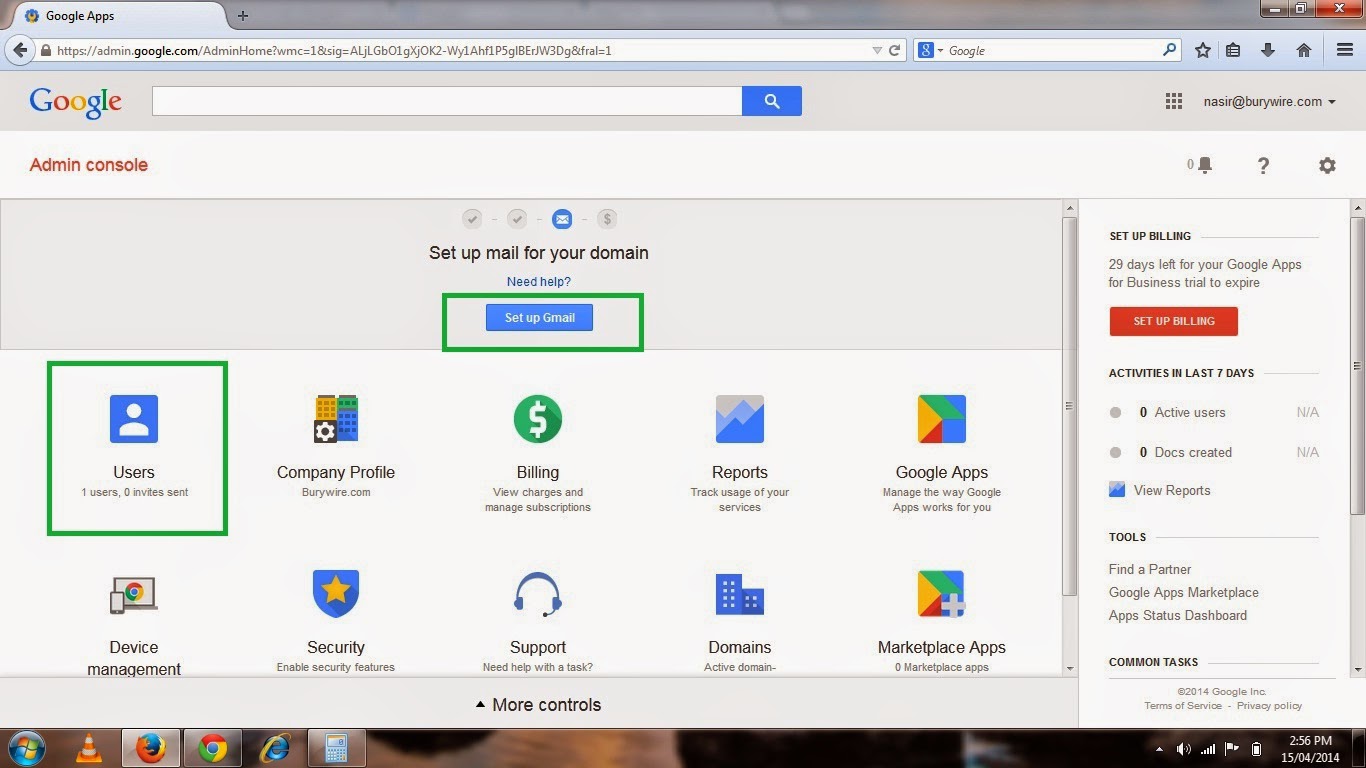
11. After you have logged in again you will see the option to set up Gmail for you organization at the top as shown in the picture-9(q) below.
 |
| Pic-9(q) |
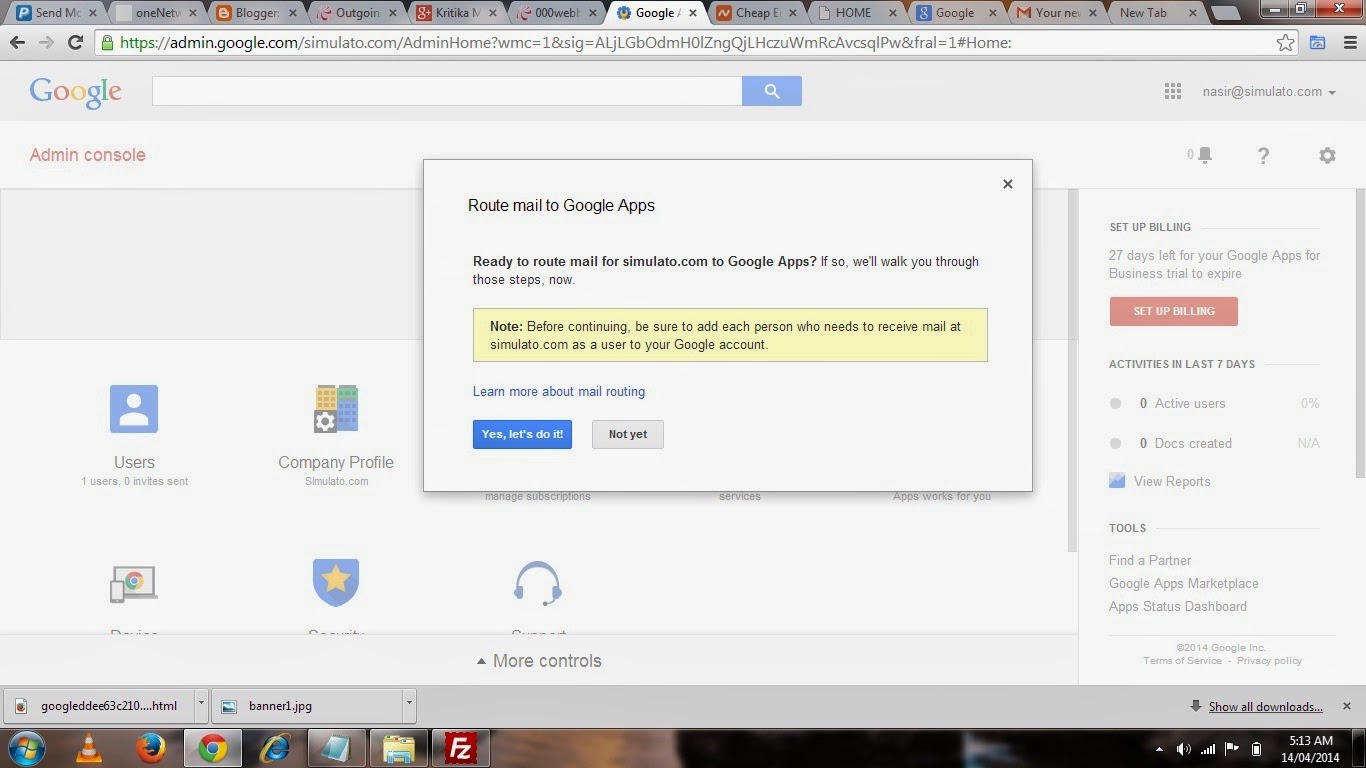 |
| Pic-9(r) |
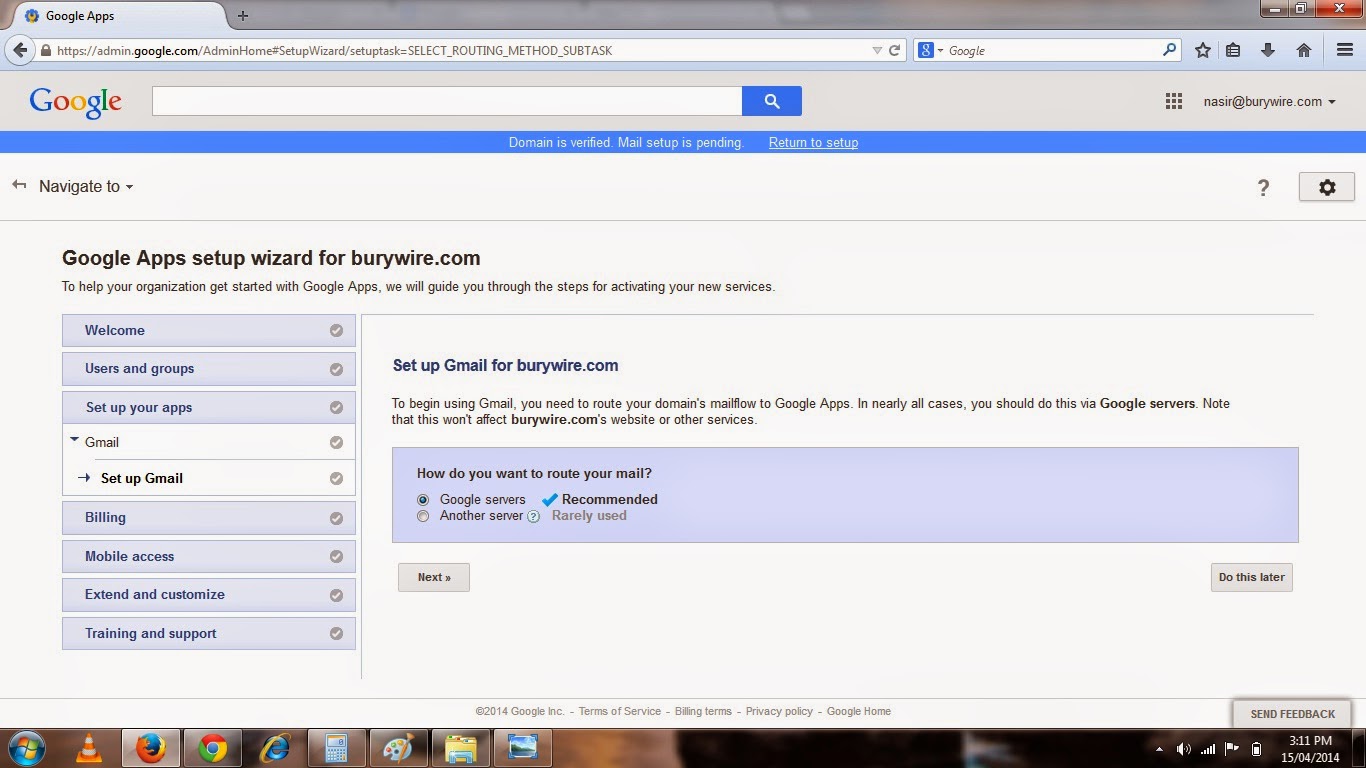 |
| Pic-9(s) |
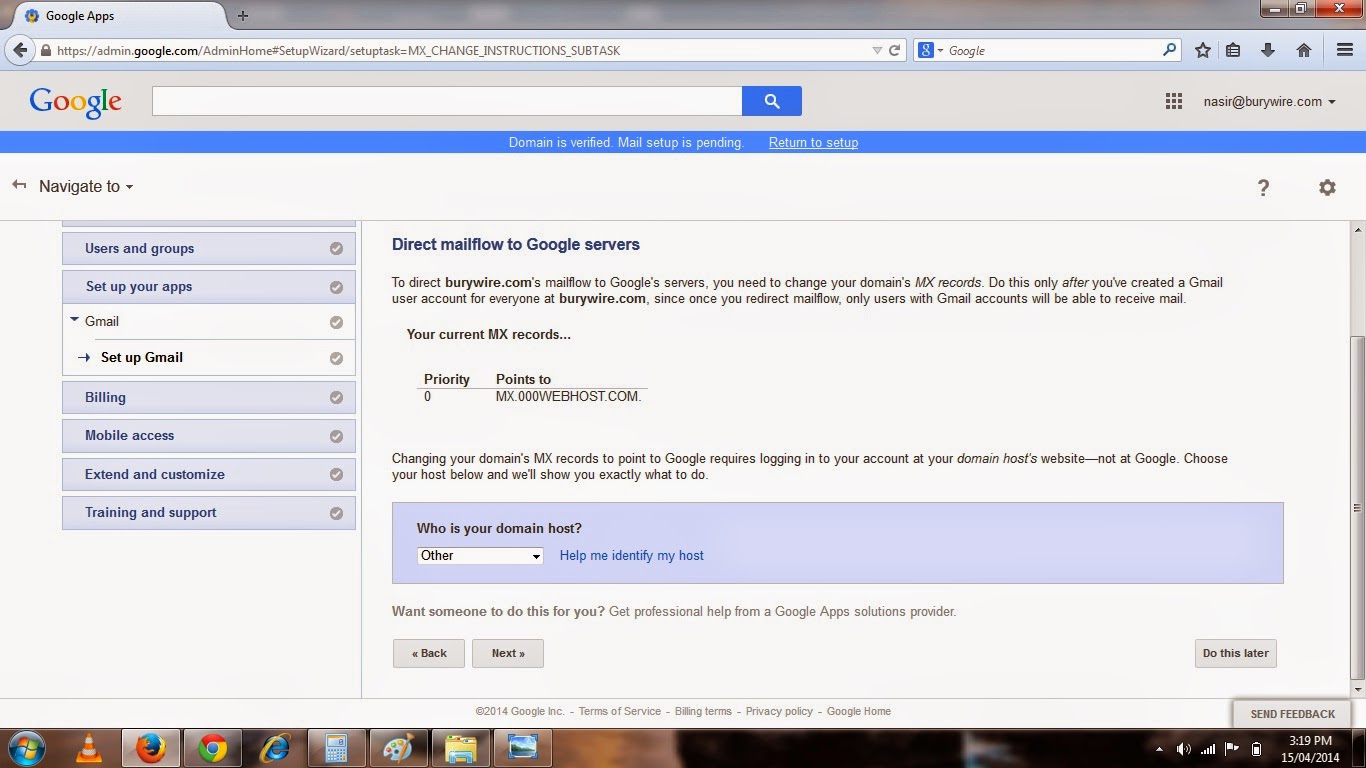 |
| Pic-9(t) |
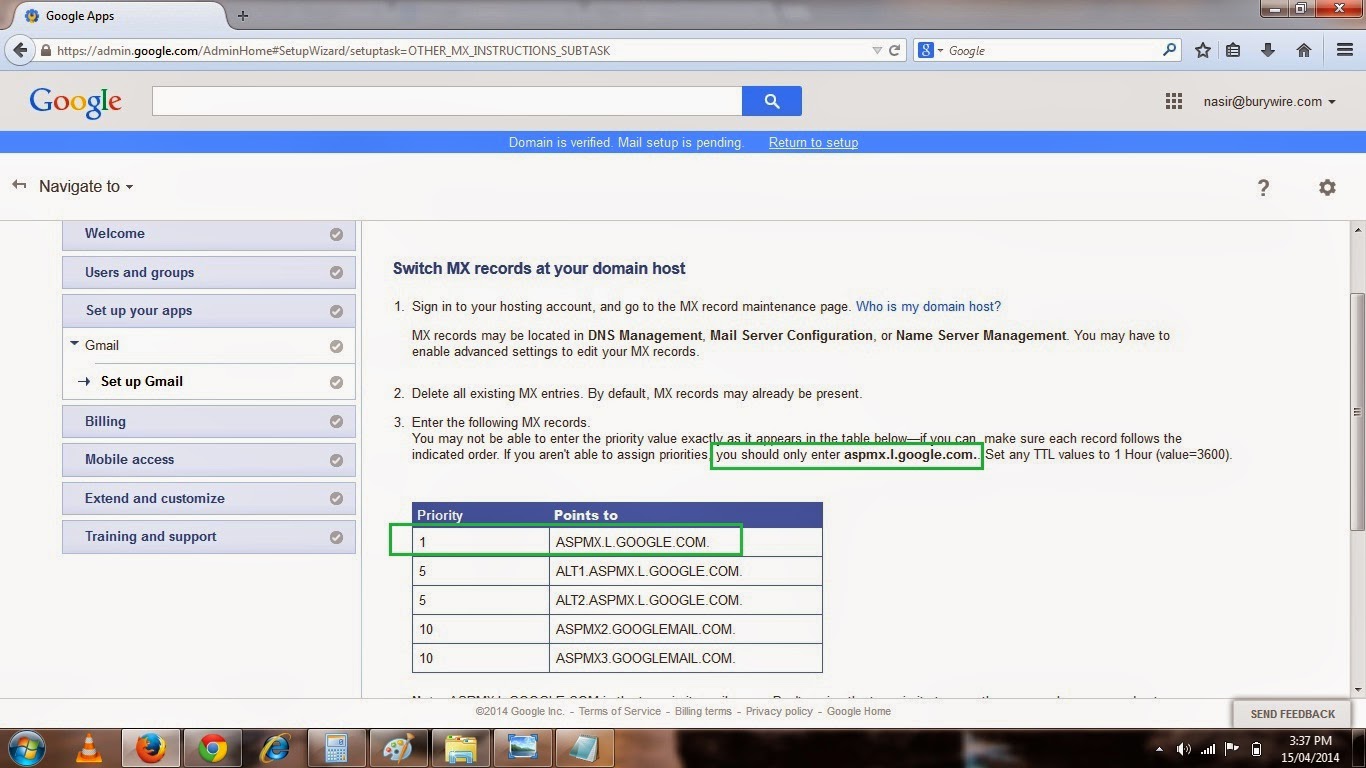 |
| Pic-9(u) |
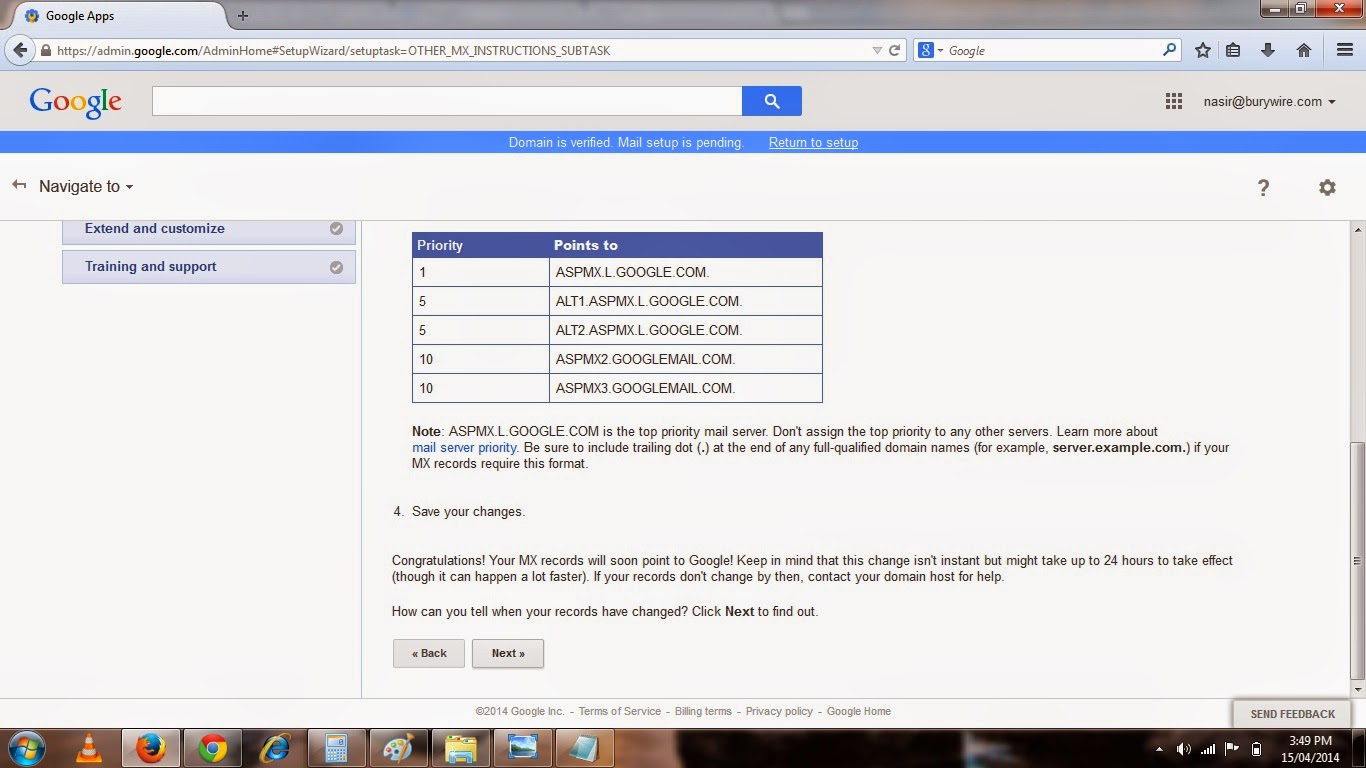 |
| Pic-9(v) |
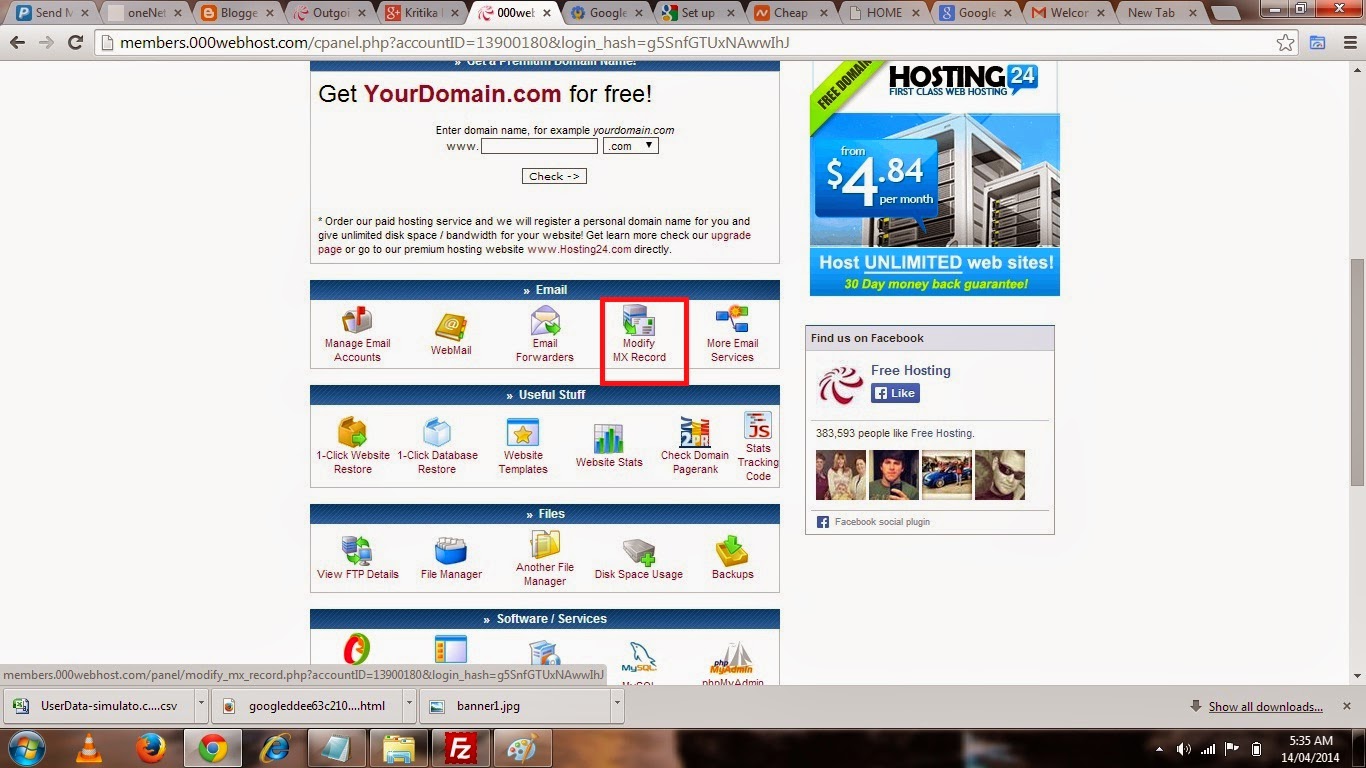 |
| Pic-9(w) |
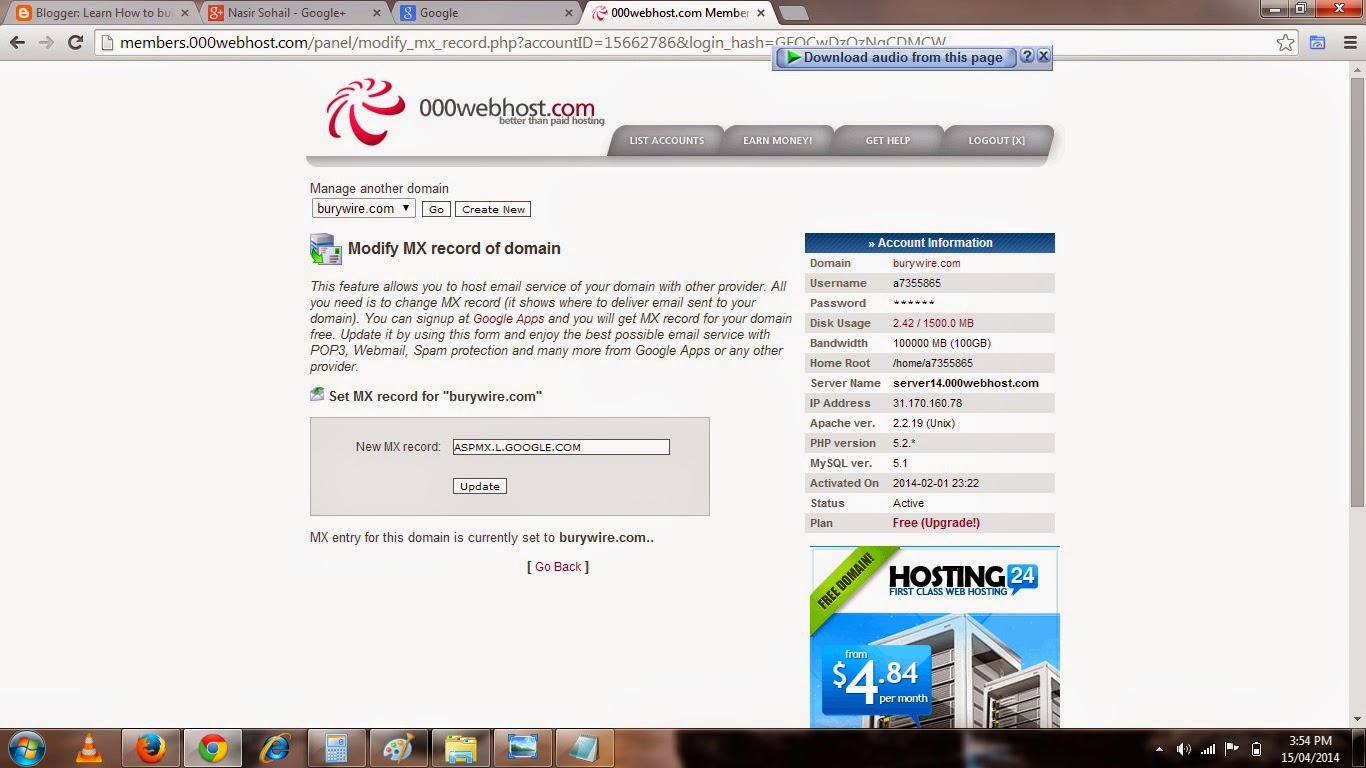 |
| Pic-9(x) |
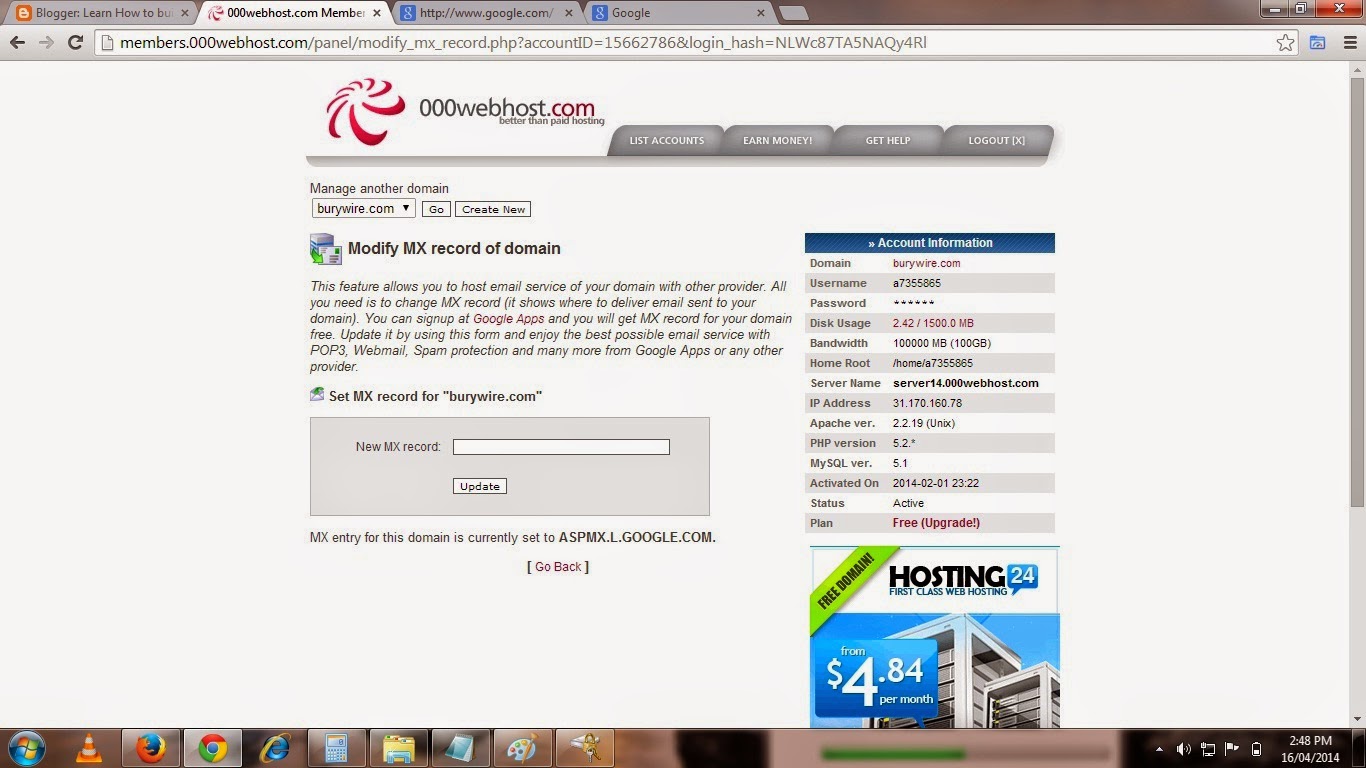 |
| Pic-9(y) |
Alrighty!! So we are good to go now and enjoy the Feature and services of Google and move freely, Manage Nicely and stay connected to you friends on Google+ .
And other good thing is that after you have set up Gmail for your business you can go ahead and make changes in your Email clients like Microsoft Outlook or Mac Mail and use Incoming and Outgoing Mail server of Gmail which are POP.GMAIL.COM and SMTP.GMAIL.COM respectively.
Now before I wrap up here is a quick learning guide from Google that will help you understand Google App a little deeper.
- Business email address. Google Apps lets you have an email address at your own domain—with the format name@your_domain.com—rather than name@gmail.com.
- More than just email. Google Apps is more than just Gmail for your organization. It includes a suite of web-based productivity and collaboration tools that include online documents, calendars, video chat, and much more.
- Different editions. There are different versions of Google Apps, such as for businesses, schools, or government organizations, each of which might have different features and capabilities. Learn more
- Administrative controls. With Google Apps, you can have an administrator manage and control peoples email accounts across your domain, from a central Admin panel.
- Gmail Send and receive mail. Watch video
- Google Calendar View and add calendar events. Learn more
- Google Talk Send instant messages.
- Googe Docs View and edit docs! Watch video
- Contacts Manage and get in touch with your contacts.
- Tasks Add and check off tasks. Watch video
- Lookup Quickly look up contacts at your domain
Note:- Please feel free to contact me in case you have any doubt or concern.Write a mail to nasir@simulato.com or leave a comment.Any suggestion to improve the contents will be highly appreciated.
Go to link Download