Showing posts with label email. Show all posts
Showing posts with label email. Show all posts
Wednesday, March 29, 2017
How to create your own Email id associated with your Own domain
How to create your own Email id associated with your Own domain
Hi friends,
Welcome back,This is Nasir with Web learning topics again.Today we are going to learn how to create our own Email account associated with your own domain like nasir@burywire.com.
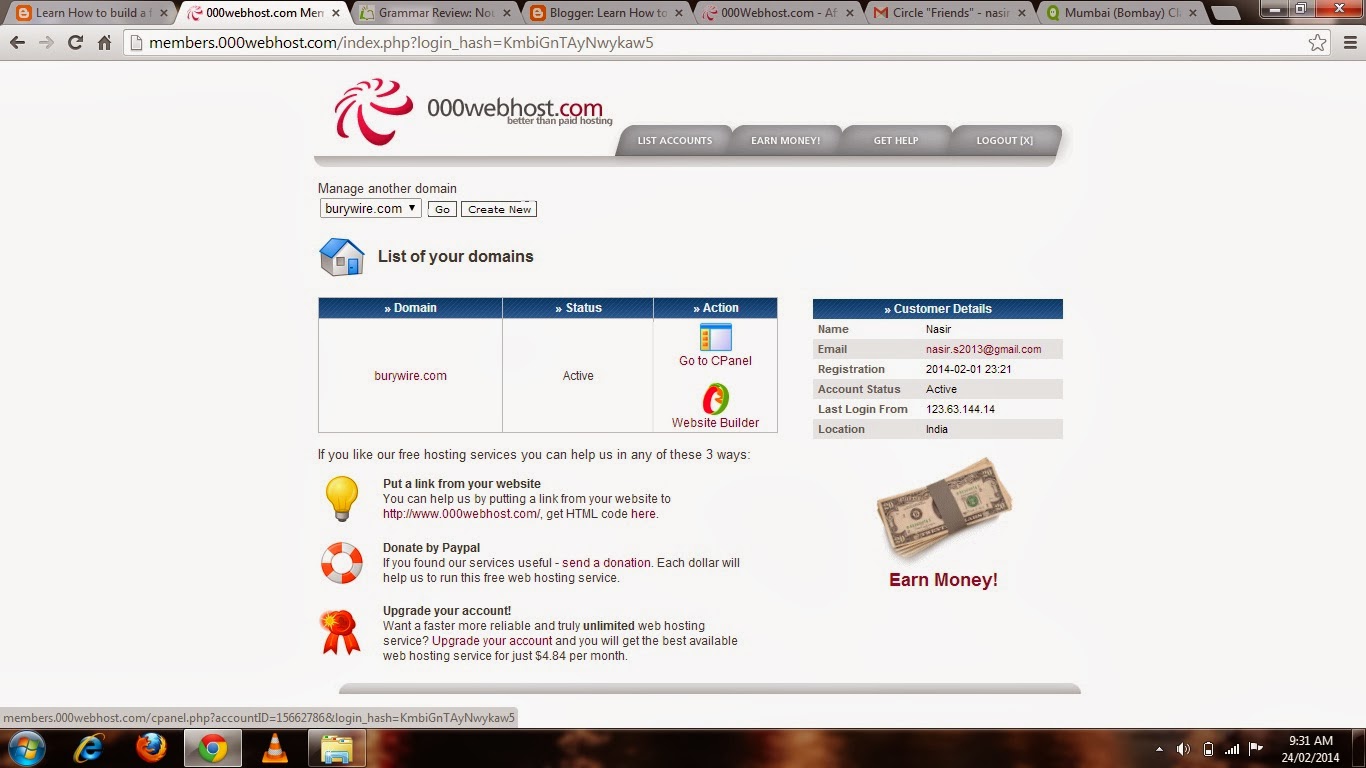
creating your Email account with your domain is very simple.So you need to first login to administrative members area of your hosting provider.In my case it will be 000webhost.com.After logging in there you go to the C panel of the domain you want to create Email account from.Look at the Picture 3-(a)below.
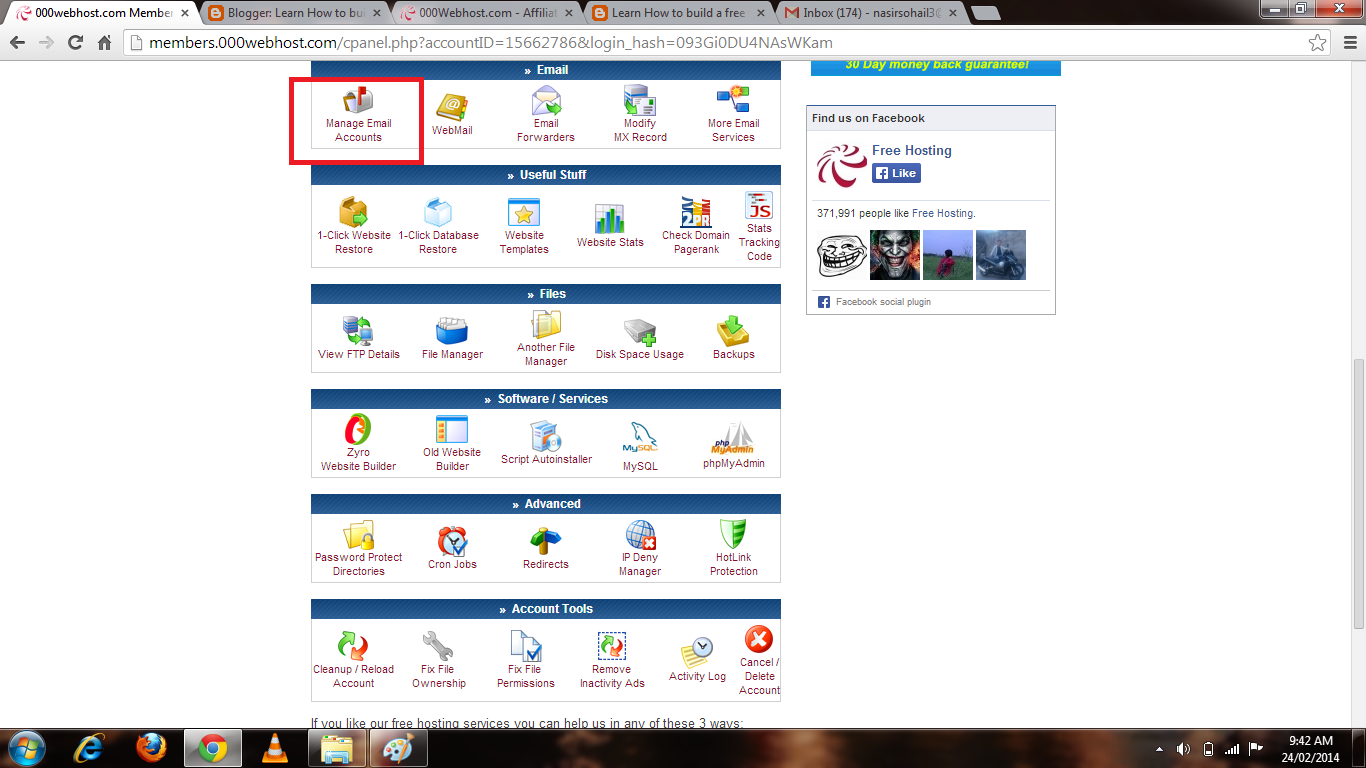
then click on the link Go to CPanel as shown in the above picture 3-(a).You will then be redirected to a handful of useful administrative stuff.Go to the Email section and click on the link Manage email as shown in picture 3-(b).
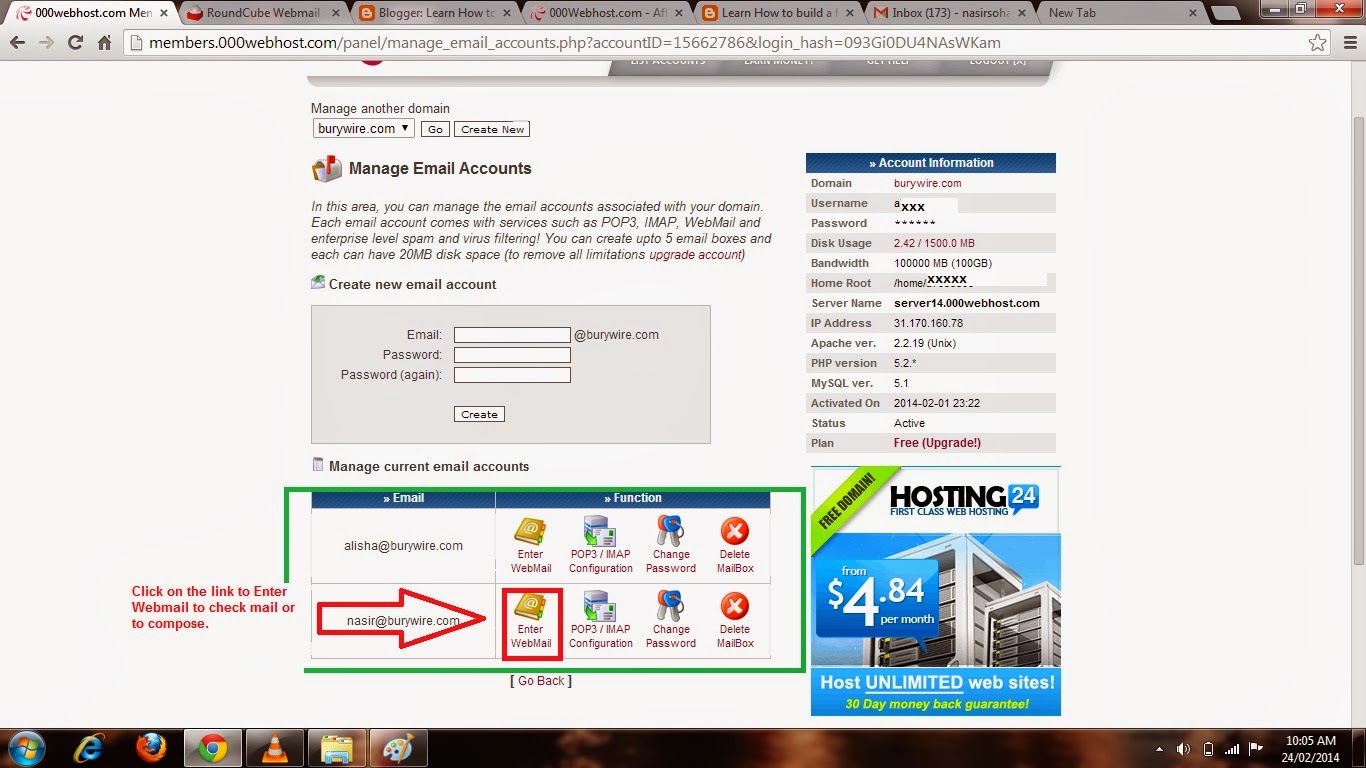
After clicking on manage email account it will ask you to type a new Email and then password and confirm the password.and then click create and it will create the email account as information provided.As shown in the below pictures 3-(c) and 3-(d) where I have just created two email account for myself and my beautiful wife.
Now you have successfully created the email account and now is the time to Test it so click on the Enter web mail option as shown in the picture 3-(d).And then you will be redirected to the web mail client as shown in the picture 3-(e) where I have sent a test mail to my Gmail account and and it worked as shown in picture 3-(f).

Finally we have created the New Email account and Tested it.And its working Fine.In my next Post I am gonna talk over how to configure your business E-mail on outlook/ Outlook Express or on your Android Phone.So Stay connected keep visiting.
Enjoy Emailing... :-)
Nasir
Welcome back,This is Nasir with Web learning topics again.Today we are going to learn how to create our own Email account associated with your own domain like nasir@burywire.com.
creating your Email account with your domain is very simple.So you need to first login to administrative members area of your hosting provider.In my case it will be 000webhost.com.After logging in there you go to the C panel of the domain you want to create Email account from.Look at the Picture 3-(a)below.
 |
| 3-(a) |
then click on the link Go to CPanel as shown in the above picture 3-(a).You will then be redirected to a handful of useful administrative stuff.Go to the Email section and click on the link Manage email as shown in picture 3-(b).
 |
| 3-(b) |
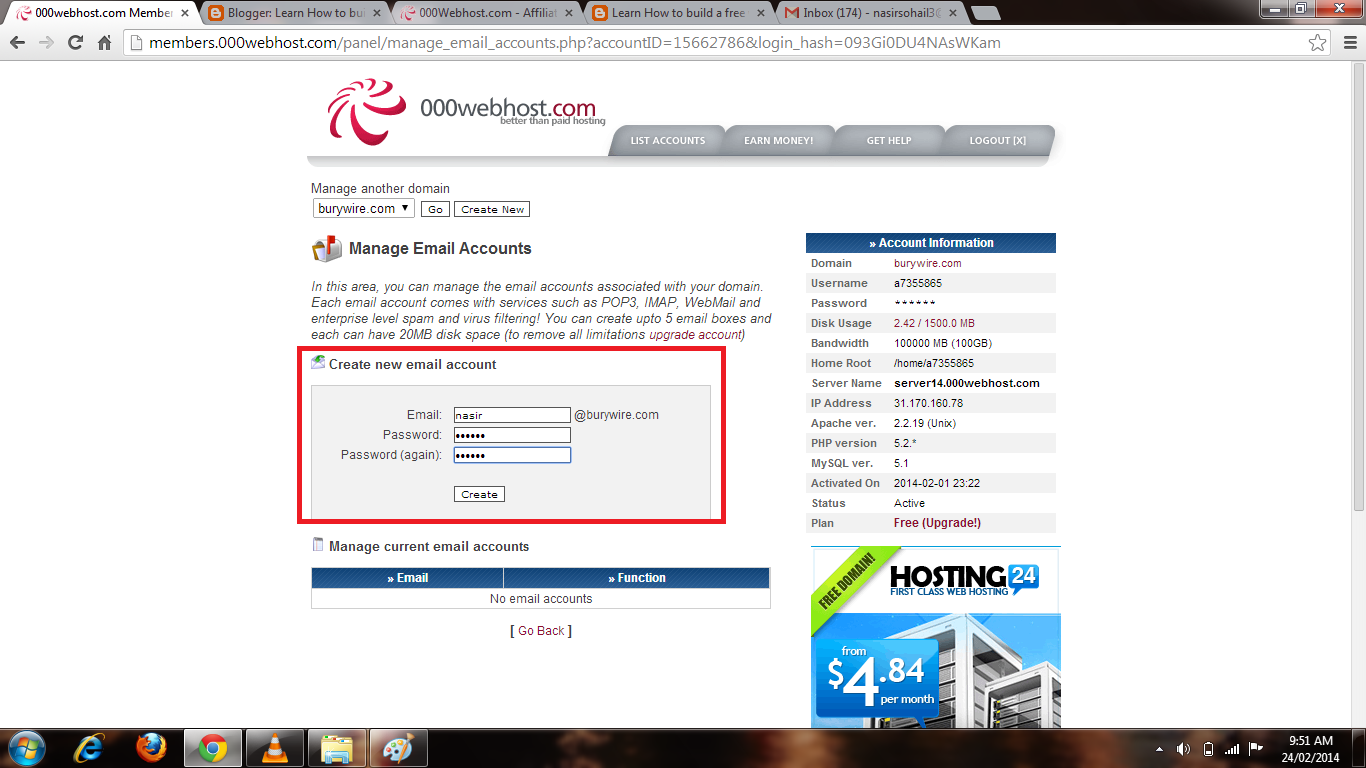 |
| 3-(c) |
 |
| 3-(d) |
Now you have successfully created the email account and now is the time to Test it so click on the Enter web mail option as shown in the picture 3-(d).And then you will be redirected to the web mail client as shown in the picture 3-(e) where I have sent a test mail to my Gmail account and and it worked as shown in picture 3-(f).
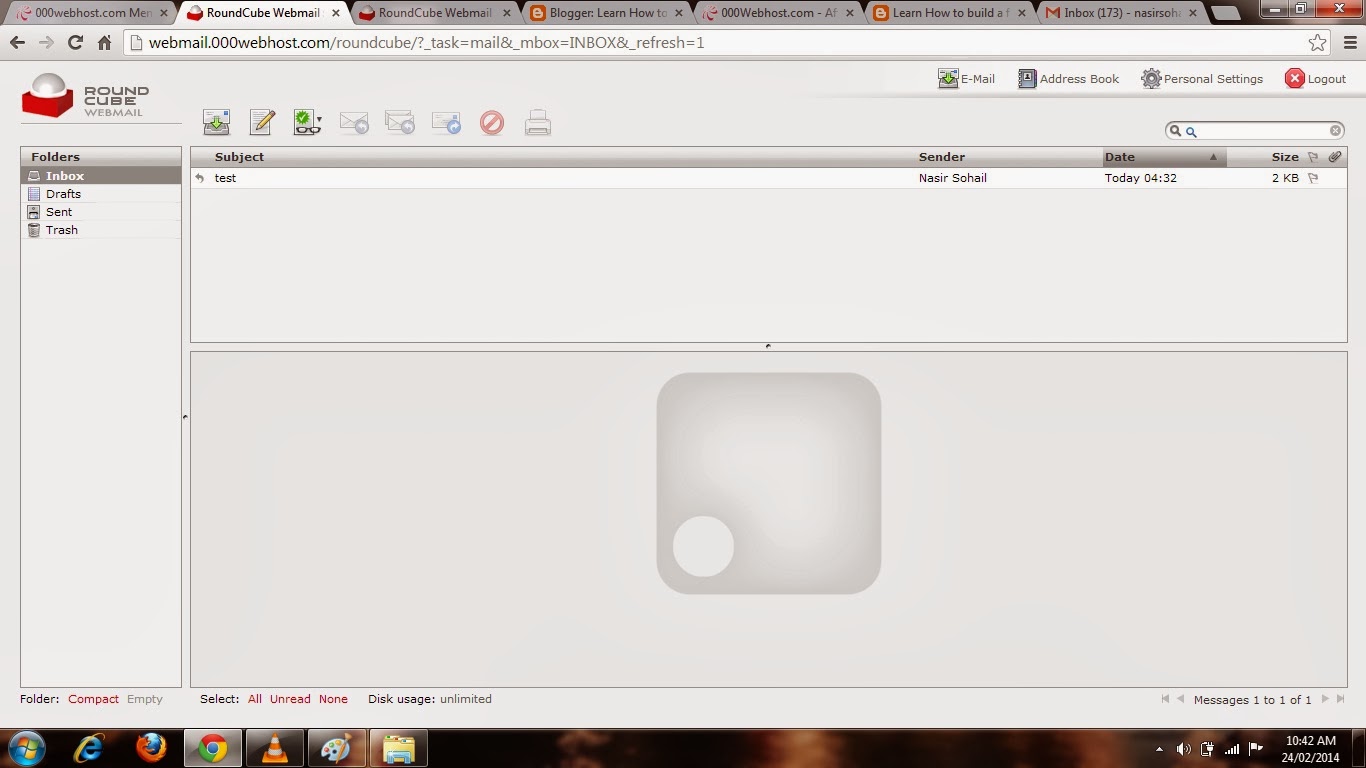 |
| 3-(e) |
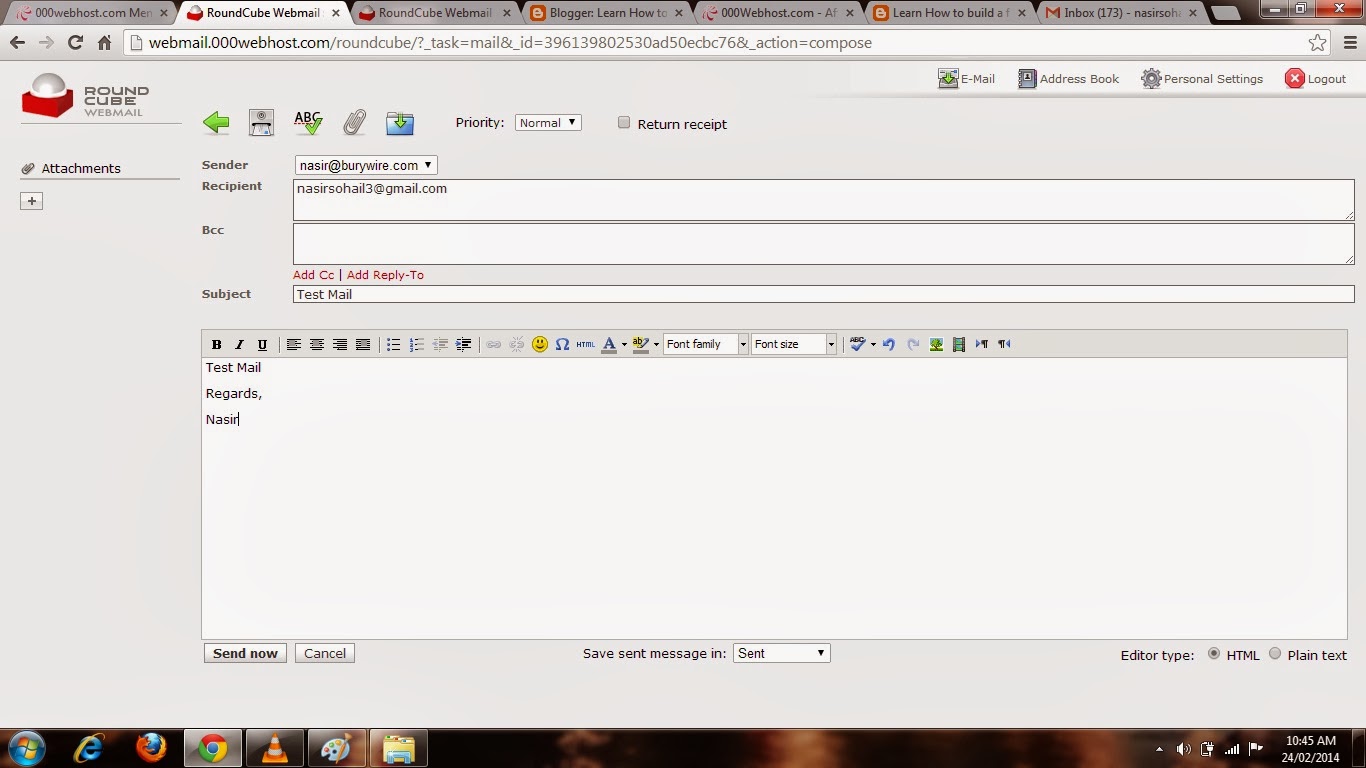 |
| 3-(f) |
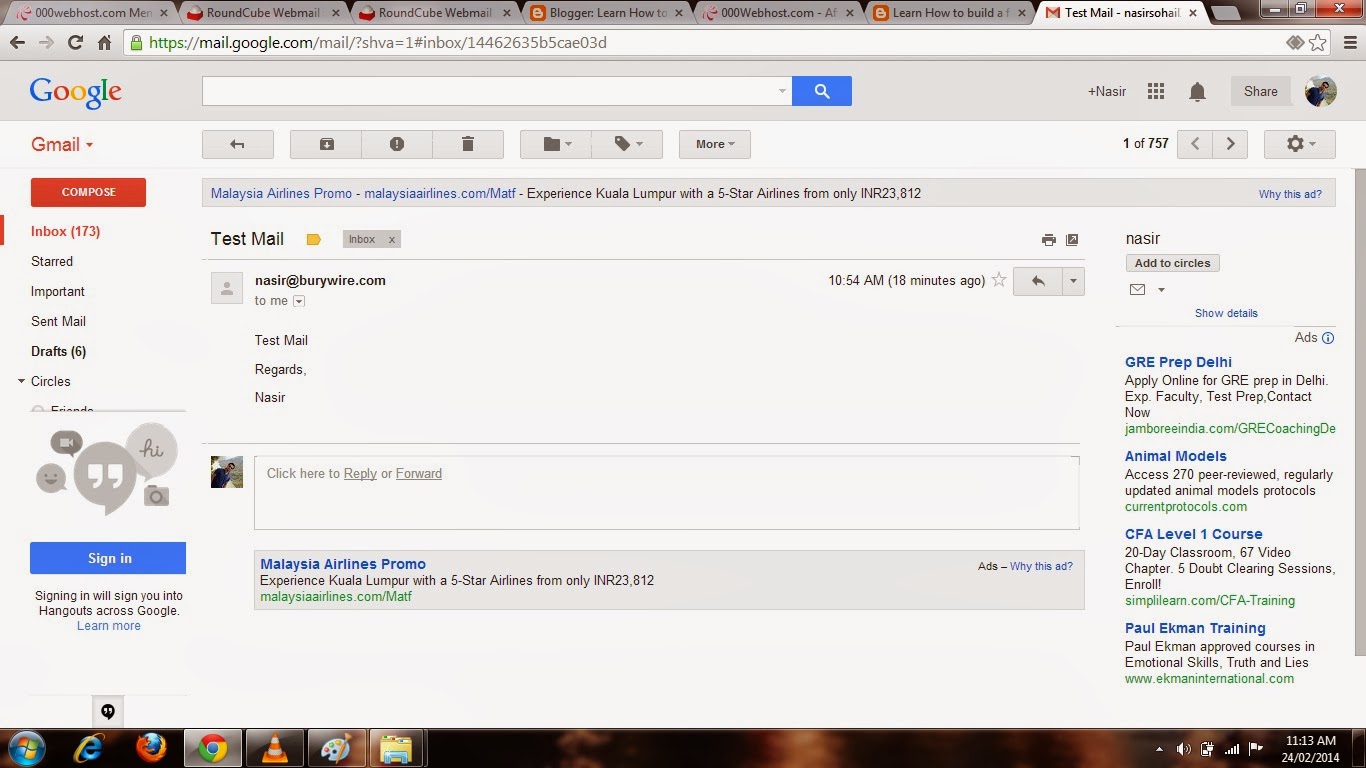 |
| 3-(g) |
Finally we have created the New Email account and Tested it.And its working Fine.In my next Post I am gonna talk over how to configure your business E-mail on outlook/ Outlook Express or on your Android Phone.So Stay connected keep visiting.
Enjoy Emailing... :-)
Nasir
Go to link Download

Thursday, October 20, 2016
How to set up Email on My Iphone
How to set up Email on My Iphone
Hi Everyone,
I could not wait to write a post on How to Set up your Email account like Gmail in your Iphone?.So today I am going to show you all the steps to setup Gmail on Iphone.I have taken the screenshots from Chasms.com where you can actually simulate the Email setup steps.
Step 1. On the Home screen tap on settings as shown in the Picture 5-(a).
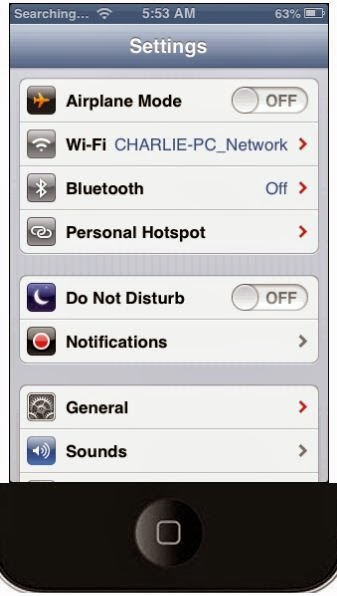
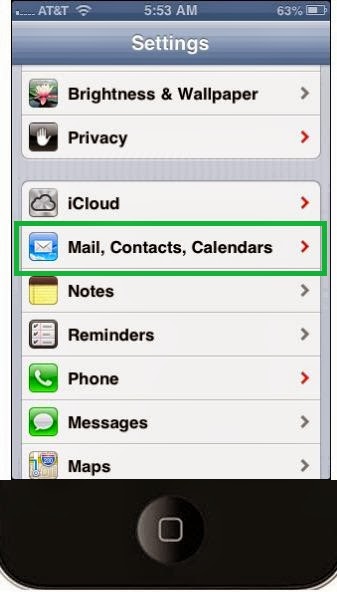
Step 2. You will see the settings menu as in Picture 5(b) below, So just scroll down a little bit and hit Mail, Contacts, Calender as in Picture 5(c).
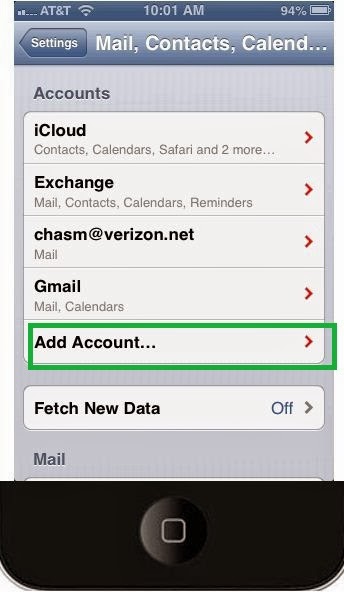
Step 3. It would ask you to select the type of Mail account you wanna add, Here you want to tap on Add Account... as shown in the picture 5(d).
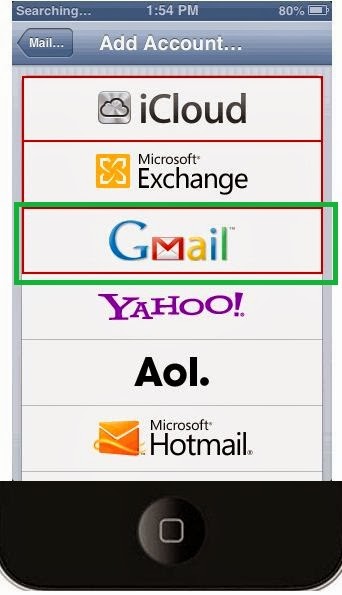
Step 4. Now hit Gmail as we are going to setup the Gmail account.
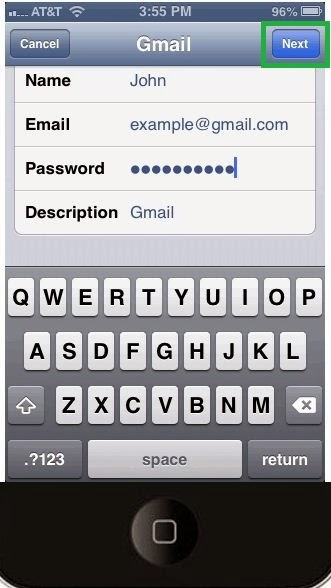
Step 5. Now type in your Name as you want it to be appeared to recipient, Then type in complete Email address, your password and in description type in Gmail as shown in the picture 5(f).And then hit on the next button on the top right hand corner as shown in the picture 5(F).
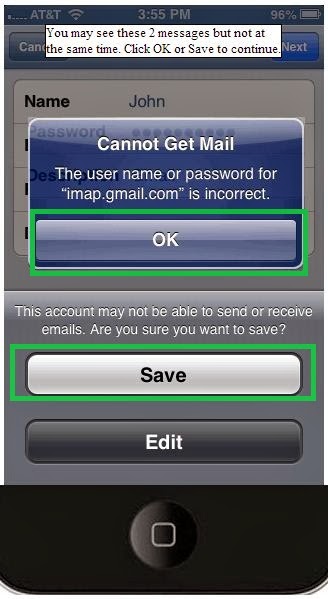
Step 6. Now you may receive a message "can not get mail" , so do not panic, cause the settings have not been changed completely so just click on Okay and save.
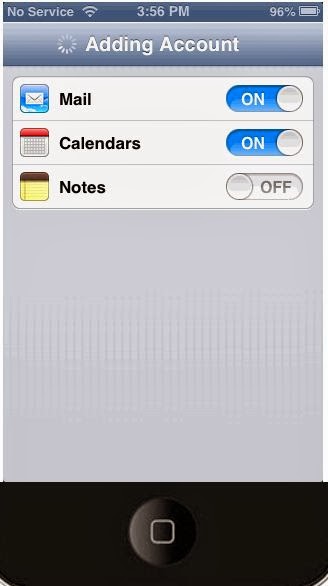
Step 7. Its now gonna show you that the account is being added as shown in the picture 5(h).
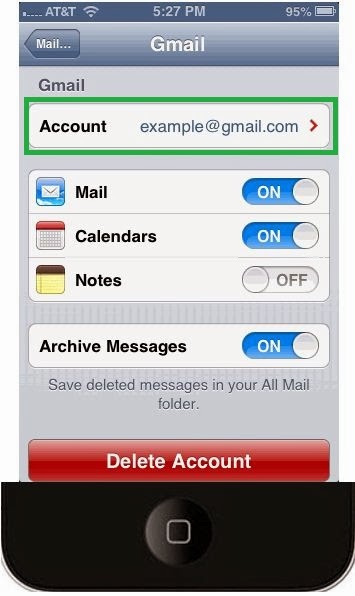
Step 8. Once the account is added it will be listed here on the next screen as in the picture 5(i) below.So here tap on the listed Gmail account.
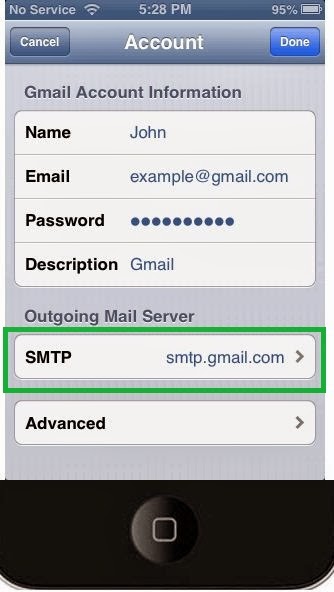
Step 9. It will now show the information you just saved and here as highlighted is the link to configure outgoing server so Tap on SMTP as in the picture 5(j).
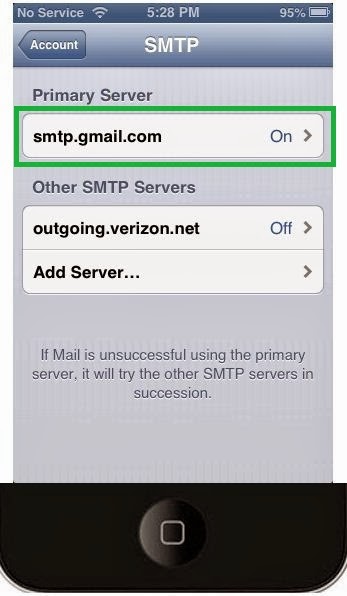
Step 10. Now hit on smtp.gmail.com as highlighted in the picture 5(k).
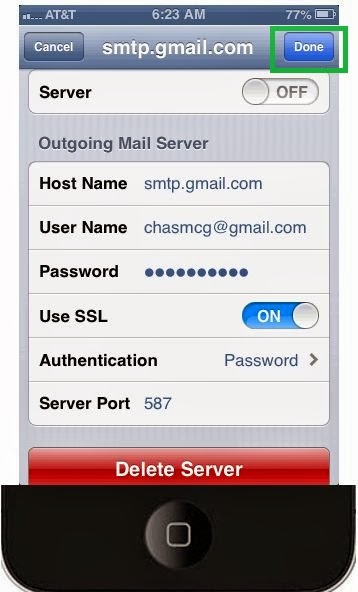
Step 11. Now make sure all the information are correct, Host name should be smtp.gmail.com, User Name should be your complete Email address, your password and also make sure that the SSL is on and then click on done at the top right hand corner as in the picture 5(L).
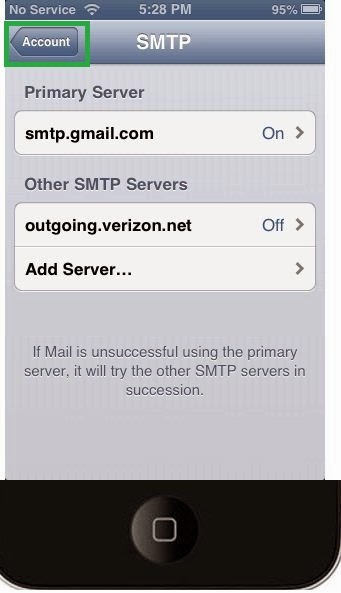
Step 12. Now you will be back to SMTP account page, Now hit on Account at the top left hand corner as highlighted in the picture 5(m).
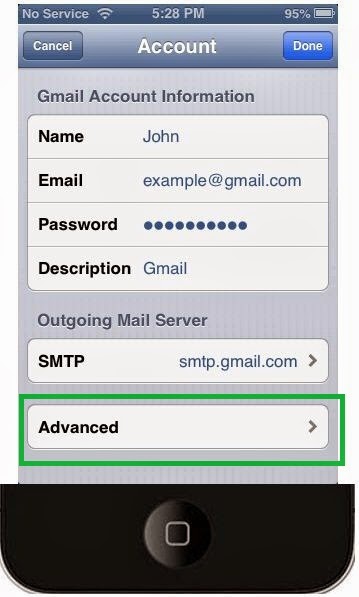
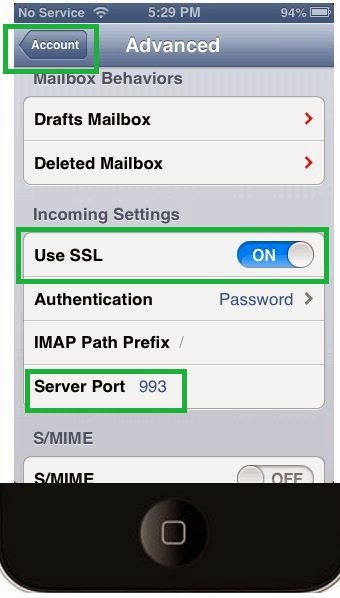
Step 13. Now you will be back to the Account description page here hit Advanced at the bottom as shown in the picture 5(n).And it will take you to the Next screen to change the settings of Incoming Mail server as shown in the picture 5(o).
Steps 14. On here make sure the SSL is on and Port No. is 993, for Gmail which you can change as per your service provider.and then click on account you will be back to screen shown in above picture 5(n) tap on done on the top right hand corner.
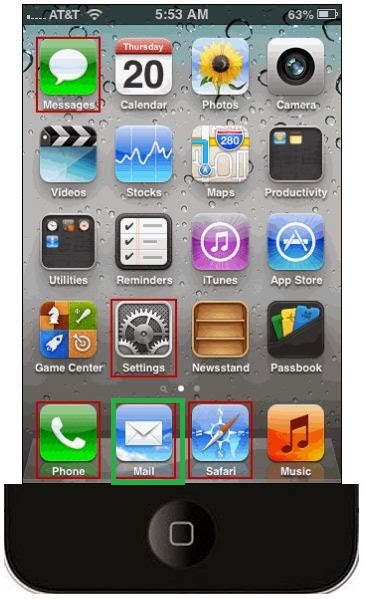
Step 15. Now hit Home button to come back to home screen as shown in the picture 5(p).Here Hit Mail on the bottom.
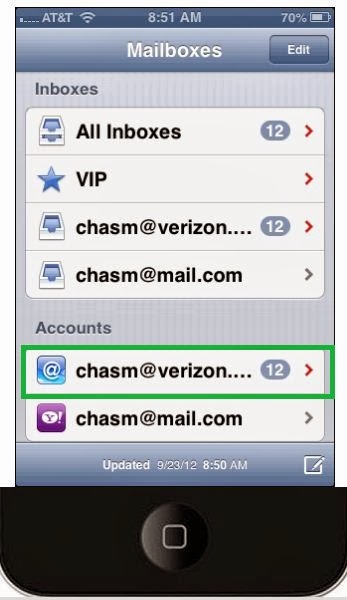
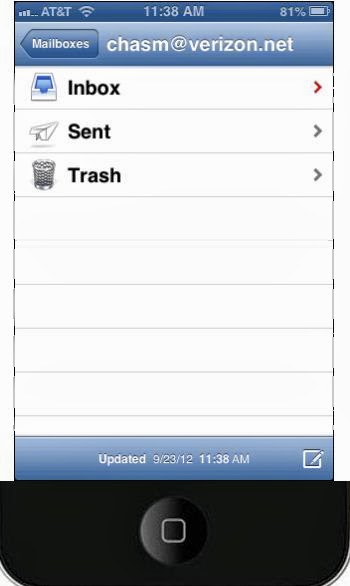
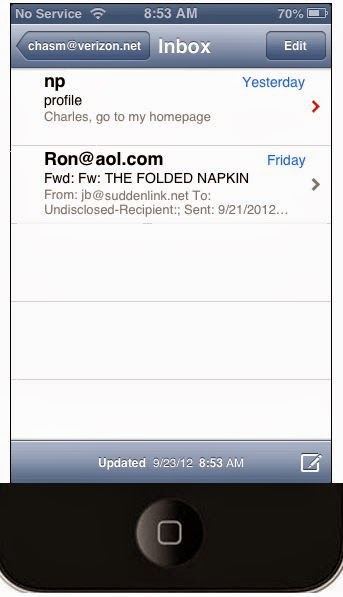
Step 16. You will now get to see a list of Email account configured on this Iphone so tap on the one you want to check Mail for.So if you hit the one highlighted as in the picture 5(q) you will then get the screen as shown in the picture 5(r) so just hit Inbox to see your Emails and that all is you had to do...You are good to go now..Your Email has been setup...
Well so we have learned How to Set up Email on Iphone.Similarly we set up email on Android as well.But I will show the steps on Android too in another post.
In my next Post i am gonna Show How to speed up your Computer and trust me that Topics is gonna be the biggest topic as I am gonna Include Every Single steps available in this World to optimize or speed up your computer and that gonna be good Informative Post...So Stay connected Keep visiting.... :-)
Happy Learning
Nasir..
I could not wait to write a post on How to Set up your Email account like Gmail in your Iphone?.So today I am going to show you all the steps to setup Gmail on Iphone.I have taken the screenshots from Chasms.com where you can actually simulate the Email setup steps.
Step 1. On the Home screen tap on settings as shown in the Picture 5-(a).
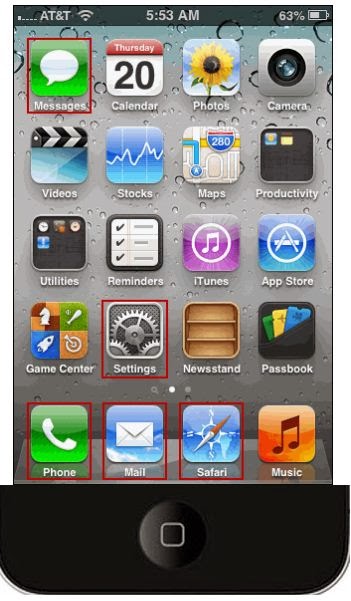 |
| 5-(a) |
Step 2. You will see the settings menu as in Picture 5(b) below, So just scroll down a little bit and hit Mail, Contacts, Calender as in Picture 5(c).
 |
| 5(b) |
 |
| 5(c) |
 |
| 5(d) |
 |
| 5(E) |
 |
| 5(F) |
 |
| 5(G) |
 |
| 5(h) |
 |
| 5(i) |
 |
| 5(j) |
 |
| 5(k) |
 |
| 5(L) |
 |
| 5(m) |
 |
| 5(n) |
 |
| 5(o) |
Step 15. Now hit Home button to come back to home screen as shown in the picture 5(p).Here Hit Mail on the bottom.
 |
| 5(p) |
 |
| 5(q) |
 |
| 5(R) |
 |
| 5(s) |
In my next Post i am gonna Show How to speed up your Computer and trust me that Topics is gonna be the biggest topic as I am gonna Include Every Single steps available in this World to optimize or speed up your computer and that gonna be good Informative Post...So Stay connected Keep visiting.... :-)
Happy Learning
Nasir..
Go to link Download
Sunday, October 2, 2016
Host your business Email with Google Use your Business Email account on Gmail and Login from Anywhere Anytime
Host your business Email with Google Use your Business Email account on Gmail and Login from Anywhere Anytime
Hi Friends,
Today I am going to write a very interesting topic which would be very helpful for a small business people who uses their business email only in their office and has limitation.After reading this article they could change the way they manage their email and use it freely from anywhere with great features of Gmail, Google Talk, Hangouts, Contacts, Task, Lookup( Look all the addresses in your company), Google Docs and Google Drive.
I have a domain name registered as Simulato.com where for my business Email I used to Login from a designated computer which has the Microsoft outlook configured or if I Have to login from a different place I had to login to My Web hosting provider and from there I could Login to my Web Mail and that did not have all the great features available as Gmail provides.So I took this decision to Host my Email Services to Google and now I login to my Email ( info@simulato.com ) from Gmail as a Google account and save my documents in Google Drive with all the Gmail Features like Google Talk and Hangouts.And I am always connected because I have also configured my business Email on my Android Phone.
Now I am gonna show you how can host your Business Email account for you and Your employees on Google.
Steps to host your Email on Google.
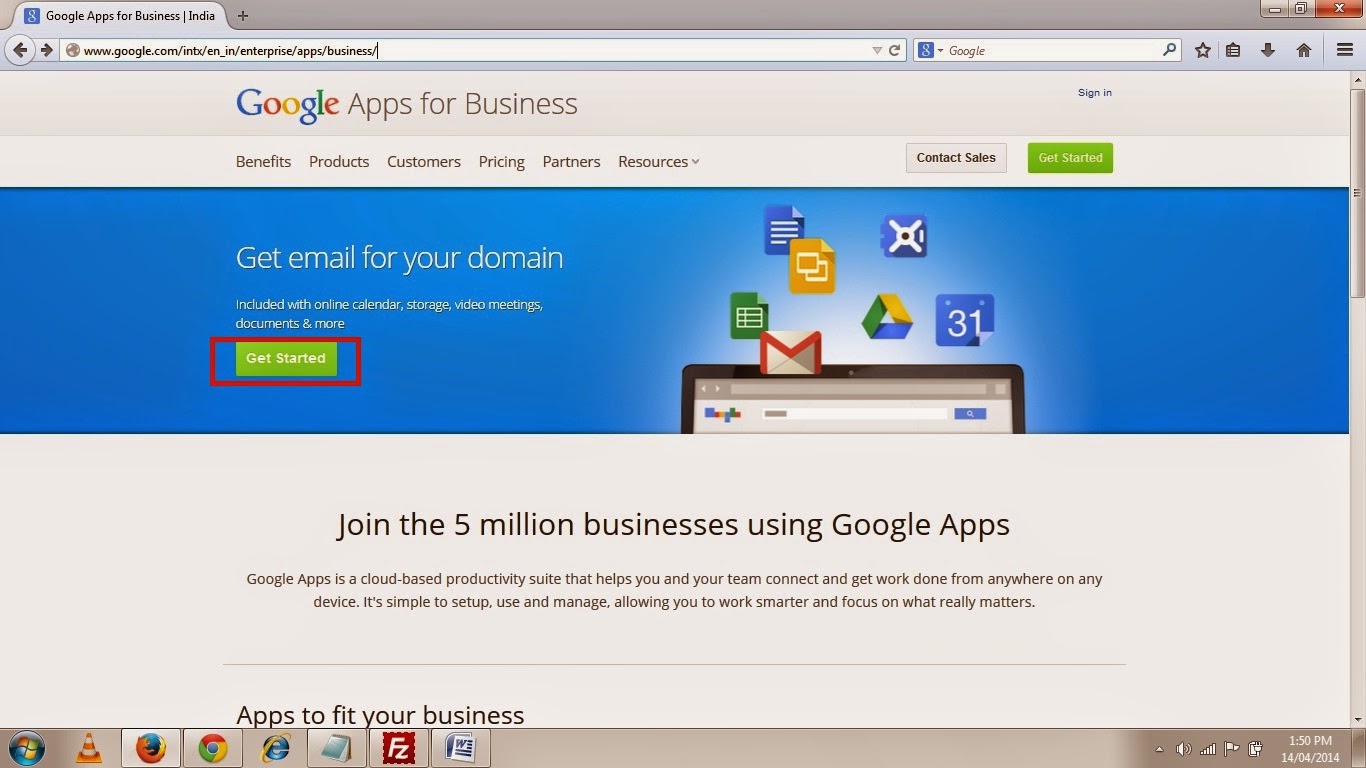
1. Log on to Google Apps for Business by Clicking here.
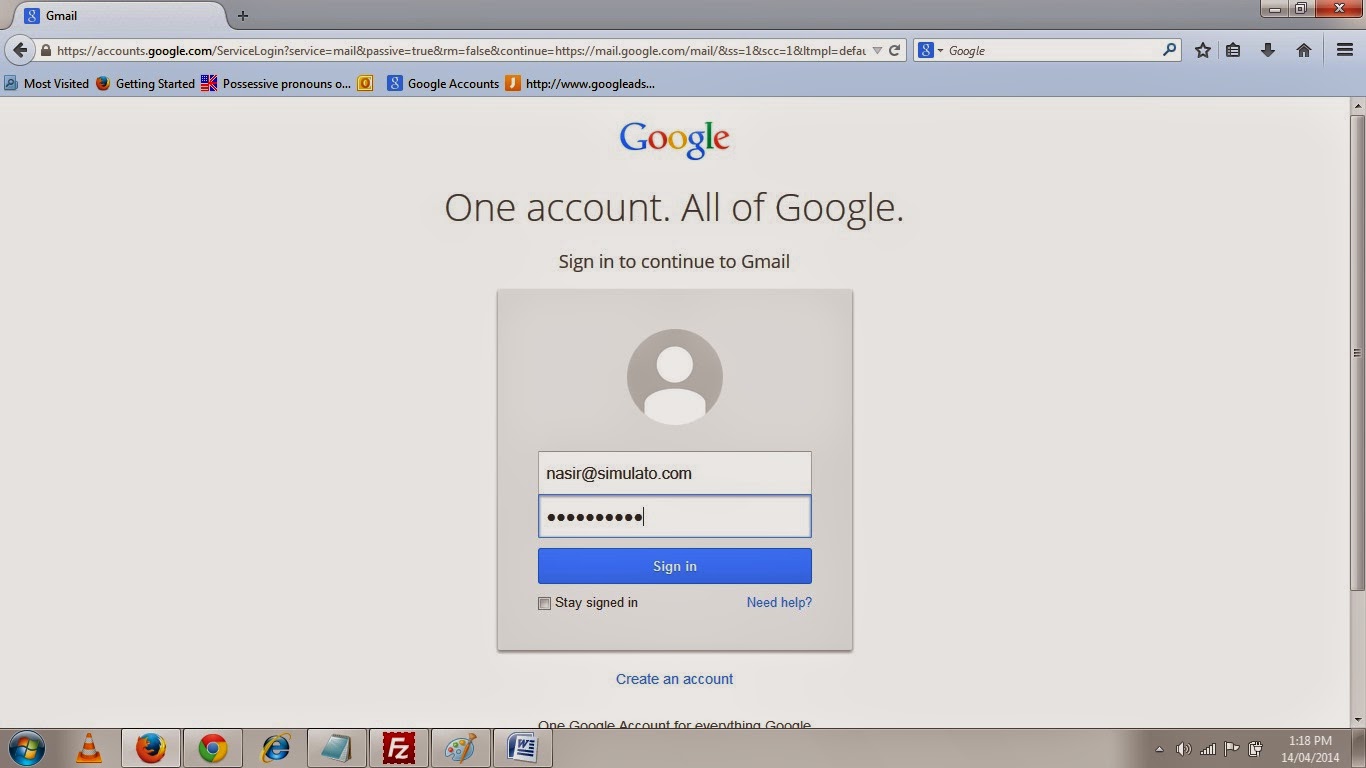
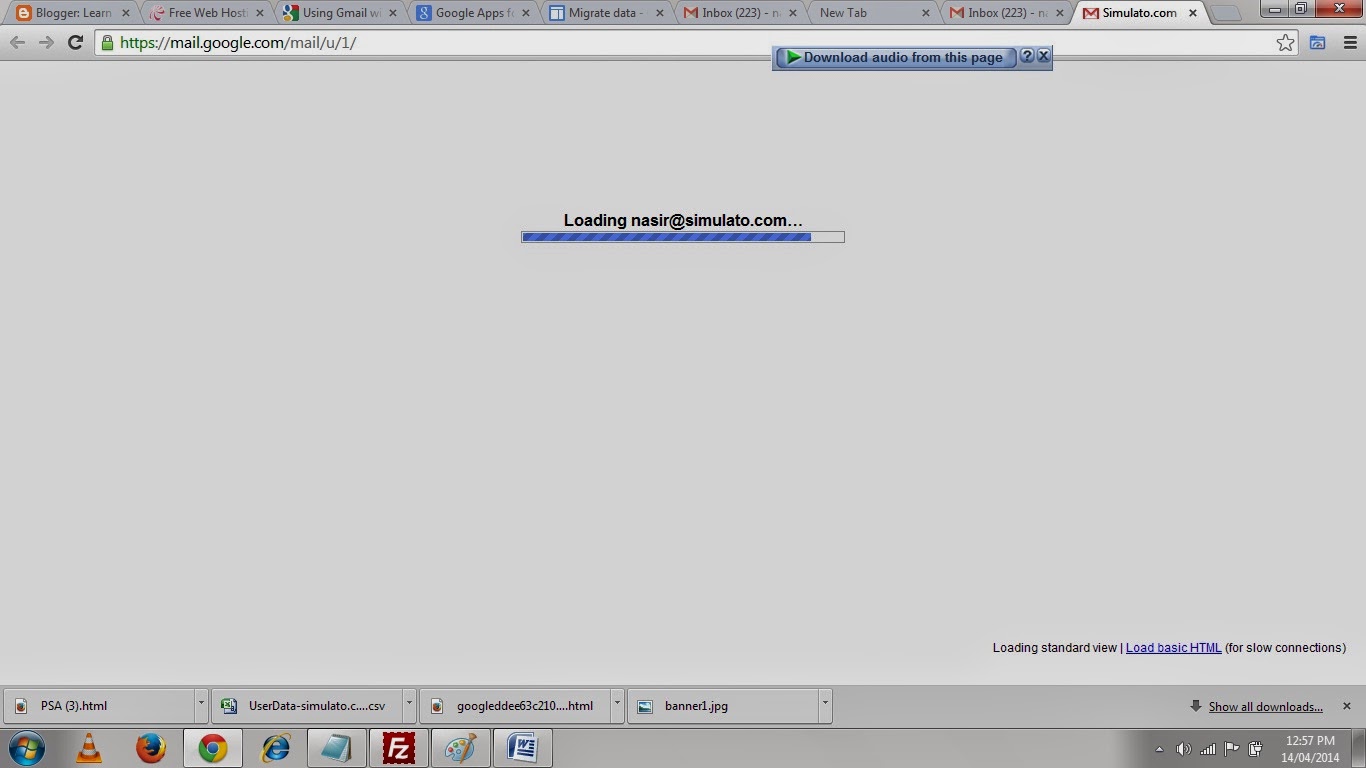
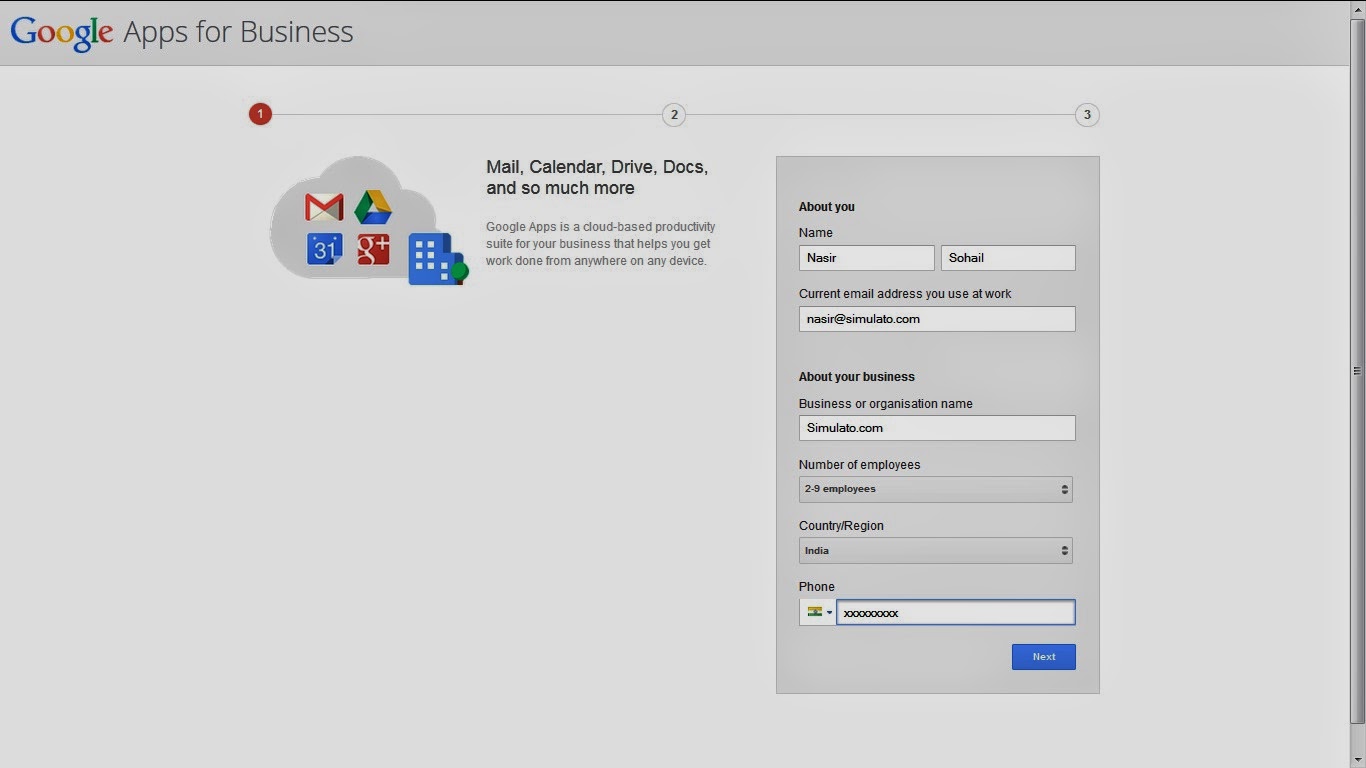
2. Click Get started and on the next page you will see a Form to fill up as shown in the picture below, so Fill up the Form and Click Next.
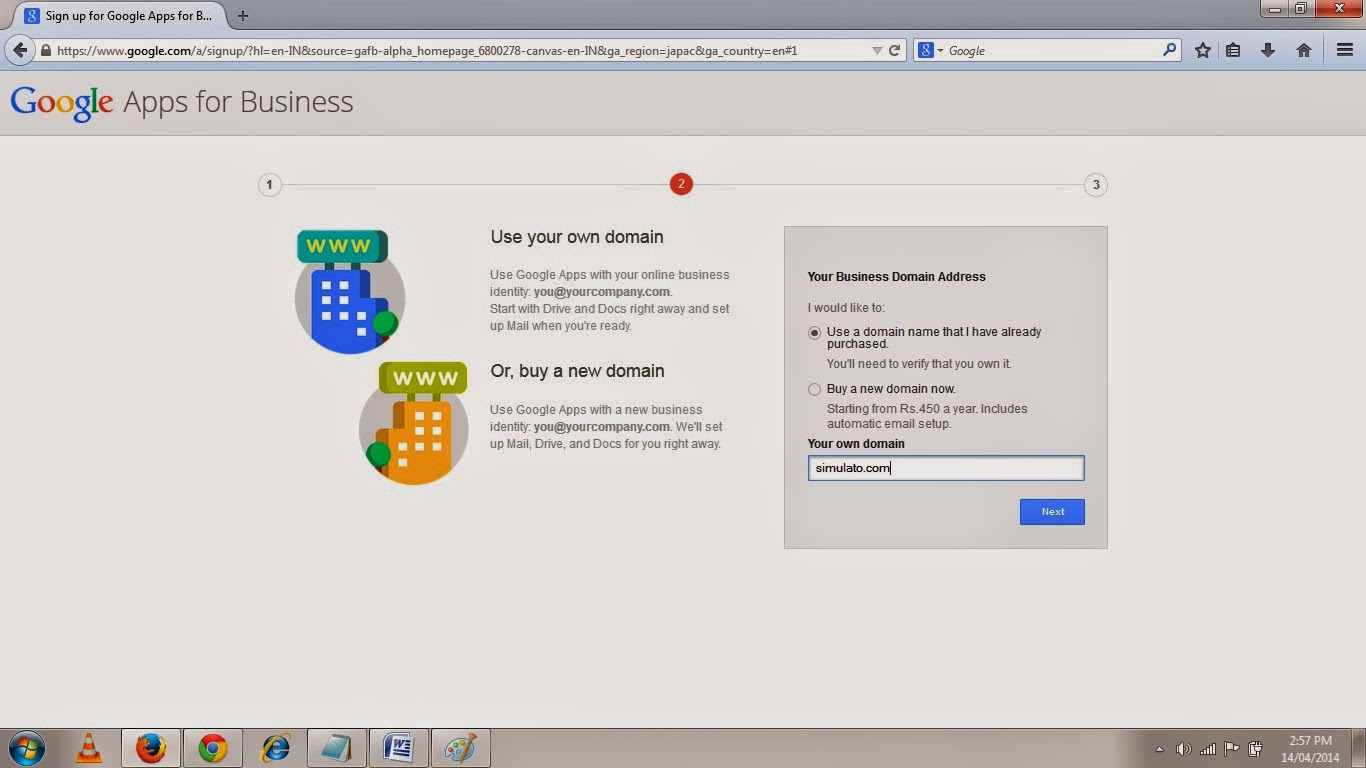
3. In the next page you will be asked about your business Domain Address.Select the option use a Domain Name that I have already purchased and then type in the Domain name and then click next.
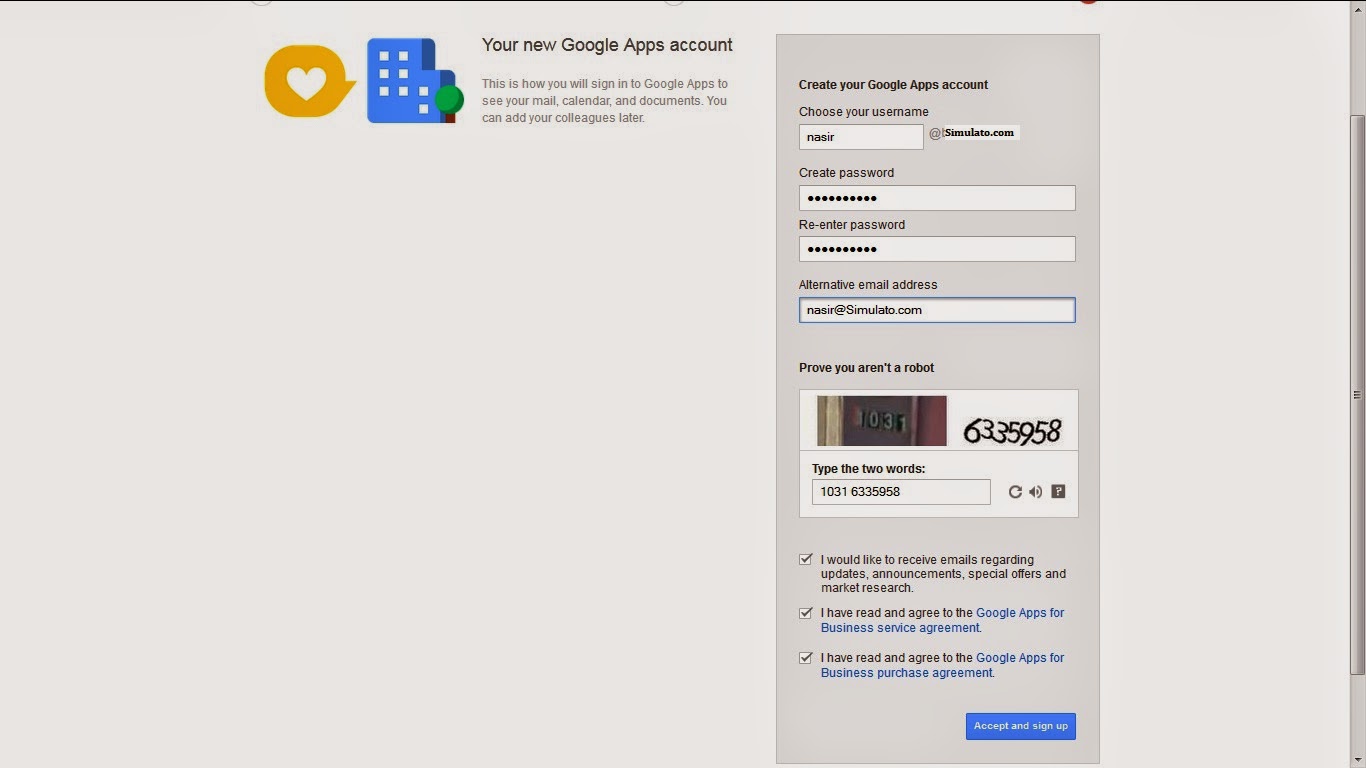
4. In the next page you will be asked to create your Google Apps Account Which will be your Admin account that you will use to sign in to Google Apps to see your mail, calendar, and documents. You can add your colleagues later.So Fill in the form as shown in the Picture below and Click Accept and Sign Up.
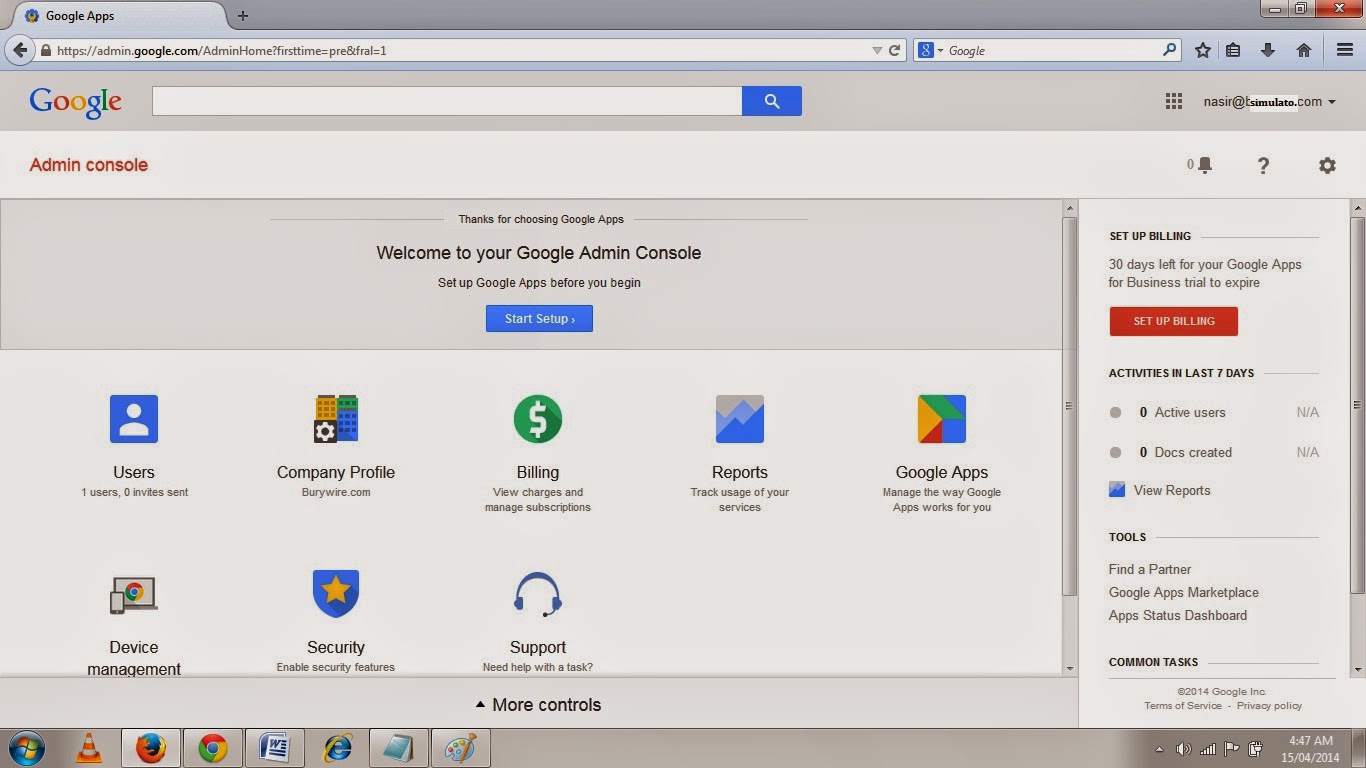
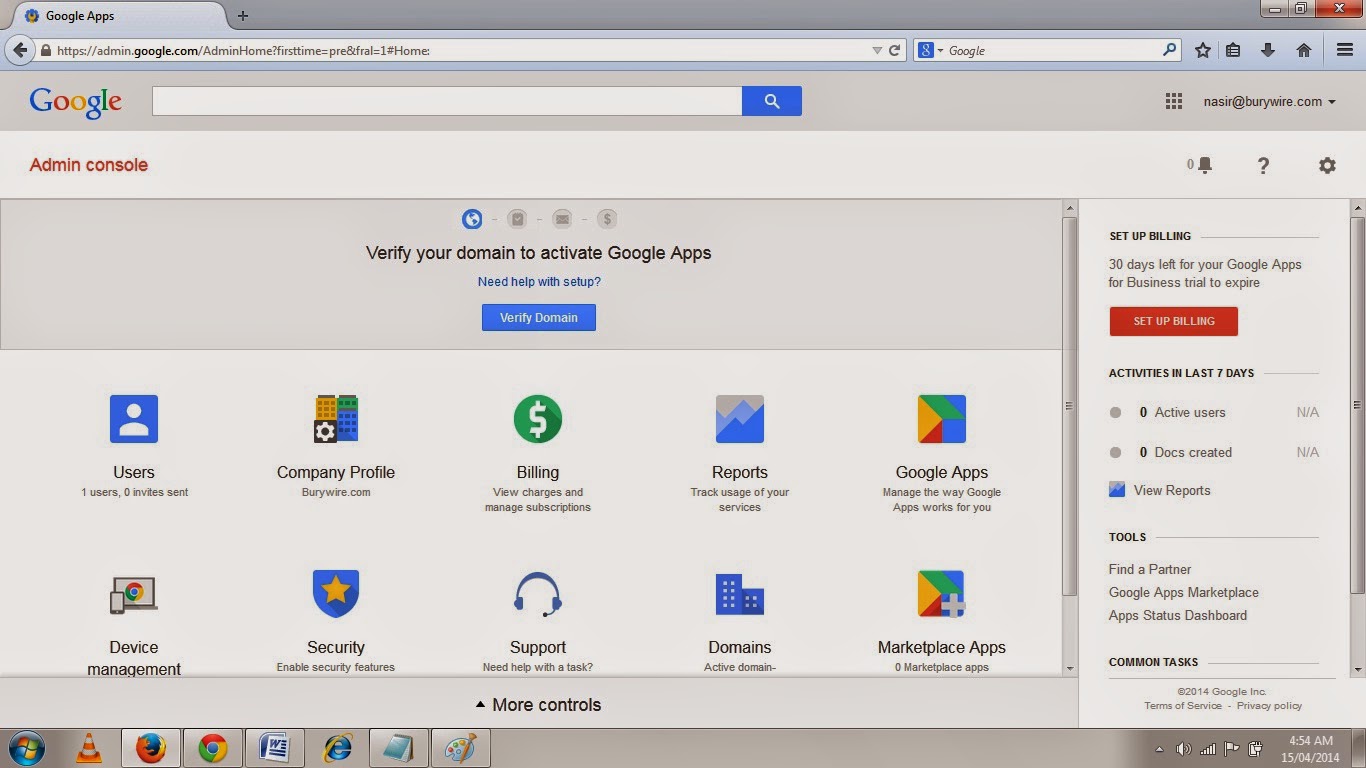
5. After you have accepted and signed up you will reach to your Dashboard.Where you have to first click on the Start Setup button and then the first thing you have to do is Verify your domain to let Google know that you own this domain.
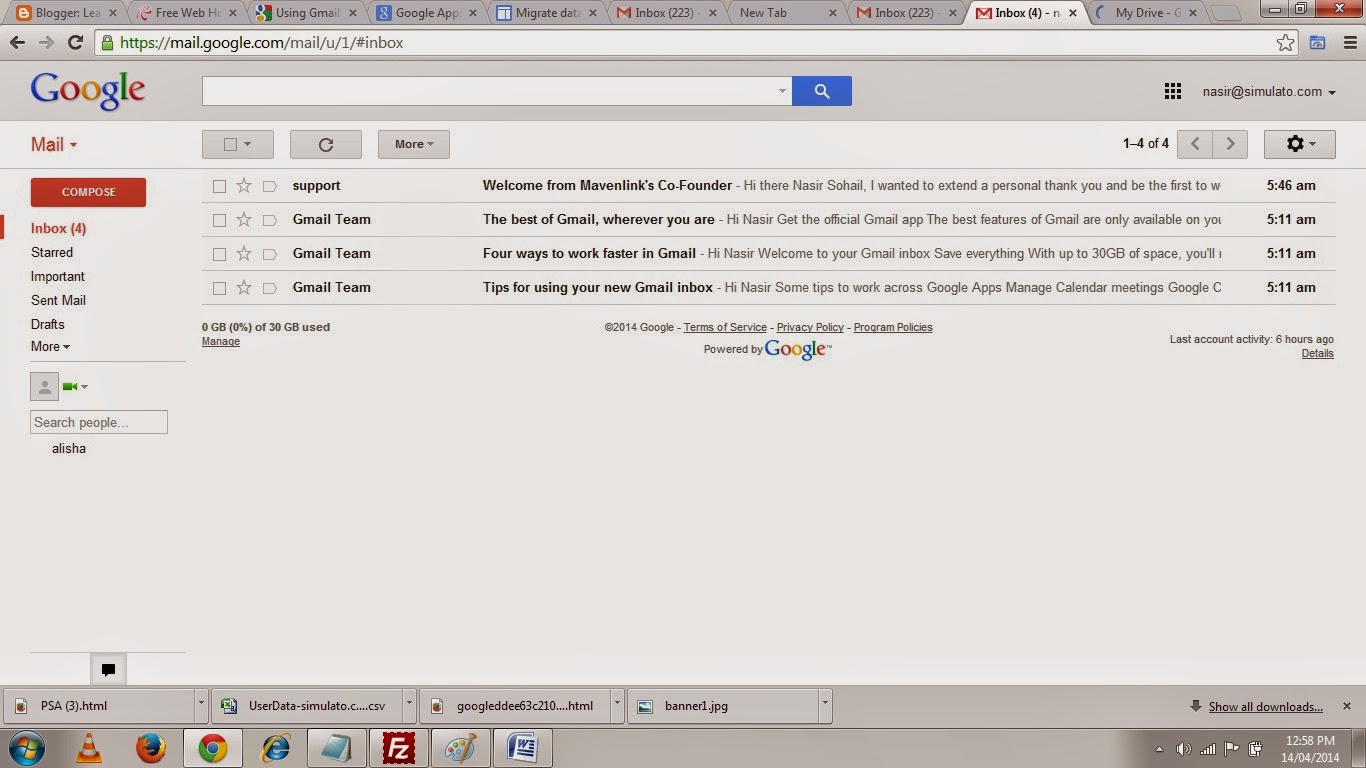
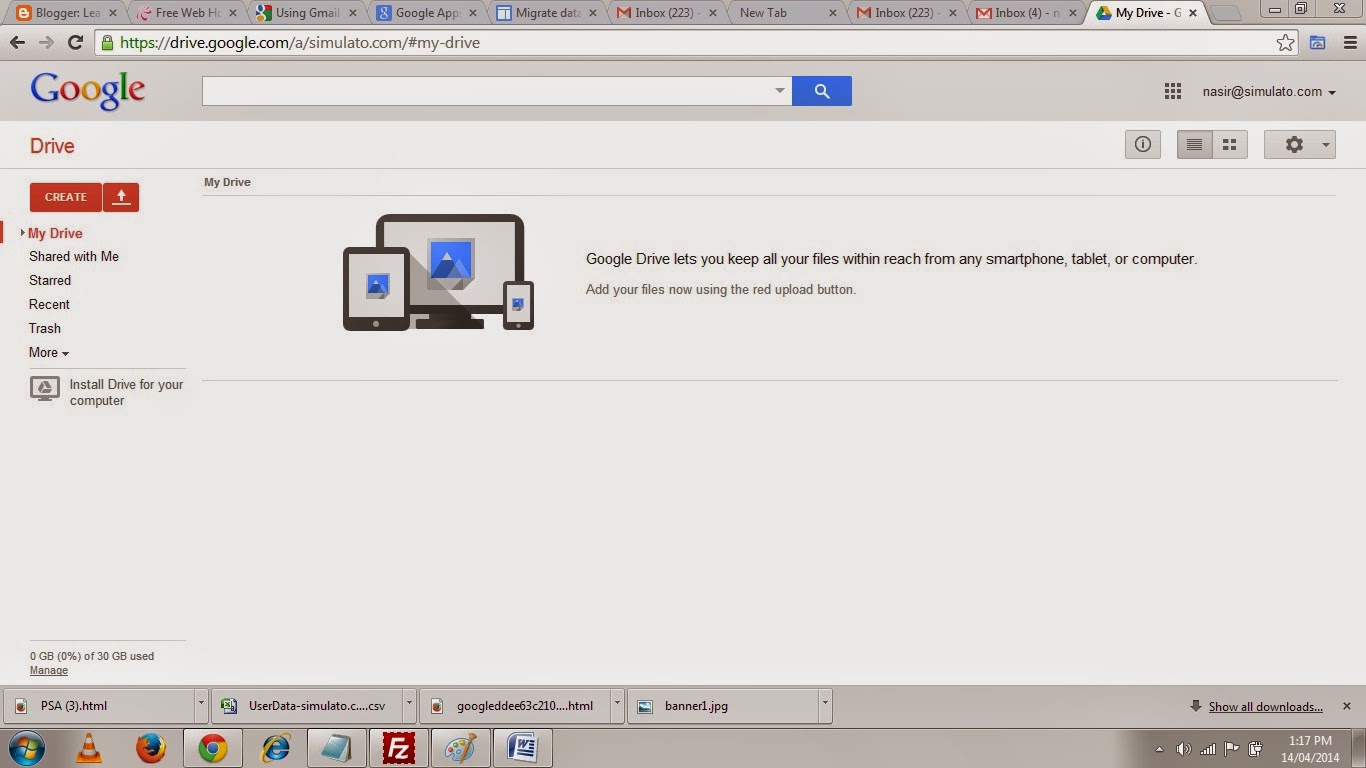
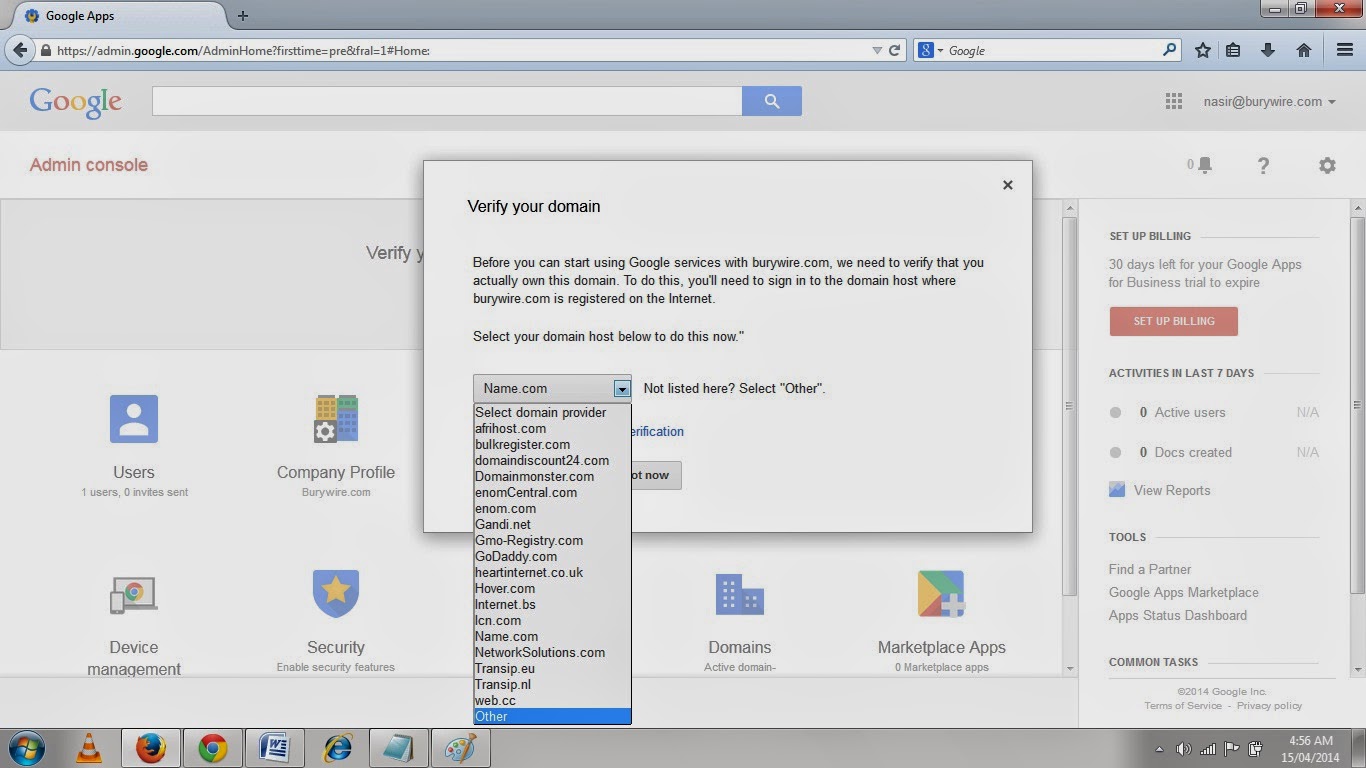
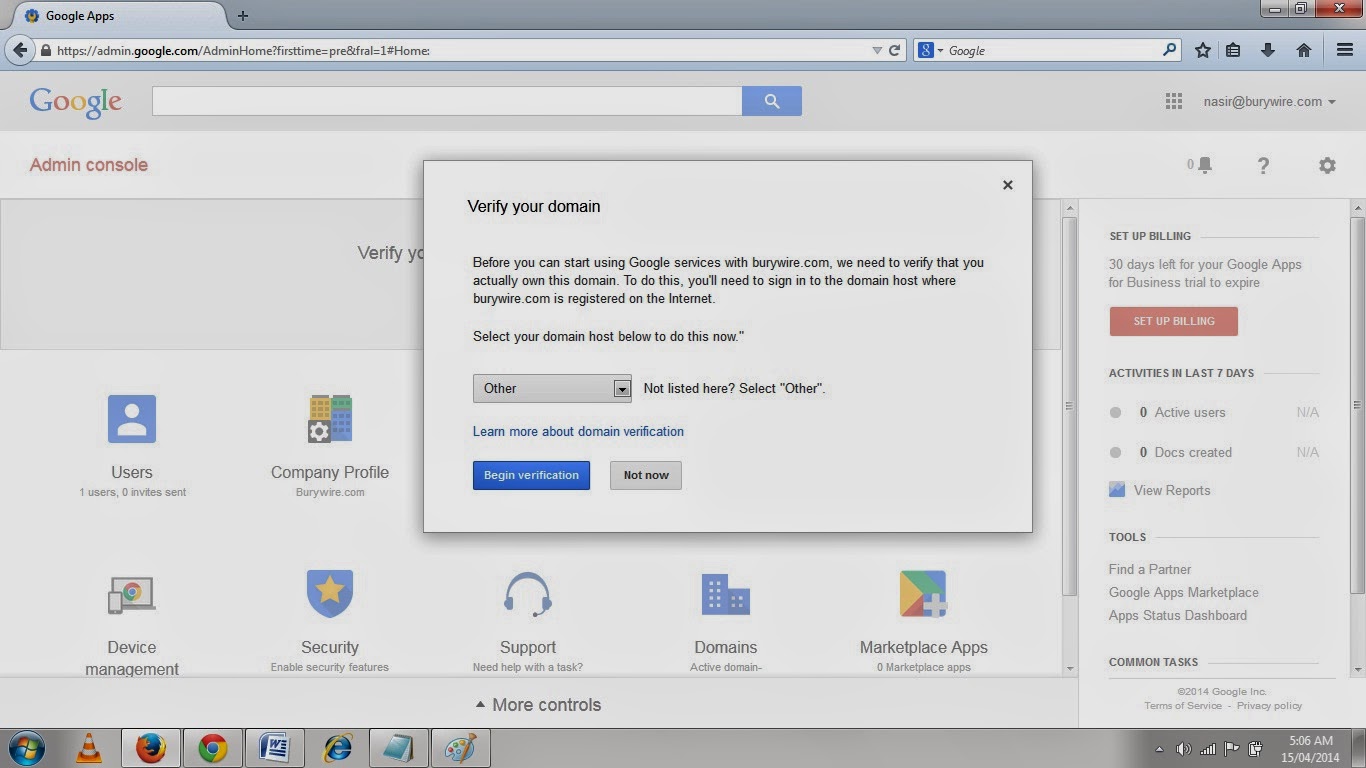
6. Click on Verify domain and then select the domain Registrar where to got your domain registered in my case it was Namecheap.com so I selected Other in the first list and then click Begin Verification, Then it showed me another larger list of all available famous registrar so select Namecheap here.
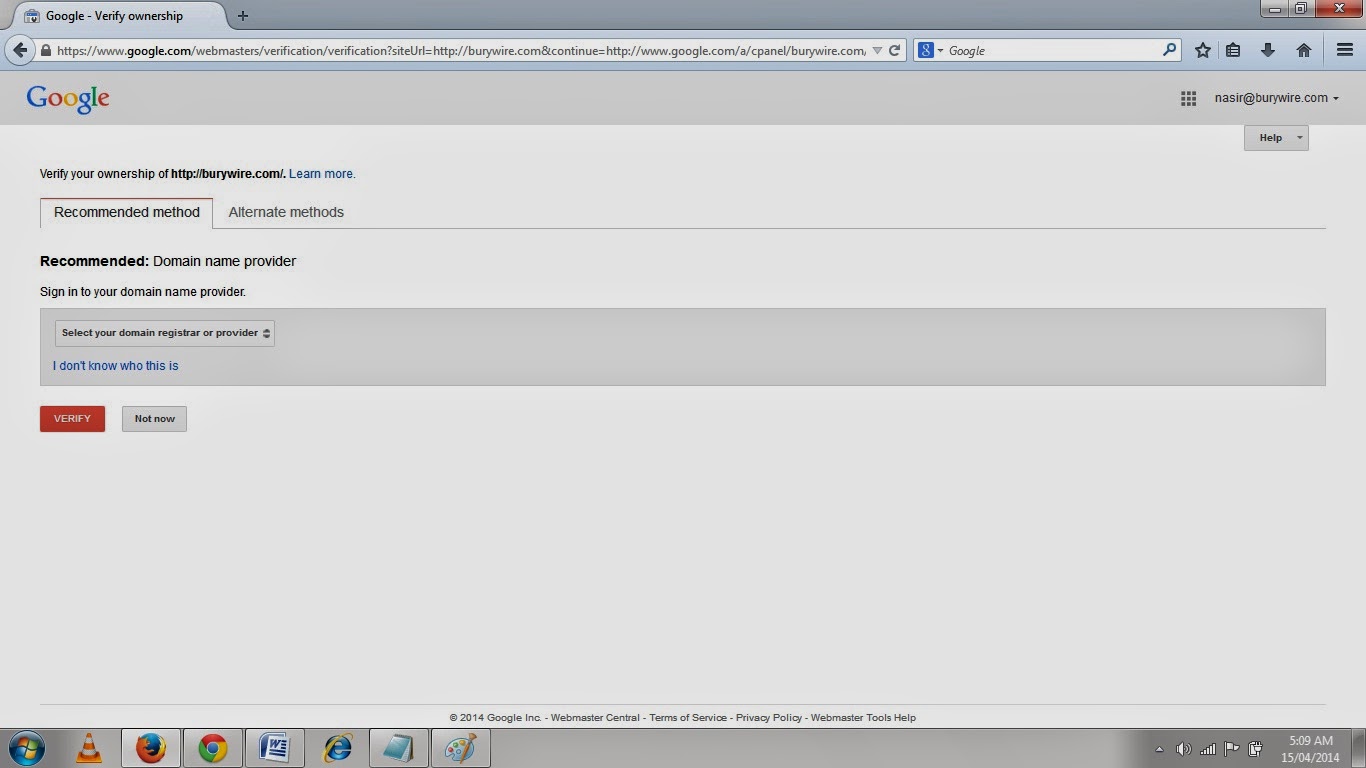
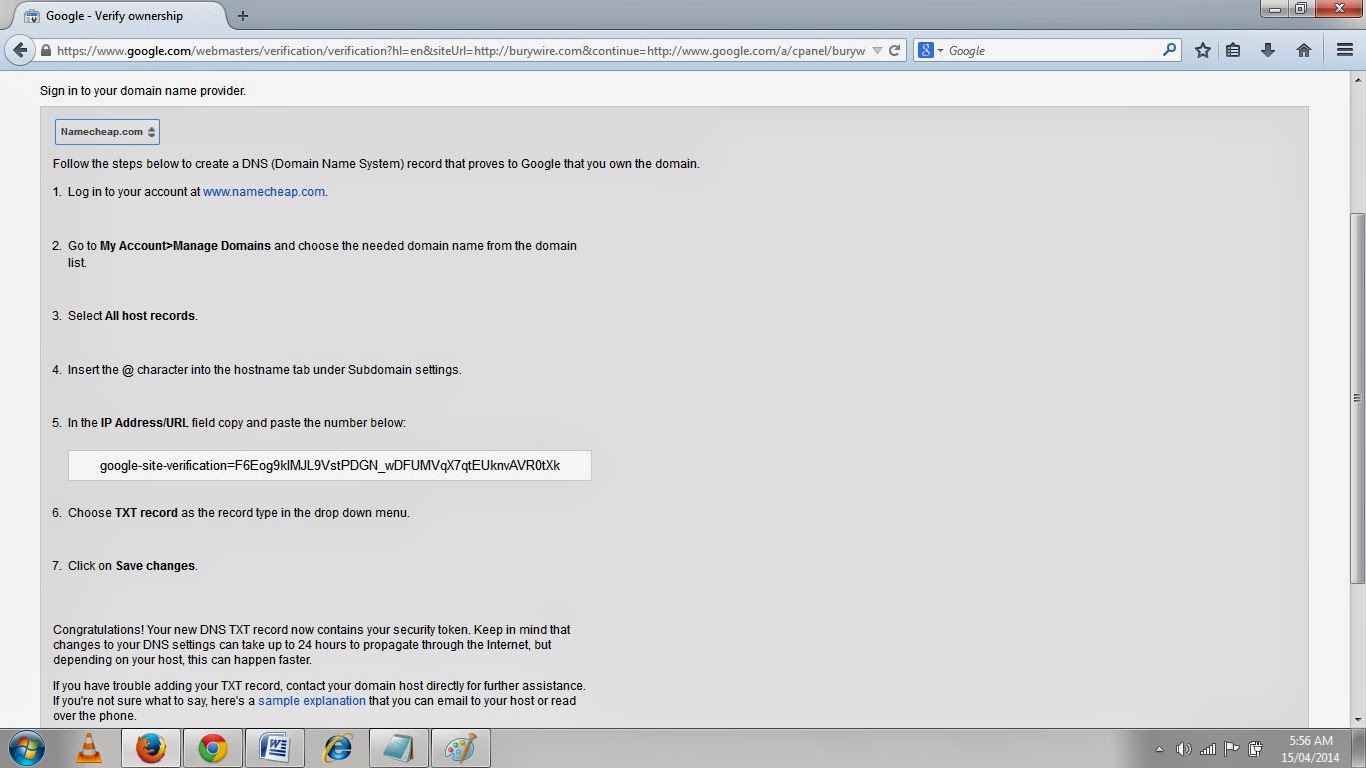
7. Now in the next page as shown in the Pic-9(m) if you can find your Domain Registrar select that or just select Other again.Now If your Domain Registrar is available it will show you couple of options to verify your domain either by adding a meta tag to the head tag of the home page or just creating an MX records or by adding a TXT records or a CNAME records, but the option to edit records will only be available when you have hosted your site with your domain Registrar.If you have hosted your website to a different hosting service provider then you have to go to your hosting service provider and probably change the MX( mail exchange) records to host your mailing solution to somewhere else after you have verified your domain to Google.
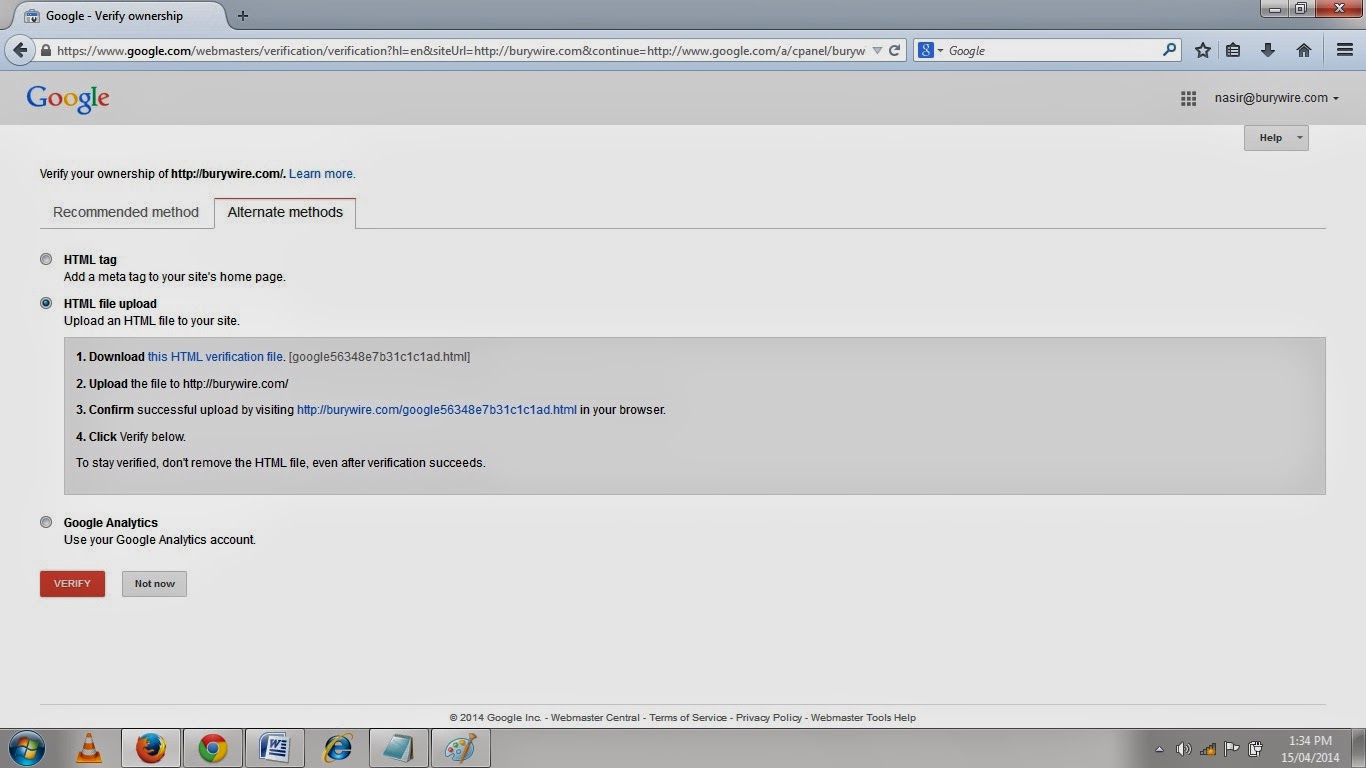
8. You can also select the Alternate Method by clicking on the alternate method tab to verify the ownership of this domain wherein you have to either put a Meta tag or just upload a file to your website as shown below in the picture- 9(o) and access that file and your are done.
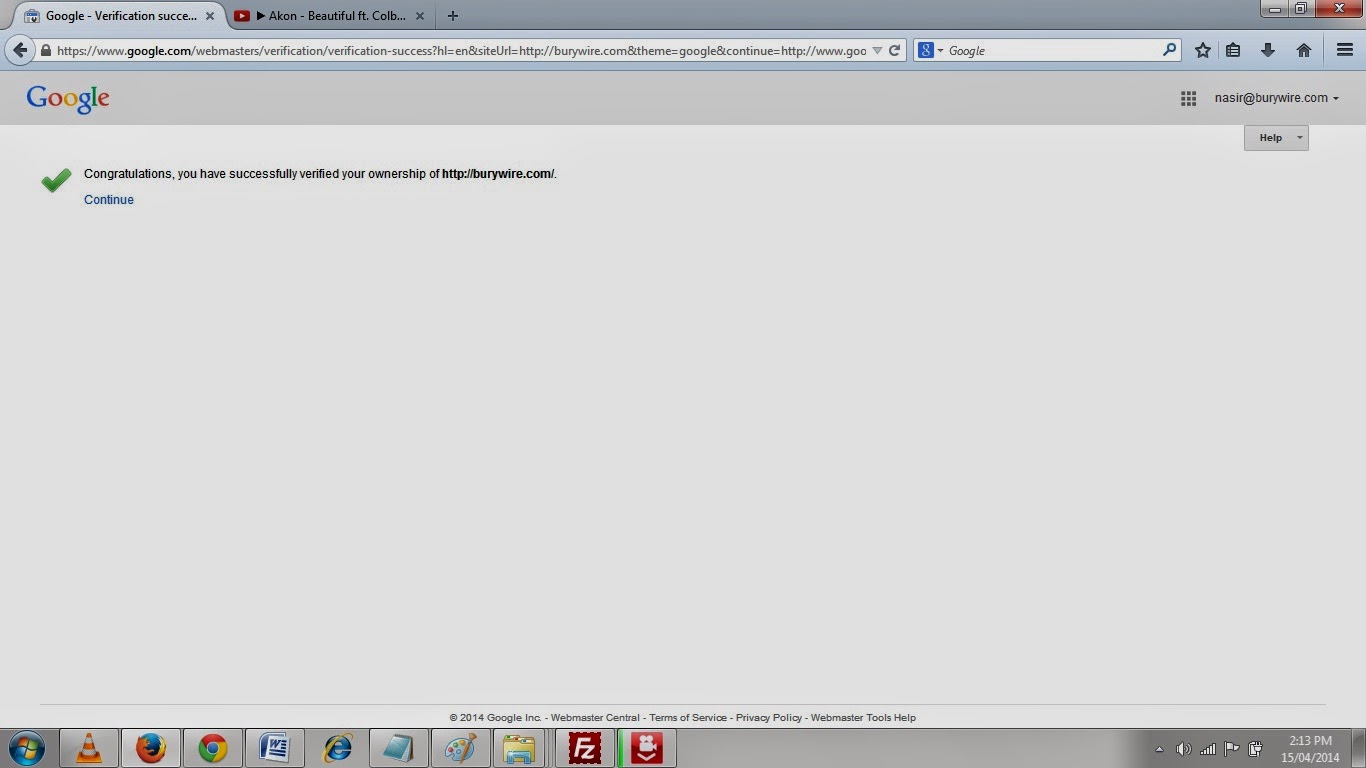
9. So I downloaded the file as shown in the picture-9(o) and then accessed the files in my browser by clicking on the link shown in the line 3. in pic-9(o).And once you have accessed the file click on Verify tab and you will see the message congratulations you have successfully verified the ownership of your Domain.
10. Click continue and You will be asked to login again.So login and then add all the user and their email addresses before you setup the Email with Google.So by now you have verified the ownership of the domain to Google and now Google will tell you what that Mail Exchange record ( MX Record ) is which you have to change for your existing hosting service provider.
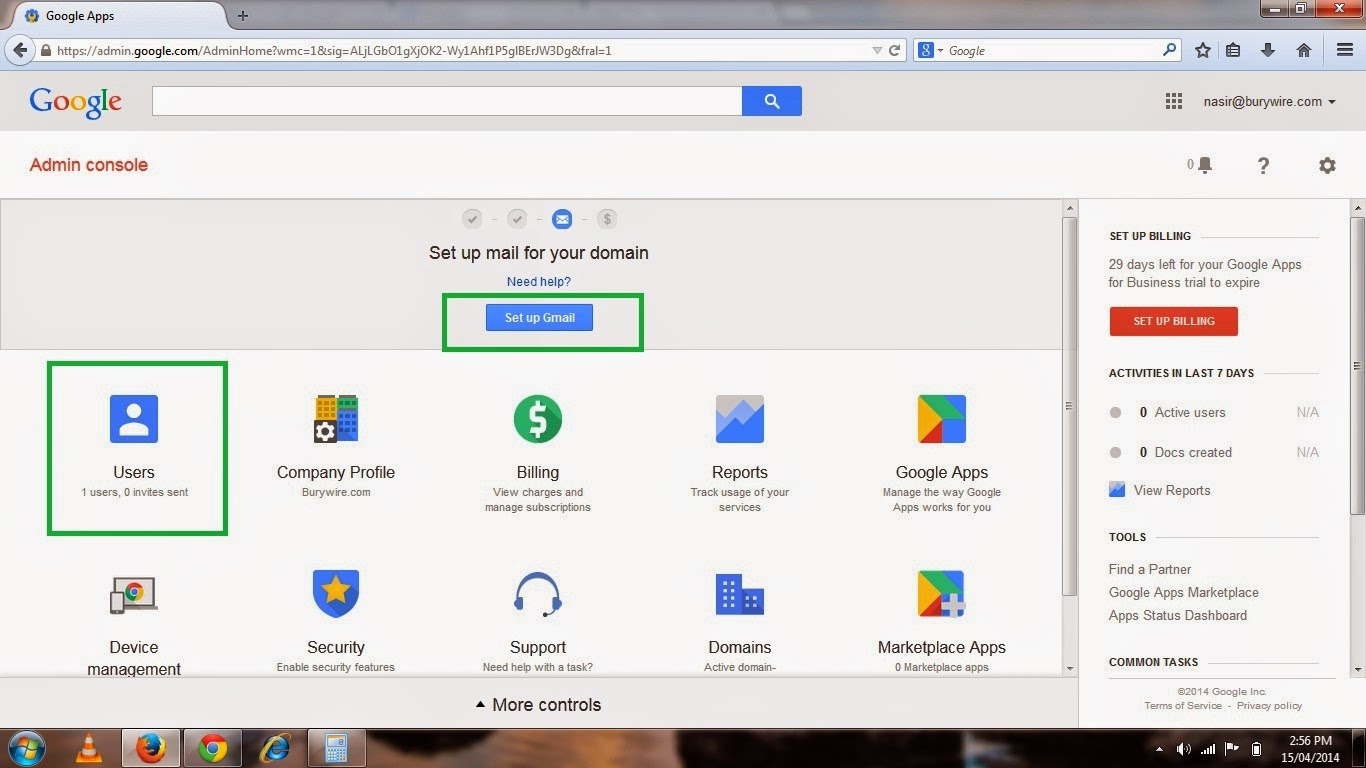
11. After you have logged in again you will see the option to set up Gmail for you organization at the top as shown in the picture-9(q) below.
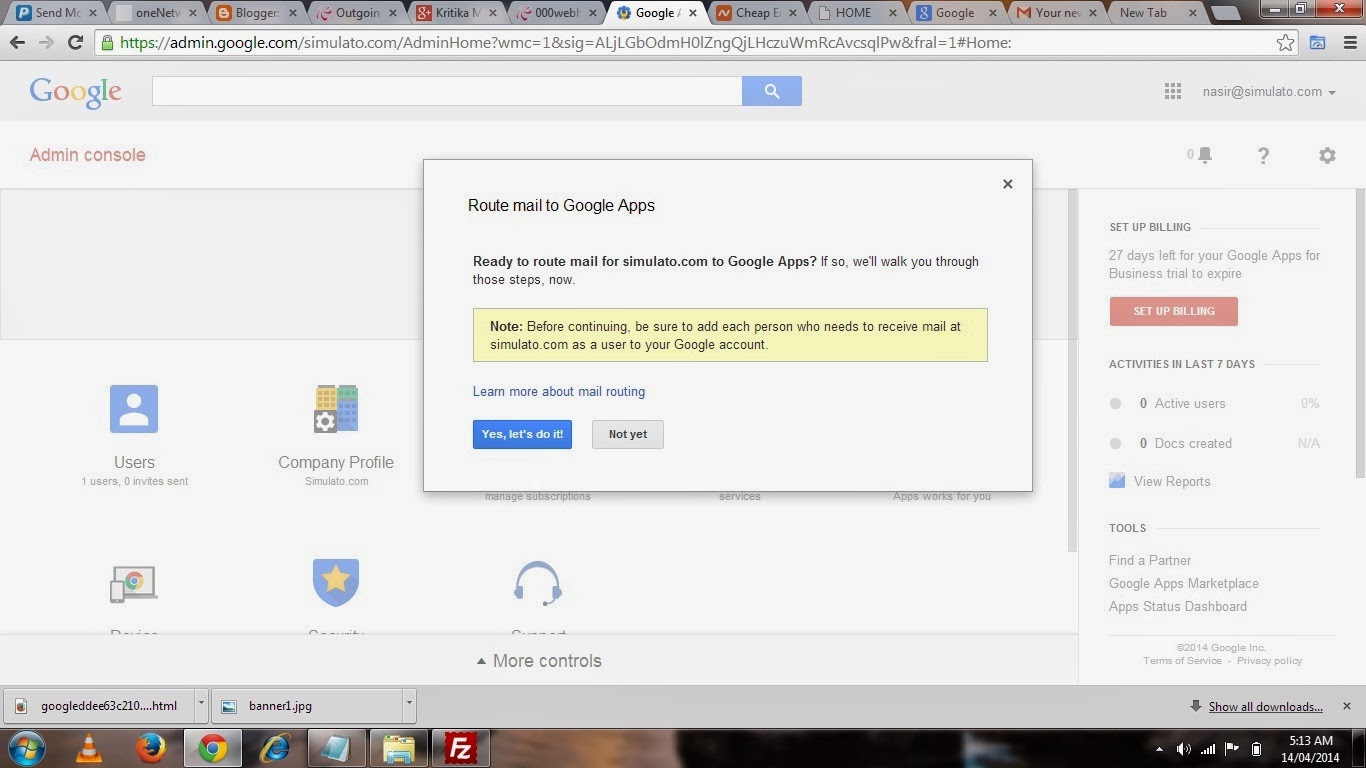
12. Click on the button Set Up Gmail and then it will show you the message as shown in the picture-9(R) so make sure you have added all the user with their Email address and then click "Yes, Lets do it!".
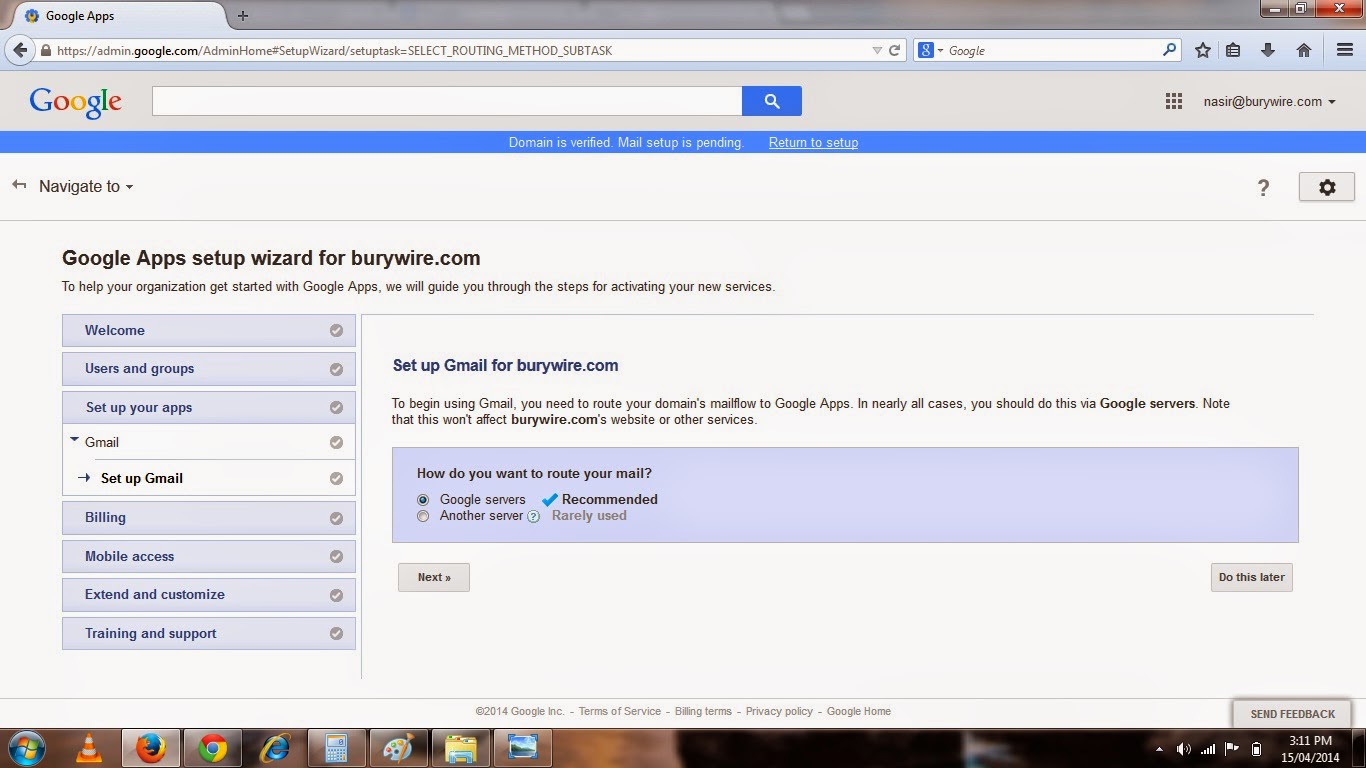
13. No in the next page as shown in the Pic-9(s) Set up Gmail for Burywire.com ( which is my other domain) select Google Servers to route your Email to and then click Next.
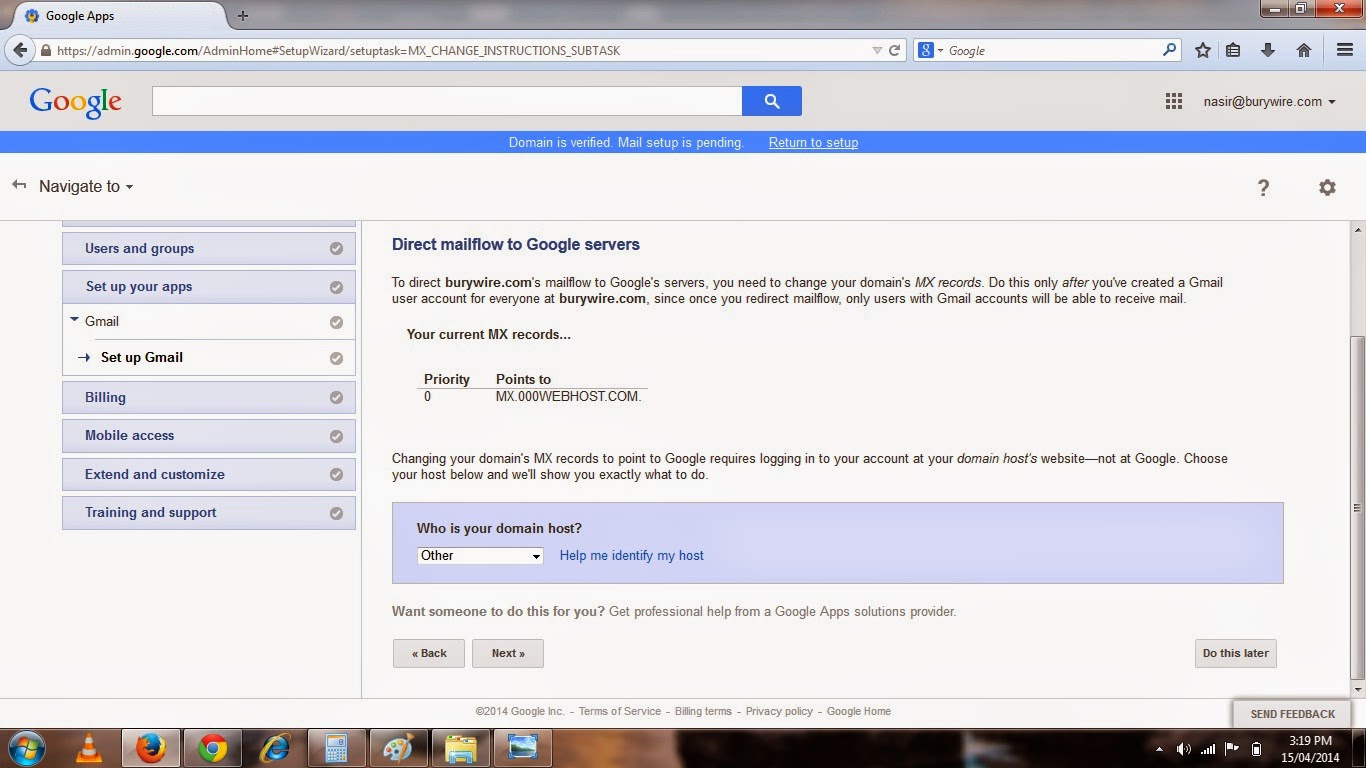
14. Click on the next and the Next page will show you the existing MX records for your Email server.Which is MX.000WEBHOST.COM, and this is what you have to change to Google s MX records.
15. Now select the Domain host from the Drop Down list if it is available in the list otherwise select Other and click next.
Alrighty!! So we are good to go now and enjoy the Feature and services of Google and move freely, Manage Nicely and stay connected to you friends on Google+ .
And other good thing is that after you have set up Gmail for your business you can go ahead and make changes in your Email clients like Microsoft Outlook or Mac Mail and use Incoming and Outgoing Mail server of Gmail which are POP.GMAIL.COM and SMTP.GMAIL.COM respectively.
Now before I wrap up here is a quick learning guide from Google that will help you understand Google App a little deeper.
Note:- Please feel free to contact me in case you have any doubt or concern.Write a mail to nasir@simulato.com or leave a comment.Any suggestion to improve the contents will be highly appreciated.
Today I am going to write a very interesting topic which would be very helpful for a small business people who uses their business email only in their office and has limitation.After reading this article they could change the way they manage their email and use it freely from anywhere with great features of Gmail, Google Talk, Hangouts, Contacts, Task, Lookup( Look all the addresses in your company), Google Docs and Google Drive.
I have a domain name registered as Simulato.com where for my business Email I used to Login from a designated computer which has the Microsoft outlook configured or if I Have to login from a different place I had to login to My Web hosting provider and from there I could Login to my Web Mail and that did not have all the great features available as Gmail provides.So I took this decision to Host my Email Services to Google and now I login to my Email ( info@simulato.com ) from Gmail as a Google account and save my documents in Google Drive with all the Gmail Features like Google Talk and Hangouts.And I am always connected because I have also configured my business Email on my Android Phone.
 |
| Pic-9(a) |
 |
| Pic-9(b) |
 |
| Pic-9(c) |
 |
| Pic-9(d) |
Steps to host your Email on Google.
1. Log on to Google Apps for Business by Clicking here.
 |
| Pic-9(e) |
 |
| Pic-9(f) |
 |
| Pic-9(g) |
 |
| Pic-9(h) |
 |
| Pic-9(i) |
 |
| Pic-9(j) |
 |
| Pic-9(k) |
 |
| Pic-9(L) |
 |
| Pic-9(m) |
8. You can also select the Alternate Method by clicking on the alternate method tab to verify the ownership of this domain wherein you have to either put a Meta tag or just upload a file to your website as shown below in the picture- 9(o) and access that file and your are done.
 |
| Pic-9(n) |
 |
| Pic-9(o) |
 |
| Pic-9(p) |
11. After you have logged in again you will see the option to set up Gmail for you organization at the top as shown in the picture-9(q) below.
 |
| Pic-9(q) |
 |
| Pic-9(r) |
 |
| Pic-9(s) |
 |
| Pic-9(t) |
 |
| Pic-9(u) |
 |
| Pic-9(v) |
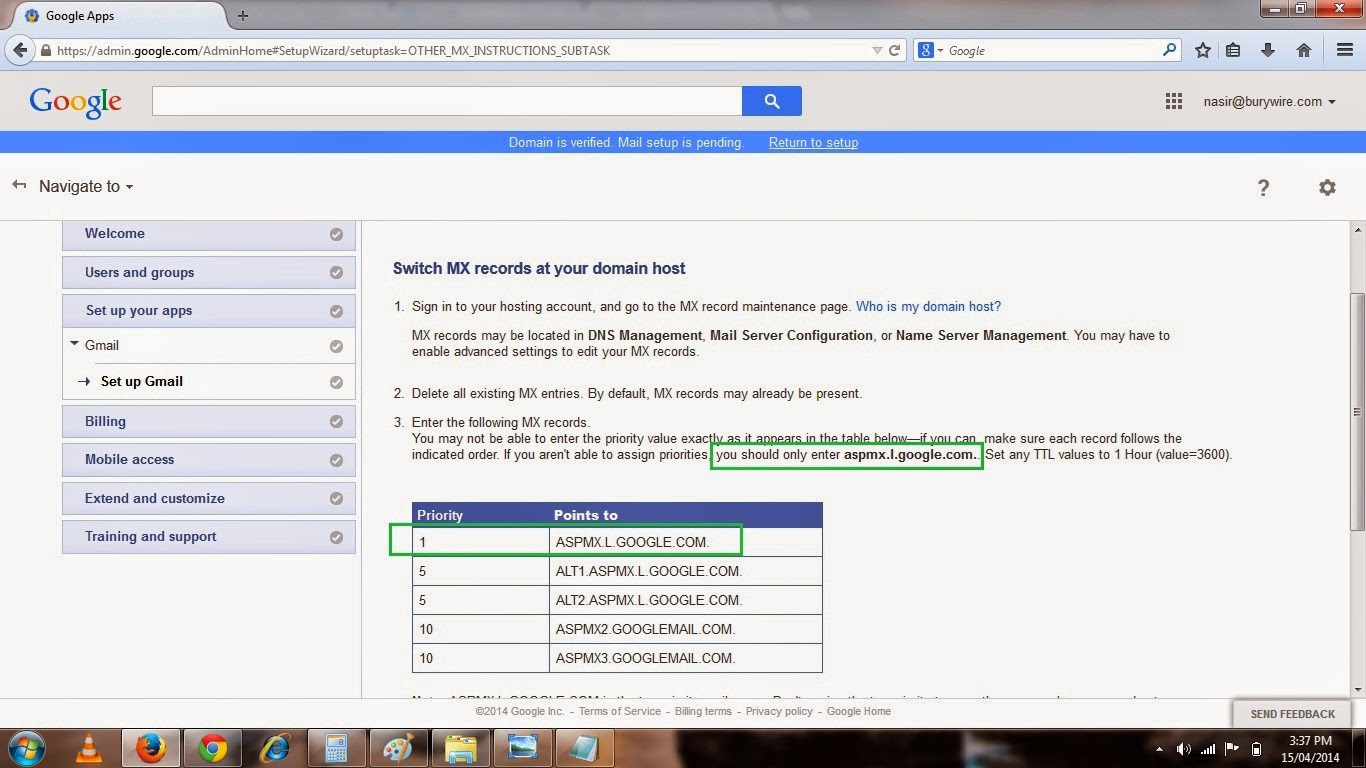
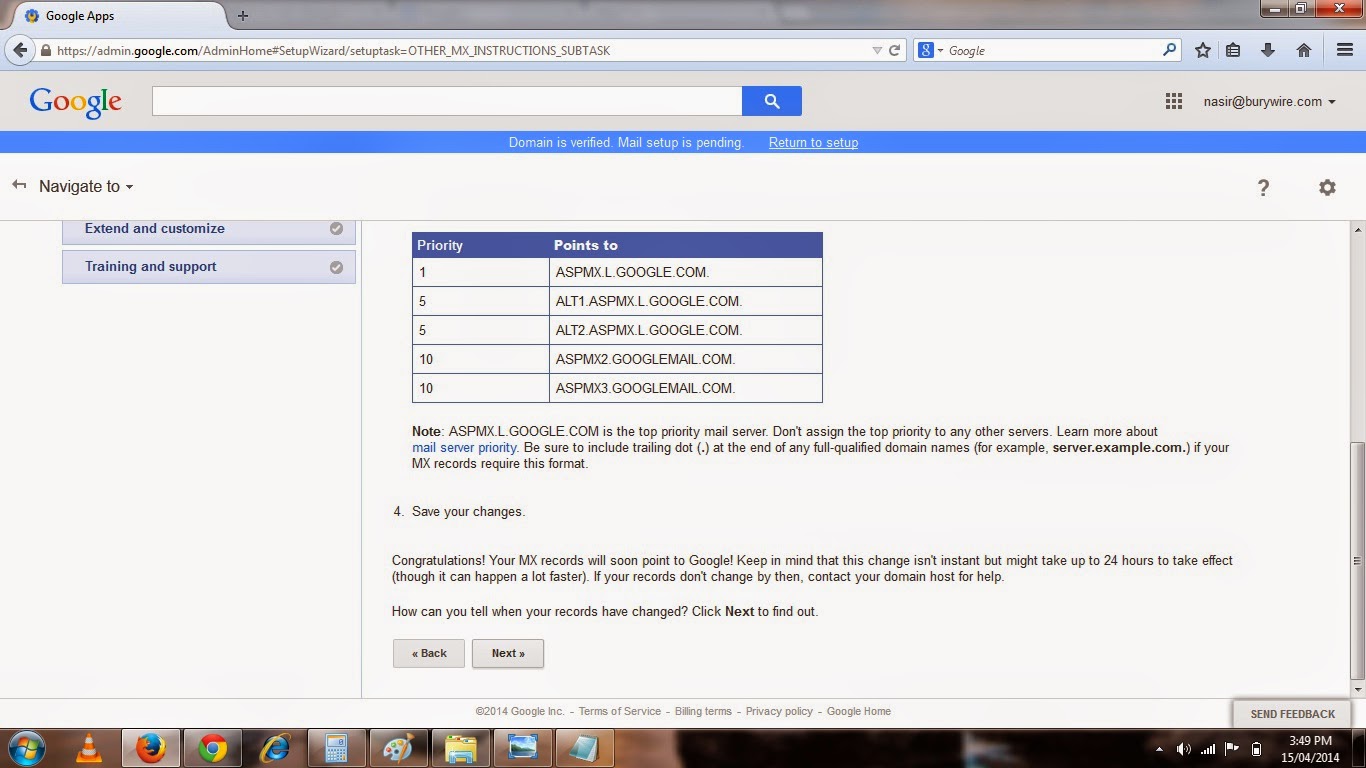
16. Now I would also recommend you to keep reading on each page you see during setup for more information. Now in the page shown above in the Pic-9(v) , I am gonna copy the first Email server address "ASPMX.L.GOOGLE.COM" and set this up as the MX record on my web host provider which is 000webhost.com.
17. So I logged into the control panel of my hosting provider and then clicked on Modify MX Record as shown in the Pic-9(w).
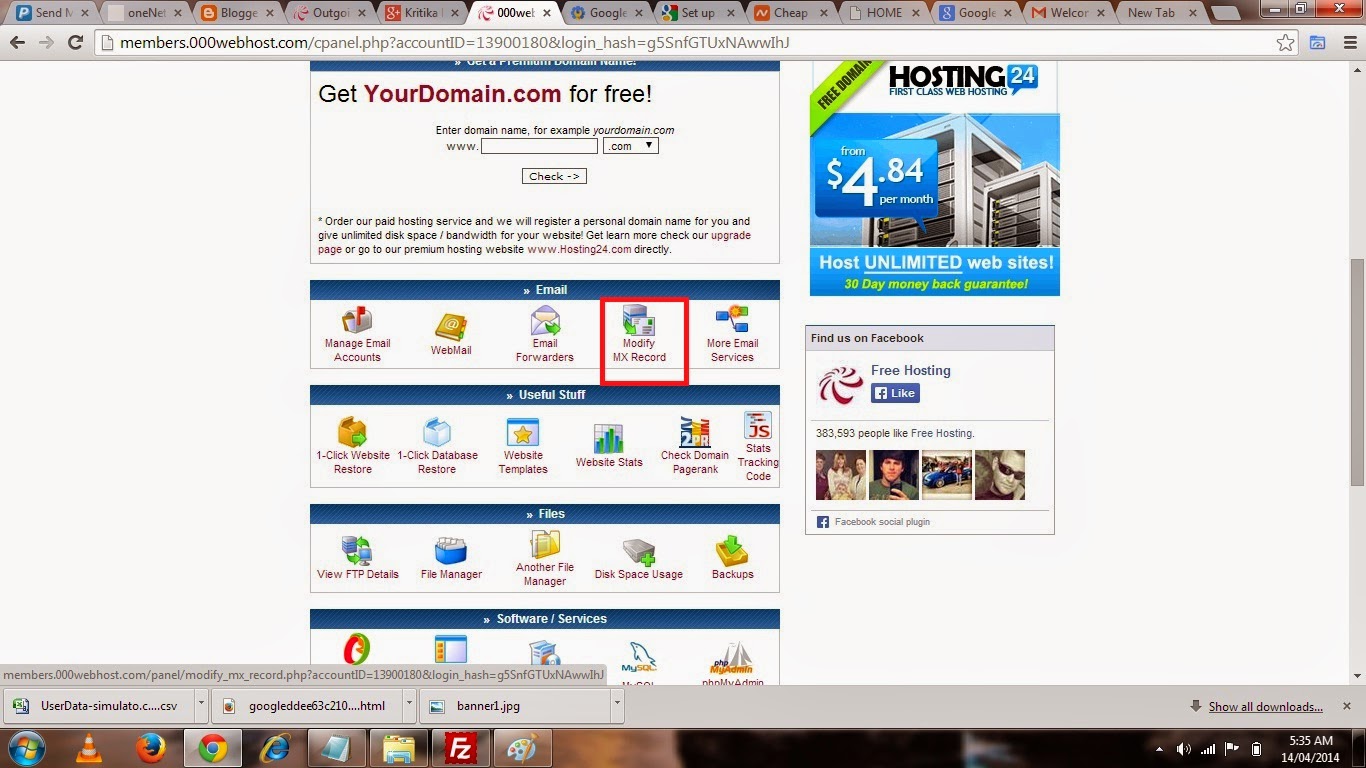 |
| Pic-9(w) |
18. Now in the next page, paste or type the Mail server of Google as shown in the picture-9(x).
19. Click on update and come back to Google Apps page and click on Next.And you are set.Now go to Gmail.com and login with your business Email Id and Password.The Administrator will give the password for all the other user to login to Gmail from their business email ID.
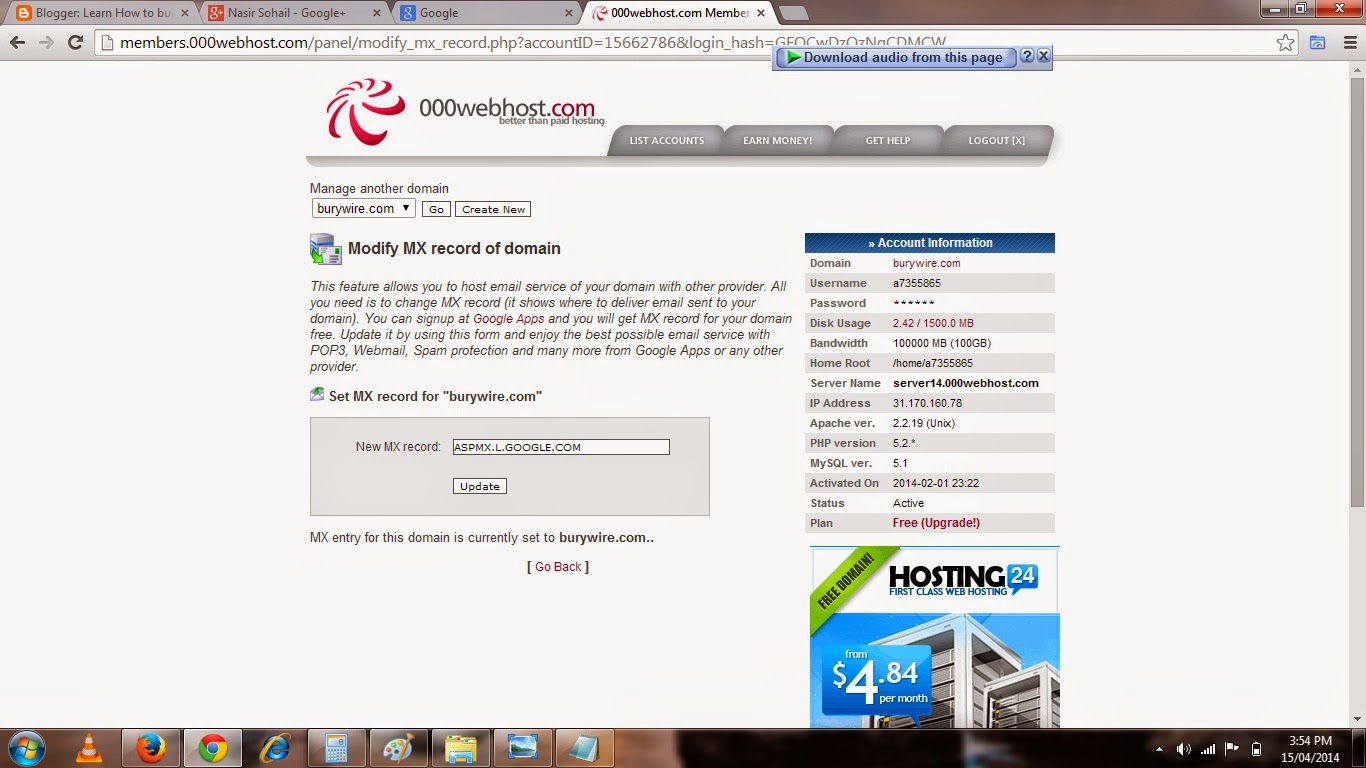 |
| Pic-9(x) |
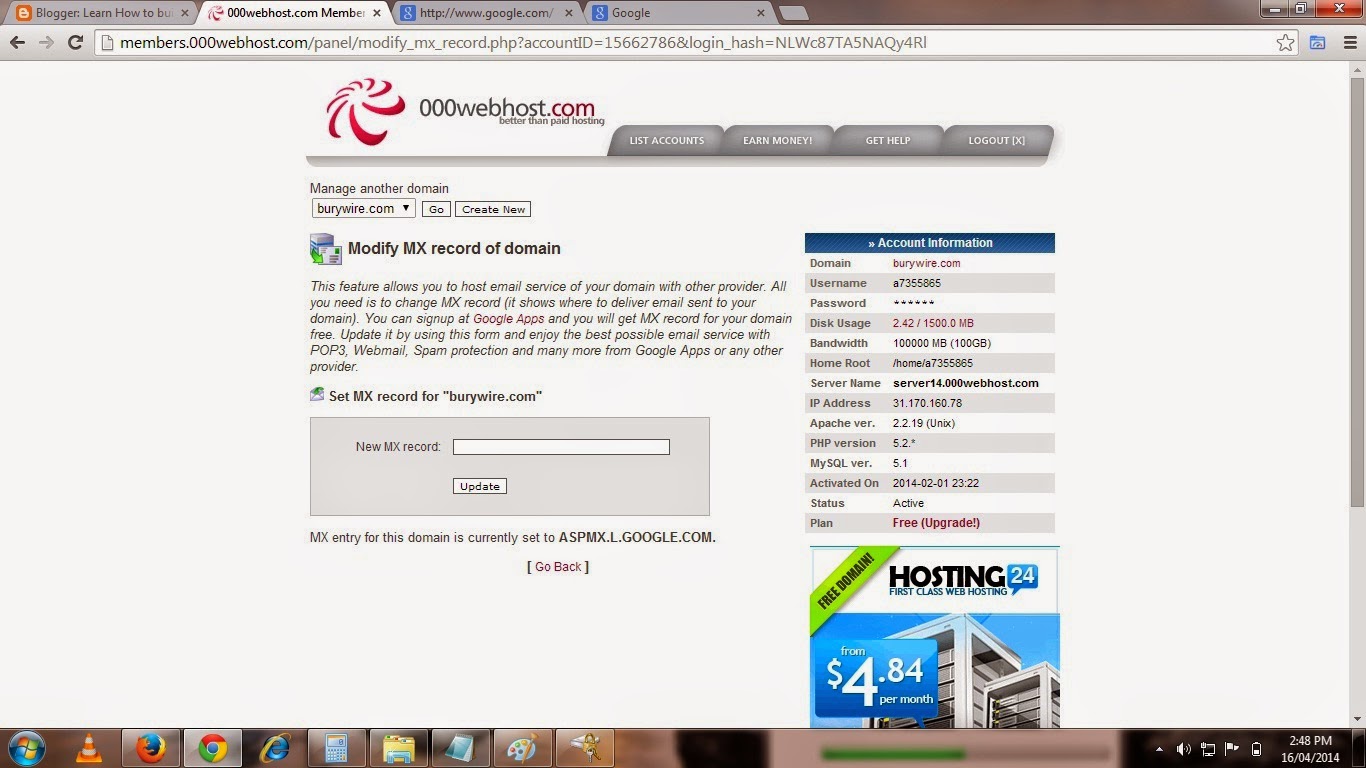 |
| Pic-9(y) |
Alrighty!! So we are good to go now and enjoy the Feature and services of Google and move freely, Manage Nicely and stay connected to you friends on Google+ .
And other good thing is that after you have set up Gmail for your business you can go ahead and make changes in your Email clients like Microsoft Outlook or Mac Mail and use Incoming and Outgoing Mail server of Gmail which are POP.GMAIL.COM and SMTP.GMAIL.COM respectively.
Now before I wrap up here is a quick learning guide from Google that will help you understand Google App a little deeper.
Using Gmail with Google Apps
Using Gmail with Google Apps is a lot like using it with your personal Gmail account, but with added enhancements for working in a company or other organization.
Using Gmail with Google Apps now? Get Gmail help for businsess users at the Google Apps learning center.
Whats different about Google Apps Gmail
- Business email address. Google Apps lets you have an email address at your own domain—with the format name@your_domain.com—rather than name@gmail.com.
- More than just email. Google Apps is more than just Gmail for your organization. It includes a suite of web-based productivity and collaboration tools that include online documents, calendars, video chat, and much more.
- Different editions. There are different versions of Google Apps, such as for businesses, schools, or government organizations, each of which might have different features and capabilities. Learn more
- Administrative controls. With Google Apps, you can have an administrator manage and control peoples email accounts across your domain, from a central Admin panel.
Using Gmail at work or school
- Gmail Send and receive mail. Watch video
- Google Calendar View and add calendar events. Learn more
- Google Talk Send instant messages.
- Googe Docs View and edit docs! Watch video
- Contacts Manage and get in touch with your contacts.
- Tasks Add and check off tasks. Watch video
- Lookup Quickly look up contacts at your domain
Note:- Please feel free to contact me in case you have any doubt or concern.Write a mail to nasir@simulato.com or leave a comment.Any suggestion to improve the contents will be highly appreciated.
Go to link Download
Subscribe to:
Posts (Atom)