Showing posts with label items. Show all posts
Showing posts with label items. Show all posts
Tuesday, January 31, 2017
How to Delete and Clear Recent Items in Windows 7 Jump Lists
How to Delete and Clear Recent Items in Windows 7 Jump Lists
BEST GREENHOUSES FOR GROOVING VEGETABLES
? ? 1(360)241-1624 ?

? ? 360organic.us ?
DURABLE! AFFORDABLE! ALUMINUM + UV POLYCARBONATE
Windows 7 has a new feature called Jump list which provides an easy access to various functions or features related to the programs directly on the applications’ icons or buttons on the Taskbar. Jump Lists, which is popping up and displayed whenever user right clicks on an icon or button on Taskbar, also shows recent items that opened or closed by the app, or frequently used or most visited items by the program. While the recent items that appear on the JumpLists allows user to quickly re-open the files, these access information may be deemed private and sensitive to some users. Windows 7 provides an easy way to delete and remove the recent item from the Jump Lists: .On the Jump Lists, right-click a recent item, and then click on the Remove from this list option.
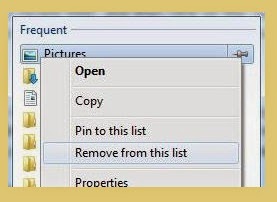
The item will be removed from the Jump Lists. However, the method will only allow removal of recent or frequent items one by one, which may be time consuming for applications that has bigger number of recent items on Jump Lists.
Windows 7 does have a hidden trick that allows user to clear and remove all recent items or frequently used items on Jump Lists at once. Follows the steps below to clear all recent or frequently opened entries history in Jump Lists.
Run Windows Explorer.
In the address bar, enter (or copy and paste) the following file location:
%AppData%MicrosoftWindowsRecentAutomaticDestinations
In the address bar, enter (or copy and paste) the following file location:
%AppData%MicrosoftWindowsRecentAutomaticDestinations
Windows Explorer will open %AppData%MicrosoftWindowsRecent Items folder, but the folder content is the listing of only automaticDestination-ms files. The files store the information of recent items to display on the Jump Lists.
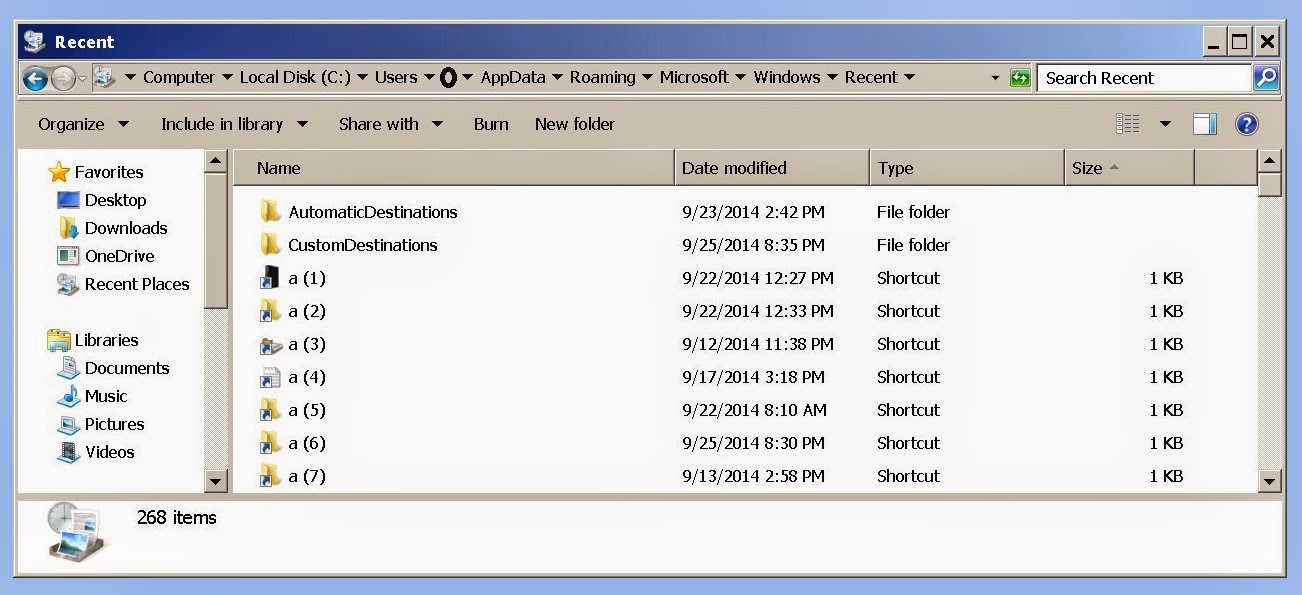
As the file name is not easily interpreted, so it’s not easy to identify which automaticDestination-ms file belongs to Jump Lists of which program from the file name itself. User can search for the item name on the Jump List inside the file content though, although there may be quite a few files to check, making the move unrealistic.
So the trick is only useful if user decides to remove and clear or clean all recent items of all programs’ Jump Lists. To remove the history, just delete the files.
Tip: The process can be automated via a batch command script, or using Task Scheduler to execute on interval, upon Windows shutdown or upon Windows startup by using the following command:
del %AppData%MicrosoftWindowsRecentAutomaticDestinations*
===================================================
Additional information
What is the difference between BIOS and CMOS?
What are the F1 through F12 keys?
How to use system recovery options in Windows?
Random black screen while playing games
How to Delete and Clear Recent Items in Windows 7 Jump Lists
How to enter the BIOS or CMOS setup
What is the difference between BIOS and CMOS?
What are the F1 through F12 keys?
Durable Greenhouses made from Polycarbonate UV Protected material and Aluminum

Durable Greenhouses made from Polycarbonate UV Protected material and Aluminum
ALSO PLEASE VISIT THIS VIDEOS AND SEE IF YOU FIND SOMETHING NEED:
Windows Registry Tools can be downloaded here:
How to kip your PC Private by deleting DATA Permanently
http://askpctech.blogspot.com/2016/03/kip-your-pc-privat.html
This tutorial is made up on request several users, is well is fallowing video:
1)How to Delete Paint Recent Pictures from List in Windows 7
2)Win 7– Fix for “Safely Remove Hardware and Eject Media” not working How To
3)Windows 10 How to Fix Black Screen After Booting
4)How To Remove Windows 10 Upgrade Notification On Windows 7 And Windows 8
5)How to Delete Face book Page Permanently - 2015
6)How to Uninstall Windows 10 and Downgrade to Windows 7 or 8.1
7)detected: not-a-virus:remoteadmin.win32
8)How to change pictures into icons for folders
9)Speed up your PC Disable System Restore on SSD
10)Speed up your PC Disable Scheduled De-fragmentation SSD
11)2015 Black screen of DEATH Windows 7 & 8 - with cursor at start-up SOLVED
12)Upon start up only wallpaper shows FIX
13)Here is video on Windows 7 & 8 - Black screen with cursor at start-up FIX
You can also open Task Manager by pressing Ctrl+Shift+Esc.
14) I bought a windows 7 PC but it Look alike old PC FIX:
15) Windows 7 & 8 - Black screen with cursor at start-up FIX:
16) How To Fix Minecraft OpenGL Error Windows 7 xp vista 720p :
17) removing bars using regscanner regedit & file shredder 720p:
18) How to Recover windows Explorer from error 2014 720p
19) HOW TO Save on battery online
20) Windows 7 & 8 - Black screen with cursor at start-up FIX
Upon start up only wallpaper shows no icons
CTL+ALT+DEL then click file and new task. then type explorer.exe and press ok
Best Greenhouse system 2015
Go to link Download

Thursday, December 29, 2016
How to Manage Taskbar Items in Windows
How to Manage Taskbar Items in Windows
There are so many options for managing taskbar items, which may include customizing notification area icons, showing or hiding system icons on notification area of taskbar and locking and unlocking the taskbar. You can also add or remove different types of toolbars on taskbar and can hide automatically. Here I have described these different ideas for managing taskbar items along with their steps.
You can select which icons and notifications appear on notification area of the taskbar by customizing notification area icons setting. You can show icons and notifications, hide icons and notifications or only show notifications about the changes or notifications. If you choose to hide icons and notifications, you wont be notified about changes or updates. You can view the hidden icons at any time by clicking on the arrow next to the notification area on the taskbar. If you have selected the option only show notifications, you will only notified on changes but icons are not shown.
You can change all of these setting from Notification Area Icons option located on Control Panel. Following are the steps to customize notification area icons on taskbar.
How to Customize Notification Area Icons
You can select which icons and notifications appear on notification area of the taskbar by customizing notification area icons setting. You can show icons and notifications, hide icons and notifications or only show notifications about the changes or notifications. If you choose to hide icons and notifications, you wont be notified about changes or updates. You can view the hidden icons at any time by clicking on the arrow next to the notification area on the taskbar. If you have selected the option only show notifications, you will only notified on changes but icons are not shown.
You can change all of these setting from Notification Area Icons option located on Control Panel. Following are the steps to customize notification area icons on taskbar.
- At first go to control panel and click on Notification Area Icons option. OR you can directly click on customize option after clicking on arrow icon on notification area of taskbar.
- On Notification Area Icons window, choose the behaviors of icons for specific icons based on whether you want to show or hide icons or notifications on the taskbar.


How to Turn System Icons On or Off on Notification Area
You can show or hide system icons on notification area by turning on or off system icons. Here are the steps for turning system icons on or off on notification area of taskbar.
- After opening Notification Area Icons window as mentioned above, click on the option "Turn system icons on or off".
- On system icons window, select the system icons behaviors on or off.

How to Lock/Unlock the Taskbar in Windows Desktop
If you unlock the taskbar, you can move it anywhere on left, right, top or bottom even can drag to increase its width.
To unlock the taskbar, go to taskbar, right click on it and unlock the taskbar option. You can also lock it by clicking on the same option again.

How to Add/Remove Toolbars from Taskbar
You can add or remove toolbars like Address, Links, Touch Keyboard, Desktop and others mannually from taskbar as you want. Here are the steps to Add or Remove toolbars from taskbar.
- At first, Right click on taskbar and select on Toolbars option.
- Select on the option which toolbar you want to display on taskbar.

How to Auto Hide the Taskbar in Windows
You can make the taskbar, which will hide automatically when not in use and appear again when you mouse over where the taskbar located. You can do the following steps to make auto the taskbar.
- Right click on taskbar and select on properties option.
- Go to Taskbar tab on Taskbar and Navigation Properties dialog box.
- Check the option "Auto-hide the taskbar" to hide taskbar automatically.

How to Show Computer Desktop Using Taskbar
If you are working on different multiple windows and you want to close all the windows to show desktop for opening items on desktop.
You can show computer desktop by simply right clicking on taskbar and clicking on "show the desktop" option. Which minimizes all the open windows and shows the desktop.

Related Posts
How to make USB boot drive to Install Windows ?
How to Keep Computer from Sleeping
Top 5 Free Methods to Make Your Computer Faster
How to Know Your Computer Configuration Easily
Top 10 Questions that Computer Beginner may Asked
How to Manage Drives Using Drive Tools
How to Share Printer for Computers on LAN
What are the Basic Components of operating Systems.
How to Share Drive Folder and File in Computer Network
What is Cyber Crime and What are the types?
What is intellectual property law?
What is literal and non-literal copying of computer programs?
Go to link Download
Thursday, November 10, 2016
How can I deleted items from recycle bin Recover deleted files e mail and more
How can I deleted items from recycle bin Recover deleted files e mail and more
How can I deleted items from recycle bin Recover deleted files, e-mail and more
The applications are much better able to recover deleted files (photos, movies, music, documents, etc.), e-mail and even deleted material to restore the iPod and other external storage devices. So if you have a few songs on your iPod or profits of a car accident has made it clear synchronized, so do not worry it is still possible to recover.
Therefore, if you want to restore recover deleted items from recycle bin or deleted e-mails, take a good data recovery system and you really need to get your files in no time. Keep improving it, please make your chances of a cure that you can not download or install new applications on your PC.
deleted files from your computer If you have accidentally? Did you release the critical information you need for your performance? It is not to be necessary, just because you can quickly recover deleted files on Windows 7 / XP / Vista.
In the above, the recovery of deleted files only with the support of business information at a high price recovery. These days you can actually install a package to restore reliable data recovery software and your belongings. This type of software is quite affordable and can work wonders when it comes to recovering deleted files.
The basis for the recovery of deleted files
The ease of production of electronic documents has caused a revolution in contemporary work. But has also be easy-to-be information. Accidents happen when you use your computer. You may accidentally delete a file and you can never perhaps never recovered from the Recycle Bin. It is also possible to lose information as a result of a virus or malware.
These are good reasons for the recovery of files has become very important these days. If you recover your file, you will have paid for their productivity and the prospect of money. To lose staff, the loss of important data also suggest their jobs.
Fortunately, you can use third-party software package to recover deleted files even if you delete files from the Recycle Bin to recover. Just set the program so that you start the approach to restore the files.
The positive aspects of the use, make use of the software program for data recovery
So, what are the advantages of using a software file recovery program? First, you can save a lot of money if you have the software only. Data recovery companies charge hundreds or even thousands of dollars for their services of experts. With this software you can recover your files quickly and easily.
Secondly, the restoration of the data using software is fast and efficient. The whole method of recovery will only take a few minutes. Once you configure the software, you can immediately find deleted files on your hard disk. So, do what you want, is to decide on the file, you need to restore.
Finally, it is easy enough to use a software to retrieve the file. You can use this application, even if only a simple understanding of computers. A complete novice will be ready to install and run the software package. The recovery process is critical and requires no laptop or advanced computer skills.
How can I deleted items from recycle bin Recover deleted files, e-mail and more.
Therefore, if you want to restore recover deleted items from recycle bin or deleted e-mails, take a good data recovery system and you really need to get your files in no time. Keep improving it, please make your chances of a cure that you can not download or install new applications on your PC.
deleted files from your computer If you have accidentally? Did you release the critical information you need for your performance? It is not to be necessary, just because you can quickly recover deleted files on Windows 7 / XP / Vista.
In the above, the recovery of deleted files only with the support of business information at a high price recovery. These days you can actually install a package to restore reliable data recovery software and your belongings. This type of software is quite affordable and can work wonders when it comes to recovering deleted files.
The basis for the recovery of deleted files
The ease of production of electronic documents has caused a revolution in contemporary work. But has also be easy-to-be information. Accidents happen when you use your computer. You may accidentally delete a file and you can never perhaps never recovered from the Recycle Bin. It is also possible to lose information as a result of a virus or malware.
These are good reasons for the recovery of files has become very important these days. If you recover your file, you will have paid for their productivity and the prospect of money. To lose staff, the loss of important data also suggest their jobs.
Fortunately, you can use third-party software package to recover deleted files even if you delete files from the Recycle Bin to recover. Just set the program so that you start the approach to restore the files.
The positive aspects of the use, make use of the software program for data recovery
So, what are the advantages of using a software file recovery program? First, you can save a lot of money if you have the software only. Data recovery companies charge hundreds or even thousands of dollars for their services of experts. With this software you can recover your files quickly and easily.
Secondly, the restoration of the data using software is fast and efficient. The whole method of recovery will only take a few minutes. Once you configure the software, you can immediately find deleted files on your hard disk. So, do what you want, is to decide on the file, you need to restore.
Finally, it is easy enough to use a software to retrieve the file. You can use this application, even if only a simple understanding of computers. A complete novice will be ready to install and run the software package. The recovery process is critical and requires no laptop or advanced computer skills.
How can I deleted items from recycle bin Recover deleted files, e-mail and more.
Go to link Download
Subscribe to:
Posts (Atom)