Showing posts with label screenshots. Show all posts
Showing posts with label screenshots. Show all posts
Saturday, March 11, 2017
How to Unlock Bootloader of Moto E with Screenshots
How to Unlock Bootloader of Moto E with Screenshots
CAUTION: UNLOCKING YOUR BOOTLOADER WILL VOID YOUR WARRANTY. PROCEED AT YOUR OWN RISK.
CAUTION: UNLOCKING THE BOOTLOADER WILL WIPE / FACTORY RESET YOUR DEVICE. IT WILL DELETE EVERYTHING FROM YOUR DEVICE
STEP:
- Take full backup of your device.
- Install the latest Motorola USB drivers with the help of this tutorial HERE.
- Choose either
- [ Recommended ] Download Minimal ADB and FASTBOOT and set up from my tutorial HERE.
- Download Android SDK and set up from my tutorial HERE.
- Put your device in fastboot mode [ Power off, then press the power and volume down buttons simultaneously ].

- Open command prompt either by
- Open desktop icon of Minimal ADB and FASTBOOT if you have that.
- If you have Android SDK then go to "C:androidsdkplatform-tools" open command prompt by holding shift and right click and press command window here.
- Connect your device to pc in USB DEBUGGING mode. If you dont know how to do that than follow this tutorial HERE.
- Now type this in command prompt fastboot oem get_unlock_data

- A string will appear on command prompt . Copy the whole string.

- Paste the string in notepad and remove empty spaces such that the whole string is in single line.


- Next, go HERE and sign in using your google account or Motorola ID; Scroll down and copy paste the string from step 9. Now click on "Can my device be unlocked?". A REQUEST KEY button will appear.


- Check I Agree option. After this you will receive an email ( on email id you used while signing in ) containing your unlock key.

- Copy the string form the email received from Motorola. Make sure the device is still connected.

- Now to check the connection type in command prompt fastboot devices.
- Now type fastboot oem unlock KEY and hit enter. [ IMP: Replace KEY with the sting from email ]

- Wait till Bootloader unlocked warning appears in your MOTO E.

In case in future if you want to Relock your Bootloader, than you can do it by doing this:
Go to Fastboot and give the command fastboot oem lock
Go to link Download
How to Flash Custom Recovery and Root Motorola Moto E with Screenshots
How to Flash Custom Recovery and Root Motorola Moto E with Screenshots
STEPS:
- Download SuperSU from HERE.
- Connect your device in normal mode with USB.
- Copy the SuperSu zip file in the internal storage of your device.
- Power off the device.
- Download Moto E CMW recovery from HERE.
- Copy the recovery.img file in
- C:Program Files (x86)Minimal ADB and Fastboot if you have used my Minimal ADB and FASTBOOT method.
- C:android-sdkplatform-tools if you have used my Android SDK method for ADB.
- Put your device in fastboot mode [ Power off, then press the power and volume down buttons simultaneously ].
- Open command prompt either by
- Open desktop icon of Minimal ADB and FASTBOOT if you have that.
- If you have Android SDK then go to "C:android-sdkplatform-tools" open command prompt by holding shift and right click and press command window here.
- In command prompt type fastboot flash recovery recovery.img

- Push volume down to select recovery on the device and Push volume up to select it.

- Now that you are in recovery, choose Install from sdcard using the volume buttons to navigate and power to select.

- Select Install zip from sdcard then select 0.


- Select the SuperSU zip file and flash it.


- Select advanced then reboot to bootloader.


- Select No if asked to Fix the SuperSU issue.

- Now as Step 9 we will repeat as we have now root access so it will still this time, In command prompt type fastboot flash recovery recovery.img

- Select Normal Powerup on the device.


After the device boots up you will see SuperSU in Applications menu.
To check that we have root access or not follow this:
- Open play store.
- Search for Root Checker.
- Install and Open it.
- Tap on Verify Root.
- Tap on Grant.
- If it says congrats then your device is rooted.
Go to link Download
Tuesday, November 29, 2016
How To Convert Music And Videos With VLC ! Interesting Guide With Screenshots
How To Convert Music And Videos With VLC ! Interesting Guide With Screenshots

How To Convert Music And Videos With VLC
Getting software to convert music and videos for free is easy, but usually comes with some drawbacks. When you try to install the freeware, several other applications may try to sneak in by disguising themselves as tools for your computer. Also, you may end up with a converter that displays ads all over the interface.
If you’re already using VLC on your desktop, you’ll be pleased to know that not only does it play pretty much all audio and video formats, it can convert them too. Here’s how to convert between formats in VLC:
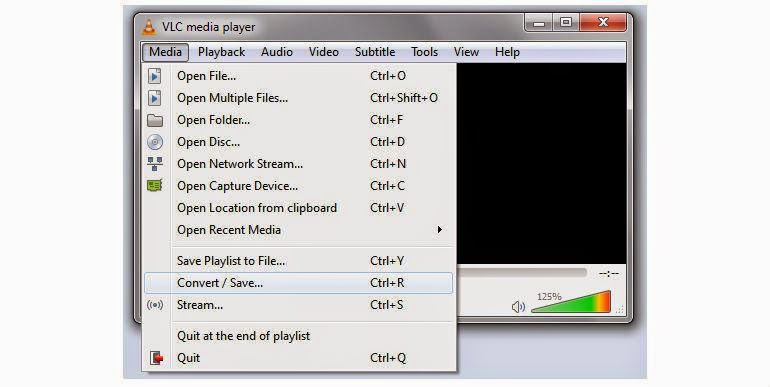
Step 1: Head to Media > Convert/Save. Click Add and locate the file you wish to convert.
Step 2: Next to Profile, choose a format from the drop-down box. Make sure to pick a format supported by the device you want to play the end result on.
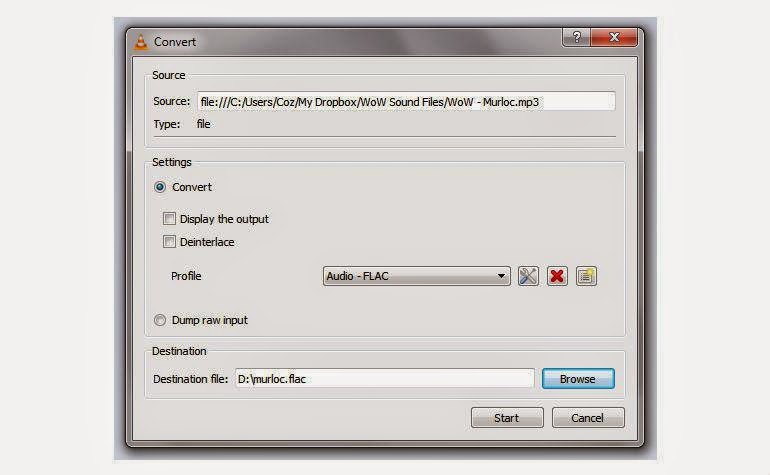
Step 3: Pick a destination and name for the converted file, then click Start.
Note: If you’re converting a large video, you’ll see the timer on the player progress as it encodes to the new format.
Although the VLC app lacks bells and whistles when it comes to conversion, it gets the job done in a pinch.
Go to link Download
Thursday, November 24, 2016
How To Change Folder Color! Guide With Screenshots
How To Change Folder Color! Guide With Screenshots

Folder Colorizer is a small Windows application created to assign a different color to any folder on your system.
Basic technical knowledge is enough because Folder Colorizer introduces an entry in the Context Menu and thus allows you to simply right click a folder to change its color.
The application already comes with eight predefined colors, but it also allows you to define your very own and even save it by writing down an unique name.
It’s all just a matter of clicks and while this could be very well considered just a task more appropriate for rookies, it could come in handy to every computer user out there.
The application doesn’t affect system performance in any way and the best of all is that it works smoothly on all Windows versions on the market. What’s more, it only asks for administrator privileges in order to change the color of system-protected folders.
Last but not least, you don’t even need to let the app running in order to keep the new folder colors, so computer performance isn’t affected at all.
All things considered, Folder Colorizer is an app that could help plenty of users out there, offering one of the most user-friendly approaches on the market. Shell integration clearly helps a lot and since it’s all so intuitive, the lack of a help manual shouldn’t bother you too much.
Guide:
1)Download The Latest Version Of Software From The Given Links
2)Install The Software
3)Right Click On Folder(which you want to customize) & Then


Download Links:
Folder Colorizer (Size 1.3MB) | Mirror 1
Go to link Download
Subscribe to:
Comments (Atom)