Friday, April 21, 2017
HOW TO UPLOAD FILE USING DropBox
HOW TO UPLOAD FILE USING DropBox
This tutorial we will discuss how to upload files using dropbox. Maybe some of you already know what it is about dropbox. Well, for the uninitiated lets talk about this dropbox. before we discuss about dropbox further, you can see the site here.
What is dropbox?

"Dropbox is a free service that lets you bring your photos, docs, and videos anywhere and share them easily. Never email yourself a file again!"
Dropbox is a cloud computing application that is used to store, access and share documents anytime anywhere by syncing folders on your computer with a folder in your Dropbox account (provided there is an internet connection of course). With dropbox account you will have to get the storage media in a free 2GB internet. This equates to an average of 500 high quality MP3 songs, or 2000 more Word documents in general, or 2000 more documents PDF files.
The point is you can upload files with any format to be shared. And a link to download the file itself is not diverted to other links such as file storage site 4shared, ziddu, mediafire, etc. .. or also called direct download
Then, what is the advantage of using Dropbox as a storage medium?
advantages are:
1. Available public and private share share
2. Can directly upload files from your computer by dragging the file to be shared or saved to storage provided by Dropbox without having to log in via the dropbox website, of course you must first mengistall applications provided by dropbox.

3. Support all file formats, CDR Either that, avi, mkv, wmv, Ai, RAR, ZIP, 7ZIP, PSD, or other.
4. Can upload files via email
5. Download files directly (direct link), it means you are not redirected to another link when downloading files:

6. File security is assured, all your files are stored safely since all data transfer is done over SSL and encrypted with AES-256 method. Simply put, the level of safety equivalent to data security dropbox online stores, banking and military hard burglarized hackers.
And there are many more advantages provided dropbox, I suggest you to use this as a dropbox online storage ... If you are interested you can directly register here. And for the way the list and use Dropbox can see more here.
Go to link Download
Monday, April 10, 2017
How to fix invalid file associations Errors Fix invalid file associations related to
How to fix invalid file associations Errors Fix invalid file associations related to
How to resolve invalid file associations? Before beginning to answer this question, lets discuss what this error is about to get a better understanding of the problem. Each is usually associated with Windows file extensions. Notice that when you install the software is usually a list of files, the program must perform well, with the appropriate extension. A good example of this is exe extension is usually tells Windows to start the program. Each time you click on the file with exe extension, it will tell Windows to start the program.
These files are stored in the registry system, with it, this area contains several types of extensions required by the various programs to function properly. When you uninstall the software, most products are not completely delete all files, then, some of them remained in the system that are no longer needed and add up messing up your computer registry. As you continue to use the equipment, installation and uninstallation of software varied along the road, this area began with the accumulation of unnecessary files to play with important data, compromising processor performance and cause some errors in your system.
How to resolve invalid file associations? This problem occurs when one of your files is to refer to certain extensions that are not valid because the registry a mess. Therefore, one of the best ways to solve this problem is to clean the registry of all unnecessary files and fixing errors on your system. The best and cheapest option for this is to use a registry cleaning software that will easily detect unwanted files are all stored and correct any errors found.
There are options that are available online for free download, but I doubt his ability to set file associations are not valid because most of them have a limited ability to solve the problem. The ideal technique is to buy a large premium software will do the cleaning process and effectively correct the file association errors in your computer is not valid, this day is the best option for you that can help solve the problem without becoming an expert programmer or computer geek.
PC registry in a mess? Clean it with the best registry cleaners. Read reviews about registry cleaner for more information.
How to fix invalid file associations Errors - Fix invalid file associations related to.
Go to link Download
Sunday, March 26, 2017
How to recover data if the Boot ini file in Windows XP is not enough
How to recover data if the Boot ini file in Windows XP is not enough
How to recover data if the Boot.ini file in Windows XP is not enough
Consider a scenario in which the switch to the system Windows XP, but it can not be started. Error message, namely:
"Windows could not start because the following file is missing or corrupt:
Windows System32 Hal.dll
Reason:
The reason for this error or corrupt boot. file is missing or contains incorrect entries.
Resolution:
To solve this problem, you need to create a boot.ini file with the new Bootcfg.exe tools. To do this, follow these steps:
Install the Windows XP CD-ROM drive and restart your computer.
Displayed when you are confronted with "Press any key to boot from CD", press the button to start the computer from the CD-ROM.
Press R, to enter the Recovery Console.
At the command prompt, type Bootcfg / list, and then press ENTER to display the current settings of the boat show INI.
At the command prompt, type bootcfg / rebuild and press Enter to scan your hard drive.
Follow the instructions on the screen.
Exit and reboot. The problem should be solved.
However, if you still can not restart your system, you must use third-party software for hard disk recovery to restore the inaccessible data. These tools allow you to read only the recovery disk without overwriting the original data.
Windows Data Recovery is a recovery tool, hard disk drive allows you to recover lost, deleted or can not access the data as FAT and NTFS file system. It can recover more than 185 different types of files from different media like hard disk, external hard drives, flash drives, iPods, etc. In addition, disk recovery tool to recover deleted emails from MS Outlook and Outlook Express. It is compatible with Windows 7, Vista, Server 2003, XP and Server 2000.
How to recover data if the Boot.ini file in Windows XP is not enough
Go to link Download
Saturday, March 18, 2017
How to get back formatted data and file from Transcend SD Card
How to get back formatted data and file from Transcend SD Card
When you connect Transcend SD Card to computer, sometimes it asks you to format, and if you click ‘Yes’ then your data will be formatted. If this happens to you, here is the solution to get back formatted data and file from Transcend SD Card.
Why and How Data Recovery is Possible from a Formatted Transcend SD Card
Transcend SD card does not wipe the files completely even after you delete any picture file or format the memory card. It just removes the file name and their entries but the original data remain the same in the Transcend SD card. So the possibility of data recovery is very high after any type of deletion or formatting the SD card. You can download Transcend SD Card Recovery software which will search all the lost photos or other media files and recover deleted photos, videos, documents from formatted SD Card.
H-Data Recovery Master is an effective recovery tool, which helps you to recover lost or formatted file from Transcend SD card. Indeed, everyone feels so depressed when he or she lost the important photos. But now, with this recovery software, there is no need to be unhappy.
Here are my steps to get back formatted data from Transcend SD Card

Note: please stop using your phone/micro sd card once data get deleted. If you continue using the phone like saved new data to the sd after data deleted, then it is of high chance that some of the lost data may become corrupted.
Step 1: Connet your SD Card to Computer
Connect SD to computer via a card reader to hook up the computer, Then in Computer, check whether the smart phone shows as a drive letter (e.g. drive E: ).
Step2: Run H-Data Recovery Master on windows OS (Windows 8.1/8/7/Vista/XP...)

Step3: Scan deleted files or lost data on formatted crashed not recognized external hard drive
After you select the "USB disk/Card recovery", press "Next" to start scanning for recoverable photos, videos, and music files.
Step4: Select and recover lost hard disk data
After the program finish scanning all files, you can preview the files you wanted. Then mark the files you need. Click the “Recover” button to recover deleted data on htc one.

View more post
Retrieve tons of formatted pictures from 8GB Micro SD Card
With no recycle bin, is it possible to do Android deleted photo recovery
Formated Data Recovery – Recover Data from Memory Card, Disk Drive, USB, External Drive
Recover deleted files from Google Nexus 6 without a backup
Android 5.0 Lollipop Phone Data Recovery– Get Back All Deleted Files
High chance to recover files/formatted files from Memory Card
Go to link Download
Thursday, March 2, 2017
How To Burn an ISO File to a USB Drive
How To Burn an ISO File to a USB Drive
BEST GREENHOUSES FOR GROWING VEGETABLES? ? 1(360)241-1624 ? ? ? 360ORGANIC.US ?HEAVY DUTY! AFFORDABLE! GOOD QUALITY!
So you have an ISO file that you want on aflash drive, or some other USB storage device. You also need to be able to boot from it. Sounds straightforward, right? Copy the file over and youre done.
Download Rufus, a free tool that will correctly prepare the USB drive, automatically extract the contents of the ISO file you have, and properly copy the files contained within it to your USB device, including any files in the ISO needed to make it bootable.
Rufus is a portable program (does not install), works on Windows 8, 7, Vista, and XP, and will "burn" an ISO image file to any type of USB storage device you happen to have.
Double-click or double-tap on the rufus-1.4.12.exe file that you just downloaded. The Rufus program will start right away.
Insert the flash drive or other USB device you want to "burn" the ISO file to into your computer, assuming its not already plugged in
From the Device drop-down at the top of the Rufus program screen, choose the USB storage device you want to burn the ISO file to.
Leave the Partition scheme and target system type, File system, and Cluster size alone unless you know what youre doing or youve been advised to set any of those parameters to something else.
For example, maybe a bootable tool you downloaded in ISO format advised on its website to make sure the file system is FAT32 instead of NTFS if youre burning to USB. In that case, make the File system change to FAT32 before continuing
Next to Create a bootable disk using, make sure ISO Image is selected and then tap or click on the CD/DVD ico When the Open window appears, locate and then select the ISO image you want to burn to the flash drive.
Once selected, tap or click on the Open button.
Tap or click OK to the WARNING: ALL DATA ON DEVICE WILL BE DESTROYED message that appears next.Wait while Rufus properly formats the USB drive so its bootable, and then copies all of the files contained in the ISO image you selected
Once the status at the bottom of the Rufus program window says DONE, you can close Rufus and remove the USB drive.
How To Burn an ISO Image File to a DVD
What is an ISO FIle?
How To Burn an ISO File to a USB Drive
<><><><><><><><><><><><><><><><><><><><><><><><><><><><><><>
MORE EXCELLENT TIPS AND TRICKS FOR END USERS:
How to enter the BIOS or CMOS setup
What are the F1 through F12 keys?
Upon start up only wallpaper shows, no icons, no task bar, no start menu, nothing [FIX]
How to Permanently fix a computer with no start menu or desktop icons (Black screen virus)
HOW To OPEN Task Manager
Manually Speed up your Windows 7, XP
How to boost INTERNET speed by 20%
Random black screen while playing games
Start your computer from a Windows 7 installation disc or USB flash drive.
Best ways to speed up Windows 7
How to use system recovery options in Windows?
How To Fix A Windows 7 Reboot Loop
An empty All Programs Folders in Windows 7 and how to fixed it!
How To Fix A Windows 7 Reboot Loop
The BIOS does not detect or recognize the ATA / SATA hard drive
My laptop wont shut down ! Windowws 8, 7, Vista, XP
You in the safe mode and it shows all the programs now what?
SPEED UP YOUR SSD IN WINDOWS 7
Speed up your PC Disable System Restore on SSD
Speed up your PC Disable Scheduled De-fragmentation SSD
Check your hard disk for errors ( Windows XP / 7 / 8 / )
How do I remove a computer virus?
What is the difference between BIOS and CMOS?
<><><><><><><><><><><><><><><><><><><><><><><><><><><><><><>
Fill Free to Donate if you found this tutorial useful. Thank you!
Go to link Download
How To Burn an ISO Image File to a DVD
How To Burn an ISO Image File to a DVD
What do you do with an ISO file once youve downloaded it? An ISO file is an image of a disc, like a DVD, so to use it you first need to burn it to a disc.
Properly burning an ISO image file to a DVD is a bit different than just burning the ISO file as you would any other file. Youll need to choose the "burn image" or "write image" option in your burning software and then choose the file.
If your DVD burning software does not have this option or you want something more simple, try following the steps below to burn
Have an ISO image you need to burn but you dont have a DVD burner drive or any empty discs? See my How to Burn an ISO File to USB for a complete tutorial on getting your ISO onto a USB drive instead.
Burning an ISO image file to a DVD usually takes less than 15 minutes. This procedure works to burn ISO images to CDs or BDs as well.
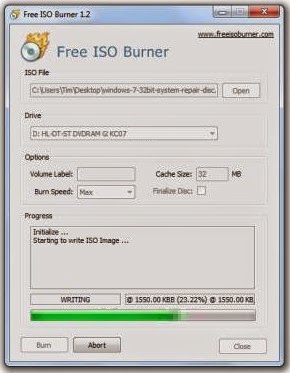
Download Free ISO Burner, a completely free program that only burns ISO files, making it really easy to use
Free ISO Burner is completely free and fully functional. HOWEVER, their download page (hosted by SoftSea.com) is a little tricky. make sure that you not downloading something else.
Double-click on the FreeISOBurner file that you just downloaded. The Free ISO Burner program will start. ISO Burner is a standalone program, meaning it doesnt install, it just runs. This is yet another reason why I prefer this ISO burner over others with huge installations. Insert a blank disc in your drive. As long as your optical drive supports it, this disc can be a blank DVD, CD, or BD since Free ISO Burner supports them all. Use the smallest sized disc CD dont use a DVD or BD. Click the Open button next to the empty space within the ISO File section, near the top of the program window.When the Open window appears, locate and select the ISO file you wish to burn to the empty disc.Once youve selected the ISO file, click the Open button at the bottom of the window to confirm your selection. Now that youre back to the Free ISO Burner main screen, check that the option under Drive is in fact the optical drive you put the empty disc in while on Step 3 above.Skip the customizations in the Options area unless you know what youre doing.Click the Burn button to start the ISO file burn.
Depending on how large the ISO file is, and how fast your disc burner is, the ISO burning process could take anywhere from several seconds, to several minutes, Now you can use the ISO-file-turned-disc for whatever you needed it for.
How To Burn an ISO Image File to a DVD
What is an ISO FIle?
How To Burn an ISO File to a USB Drive
<><><><><><><><><><><><><><><><><><><><><><><><><><><><><><>
MORE EXCELLENT TIPS AND TRICKS FOR END USERS:
How to enter the BIOS or CMOS setup
What are the F1 through F12 keys?
Upon start up only wallpaper shows, no icons, no task bar, no start menu, nothing [FIX]
How to Permanently fix a computer with no start menu or desktop icons (Black screen virus)
HOW To OPEN Task Manager
Manually Speed up your Windows 7, XP
How to boost INTERNET speed by 20%
Random black screen while playing games
Start your computer from a Windows 7 installation disc or USB flash drive.
Best ways to speed up Windows 7
How to use system recovery options in Windows?
How To Fix A Windows 7 Reboot Loop
An empty All Programs Folders in Windows 7 and how to fixed it!
How To Fix A Windows 7 Reboot Loop
The BIOS does not detect or recognize the ATA / SATA hard drive
My laptop wont shut down ! Windowws 8, 7, Vista, XP
You in the safe mode and it shows all the programs now what?
SPEED UP YOUR SSD IN WINDOWS 7
Speed up your PC Disable System Restore on SSD
Speed up your PC Disable Scheduled De-fragmentation SSD
Check your hard disk for errors ( Windows XP / 7 / 8 / )
How do I remove a computer virus?
What is the difference between BIOS and CMOS?
<><><><><><><><><><><><><><><><><><><><><><><><><><><><><><>
Fill Free to Donate if you found this tutorial useful. Thank you!
Go to link Download
Sunday, January 29, 2017
H Data ZiP File Recovery free download to retrieve deleted zip archives
H Data ZiP File Recovery free download to retrieve deleted zip archives
H-Data Zip Recovery free download to retrieve deleted zip archives
The algorithms used in the compressed file recovery program make it possible to recover data from password-protected archives, which requires the password to be specified at the request of the program. During data recovery, the zip recovery program does not modify the corrupted file in any way, the recovery ZIP files tool only extracts data and saves it to the hard disk While saving folders and files, the zip recover program preserves the initial data structure. The names of files and directories also remain unchanged.
Free download H-Data ZIP file Recovery with best reviews

Click here to get Pro Version H-Data Recovery Master
How to recover data from corrupted/damaged/deleted ZIP archives with H-Data Recovery for Zip?
Steps to retrieve compressed files, photos, videos, musics
Step 1. Launch H-Data Recovery for ZIP file and select the file types you want to recover. Then click "Next" button to move to the next step.
Step 2. Select the disk where you lost your data and click "Scan" button, the software will quickly scan the selected disk to find all your target files. If you lost your partition, select "partition formatted/disapper" to continue the recovery process.
Step 3. After scan, you can preview all the listed recoverable files one by one and select out those you want. Then, click "Recover" button to get them back once. Here you should save all the recovered files on another disk to avoid data overwriting.
H-Data Recovery for Zip File helps when
1. You deleted a ZIP, RAR, GZIP, TAR, LZH and CAB file that you need to recover.
2. Your computer crashed and you lost ZIP files and RAR, GZIP, TAR, LZH and CAB files.
3. You lost a ZIP, RAR, GZIP, TAR, LZH and CAB file due to a virus infection or other system failure
4. Compressed files emptied from the Windows Recycle bin
5. RAR or ZIP file deleted and bypassed the Recycle bin
6. Zip files lost as a results of a hard drive format or a disk error
7. Deleted Zip files lost as a result of virus or Trojan infection
Support OS:
Windows 8.1/Windows 8/Windows 7/Windows Vista/Windows XP (64&32 bits)
Windows 2000 Server Family
Windows 2000 Professional
Windows Server 2003 (32 & 64 bit)
View more posts about undeleting files:
How to undelete my files and file folders from external drive
Recover accidentally deleted RAA/ZIP files with RAR File Recovery
Directly download Android SD Card Recovery to retrieve 350+ file formats
How to undelete my files and file folders from external drive
Recover 350 + files and file formats with H-Data File Recovery Master
H-Data Photo Recovery 4.6.00.000154 with enhanced Six Photo Recovery Mode
Amazing Android SD Card Recovery for deleted files, photos and video
Restore deleted photo, image picture files from Samsung Galaxy S6
Samsung Phone Photo Recovery- 3 click to get all deleted picture formats from Galaxy S6
Wise option for recovering deleted files from external hard disk
Go to link Download
Wednesday, December 28, 2016
How to Fix Problem Applying formulas defined within one XLS file to multiple XLS files
How to Fix Problem Applying formulas defined within one XLS file to multiple XLS files
Applying formulas defined within one XLS file to multiple XLS files
Hello everyone,
I have a bunch of CSV data files, all having the same number of rows and columns, representing data collected in an experiment from different subjects.
For each data file, I need to add a number of columns defined as a function of the existing columns (e.g.
define column C as being column A + column B).
Is there any way of defining these new columns in *one* data file and then applying the exact same operations - in batch - for all other CSV files?
Many thanks for any replies!
Anwsers to the Problem Applying formulas defined within one XLS file to multiple XLS files
Download SmartPCFixer to Fix It (Free)
Windows Error Reporting - To Fix Applying formulas defined within one XLS file to multiple XLS files
- Go to Start button.
- Open Control Panel.
- Go to Windows Error Reporting.
- Click on System and Maintenance, then click Problem Reports and Solutions.
- Next, click Change Settings located on the left side panel of the Problem Reports and Solutions window.
- Select an option to configure how you want Windows to look for a solution to your problems. You may allow Windows to do it automatically or ask you every time to check if problem occurs.
- Next, click the Advanced settings link.
- Select Off to turn off Error Reporting.
Recommended Method to Fix the Problem: Applying formulas defined within one XLS file to multiple XLS files:


How to Fix Applying formulas defined within one XLS file to multiple XLS files with SmartPCFixer?
1. Click the button to download Error Fixer . Install it on your system. Open it, and it will perform a scan for your computer. The errors will be shown in the scan result.

2. After the scan is done, you can see the errors and problems which need to be repaired.

3. The Repair part is finished, the speed of your computer will be much higher than before and the errors have been fixed. You can also use other functions in SmartPCFixer. Like dll downloading, junk file cleaning and print spooler error repair.

Related: error message fsui.exe/ wlidcli.dll is missing
,Solution to Error: Excel: Automatic number generation
,Troubleshoot:i wanna change language of all windows in Windows 7 Home Premium
,Troubleshooting:IF Function, if the vendor ID in column A matches any of the vendor IDs in column F, I want 1099 to appear in column D. Error
,Fast Solution to Problem: ReadyBoost is not working properly in my computer
,Troubleshoot:Error: "0x81000032 make sure the C: drive is online and set to NTFS" when trying to backup to external hard drive. Error,External Hard Drive not listed in Windows 7 backup wizard Tech Support,Tech Support: Im always being signed off so annoying,Solution to Problem: Impossible to use Internet Explorer! I keep getting the same error message every time i try to use IE.,Referencing data in Access using Excel [Anwsered],Need Best Way To Present Data [Anwsered],Same question but for windows 7 home edition,sometimes fullscreen wont activate [Solved],Solution to Error: We bought a new computer with windows 7 and it is constantly freezing. How do we fix this?,Solution to Error: Windows 8 update crash (2013-07-22),brclr.dll.mu_ Missing Error Fixer,How To Resolve Missing fin_myagtui.eng Problem,Corrupted f_0006ad File - How to Fix,nkebigvg.cpl Not Found Error Fixer,Corrupted olcontrols.ocx File - How to Fix
Read More: Troubleshoot:Apps and PC Setting do not work after upgrading to Windows 8.1 Error,How Can You Fix - Always my system needs Last Known Good Configuration to reboot?,How to Fix - AppData folder shows to have 170gigs in it. My hard drive is full. Can I delete the folder??,Tech Support: any year calendar template does not show dates,How to Resolve - Any free animation software??,After Windows Update CD/DVD drive does not work,After installing windows 7 to laptop the labels print out of line how can I fix it,After my computer sleeps the wireless always disconnects and will no reconnect,After signing into Pogo.com, I get a message" This tab has been recovered"....what does this mean and how do I fix it.....,All desktop icons changed to windows live and does not open
Go to link Download
Friday, December 9, 2016
Hide Folder with Batch File and CLSID
Hide Folder with Batch File and CLSID
This trick also work with windows 7 and Windows 8.
Commonly we use some encryption software to lock the secure data like Folder Lock but this trick is for hiding some private stuff ;) if you want to avoid direct access to folder.
Now we will create two batch files (available for download at bottom) one will hide the folder and another will unlock the folder using a secure word you can say password.
The technique is very simple we will change properties of locker folder completely same as some system folder, using windows commands. Therefore, accessing the locked folder will result in system file instead of actual folder path and making batch files of these commands will make lock and unlock process very easy.
About CLSID:
CLSID are Windows class id for various windows class objects like My Computer, Control Panel, and Administrative Tools etc. we will use My Computer class id to make the locker behave like Computer Folder and clicking on that will show My Computer screen like hard drives.
Commands:
We will use these commands
- First, rename the folder to make it system folder.
rename Locker "Computer.{20D04FE0-3AEA-1069-A2D8-08002B30309D}" - Then apply system attribute to completely hide this folder.
attrib +h +s "Computer.{20D04FE0-3AEA-1069-A2D8-08002B30309D}" - Revert the same process to unlock the folder.
Click here to download batch files
- Download zip file that contain whole structure of locker.
- To lock: Extract the zip file containing two files one to unlock and another to lock. "Lock.bat" should be inside the "locker" folder, to lock folder close all applications and files that are inside of locker folder and run that file then folder will be locked and hidden it will also make all files path invalid those are inside the locker folder. Therefore, no one can access using history of video player and from other apps recent files section.
- To unlock: run "unlock.bat" it will show blank cmd screen type "password" and hit enter, "Locker" folder will be visible immediately.
To change the locker name unlock the locker and rename the folder but also search and replace "locker" with "new_folder_name" in both files as folder name is hardcoded in batch files.
To change the unlock password open "unlock.bat" in notepad and look for "password" replace this word with your password.
Comment your queries and suggestions!
Go to link Download
Friday, December 2, 2016
H Data Picture File Recovery Get Permanently Deleted Photo At Once
H Data Picture File Recovery Get Permanently Deleted Photo At Once
Recover permanentlly deleted files with H-Data Picture File Recovery
Why is photo recovery available? When the photos are deleted from the computer, these photos disappear from your computer, but their contents arent immediately destroyed. Windows simply marks the hard drive space as being available for use by changing one character in the file table so that the file entry wont be displayed in My Computer or a command line DIR command, etc. Therefore, we often recommend you not to write any data to the partition where files got deleted.
If your photos have been accidentally formatted or deleted, dont be panic. Formatting a partition only erases the address table, not the data itself, so there still is a chance to do photo recovery from formatted partition with an easy photo recovery software.
H-Data Photo Recovery can recover deleted photos, even if the deleted photos emptied from Recycle Bin, or recover photos lost due to software crash, formatted or damaged hard drive, virus attack, lost partition and other unknown reasons under Windows 2000/2003/XP/Vista/2008/2012/Windows 7/8/8.1.
4-step to restore Shift+ Delete files or emptied recycle bin file
Step1: Free download and install the program on your computer.
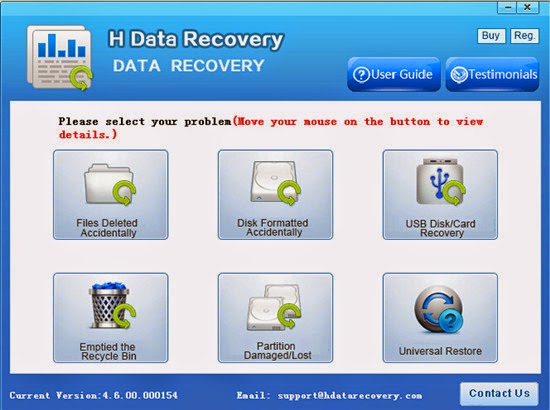
Step 2. Launch H-Data Recovery Master and select "Emptied the Recycle Bin" to recover files removed from recycle bin. If you shit+deleted file, you can choose "Files Deleted Accidentally".

Step 3. Select the disk where you lost your data and click "Scan" button, the software will quickly scan the selected disk to find all your target files. If you lost your partition, select "partition formatted/disapper" to continue the recovery process.

Step 4. After scan, you can preview all the listed recoverable files one by one and select out those you want. Then, click "Recover" button to get them back once. Here you should save all the recovered files on another disk to avoid data overwriting.
view H-Data Photo Recovery on Softonic.
Vist more posts:
H-Data Windows File Recovery - Windows 8/8.1 Permanently Deleted Files Recovery
Successfully get back files and folders deleted from Recycle Bin
Solution to recover both folders and files deleted or emptied from Recycle Bin
100% Data Recovery to get Erased/deleted files from Windows 8.1 hard drive
Wise option for recovering deleted files from external hard disk
Go to link Download
Monday, November 14, 2016
How to write an image file to a disc using ImgBurn
How to write an image file to a disc using ImgBurn
ImgBurn is a lightweight CD / DVD / HD DVD / Blu-ray burning application that everyone should have in their toolkit!
Read - Read a disc to an image file
Build - Create an image file from files on your computer or network - or you can write the files directly to a disc
Write - Write an image file to a disc
Verify - Check a disc is 100% readable. Optionally, you can also have ImgBurn compare it against a given image file to ensure the actual data is correct
ImgBurn supports a wide range of image file formats - including BIN, CCD, CDI, CUE, DI, DVD, GI, IMG, ISO, MDS, NRG and PDI.
It can burn Audio CDs from any file type supported via DirectShow / ACM - including AAC, APE, FLAC, M4A, MP3, MP4, MPC, OGG, PCM, WAV, WMA and WV.
You can use it to build DVD Video discs (from a VIDEO_TS folder), HD DVD Video discs (from a HVDVD_TS folder) and Blu-ray Video discs (from a BDAV / BDMV folder) with ease.
It supports Unicode folder/file names, so you shouldnt run in to any problems if youre using an international character set.
ImgBurn supports all the Microsoft Windows OSs - Windows 95, Windows 98, Windows Me, Windows NT4, Windows 2000, Windows XP, Windows 2003, Windows Vista, Windows 2008, Windows 7 and Windows 8 (including all the 64-bit versions). If you use Wine, it should also run on Linux and other x86-based Unixes.
Its a very flexible application with several advanced features that are often lacking in other tools, especially when it comes to burning DVD Video discs. It supports all the latest drives without the need for updates (including booktype / bitsetting / advanced settings on many of the major ones - i.e. BenQ, LiteOn, LG, NEC, Optiarc, Pioneer, Plextor, Samsung, Sony).
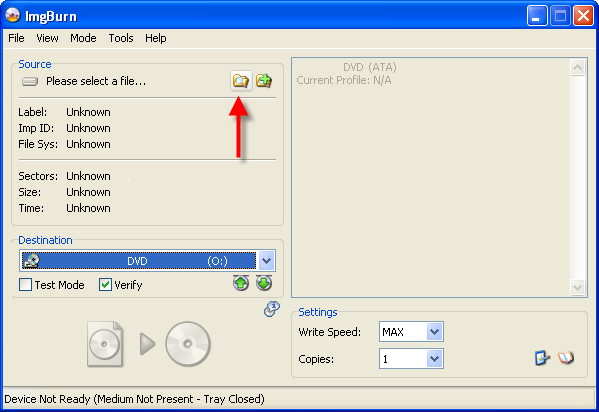
1. Load ImgBurn

2. Switch to Write mode, via the Write image file to disc button on the Ez-Mode Picker screen.

or click the Mode menu at the top and then the Write option.
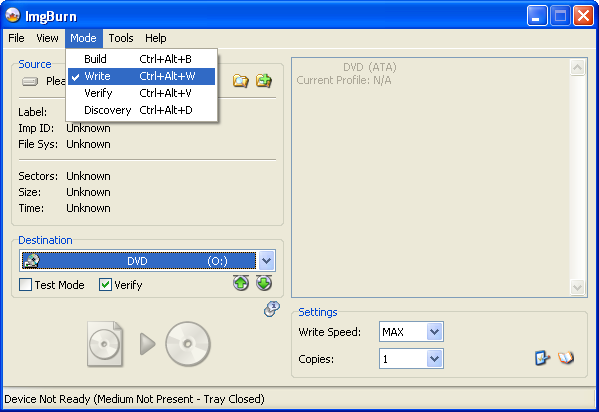
3. Insert blank CD/DVD/BD format is on image size!
4. Select a file to write by clicking on the Browse for file button.
If you created the image with ImgBurn, you should be looking for a *.CUE / *.MDS file initially. If you cant locate one of those with the name youre expecting, go for whatever is left! (probably a *.ISO file)
5. Click the big Write button.
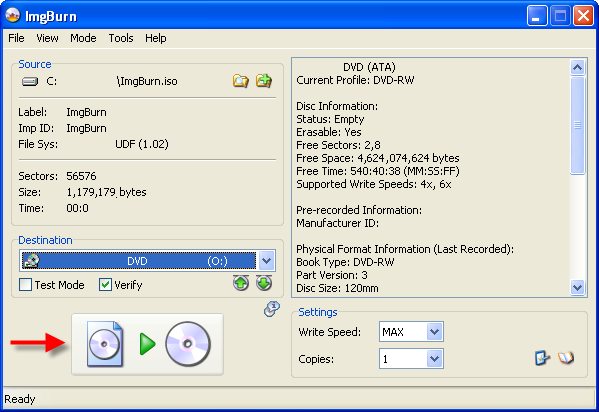
6. Finished!

Go to link Download
Sunday, October 30, 2016
How to Share Drive Folder and File in Computer Network
How to Share Drive Folder and File in Computer Network
How to Share Drive in Computer Network
- At first Go to "My Computer" from Desktop or Start Menu and Open it.
- Right Click on the required drive which you want to share and Choose "Share width" and the "Advanced sharing.." As given below.

- After that, drive properties window will appear, then click on "Advanced sharing" button.
- That displays advanced sharing dialog box then select on the "Share this folder" check box, give required comments and the share name as given on the screen below.

- After completing all of these click on OK button.
How to Share Folder and Files in Computer Network
- At first, Go to your folder or file and right click on it, Choose "Share with" option and then click on "Specific people.." as on the screen below.

- On the File sharing dialog box, choose people to share with, you can select specific computer or can choose everyone and click on "share" button at last.

- If you want to Stop sharing them on computer network, Go to step 1 and choose "Stop sharing" option instead of "Specific people".
- After clicking on "Stop Sharing" option, you can see file sharing dialog from where you can choose the option "Stop Sharing" - To remove all the permissions for all the people and "Change Sharing Permissions" option - To add or remove people or change the permission.

- While changing permissions, you can do as given on the step 2.
Related Posts
How to make USB boot drive to Install Windows ?
How to Keep Computer from Sleeping
Top 5 Free Methods to Make Your Computer Faster
How to Know Your Computer Configuration Easily
Top 10 Questions that Computer Beginner may Asked
How to Manage Drives Using Drive Tools
How to Share Printer for Computers on LAN
What are the Basic Components of operating Systems.
How to Share Drive Folder and File in Computer Network
What is Cyber Crime and What are the types?
What is intellectual property law?
What is literal and non-literal copying of computer programs?
Go to link Download