Monday, April 10, 2017
How I installed Owncloud v6 0 3 on Ubuntu Server 14 04
How I installed Owncloud v6 0 3 on Ubuntu Server 14 04
Update; 1 Jul 14
Decided to try installing via the:
http://software.opensuse.org/download/package?project=isv:ownCloud:community&package=owncloud

The version installed was 6.0.4.1 at the time.
This gives the ability if there are updates that they will be installed automatically through apt-get updates and no more manual updates.
I crossed out the items that were not necessary with the update install version verses the manual install.
So...
1. Installed Ubuntu Server 14.04 on the computer.
2. Installed with OpenSSH and LAMP. Root should be the default admin account created for mysql. Remember the password.
3. Performed updates:
sudo apt-get update
4. Performed upgrades:
sudo apt-get upgrade
5. Perform additional required installs (In Accordance With [IAW] Owncloud v6 Manual Installation):
sudo apt-get install php5-gd php5-json php5-mysql php5-curl php5-intl php5-mcrypt php5-imagick
sudo sh -c "echo deb http://download.opensuse.org/repositories/isv:/ownCloud:/community/xUbuntu_14.04/ / >> /etc/apt/sources.list.d/owncloud.list"
sudo apt-get update
wget http://download.opensuse.org/repositories/isv:ownCloud:community/xUbuntu_14.04/Release.key
sudo apt-key add - < Release.key
sudo apt-get install owncloud
sudo chown -R www-data:www-data /var/www/html/owncloud
10. Enabled ssl within Apache2"
sudo a2enmod ssl
sudo a2ensite default-ssl
sudo service apache2 restart
11. Modified the default-ssl file for Apache2:
sudo nano /etc/apache2/sites-available/default-ssl.conf Add ServerName; 
<Directory /var/www/html/owncloud>
 Options Indexes FollowSymLinks MultiViews
 AllowOverride All
 Require all granted
</Directory> 
12. Enable mod_rewrite
sudo a2enmod rewritesudo service apache2 restart 13. Might get error "Could not reliably determine the servers fully qualified domain name"
Add FQDN to /etc/hosts
sudo nano /etc/hosts

sudo service apache2 restart14. Log into your owncloud via http
-You will get a warning that your data directory is exposed. Well change that later.
-Create an admin account name with password.
-Leave the data folder alone.
-Hopefully you remembered the mysql root password.
-Call you database "owncloud_db".
-The database will be located on the "localhost".

15. Close the client download window.
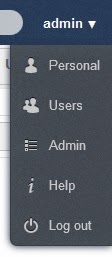
-Select admin (upper right corner) --> users
16. Create your first user.
-Provide that user with enough storage space.
-Select admin again and logout.

sudo mv /var/www/html/owncloud/data /
18.
You will need to edit the config.php file and add the fqdn:
sudo nano /var/www/
Add your FQDN; 1=> owncloud.no-ip.info

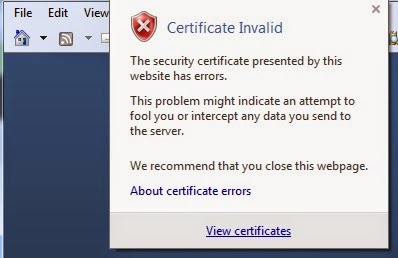
19. You should be able to access https now without complaint. Running owncloud through http is not healthy. It should be running under https. If you check the ssl cert (view certificates) the default cert used should be from the ubuntu installation and have the computer name in the "issued to" "issued by".
20. OPTIONAL if you dont like the default sizes to upload make these changes:
sudo nano /etc/php5/apache2/php.ini
Change;
post_max_size = 4G
cgi.fix_pathinfo = 0
upload_max_filesize = 4G
date.timezone = "America/New_York"
21. You should be good to go.
UPDATE; 16 Jun 14
1. If you get the following error:
isWebDAVWorking: NO - Reason: [CURL] Error while making request: SSL: certificate subject name XXXXX does not match target host name YYYYYsudo nano /var/www/html/owncloud/3rdparty/Sabre/DAV/client.php
Find; <ctrl w>curlsettingsAdd below;CURLOPT_SSL_VERIFYPEER => 0,
CURLOPT_SSL_VERIFYHOST => 0, 
sudo service apache2 restart2. I also added my own self created certs instead of using the default.
Now to get https ssl working with OwnCloud I created self-signed certs. Remember the self signed password as it will ask you again.
sudo openssl genrsa -des3 -out /etc/ssl/server.key 4096
sudo openssl req -new -key /etc/ssl/server.key -out /etc/ssl/server.csr
sudo openssl x509 -req -days 3650 -in /etc/ssl/server.csr -signkey /etc/ssl/server.key -out /etc/ssl/server.crt
sudo openssl rsa -in /etc/ssl/server.key -out /etc/ssl/server.key.insecure
sudo mv /etc/ssl/server.key /etc/ssl/server.key.secure
Go to link Download
Friday, March 24, 2017
Hp Dc7800 Win2000 Server
Hp Dc7800 Win2000 Server
Best hp dc7800 win2000 server.
Informations:
File name: HpDc7800Win2000Server.rar
Driver version: 1.1.2
File size: 4.91 MB
Operation System: Win XP, Win Vista, Windows 7, Win 8, Windows 10
File is safe, tested with anti-virus software!
Go to link Download
Monday, February 27, 2017
How to set the Universal DNS Server address manually
How to set the Universal DNS Server address manually
For more details read about DNS here.
So whenever we have to open any website lets say http://www.yahoo.com we type the address of the website in the browser and the browser send the Website address to DNS Server to look for its IP address.DNS Server responds to the browser with the IP address ( 46.228.47.115 in case of www.yahoo.com) and then your browser makes a direct contact with the website http://www.yahoo.com using its IP address.
If your Internet Service Provider s DNS server set on your computer goes down or does not respond due to any reason you will not be able to visit any pages if you type the website address in the browser like http://www.google.com but you can visit the same website easily by typing its IP address directly as 173.194.40.115 in case of www.google.com. Complex pages often require multiple DNS lookups before they start loading, so your computer may be performing hundreds of lookups a day.
If the DNS Server is down or have some issue you would see the following error messages.
1. Server not found
2. The webpage requested is not available
3. The webpage is not available
5. Webpage can not be displayed
6. Sorry,We could not find www.google.com.
Flush your DNS. Sometimes your DNS cache gets outdated and needs to be manually flushed. This can be done from the Command Prompt.
To open the Command Prompt, press ? Win+R and type cmd.
Type ipconfig /flushdns. Wait for the command to process and then restart your computer.
Test the connection again. If the problem still persists, move on to the next step.
So in order to fix this problem change the DNS server address to a reliable DNS server.There are some Global Universal DNS Server which are ups and running all the time 24x7x365.They are free to use and are very fast.
The most commonly used Universal DNS server address are 4.2.2.2, 4.2.2.1. They are 6 DNS servers at 4.2.2.1 through 4.2.2.6.
You could also use Googles Public DNS, which is a free and used as global Domain Name System (DNS) resolution service, that you can use as an alternative to your current DNS provider.
The Google Public DNS IP addresses (IPv4) are as follows:
- 8.8.8.8
- 8.8.4.4
The Google Public DNS IPv6 addresses are as follows:
- 2001:4860:4860::8888
- 2001:4860:4860::8844
You can use either address as your primary or secondary DNS server. You can specify both addresses, but do not specify one address as both primary and secondary.
Steps to Change DNS server settings on Windows 7
- Go to the Control Panel.
- Click Network and Internet > Network and Sharing Center > Change adapter settings.
- Select the connection for which you want to configure Google Public DNS. For example:
- To change the settings for an Ethernet connection, right-click Local Area Connection > Properties.
- To change the settings for a wireless connection, right-click Wireless Network Connection > Properties.
- Select the Networking tab. Under This connection uses the following items, select Internet Protocol Version 4 (TCP/IPv4) or Internet Protocol Version 6 (TCP/IPv6) and then click Properties.
 |
| How to set the universal DNS Server address |
- Click Advanced and select the DNS tab. If there are any DNS server IP addresses listed there, write them down for future reference, and remove them from this window.
- Click OK.
 |
| How to set the universal DNS Server address |
 |
| How to set the universal DNS Server address |
- Select Use the following DNS server addresses. If there are any IP addresses listed in the Preferred DNS server or Alternate DNS server, write them down for future reference.
- Replace those addresses with the IP addresses of the Google DNS servers:
- For IPv4: 8.8.8.8 and/or 8.8.4.4.
- For IPv6: 2001:4860:4860::8888 and/or 2001:4860:4860::8844
- Restart the connection you selected in step 3.
- Repeat the procedure for additional network connections you want to change.
- Click Apple > System Preferences > Network.
 |
| How to set the universal DNS Server address |
- If the lock icon in the lower left-hand corner of the window is locked, click the icon to make changes, and when prompted to authenticate, enter your password.
- Select the connection for which you want to configure Google Public DNS. For example:
- To change the settings for an Ethernet connection, select Built-In Ethernet, and click Advanced.
 |
| How to set the universal DNS Server address |
- To change the settings for a wireless connection, select Airport, and click Advanced.
- Select the DNS tab.
- Click + to replace any listed addresses with, or add, the Google IP addresses at the top of the list:
- For IPv4: 8.8.8.8 and/or 8.8.4.4.
- For IPv6: 2001:4860:4860::8888 and/or 2001:4860:4860::8844
 |
| How to set the universal DNS Server address |
- Click Apply > OK.
- Repeat the procedure for additional network connections you want to change the DNS for.
After changing the DNS server address, restart the computer and your internet should work faster.
Incoming search term
- Universal DNS Server
- DNS Server address
- Set DNS Manually
- Set universal DNS in Mac
- How to set the universal DNS Server address
Go to link Download
Sunday, November 20, 2016
How to Fix Problem adobe acrobat cannot find DDE Server
How to Fix Problem adobe acrobat cannot find DDE Server
adobe acrobat cannot find DDE Server
when trying to open a pfd file, using either internet explorer or directly with adobe reader version X,it opens a screen which gives threeoptions concerning enabling or disabling proection mode.
after choosing dsable protection mode, the acrobat reader does
not open, saying that it has stoppped working.
Keys to the Problem adobe acrobat cannot find DDE Server
Download SmartPCFixer to Fix It (Free)
Hi A Ledakis,
DDE Share is a tool for managing the way programs communicate and share data over a network.
If you wish to disable this prompt then you may follow the below steps.
Here, this issue could occur if you have installed any security program on your computer you may get this error message.
Try to turn off the on-access scanning for the application control policy in your security program and check for the issue.
To do that you need to contact your security program support team.
If that doesn’t work, I would suggest you to perform the following troubleshooting methods:
Method 1:
I would suggest you to set the computer to clean boot state and check how it works.
To set the computer in clean boot, follow the steps from the following link:
How to perform a clean boot
Note: After checking in clean boot, follow step: 7 from the article to reset the computer to normal boot.
Method 2:
If that doesn’t work, I would suggest you to check with the Adobe Reader support for more information regarding the issue.
Refer the following link to get support for Adobe Reader.
http://www.adobe.com/support/reader/
In this method we will try to Boot in Safe mode with Networking and see if the error still persists.
- Search "MSCONFIG" and Open.
- Click on Boot Tab
- Tick Safe Boot in Boot Option
- Select Network.
- Click Apply and OK.
- Reboot your System.
Recommended Method to Fix the Problem: adobe acrobat cannot find DDE Server:


How to Fix adobe acrobat cannot find DDE Server with SmartPCFixer?
1. Click the button to download Error Fixer . Install it on your computer. Open it, and it will scan your system. The errors will be shown in the scan result.

2. After the scan is done, you can see the errors and problems which need to be fixed.

3. The Fixing part is finished, the speed of your computer will be much higher than before and the errors have been removed.

Related: How to Fix - 64g ssd with a 500g regular drive?,Allow Unhide Rows in Protected Workbook [Solved],[Solved] Get in Excel 2007 data from Access 2007 out of self-built Queries,[Solution] How can I temporarily disable service manager to install Adobe flashplayer?,[Anwsered] When I try to watch a flash video, I am told occasionally that I dont have Adobe Flash.,Solution to Error: Black screen during boot sequence,[Solved] Cant restore Windows 7 64-bit from external hard drive,How to Fix - IE 11 Enhance Protect Mode reset issue with add-ons?,Solution to Error: Internet Explorer 9 update/install error - Error Code 80092004,Upgrading to IE 8 causes cookies to get deleted when starting IE [Anwsered],Solution to Problem: All programs try to start from windows component
,Troubleshoot:External Hard Drive not listed in Windows 7 backup wizard Error
,How to Fix Error - Getting an error "not connected to the internet" while trying to install Samsung Kies?
,How to Fix - Internet Explorer shuts down and reopens tab when attaching to email or uploading files.?
,Fast Solution to Problem: Sending Error Message
,[Anwsered] Thinkpad 8611 Boot,How to Resolve - Svchost Helper?,Fast Solution to Problem: L30 101 Driver Windows 7,Troubleshooter of Error: Io Device,How to Fix Error - Dell Laptop Code 39?
Read More: [Anwsered] After booting up Windows 7 machine, getting Error with Program: C:windowssyswow64rundll32.exe,How to Fix - Adobe CS4 Premier Pro?,Troubleshooter of Error: adding more than one IF parameter,How to Fix Error - adding home group and trying to add comp with printer not printing?,administrator set policy prevent installing/uninstalling application Tech Support,a file called mDNSResponse.exe. is causing bonjour not to operate properly,what should I do?,A QUESTION USING THE "IFS" Formula.,A continuos flashing window with which title is C:WindowsSystem32cmd.exe, and has the following message: The syntax of the command is incorrect.,Acrobat compatibility issue and you tube problems____,ActiveX on IE 9 not loaded
Go to link Download