Showing posts with label effect. Show all posts
Showing posts with label effect. Show all posts
Sunday, April 9, 2017
How to create fade effect image slideshow using CSS
How to create fade effect image slideshow using CSS
You can give fade effect animation for image slideshow using CSS. @keyframes at rule and animation keyword in CSS can be used to make image slideshow with fade effect. With @keyframes at rule, you can define the properties that will be animated in an animation rule and animation keyword to set all of the animation properties.
Here I have used different types of animation properties like animation-name, animation-duration, animation-timing-function and animation-iteration-count. Where animation-name specifies name of the animation, animation-duration specifies animation duration in second(s) or milisecond(ms), animation-timing-function specifies how the animation will play like ease, ease-in, ease-in-out, ease-out and linear and animation-iteration-count:number of times animation should play.
Simple fade effect image slideshow
Here is a sample CSS code for creating simple fade effect image slideshow written for safari browser.
<style type="text/css">
@-webkit-keyframes fade{
from {opacity:.5;}
50% {opacity:1;}
to {opacity:.5;}
}
#anim1 {-webkit-animation-name:fade;-webkit-animation-duration:5s;
-webkit-animation-iteration-timing-function:linear;
position:relative;-webkit-animation-iteration-count:infinite;}
</style>
Here is a full HTML code along with required JavaScript code for creating simple fade effect image slideshow.
<head>
<title>CSS Animations</title>
<style type="text/css">
@-webkit-keyframes fade{
from {opacity:.5;}
50% {opacity:1;}
to {opacity:.5;}
}
@-moz-keyframes fade{
from {opacity:.5;}
50% {opacity:1;}
to {opacity:.5;}
}
@-o-keyframes fade{
from {opacity:.5;}
50% {opacity:1;}
to {opacity:.5;}
}
@-ms-keyframes fade{
from {opacity:.5;}
50% {opacity:1;}
to {opacity:.5;}
}
#anim1 {-webkit-animation-name:fade;-webkit-animation-duration:5s;
-webkit-animation-iteration-timing-function:linear;position:relative;
-webkit-animation-iteration-count:infinite;-moz-animation-name:fade;
-moz-animation-duration:5s;-moz-animation-iteration-timing-function:linear;
-moz-animation-iteration-count:infinite;-o-animation-name:fade;
-o-animation-duration:5s;-o-animation-iteration-timing-function:linear;
-o-animation-iteration-count:infinite;-ms-animation-name:fade;
-ms-animation-duration:5s;-ms-animation-iteration-timing-function:linear;
-ms-animation-iteration-count:infinite;}
</style>
<script language="JavaScript">
var i = 0;
var path = new Array();

// LIST OF IMAGES
path[0] = "image1.jpg";
path[1] = "image2.jpg";
path[2] = "image3.jpg";

function swapImage1()
{
 document.slide.src = path[i];
 if(i < path.length - 1) i++; else i = 0;
 setTimeout("swapImage1()",5000);
}
window.onload=swapImage1;
</script>
</head>
<body>
<div id="anim1"><img height="400" name="slide" src="image_1.gif" width="600" />
</div>
</body>
</html>
In the above code prefixes -webkit-, -moz-, -o-, -ms- are used for browsers safari, firefox, opera and internet explorer respectively.
Here is a preview of image slideshow for the code above.

Fade effect image slideshow with caption
You can add caption for this slideshow by adding following JavaScript codes within <script> tag.
// LIST OF CAPT?ONS

caption[0] = "Caption for the first image";

caption[1] = "Caption for the second image";

caption[2] = "Caption for the third image";

function swapImage(){

var el = document.getElementById("mydiv");

el.innerHTML=caption[i];

var img= document.getElementById("anim1");

img.src= image[i];

if(i <k ) { i++;}

else { i = 0; }
For details on adding caption on image slideshow visit the post: How To Create Simple Image Slideshow Using JavaScript ?
Fade effect image slideshow with caption and link
You can add caption for this slideshow by adding following JavaScript codes within <script> tag.
var link= new Array();

link[0] = "http://www.siteforinfotech.com/";
link[1] = "http://www.siteforinfotech.com/p/tutorial.html";
link[2] = "http://www.siteforinfotech.com/p/mcqs.html";


function swapImage(){

var el = document.getElementById("mydiv");

el.innerHTML=caption[i];

var img= document.getElementById("anim1");

img.src= image[i];

var a = document.getElementById("link");
a.href= link[i];

if(i <k ) { i++;}

else { i = 0; }
For details on adding caption and link on image slideshow visit the post: How to Create JavaScript Image Slideshow with Links
Related Posts:
- How To Create Simple Image Slideshow Using JavaScript ?
- How to Create Simple JavaScript Fade Effect Animation?
- Image Slideshow with Navigation Buttons Using JavaScript
- How to Create JavaScript Image Slideshow with LInks
- Simple JavaScript Fade Effect Animation Using Jquery
Go to link Download

Saturday, December 3, 2016
How to Create Show Hide Effect in Image SlideShow Using JQuery
How to Create Show Hide Effect in Image SlideShow Using JQuery
The fadeOut() effect presented on the post "How to create Fade Effect in Image Slideshow using JQuery" which I have already posted, makes elements invisible but retains space for them in the document layout.
The hide() method, by contrast, removes the elements from the layouts as if the CSS display property was set to none. When invoked with no arguments, hide() and show() simply hide or show the selected elements immediately. With a duration argument, however, they animate the hiding or showing process. hide() shrinks an elements width and height to 0 at the same time that it reduces the elements opacity to 0. show() reverses the process.
toggle() changes the visibility state of the elements, it is invoked on, if they are hidden, it calls show(), and it they are visible, it calls hide(). As with show() and hide(), you must pass a toggle() to get an animated effect. Passing true to toggle() is the same as calling show() with no arguments. Note also that if you pass two or more function arguments to toggle() it registers event handlers.
Here is an example that invokes methods for show/hide effect animation. The first image has show() effect animation, second image has hide() effect animation and the third animation has toggle() effect animation.
Here are some examples to show show(), hide() and toggle() effects using jQuery.


$("#img1").show(2000);
$("#img2").hide(3000);
$("#img3").toggle(1000);
Here are some examples to show show(), hide() and toggle() effects using jQuery.
Example of show() Effect
<script>
 $(document).ready(function(){
 $(#btn1).click(function () {
 $("#img1").show(2000);
 });
 });
 </script>

<input type=button id="btn1" value="Start Show"/>
<img id="img1" src="img1.jpg">
Example of hide() Effect
<script>
 $(document).ready(function(){
 $(#btn2).click(function () {
 $("#img2").hide(3000);
 });
 });
 </script>

<input type=button id="btn2" value="Start Hide"/>
<img id="img2" src="img2.jpg">
Example of toggle() Effect
<script>
 $(document).ready(function(){
 $(#btn3).click(function () {
 $("#img3").toggle(1000);
 });
 });
 </script>


<input type=button id="btn3" value="Start Toggle"/>
<img id="img3" src="img3.jpg">
Full jQuery code for Show/Hide effect image animation
<script

src="https://ajax.googleapis.com/ajax/libs/jquery/1.11.2/jquery.min.js"></script>
</script>

<style>
.show_hide
{
 box-shadow:1px 1px 5px 2px #6DC83C;
 position:relative;
 width:448px;
 height: 336px;
 border-radius:19px;
}

.show_hide img
{
 border-radius:19px;
 position:absolute;
 left:0;
 top:0;
}

</style>

<script>
$(function(){
 $(.show_hide img:gt(0)).hide();
 setInterval(function(){$(.show_hide :first-child).hide(3000).next(img).show(3000).end

().appendTo(.show_hide);}, 6000);
});
</script>

<div class="show_hide">
<img src="img1.JPG" />
 <img src="img2.JPG" />
 <img src="img3.JPG" />
</div>
Preview of Show/Hide effect image animation

Related Posts:
How to Scroll Top or Bottom of Document Using JavaScript
How to Create Table of Contents Using JavaScript
How to Select Document Elements Using JavaScript?
How to Show Pop Up Window Using JavaScript
How to go Back Browsing History Using JavaScript
How to Click Button Using JavaScript?
How to Write JavaScript Function as URL in Hyperlink?
How to use Round, Random, Min and Max in JavaScript
How to Concatenate, Join and Sort Array in JavaScript?
How to Loop Through JavaScript Array?
How to Loop using JavaScript?
How to Show Pop Up Boxes Using JavaScript?
How to Write Conditional Statements in JavaScript?
How to Write JavaScript With HTML?
How to create Changeable Date and Time Using JavaScript?
How to Validate a HTML Form Using JavaScript?
How to create a simple form using HTML?
How to Create JavaScript Image Sideshow with Links
How to Display Date Format in JavaScript?
How to Validate a HTML Form Using JavaScript?
What are the Different Ways to Redirect Page in JavaScript?
How to create Timer Using JavaScript?
Go to link Download
Saturday, October 22, 2016
How to activate Flip 3D effect with mouse cursor in Windows
How to activate Flip 3D effect with mouse cursor in Windows
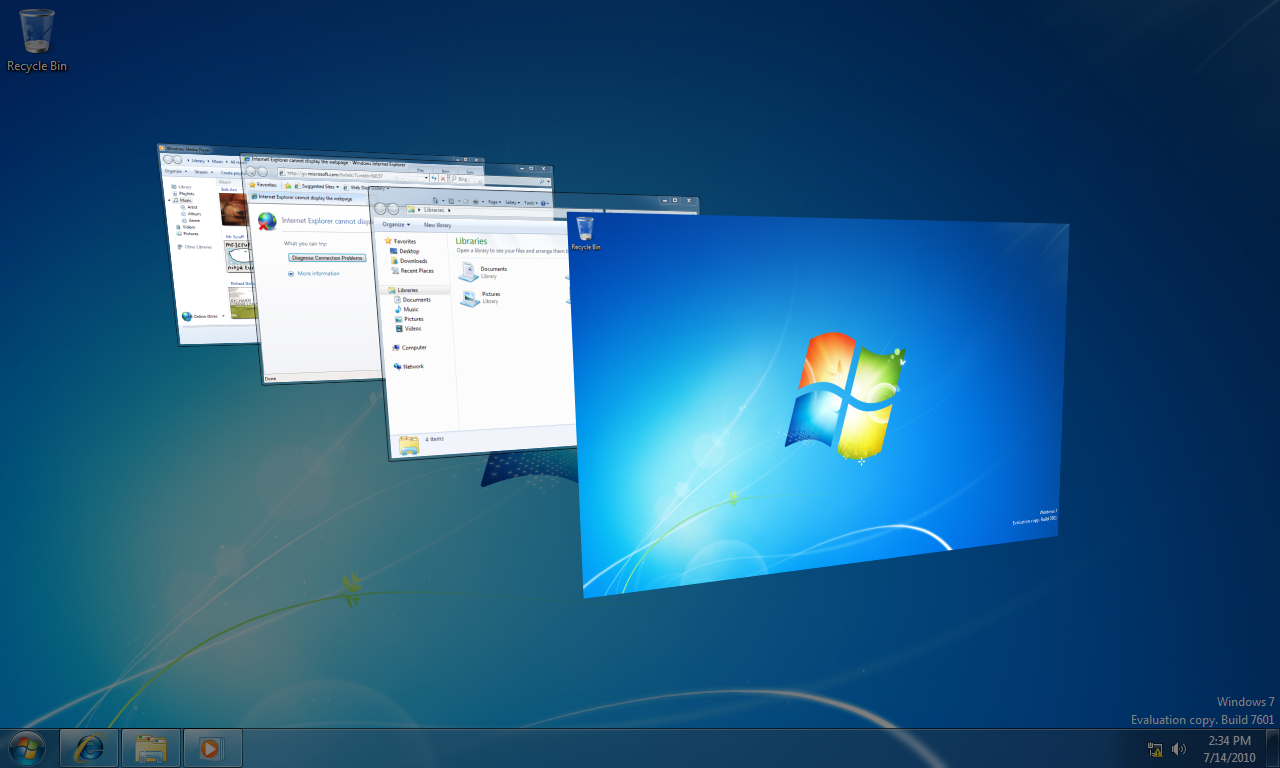
Windows Flip 3D is the 3D preview of open windows. You can trigger the 3D preview in Windows Vista and 7 by pressing the Win + Tab keyboard shortcut. Alternatively, Flip 3D can also be triggered without any hotkey with the FlipCorner utility.
FlipCorner is an application that enables you to trigger Flip 3D by moving the cursor to the corners of the desktop. You can add the software to Vista or 7 from this page. Click the Download button on the right side of that page to save the Flip 3D Zip file. To extract the Zip, right-click it, select Extract All and choose a path for the extracted folder. Then you can open FlipCorner from the extracted folder. When the app is running, it sits in your system tray as in the shot below.
Click the FlipCorner system tray icon to open the window below. There you can select the corners of the desktop to open Flip 3D from by clicking the check boxes. Press the OK button to close the window, and move the cursor to one of the desktop corners you selected. That will open the Flip 3D window previews.

The FlipCorner window also includes a Reaction area bar. That’s the corner area of the desktop that opens Flip 3D. To expand the corner area, drag the bar to the right.
With the FlipCorner utility you can now quickly open the Flip 3D preview from any corner of the desktop. Note that you will need to have Windows Aero enabled for the utility to work.
Go to link Download
Subscribe to:
Posts (Atom)